Home » Type » House
House
Alyona
40424 Views 1 comment
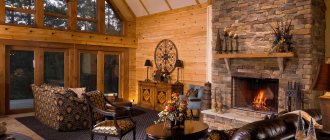
About ten years ago, fireplaces began to be sold en masse - these are beautiful fireboxes of different sizes, made with a variety of decorative finishes. Thanks to the variety of types of portals, such fireplaces began to be installed in almost all private homes. Their beauty and high safety (the firebox is closed under glass) attracted many. For several years, they successfully replaced ancient Russian stoves. Till today…
Russian stoves in the interior
A stove in the interior has great advantages compared to a fireplace: it retains and releases heat for a long time, it does not need to be lit often.
Many models of beautiful Russian stoves are particularly economical and easy to use. It is simply impossible not to adopt such a “miracle unit”. Considering that thoughtful design significantly changes the atmosphere in the house.
Design Features
A Russian stove is easy to recognize by its design features: traditionally it has a stove bench (polati), is quite massive, often with numerous shelves for various kitchen utensils. The cooking chamber is located deep in the oven, so a special grip and skill are required to cook food in it. The basis is a guard; there are usually two dampers for smoke. Between the cooking chamber and the mouth there is a gas threshold, a wall, thanks to which the combustion products are retained under the roof and utilized more completely.
The second important design element is the inflow. It can be completely ordinary or combined with a fireplace.
Also, all furnaces can be classified according to the size of the structure:
- small;
- average;
- big.
A small dacha is often equipped with a compact stove, but a huge country house can be complemented by an unusually large structure of complex design and ornate decor.
Advantages and disadvantages
The stove, conveying the old Russian style, will be an effective addition to many interior compositions. From the point of view of efficiency and functionality, this heating option also has many advantages:
- Long cooling time;
- Good heat conservation;
- High level of efficiency;
- Long service life;
- Design safety.
However, the shortcomings are worth mentioning. The most serious disadvantage is the heat generation higher than 1 m from the floor. However, some improved designs, which involve the installation of a special smoke circulation channel, also allow the floor to be heated.
Also, a stove as a heating device requires a specific type of raw material. Firewood needs to be found, purchased, delivered and storage space organized. Fuel consumption in models of any type is quite high. It is worth considering the fact that not every interior can fit into a stove project in an ethnic direction.
Historical reference
The presence of a Russian stove has become a real legend - previously such heating structures were installed in every private house. They have become an integral part of Russian folklore. Even today it is difficult to find a replacement for a Russian stove, taking into account its reliability!
It is not known exactly when they began installing similar structures for heating homes in Russia. According to approximate data, their prototypes appeared 4 thousand years ago, when people decided to equip their house with the ability to make a fire hidden under clay materials.
Stove in a rural wooden house
In Rus', stoves were distinguished by the peculiarity of their masonry. Until the 13th century, the most common variants were chimneys, in which there were no chimney pipes facing the street. In such options, smoke escaped from the premises due to drafts through the door, but at the same time, soot constantly settled on any surfaces, which caused a lot of inconvenience.
However, the usual version appeared only in the 18th century. Then they were made of bricks with fire-resistant properties, they had chimneys. At that time, such structures were placed exclusively in the corners of huts, not far from the front door. It was permissible to leave a small space between the wall and the stove, where various kitchen utensils were stored.
Materials for the Russian stove
The design of a country house stove will largely depend on the material used. The traditional design was “sculpted” from clay. More modern models were created from brick. Stoves made of cast iron and steel also played an important role.
These are the so-called potbelly stoves. For many, they are associated with something unsightly and rude, but the modern range of mobile and compact heating devices allows you to choose quite sophisticated options.
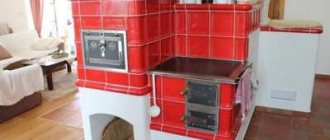
Brick
Beautiful brick stoves for the home are the dream of true romantics and fans of Slavic flavor. A special advantage of the structures is the “breathable” material. A brick fireplace is a specific microporous body. It releases moisture vapor into the air, and when it cools, it takes it back. A stone heating unit is not capable of this.
A well-designed stove is useful for both heating and cooking. Many models of brick Russian stoves also work as a barbecue or grill.
You can build a brick stove in a small country house or in a luxurious spacious cottage. However, it is better to trust the laying of any type of structure to professionals, avoiding dubious experiments with stove-making amateurs.
Clay
A simple log house of poor people was always complemented by a clay stove. In the modern format, only finishing is made from this material and the sunbed is lubricated. Such a fireplace stove will look luxurious in the interior of a wooden house in a rustic style.
If the heating product is made exclusively on clay, then it will need to be constantly restored. It is necessary to grease and plaster at least once a year.
Cast iron
A wood-burning fireplace made of cast iron has amazing heating properties. The traditional potbelly stove appeared in the 19th century. Initially, such stoves were actively used by the Danes and Germans, and then by the Slavs.
A cast iron fireplace is like a fire: it warms you to the bone if you are in close proximity to it. If you move a decent distance away, the heat will be very soft and delicate. It does not dry out the air.
It is worth noting the disadvantages. Even a relatively small stove with cast iron elements will be very heavy. Huge structures are so heavy that they require strengthening the foundation (in some cases). In addition, cast iron is quite expensive when it comes to expensive materials.
A simple potbelly stove in the interior of a miniature wooden house will always look very stylish. A small unit with ornate “old-fashioned” decor and wooden log walls, a cozy blanket with embroidery and original patterns, indoor flowers - all this will give a person a feeling of calm, relaxation and privacy.
Steel
By analogy with classic cast-iron structures, steel stoves began to be produced. In large units, some elements (for example, the firebox) are replaced with steel ones.
Almost always, the fireboxes of steel furnaces can be lined - they are laid out with fireclay bricks. This is necessary to give the fabric greater heat resistance. You can additionally install tiles on the steel body. It is very fashionable to decorate fireboxes with natural or artificial stone.
Steel structures are much lighter than cast iron prototypes. They are much cheaper, much more mobile in terms of movement (if we are talking about devices like potbelly stoves).
Decorative rock
Stone is rarely used for lining a Russian stove; it does not really match the appearance of the structure. Most often, stone is used to decorate the portal or base of the stove, but it can also be used for the entire body.
Materials and tools
For finishing you need:
- facing stone (you can use hewn and wild stone, pebbles);
- adhesive solution (clay or cement);
- level;
- comb;
- rubber hammer;
- solution container;
- metal grid;
- mesh fasteners;
- construction mixer.
The optimal solution for stone is clay in a ratio of 1:2 (clay and sifted sand, respectively). For large-format stones, it is better to take a cement mortar with a component ratio of 1:2:1 (cement, fatty clay, sand, respectively).
Instructions
Scheme
- Before cladding begins, the surface is reinforced with a metal mesh, which is attached to the seams of the brickwork. Next, the mesh is covered with a layer of plaster mortar (as for conventional plastering of a stove). The surface must dry, after which it should be leveled and sanded.
- The cladding begins from the bottom row, the glue is applied with a comb to the surface of the stove and the tiles, then each element is pressed tightly against the wall. Using a rubber hammer, carefully tap the stone to give it the desired position. When laying, it is not recommended to make very wide seams, as the surface will not look very beautiful.
If necessary, individual stone plates are trimmed with a grinder; this should be done as the finishing is being glued. All excess solution is removed immediately, since after drying it will be almost impossible to remove it.
Additional materials
Auxiliary parts and additional materials for a traditional Russian stove are not only functional elements, but also serve as effective decor. When working on the creation and design of a stove with a stove bench, you may need the following:
- brick;
- sand;
- accessories for stoves;
- grate;
- valves;
- corners;
- fireclay slabs;
- fireclay brick;
- tile;
- ceramics;
- stone cladding;
- basalt insulation.
The old Russian stove is very economical in everyday life. She will decorate a modern country cottage, and housewives will appreciate her ability to prepare original dishes.
Beauty majolica
The tiles, painted with bright fiery colors and covered with a durable layer of glaze, came from the Mediterranean. Ancient Roman traders brought it from Mallorca. The area was famous for its tin-lead painting on ceramic tiles and pottery.
Glazing serves as another layer that retains heat inside the finishing material, so majolica was in demand as an excellent type of cladding.
Only wealthy people could decorate their stoves with such beauty.
Features of masonry
A modern country house requires a special approach to the laying and design of such a complex and powerful heating unit. First they make a backfill - a chamber. It acts as a kind of battery, retaining heat in the house.
The cooking chamber is covered with a roof. It is designed strictly according to the formwork - plank or metal. When laying bricks, they are placed on both sides at once. The angle of inclination will depend on the shape of the arch. This is necessary so that the load is evenly distributed throughout the structure. At the end of the work, the master forms a wedge castle from brick.
The chimney is installed in the furnace itself. The height of the element must be higher than 5 m from the level of the blind hearth. There are no horizontal sections or turns needed. A well-formed vertical (like for a fireplace) is enough.
Tile - man-made beauty
This is a beauty created from different types of clay. The manufacturing technology came from ancient Babylon and has survived to this day. The tile is a box shape, thanks to which heat retention increases significantly.
This is a piece and expensive finishing material. In past centuries, only very wealthy people could cover a stove with tiles.
Beautiful boxes, each with an individual design, were incredibly expensive, but were in great demand.
Nowadays, tiles are also popular.
Where is a Russian stove installed?
In ancient times, at the stage of building houses, they first of all determined where the stove would be located in the house, as well as the bathhouse on the estate. And if not everyone had steam rooms, then they simply could not do without a heating unit.
When choosing the optimal location, the operating principle of the stove, the possibility of further connection of the chimney and ease of maintenance during operation are taken into account. Fire breaks must be calculated - the distance between heating surfaces and walls made of flammable materials.
If the cottage is small, then it is better to place the stove as centrally as possible in the house. The same rule is relevant if the country house is entirely wooden.
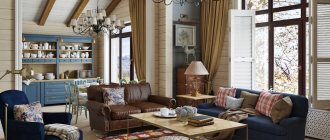
In the living room
If the house is large and has many rooms, the ideal place to install the stove is the living room (even if we are not talking about traditional large units, but about miniature potbelly stoves or modern electric fireplaces).
For a large house it is better to create brick structures. Such a stove will warm up spacious rooms well. Typically, the living room is the center of the home.
By placing a stove in it, you can warm up all the rooms. Of course, the design will take quite a lot of time, but it is at the planning stage that it is important to take into account all the subtleties.
For example, to heat a village house consisting of four rooms, the stove is placed at the junction of the two main rooms. The “antique” format of the stove – with a stove bench – will look good in the living room.
Installation in the kitchen
Installation in the kitchen is the second common option for placing a stove in the traditional Russian style. As a rule, this technique is used in several cases:
- Only one room needs to be heated. Usually this is the kitchen or remote living room. A similar need arises when there is a good heating system throughout the house (for example, a gas boiler with a water circuit) and there is a shortage of heat in one of the rooms. Often, it is the kitchen that is being completed or its main structural components are being changed, which requires additional heating.
- A stylish Dutch or Russian “mazanka” skillfully emphasizes a thoughtful interior. Experiments with gastronomic-themed decor and decorations in ethnic style very often go well with the decoration of expensive kitchen locations in country, ethnic, and rustic styles.
- The stove plays the role not so much of a heating device, but rather of a device for cooking. A well-formed design and skillfully selected place will allow you to bake delicious pies, heat a vat of water, experiment with a device with an original barbecue system or grill.
The stove in the kitchen is also located in very small houses. In this case, it is the heating element that becomes the “hot heart” of the whole house. The well-thought-out design of the stove helps to correctly delimit space and divide a compact location into zones.
Porcelain tiles
Its creation dates back to the 80s of the last century. Porcelain stoneware is intended not only for finishing stoves, but is also widely used in construction. To produce it, several types of special clay are required with the addition of quartz sand, various types of natural dyes and a fine fraction of marble or granite.
The whole mass is well kneaded and pressed at fairly high temperatures under pressure. The result is a durable product that is not afraid of strong impacts and high temperatures, and retains heat well.
This is a monolithic material that can be given any color during manufacturing.
Thanks to modern technologies, porcelain stoneware can be made in the form of majolica, terracotta or tiles. The cost of such material is not high in comparison with the original ones.
How to decorate a stove
There is nothing more original than the use of authentic materials and extravagant techniques in the design of modern apartments. The design of the Russian stove is quite unusual and can complement the beautiful design of the room.
If once the stove played a functional role and was the “center of everyday life” in a home, now its purely aesthetic role has increased. An impressively designed and decorated stove will enrich any modern interior.
Considering the fact that stoves can also be placed on the street, the entire private sector is transformed as soon as a cozy and “elegant” fireplace appears on the site.
Decorating the stove with tiles
Tiles are three-dimensional ceramic tiles that are used for finishing stoves, facades of buildings, and any other structures. The decoration has one distinctive feature - the rump. This is a box with holes through which the decor is attached to the wall.
Tiles come with a smooth surface and a relief canvas, plain and painted with bright patterns, rectilinear design and complex shapes. The decor can be turned into a monochromatic elegant panel or you can create a complex colorful installation with an abundance of decorative techniques.
A special artistic merit of such jewelry is majolica, which can change color at different times of the day. The decoration will show its qualities well in spacious, bright rooms.
The design of a Russian stove using tiled elements has the following advantages:
- Hygiene. They do not accumulate dust and dirt, do not darken over time and are not deformed. The special composition of the glaze does not allow soot and carbon deposits to penetrate inside the decorative ball.
- Highest level of heat capacity. The current eco-friendly format of modern rational heating of housing involves the use of only those heating devices whose efficiency is as high as possible. Tiled decor has a special heat capacity, improving the technical characteristics of the stove as a whole.
- Long heat dissipation. The oven cools down much more slowly.
Decorating a Russian stove with tiles is a complicated matter. Not every stove maker will undertake such work. Ideally, several specialists are involved in the work at once - an experienced stove maker or ceramist, as well as an architect or designer artist.
Plaster and paint
A classically plastered stove looks beautiful and cozy. There are many reasons why the old format of finishing heating units has retained its relevance today:
- Plaster allows you to level even a crooked structure, making the stove more elegant and attractive;
- A beautiful finish gives the old structure a fresh look.
- A large number of types of plastering and a solid range of materials allow us to implement any design project.
The easiest way to decorate a stove after plastering is to whitewash it.
You can do this yourself. A cheap and simple method will not allow you to use the stove to its full potential, since the bleached surfaces will get dirty. Another option (more practical) is the use of paints. If you cover the fireplace with oil and enamel compounds, you can increase heat transfer. Glossy and shiny paints work in the opposite direction. Formulations containing oil may darken under prolonged exposure to high temperatures.
Decorating the stove with tiles
Tiles are an expensive design material for finishing stoves. There is an excellent alternative (more attractive in terms of pricing) - tiles. Tiles or ceramics are presented in such a wide range that such decorative elements can be found in any form. They are suitable for creating unimaginable panels and complex decoration.
Another alternative option is porcelain stoneware or artificial stone. This is a relatively inexpensive material that looks magical in any interior.
The slightly rough textured background is complemented by wooden decorative elements. It turns out very colorful.
Decorate with household items
There are a lot of options for designing a stove in terms of decorative elements. It all depends on the specific stylistic direction in which the stove itself is presented:
- "a la russe";
- hut;
- tower;
- Noble Nest;
- estate in neoclassical format.
An apartment or house decorated using several stylistic concepts at once looks even more interesting. If desired, even a boiler or fireplace corner can be decorated in an incredible way.
Fuel economy
Do-it-yourself stove This is the last criterion for potbelly stoves, which are used in modern apartments.
Long-burning designs have already been mentioned above. They are the most popular option today when it comes to installing a potbelly stove in an apartment. What is the design feature of this model? The thing is that the firebox of the device is divided into two parts - lower and upper. The separation boundary can be horizontal or angled. It all depends on what conditions for combustion of flue gases we are trying to achieve. When the boundary is placed at an angle, the combustion efficiency is slightly higher due to the higher gas concentration inside the narrowed part of the chamber.
In the lower firebox, wood or coal is usually smoldering. Oxygen-enriched flue gases burn at the top. Channels are specially installed to allow oxygen to enter the chamber. At the same time, there is one very important criterion that ensures complete combustion of fuel in the first chamber. The fuel must be placed correctly, that is, with a minimum number of gaps between its parts.
For example, if it is firewood, then it should be laid out horizontally in a row or in the form of a cage. The distance from the walls of the potbelly stove should be minimal. If the stove has a cylindrical shape, then in addition to horizontally laid logs, it is necessary to lay firewood in the vertical direction. They must be placed in the gaps between the walls of the unit and the corners of the stacked pyramid of firewood. In this state, a minimal amount of fresh air penetrates the firewood, but it is quite enough for the fuel to smolder.
The combustion gases flow through the outlet channels under the influence of physical laws upward into the second combustion chamber, where they burn, releasing additional heat.
Attention! One load of solid fuel is enough for a whole day. In potbelly stoves of traditional design, the fuel supply is enough for only a couple of hours.
A la russe
The “a la russe” style involves the use of traditional authentic elements of Russian life. Once upon a time, classics were written about stoves with such decor. Shelves were placed near the whitewashed hearth.
Wood is an absolute favorite. The main decorative elements are samovars, brooms and spinning wheels, animal skins (not exotic) and towels with embroidered ornaments. It is not at all necessary to decorate the stove with drawings. A perfect white background is enough.
Improved heater options
Many Russian masters were involved in the modernization of the classic stove - I. Kuznetsov, I. Podgorodnikov, A Emshanov, A. Batsulin. The essence of the changes is as follows: the details of the old design were taken as a basis - the vaulted furnace, the bend and the high above the mouth. New functional elements were added to them:
- Instead of a hearth, a hob is placed, and a small flood is arranged below. A parallel summer passage shaft is laid out, connected at the top with the main smoke collector.
- Hot gases from the additional firebox are directed through smoke circulations made in the lower part - the stove. Then the combustion products are discharged into a common pipe.
An example of modernization - in winter mode, gases from the furnace and furnace heat the lower part of the structure - At the end or on the sides of the furnace, vertical channels are installed, again leading to the lower zone under the firebox, then into the chimney.
- The channels from the firebox go into the attached heating panel and out through a combined pipe.
- The firebox is made from the bottom of the furnace and communicates with it through a grate installed in the hearth (bottom) of the main firebox. Gas ducts from the furnace penetrate the furnace and converge into a vertical shaft leading into the chimney.
Note. The changes made allow the stove to be heated in two ways: in Russian (the smoke comes out through the mouth and high) and in the heating and cooking mode (gases move around the channels).
Another example - there are vertical passages in the side wall that form a heating shield.
We tried to clearly describe common concepts; there are many more existing options. The purpose of the changes is to improve heat transfer and functionality of the basic design. If desired, a water circuit register or an oven is mounted inside the flues (the cabinet is placed next to the firebox).
Now we will analyze the updated options in detail using specific examples - with drawings and procedures.
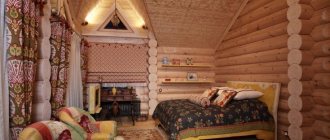
Russian hut and tower
The stylistic concept of “Russian hut” involves the use of wood. It can only be an imitation, but it must be skillful and thoughtful. In some ways, this direction is reminiscent of a loft, but it is much more dynamic and elegant than the “concrete jungle” style. The main difference from the previous style is that each decorative element has its own functional purpose.
A house in the “Russian tower” style is radically different from other styles. Planning plays an important role here. In villages, many people still decorate their yard in this style. Key features: the presence of garden decor, bright colors, ornate carvings, an abundance of tiles, colorful patterns, bright decor.
Russian "teplushka" with a couch 127 x 166 cm
The design and principle of operation of this stove are similar to the previous heat source. The difference is in size, power and some design features. There are also 3 modes available here - winter, summer and Russian fire. The heat output is 4.5 kW, the heated area is 45-50 m².
In winter mode, firewood can be burned on the grate of the furnace or in the firebox - the gases will still flow through the lower passages and warm up the entire stove
The size of the stove in plan is 1270 x 1660 mm plus 10 cm for the projection of the foundation. The height of the front part is 210 cm, the height of the bed is 147 cm. Set of materials for construction:
- refractory bricks ША-8 – 26 pcs.;
- red solid brick – 995 pcs. (the chimney is not included in the specified quantity);
- fireclay block type ШБ-94 – 1 pc.;
- main door installed at the mouth - 41 x 25 cm;
- ash pan door 14 x 25 cm, firebox door – 21 x 25 cm;
- 2 grates with dimensions 240 x 415 and 220 x 325 mm;
- stove 71 x 41 cm (2 burners);
- chimney damper type ZV-5, size 260 x 240 x 455 mm;
- 2 valves 130 x 250 mm;
- sheet steel 2 mm thick;
- galvanized reinforcing mesh – 1.5 lm (mesh 30 x 30, wire 1 mm in diameter);
- template for forming an arch, radius – 322.5, length – 645 mm;
- circled under the arch of the main firebox with a radius of 60 and a length of 77 cm;
- corrugated packaging cardboard, kaolin wool.
This is what a large “Teplushka” with a power of 4.5 kW looks like.
Preparatory work - installation of a reliable foundation. Keep in mind that after pouring the foundation, the formwork can be removed after 3-4 days (during the warm period), and the stove can be built only after 2 weeks. The base area is covered with waterproofing - roofing felt folded in half.
How to properly lay out a full-size “Teplushka”:
- Row No. 1 is continuous, consisting of 65 ceramic bricks. On the second tier, we begin to form the walls of the furnace and support columns, and install the door of the ash chamber. We install 8 stones on a poke without mortar and cut them to the height of the 3rd row. We do not connect it with the rest of the masonry - these will be cleaning hatches.
- We place the third tier according to the diagram, on the 4th we cover the ash pan. On the 5th row, we begin to build the walls of the firebox from refractory, insert a grate 415 x 240 mm.
- Rows 6 and 7 continue to be laid according to the pattern, fireclay stones are placed on the edge. After the formation of the 7th tier, we install the firebox door and the summer valve installed vertically. Rows 8-9 are built according to the order.
- On the 10th tier we cover the floodplain and cover the upper ends of the refractory bricks with kaolin wool. The front part of the chamber must be covered with fireclay block ШБ-94 or similar. We begin to reinforce the walls of the furnace with galvanized wire mesh, then we arrange a re-covering of red bricks (row 11).
- On the finished 11th tier we insert the stove and grate bars of the main chamber - the furnace. We make level No. 12 according to the order and install a large door. Then we lay out the 13th tier and arch using a circle.
- We build rows 14-17 according to the drawings, raising the outer walls of the furnace, the smoke channel and the front partition of the furnace. Next we lay an arched vault R = 60 cm made of wedge bricks. We continue to build tiers 18 and 19 according to the diagrams.
- In the twentieth row we block the front arch and raise the outer walls higher. We fill the void above the vault with a solution of clay and sand. After drying, we build tier 21 - the plane of the bed.
- Tiers 22-32 make up the front section of the stove, where the chimney is combined with the side flue. We line up the rows according to the diagrams, on the 24th level we install 2 valves, on the 29th level we place a sheet of metal covering the stove.
The expert will give step-by-step instructions for building a Russian multifunctional stove in his video:
Other directions
Traditional Russian stoves with couches in modern apartments are often decorated in ethnic styles, very far from Slavic symbols. The most fashionable formats are oriental and Mexican.
The Russian stove in the interior of houses is a wonderful element that decorates the location and gives the room a unique atmosphere of comfort and homely warmth. With the help of the right design and well-chosen decor, you can turn your home into a real work of art.
Briefly about the main thing
A classic Russian-style stove is a popular option for a heating structure with a large heating surface and equipped with a stove bench. Its design also includes a crucible, a hearth, an oven, a sub-pipe, an over-pipe, smoke exhaust channels, and a view.
A Russian-style stove can be miniature or medium in size. Large heating structures with a hob, fireplace, and oven are also being built. To build an effective stove, masters carry out masonry according to proven schemes. The stove structure with the hob is often adjusted. Miniature heated structures are also popular. This is a simplified version of the classic Russian-style stove.
Furnace finishing
The firebox is finished with the same materials as the stove itself. The main condition when choosing materials is safety, fire resistance, reliability, and strength. When designing the firebox, special attention should be paid to fire safety rules, because this part is most directly related to fire.
It is very important to leave a gap between the firebox and the stove lining. This is necessary for free air circulation, which affects the efficiency of its operation as a whole. It is not advisable to fill this gap with sand or thermal insulation material. It will become a reliable obstacle to deformation of the facing material. If there is a gap, then the finishing material will not crack, voids or other negative aspects will not appear in it.
When using plasterboard structures, leaving a gap will be an additional means against fire. 10 centimeters is the minimum gap that must be left between the firebox and the stove for safety reasons.
Types of cladding for furnace devices
Before carrying out work on lining the furnace, you should very carefully select the material to change the appearance of the furnace device. Properties to consider when choosing materials:
- high temperature resistance;
- good heat dissipation;
- mechanical reliability, practicality;
- strength of adhesion to the solution;
- aesthetic appeal.
Most often, materials with a thickness of at least 6 mm with a low-porosity structure are used for lining the furnace.
Since ancient times, brick, natural stone, tiled material, and ceramic tiles have been used to change the appearance of the stove. Modern industry offers artificial stone, as well as soapstone, for such work.