There are several different technologies and many building materials for repairing and finishing slopes. Let's consider how to plaster a doorway after installing the door, taking into account their condition. Let's get acquainted with the characteristics of the most commonly used mixtures, with detailed instructions for carrying out installation work, with recommendations from specialists. Read to the end and you will learn about common finishing methods.
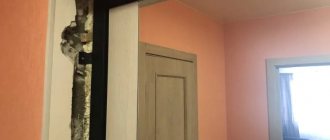
Doorway after installing a new door Source remontnik.ru
Relevance of plastering
After installing the door, there is almost always some gap left between the frame and the opening. And these are voids, visible fasteners and, in general, the area looks unfinished and not aesthetically pleasing. To eliminate these and other unpleasant moments, you can resort to various technologies. One of them is plastering the slopes of the doorway.
This technique allows you to solve the following problems:
- filling voids and depressions;
- leveling slopes or giving them the desired geometric shape and strengthening mounting corners, if provided;
- strengthening the fixation of the box in order to increase its bending strength;
- improving the situation with ventilation, penetration of noise and air flow, moisture in the case of a street door;
- protection of polyurethane foam, which is used in most cases when fixing the box in the desired position;
- creating a complete look of the structure as a whole;
- formation of a solid foundation for further decorative finishing of the technological opening.
Standard option for finishing a doorway Source doors-im.ru
Plaster is a mixture, the basic composition of which includes a binder component and a mineral filler. That is, the solution can be applied in a layer of over 5 mm; after drying, a durable material with a rough surface is formed. This base has good adhesion and load-bearing capacity. Virtually any further finishing can be chosen: paint, putty, wallpaper, tiles, etc.
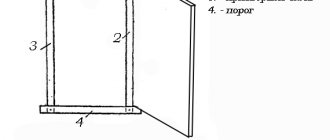
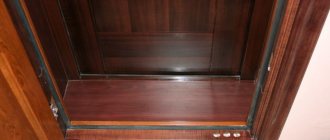
Seal the gap at the bottom of the door
As a rule, all entrance doors are equipped with a threshold. Blowing from the bottom is eliminated by increasing its height or decorating the area of contact with the canvas with a special seal. Given the constant contact with water and cold air, it is recommended to use reliable rubber as a seal. An excellent option are special threshold slats of a combined type, equipped with nylon brushes. The presence of a special groove protects the home from the penetration of external moisture.
Installation procedure for the combined threshold strip:
- Cutting the strip and brush to the size of the threshold. It is important to ensure that the overhanging edge penetrates into the opening. You can use a hacksaw as a tool.
- Brush installation. In the correct position, it should exert some pressure on the bar.
- Screwing the brush onto the lower edge of the canvas (away from the home). For this, a screwdriver and self-tapping screws are used.
Selection of plaster
Plaster for door slopes must comply with operating conditions. These may be sides inside or outside the heated room, constant or variable relative humidity and temperature, and mechanical stress to varying degrees. You also need to take into account the materials with which the solution will come into contact: concrete, wood, metal, plastic. Good adhesion of the composition to one or another base is important here.
Cement plaster for interior and exterior work Source prom.st
More often, craftsmen consider three options for dry mixtures:
- DSP.
This can be a ready-made composition or mixed independently in traditional proportions: 1 part cement and three sands. This plaster is inexpensive, but has a number of good characteristics. In particular, the material can be used in conditions with any humidity and temperature changes. The coating becomes strong and durable. When applying a layer over 3 cm, it is recommended to use reinforcing fibers or lay a mesh to avoid cracking. The composition has good contact with most types of substrate. The surface is grey, rough, with high compressive strength.
- Two-component plaster.
This is a cement-sand mixture, which includes another binder component. For example, gypsum accelerates the hardening process of the solution, slaked lime improves the plasticity of the crumbly mass. There is less susceptibility to cracking, but resistance to direct moisture is slightly reduced. That is, on a street without a canopy, it is better to finish the slopes of the external door with one-component plaster.
An example of two-component plaster Source virashop.ru
See also: Catalog of companies that specialize in finishing materials and related work
- Gypsum mixture.
Compared to cement analogs, this composition is more flexible, easier to work with, cracks less, and the surface can be created smooth enough to immediately begin painting or wallpapering. But such a composition is unacceptable for use in conditions with high humidity and gypsum has less mechanical strength. There is also the appearance of rust stains that appear through the layer.
In addition to operating conditions, before choosing a plaster mixture, you need to take into account the permissible layer. For example, it is not recommended to apply a cement-sand mixture in a layer less than 10 mm. And Rotband, known to all builders, has a coating thickness limitation of 50 mm.
Gypsum plaster Rotband Source td-komplektovshik.ru
Gaps in interior doors
Unlike entrance doors, these structures generally do not require outstanding thermal insulation qualities. However, it is advisable to eliminate large gaps around the perimeter of the canvas, because this spoils the overall impression of the interior of the room and complicates the use of doors (they do not close tightly, they slam in drafts).
Eliminating side gaps
In addition to the above-mentioned self-adhesive tapes, silicone paste, which is sold in special tubes, is often used to seal interior doors. To apply it you will need a special gun.
Operating procedure:
- Tape the application areas on both sides with masking tape or Vaseline. This will eliminate the possibility of contamination of adjacent surfaces of the canvas.
- Charge the gun with a package of silicone. The thickness of the extruded seal is adjusted by cutting the edge of the tube. This parameter should slightly exceed the dimensions of the gap seal.
- The optimal angle for holding the gun relative to the surface during application is 45 degrees. You must press the lever smoothly and move the gun evenly and slowly.
- The treated door is closed until the silicone dries completely (the time is indicated in the instructions).
- After drying, the door is opened to remove excess sealant.
Applying silicone paste into the crack of a doorway
The convenience of this method lies in the speed of application and good sealing of the joints (the property of silicone is to completely repeat the configuration of the crack). Most often, doors to the bathroom, toilet or kitchen are designed in this way, which allows you to create a reliable barrier to moisture and odors.
You can watch the video for more information about applying silicone using this method:
Gap between floor and door
The appearance of excessive clearance in this area does not always indicate an error in installing the interior door. Such a defect is often discovered after replacing the floor covering, when the new material is inferior in thickness to the previous one.
There are several ways to fix the problem:
- Lower the hinges to the desired height. If the owner of the house has at least a little experience in carpentry, it is better to use this method. To do this, you need to remove the door and move the hinges on the frame lower. This does not require additional seals or linings.
- Install sealing brushes or pads. Specialized departments offer a choice of rubber pads of different thicknesses. It is necessary to select a product so that it closes the gap without creating additional interference when opening and closing. The seal is cut to the width of the canvas and screwed to the bottom end.
- Use a decorative threshold or flat threshold strip. As a rule, such products are equipped with special holes for self-tapping screws. The cut-to-size strip is fastened to the floor using dowels or screws.
- Installation of a lowering tire seal. We are talking about automatic sealing devices of the “Dichtomat” type. Before installing the system, the door must be closed, using pads to achieve strict horizontal fastening. The size of the mechanism, strap and rubber insert is adjusted using a hacksaw. The support mechanism is fixed to the bottom of the box using screws. The metal plate must be placed strictly at the border between two rooms, under the door.
Installation stages
The technological process of finishing a particular object with water-containing solutions includes several mandatory stages. This includes site preparation, rough and finishing leveling. Additionally, reinforcement and installation of mounting angles may be necessary. Let's take a closer look at how to plaster door slopes.
Preparatory stage
Here all actions come down to the formation of a solid and clean foundation. So, if this is a newly installed box, then first you need to cut off the excess polyurethane foam. A common mistake that is often observed is that the foam mass is removed flush with the profile. However, it is necessary to take into account the plasticity of this material and the minimum layer of solution. The latter should be at least 5-10 mm. That is, cutting the foam should be done with a groove so that the coating does not immediately crack.
Trimming excess polyurethane foam Source chistoe-okno.ru
How to close cracks and holes after installing the structure?
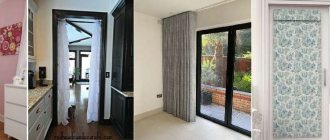
To eliminate defects after installing an interior door, various methods are used, among them you can even find such rare ones as finishing with decorative stone or tiles. Here, owners are more often guided by the general characteristics of the design and interior features.
If several methods are applicable for design, then the choice is made based on financial capabilities or relying on the taste of the owner. The choice depends entirely on preference, and the result depends on the quality of sealing the cracks.
Polyurethane foam
The space between the wall and the box must be foamed. You cannot install an interior door close to the wall, this will reduce the reliability of the structure. This gap should not exceed 2 cm. When working with foam, it is necessary to protect the coating of the door and frame from getting in , then it will be difficult to clean this material.
If the door is installed by specialists, they will fill the space themselves with foam.
If you do the installation yourself:
- the room temperature should be +5 - +30 degrees;
- Moisten the opening to be filled with water;
- the cylinder is kept upside down;
- fill no more than 1/3 of the total space;
- you need to start from the bottom.
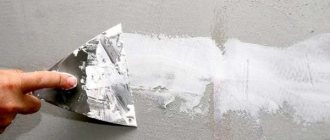
Finishing
Leveling plaster alone cannot be used as a finishing coating. No matter how strong it is, it wears out and cracks over time. Therefore, the surface must be subject to further finishing. But before this, in any case, all defects are eliminated and a primer with a strengthening effect is applied.
The simplest solution is coloring. If the appearance of the plaster is not satisfactory, then the surface is first smoothed with putty, sanded and treated with primer. The same thing happens before finishing the opening with wallpaper.
Another option is decorative plaster. It can be different in texture and color. Puttying is not necessary here. You can immediately begin facing work. But in this case, the plaster layer must be reinforced.
Methods for making slopes
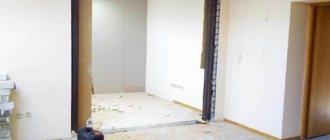
The outer side of the door is finished by master installers. But on the inside, everything is terrible. Before your eyes is a bare wall, bricks and a lot of possibilities for designing slopes.
The sloping part gives the doors a beautiful appearance, hides all fasteners and makes the entire structure stable.
Therefore, after the box is installed, you need to choose a finishing method, and there are not many of them:
- Finishing with platbands and additional boards;
- Plastering slopes;
- Gluing the material.
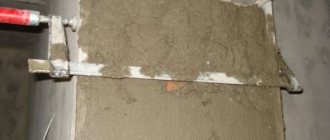
The division occurs according to different methods of forming the slope area, and choosing the material for cladding is not a problem. The most ideal option is to seal the slopes with concrete and then paint.
Finishing slopes with installation of finishing material on a special frame is beneficial when a decent amount of mortar is required for voids in the opening. Judging by the photo, using this method the slope will be flawless and even.
Alternative options
To effectively seal gaps between the leaf and the door frame, flashing strips are used. Structurally, they are made in the form of wedges or external adjustments. The slats can be made of plastic, metal or foamed polymers. Home craftsmen often replace them with pieces of felt or wood glazing beads, and use nails or screws for fastening.
Covering with MDF panels
To achieve good thermal insulation and soundproofing, MDF panels are used when making slopes. The panels are attached directly to the finished slopes.
The main stages of design using MDF materials:
Wooden slats (guides) are prepared, which are pre-treated with an antiseptic. These slats are attached around the perimeter of the doorway with dowels and screws.
You can use shingles.
A decorative corner is attached to the guides along the entire doorway using screws or nails.
MDF sheets are cut according to the dimensions of the slope and inserted into the fixed corner.
Then the outer edges of the slope are sheathed with a decorative strip or corner.
A platband is installed on the opposite side of the door.
MDF material tolerates moisture well, is durable and hygienic. Looks presentable. The main disadvantage is rapid flammability.
How to trim trim
Sometimes it becomes necessary to trim the platbands. Most often this is necessary in old wooden houses that have suffered severe shrinkage, Khrushchev-era buildings with uneven walls. To trim trims made of different materials, it is recommended to use the following tools:
wood or foam can be planed with a plane or knife;
MDF trims are covered with decorative lamination on the front and side surfaces. The structure of MDF itself, as a pressed board made of sawdust and an adhesive base, is fragile and cannot be processed with a plane. Its thickness can only be adjusted with a sharply sharpened knife, removing chips no more than 25% of the original thickness of the plank. When the thickness of the platband is trimmed, it will lose its decorative effect and it is the sidewalls that will suffer, since the PVC coating is brittle and breaks unevenly when trimmed, with chips.
Standards for gaps between canvas and frame
Any door is characterized by a gap regulated by GOST, which is necessary for comfortable opening and closing of the product. Wood products are prone to swelling and drying out, which leads to the loss of their original qualities and structure. Even at the installation stage, experienced specialists recommend competently forming a doorway, the correct size of which depends on the dimensions and weight of the doorway. A slight upward deviation from GOST is allowed, provided that the humidity in the room with insufficient ventilation is high, and the door leaf or frame is made of wood materials that are hygroscopic.
Before thoroughly sealing the slopes of the opening, check whether the gaps between it and the door comply with the standards prescribed in GOST.
In order to improve ventilation, the gap between the lower edge of the canvas and the floor can be increased to 40 mm.