What can you make from old empty shoe boxes or candy boxes that are left around the house? Let's use them and make practical storage crafts. We offer you ideas and master classes on how to decorate and decorate boxes with your own hands, how to make an organizer, box, shelves and other necessary things for storing various small items.
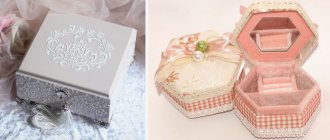
Jewelry box
If you still have a beautiful box that you hate to throw away, then put fabric rollers in it and you will get an excellent box for storing jewelry.
TIP: it is better to make rollers from a soft material, like felt or flannel
Huge pencil holder
An excess of office supplies: pencils, pens, rulers, felt-tip pens, markers will take root in a spacious stand. Everything is in one place and can be easily moved around the house to the right place. Decorate the outer part as you wish, and empty tin jars of olives will go inside. Or beer.
For the environmentalists at home: Replace jars with cardboard toilet paper rolls.
Picnic box
Using large or medium-sized shoe boxes, you can make a charming and very convenient picnic box that will be a great replacement for a standard basket. Decorate the box with decoupage or simply glue the fabric.
- A shoe box can be decorated with fabric or colored paper using PVA glue ,
- make handles from braid and decorate them at your discretion.
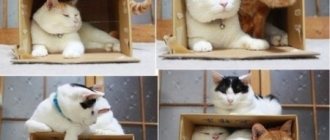
Sleeping area
People who have a cat as a pet know it when you buy a large sleeping house for it with a scratching post, with platforms at different levels; you arrange the space inside as comfortable and soft as possible, but the cat will still choose a flat cardboard box.
Article on the topic: 5 cool lifehacks for the garden
Many people begin to specifically accustom their pets to their new housing, but this should not be done. Why force a cat to live in warmth and comfort, if you can pleasantly furnish the same box.
You need to put a blanket inside the cardboard so that your pet can sleep softly and comfortably. Also, for your own aesthetic pleasure, you can paint the edges of the box as you wish. For example, sleeping cats, and then this place in the house will definitely become stronger, like a pet’s sleeping place.
Jewelry organizer
The lid from the box can be as useful as the box itself. For example, it can be used as a jewelry holder. To make such an original thing, you need:
- cover the lid of a shoe box with burlap,
- then attach it to the wall,
- fasten with nails through the cardboard, on which bracelets, chains and other jewelry will be hung.
Wrap
The easiest and fastest way to turn a shoe box into a gift box is to wrap it in beautiful paper. To do this you will need the following materials:
- wrapping paper (foil, a piece of wallpaper);
- scissors;
- narrow tape.
Step-by-step instruction:
- Unfold the paper on the table. Place a gift box on it.
- You should cut the paper so that the side is completely covered on one side and ⅔ on the other. The length of the box should be completely wrapped in paper, plus a margin of 3–4 cm.
- Turn the box upside down, press the paper as tightly as possible and seal with tape. This way the seam will be at the bottom.
- Now press the paper against the side, moving from top to bottom. Smooth it down and secure it with tape.
- Grasp the side tabs and fold them into a triangle (like envelopes). Tape it to the box. Fold the corners of the bottom part in the same way, and then glue it to the center.
- Do the same on the other side.
We recommend: Vampire things: items that take away positive energy in the house
The main secret of this technique is the tension of the wrapper. For gift wrapping to turn out beautiful, the paper should not dangle, but fit tightly around the box.
Organizer for pens and pencils
As a rule, cardboard toilet paper rolls are a very useless thing and can only be thrown into the trash.
However, using a cardboard box and several of these rolls, you can make a wonderful stand for pencils and pens with your own hands. Such an organizer will become a very convenient thing, and its creation will only take a few minutes.
- To make such an organizer, we will need a small cardboard box, you can take it from shoes and cover it with colored paper or decorate it in every possible way with ribbons, bows, stickers .
- Place cardboard rolls tightly into the box or glue them together for greater convenience, which will allow you to sort pens, pencils and other items according to their intended purpose.
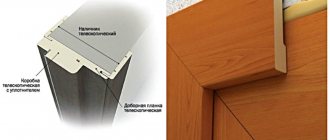
How to turn a shoe box into a gift box?
Shoe boxes are a great base for gift wrapping. They are durable and spacious. You only need to decorate the outside. Different materials are used for this:
- wallpaper;
- wrapping paper;
- self-adhesive film;
- textile.
At the first stage, you need to hide the shoe logo, and at the second, add decor in the form of bows, ribbons, flowers or Christmas compositions.
Paintings or panels on the wall
An ordinary lid from a shoe or candy box can be turned into a real work of art that looks like a real artistic canvas or decorative panel.
- To do this, just cover the lid with decorative paper or white paper and draw a pattern yourself.
- Then simply hang the lid on a nail in the wall and you can admire this work.
How else can you make paintings for your home - a detailed master class.
Wine box: decoupage
If you want to give your friend a bottle of good wine for the New Year, a tastefully decorated box using decoupage technique will help complement the gift. You can take a ready-made wooden slatted blank or use a regular box of butt boots to make it.
Decorating wine boxes using decoupage technique step by step:
- We process the box with sandpaper;
- We remove dust from the workpiece and degrease it using a cotton pad soaked in alcohol;
- We cover the outer part of the box with several layers of primer, paying special attention to the lids;
- We treat the inner part with stain;
- Paint the outside of the wine box with a mixture of blue, pink and green paint;
- We separate the top layer of the napkin or decoupage card and tear out the motif we need;
- Soak it on the file in a small amount of liquid and transfer it to the surface of the base;
- Lubricate the picture with glue, straightening it along the box with a hard brush.
- We complete the missing elements;
- We decorate the box with gold leaf;
- We cover the product with several layers of varnish.
All that remains is to put a bottle of wine in the box and the gift in the original style is ready. There is no shame in exhibiting such a product at the crafts fair in Ukraine.
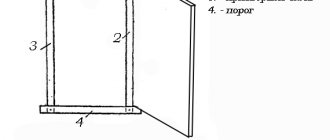
Decorative wall shelves
If you want to decorate an empty wall in a room, then a shoe box is perfect for this.
- Its inside can be painted or covered with colored paper and the box can be glued to the wall with Moment glue or liquid nails.
- Install the desired decor inside the box, but it should not be heavy so that it does not pull the box down.
Pasting with self-adhesive film
Self-adhesive is an excellent option for those who like “clean” work. You don't need glue or tape. All you need is a roll of self-adhesive paper and scissors.
Progress:
- Place the shoe box in the center of a piece of sticky paper. Wrap it tightly. Bring the edges into the center to the full depth. Mark the required length and angles.
- Cut out a rectangle.
- Cut the corners to create a cross-shaped piece. Use the pieces to make corners for the box. Or immediately provide allowances that you will bend at the corners.
- Now is the most important stage. To ensure that the self-adhesive lays flat, lift the protection at the edge and apply the adhesive layer to the inside of the box. Gradually remove the protection and smooth the film with a cloth. Move from the middle of the box to the outer side, the bottom. Cover the opposite side and the other 2 sides. If there are any bubbles, carefully prick them with a needle and smooth them out. Warm up the uneven areas with a hairdryer. The gift box will be perfect!
Try mirror, velvet or matte self-adhesive. They will give the gift box a chic, expensive look. Or you can use the option with a wood pattern to create the effect of a chest.
Cardboard furniture
Gift and packaging boxes are a great source of cardboard that can be used to create furniture, such as a shoe rack, cabinet or laptop table. We have a separate article devoted to this - 10 ways to make furniture from cardboard.
Drawer divider
Small things like panties, socks, underwear, tights drink a lot of blood from their owners when they feverishly search for what they need in the depths of the closet. Take scissors or a utility knife and quickly zone the space in the drawer. You don't even have to color it.
For perfectionists, of course, here too you can cover the cardboard with cambric or lace.
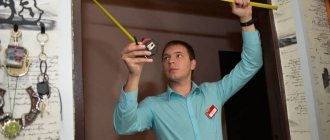
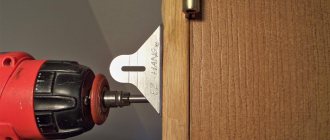
Charging station for phones
A shoebox makes a great compact phone charging station. To do this you need:
- just cut holes in one wall of the box and secure them with special metal labels, which can be bought at any hardware store.
- Place the power supply inside the box and attach the box to the wall.
- When you need to charge your phone, you just need to pull the cord through the hole. This way, the wires will be in order and at the same time have an aesthetic appearance.
We use napkins to decorate paper products
A cardboard box can be used for anything. And don’t rush to throw away even small boxes. Decoupage of boxes with napkins consists of several stages, and doing it yourself is not difficult. In the photo you see what you can achieve. First you need to prepare the materials.
To get started you will need:
- A small box of any shape prepared in advance;
- Paint (you can use acrylic and oil paints);
- Glue (PVA is suitable);
- Napkin with a pattern;
- Manicure scissors;
- Brushes;
- Sponge.
Let's look at a simple and understandable master class step by step
- To begin with, if the surface of the box is not completely smooth, it needs to be lightly sanded. Sand until it is smooth.
- After this, apply paint to the surface of the box.
- Carefully cut out the design from the selected napkin.
- Place a napkin on the surface of the box (lid or walls) and use a pencil to mark the place where you plan to glue it.
- Now take your paints. You can mix several shades so that they do not contrast too much with the chosen pattern. Then use a sponge to carefully apply paint to the box lid, being careful not to touch the area you have allocated to attach the design.
- After this, apply glue to a clean area of the lid and glue our pre-prepared pattern there.
- You can also cover the outer walls of the box with a colored napkin - at your request.
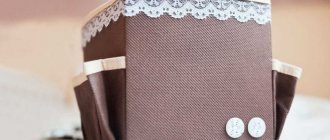
Storage basket
To create an imitation of a real wicker basket, it will be enough to glue the shoe box with a rope turn to turn; you can use ordinary PVA glue for this.
Inside, you can sew a bag of white soft fabric the size of the box, so you can very easily make with your own hands a very cute decorative basket for storing small items, which will be in no way inferior to a real wicker basket.
Master class on basket weaving
The best decor ideas with photos
Pasting and wrapping is only the first stage of work. Next you need to come up with a beautiful decor. For example:
- tie the box on 4 sides with ribbon and make a beautiful bow;
- glue the lace;
- make an applique;
- wrap the card with twine and pin it with a pin;
- tie flowers to the box.
We recommend: When you don’t want to go home: 7 reasons and 7 solutions from experienced psychologists
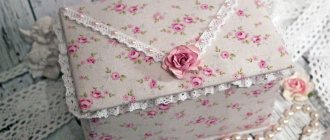
There are many types of decor for gift boxes. A box with a contrasting and lush bow is considered a classic:
A relatively fresh and fashionable idea is to decorate a shoe box with fabric, lace and ribbons: The fair sex will be delighted with a gift presented in a box decorated with flowers: A simple and laconic idea for decorating with craft wrapping paper:
Shoe boxes are very easy to transform into gift boxes. You don't need any special skills to do this. Using step-by-step instructions, you can easily bring any of the above ideas to life. And how nice it will be to receive a gift in a homemade package – unique and unusual!
Storage box
Shoe boxes are an excellent material for storing various things; in order for them to have an original and attractive appearance on storage shelves, they are quite easy to transform.
- To do this, you just need to cover them with a satin card using PVA glue.
- You can stick a sign on the end of the box with a signature indicating what is stored in this box, this will make it easier to find the right thing.
5 master classes on how to make a storage box with your own hands
Pasting with paper
A papered box is undoubtedly more practical to use as a gift. To open it, you don’t have to tear the paper and disturb the decor. Many people subsequently use gift boxes to store things. It’s just a shame to throw away such beauty!
For pasting you will need the following materials:
- wrapping paper or wallpaper;
- double-sided tape or glue (PVA for paper, Titanium for vinyl wallpaper);
- scissors;
- pencil.
Step-by-step instruction:
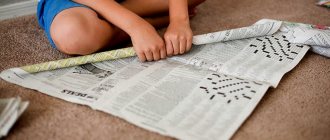
- The first step is to take measurements. Wrap the box as tightly as possible with paper on all sides. Iron all corners. Fold the edges into the middle by 5–10 cm and mark with a pencil.
- Now you need to cut out a rectangle along the lines marked with a pencil. Do not smooth out the paper. Make cuts along the sides and cut off the corners, as shown in the picture:
- At the last stage we perform pasting. The joints are the sides and the inside. Place a shoe box in the center. Glue the beveled edges. Then apply glue or tape to the inside of the rim and secure the remaining layers of paper.
- Cover the lid in the same way.
For beginners, it is better to take thick paper on which the folds are clearly visible. Having practiced, you will be able to cover boxes with fabric in the same way: velvet, satin, cotton.
Cover the box and lid with materials of different colors. Such gift wrapping will look brighter and more original.
Mini file
If you have a collection of stickers, stamps, or other small items, a shoe box is a great place to store them.
- First you need to choose a box of the appropriate size and cover it with colored paper, so it will acquire a beautiful appearance.
- Cut sheets of paper to the size of the box and sign the names of what will be stored in the box, then place these sheets between the corresponding things.
This way you don't have to go through the entire contents of the box to find the item you need.
Decoupage spice box using printout method
For this method, it is better to use plywood blanks, since during the implantation process the cardboard base may delaminate. However, if you work very carefully, you can also decorate a shoe box with decoupage and implantation of a printout.
In addition to the technique given here for implanting a printout “with its face into the varnish,” there is another method: transferring the design to the product using a hot iron.
This technique may seem too complicated for beginner decoupage artists, but if you follow all the steps carefully, you will be pleased with the result.
Master class for beginners on decorating a box using the technique of implanting printouts:
- Sand the box with sandpaper.
- Apply a thin layer of primer, white acrylic paint or stain to its surface and let it dry.
- On top of the primer we apply several layers of acrylic paint of the main color. Let the boxes dry thoroughly. This step does not need to be completed if you used stain to decorate the box.
- We apply several layers of acrylic varnish or special adhesive varnish to the printed motif. We cover the places where the design will be implanted with a thin layer of the same composition and until it dries, we lower the varnished image with its face into the varnish. Leave this structure in this position until completely dry.
- The next day, generously moisten the printout with water and begin to roll all the paper off the product. When you think there is no more paper on the image, dry it with a hairdryer and you will see a white coating, you need to get rid of that too.
- When only a bright image remains on the product, fill in the missing details with acrylic paint.
- Open the box with several layers of varnish and leave it until completely dry.
Despite the apparent complexity of this technique, even a beginner can handle it, the main thing is to follow the described sequence of actions exactly.
Chalk board
You can use shoe box lids to make a mini chalkboard very easily. To do this, you need to paint the lids with black acrylic paint and you have mini chalkboards that will be great fun for children.
These boards can also be used as signs at a large event, or they can also be used as large price tags. In order to change the inscription, you just need to erase the chalk and write a new one again.
Detailed master class on how to make a chalk board
Tools and materials for decoupage boxes
Before you start decorating any product, you will have to prepare some tools and materials. They can be bought in specialized or office supply stores.
Materials and tools that may be needed to decoupage the box:
- Actually the box itself, it can be metal, plastic, wood or old shoes.
- Acrylic paints;
- Glue (if the box is cardboard, you can use regular PVA, in other cases it is better to purchase special decoupage glue).
- Printouts or napkins with pictures;
- Decoupage or parquet varnish;
- Soft brushes for painting boxes with paint;
- Hard brushes for applying glue and varnish;
- Sponge;
- File;
- Container with warm water;
- Priming;
- Sandpaper;
- Additional decorative elements.
Here is a minimum set of items that may be useful for decoupaging a box with your own hands. All additional materials will have to be purchased during the creative process.
Final stage
- Proceed to creating an image: either take decoupage napkins, or any other image on paper.
- You can paint it yourself using soft brushes.
- Apply glue to the box, wait for it to dry, attach an image, if the option with drawing is not suitable, put a sheet of white paper on top, iron it.
- Trim off the excess if a napkin was used.
- Secure the final version with 3 layers of varnish. Both decoupage varnish and parquet varnish are suitable.
- This completes the decoupage of the cardboard box! Enjoy!
Nuances of working with images:
- Individual elements should not be cut out, but rather torn out of the napkin, so the edges will be less noticeable; they can be retouched using fine-grained sandpaper.
- Movements to smooth out the pattern should be done from the center to the periphery.
- After successfully fixing the drawing, acrylic paints are used for greater effect.
- Additional elements are welcome (colored paper, beads).
Organize your beads
The yokes will find use for the lid, covering it with burlap or velvet. Shiny jewelry looks great against such a background. And the man will attach the hooks or pins - he is always present with the yoke.
Interesting fact. According to an article in Glamor magazine, the average woman will purchase 469 pairs of shoes in her lifetime.