- November 20, 2020
- Windows and Doors
- Ivan Gresko
To make it more convenient to store clothes, dishes, books and other necessary things in an apartment or house, use various bedside tables and cabinets. Judging by the reviews, a fairly pressing problem is when you need to hang swing doors on a closet. It is noteworthy that you can handle this work yourself without resorting to the help of a specialist. To do this, you need to familiarize yourself with the mechanism of operation of doors and the types of hinges. In addition, during the execution of work it is necessary to strictly adhere to the algorithm of actions. You will learn more about how to properly hang doors on a closet in this article.
About materials
For those who do not know how to hang swing doors on a closet, experts recommend taking into account the characteristics of the material. In general, doors are made of wood, plastic, glass and light metal. It is important that the selected material holds its shape well. Previously, the only material was wood. Doors made from solid wood will add homely warmth and comfort to your home. However, such doors are more expensive. If you want to save money, purchase chipboard and MDF. Products made from such materials will cost you less, since they are made not from natural solids, but from shavings and tiny fibers with the addition of thermosetting resins for rigidity. It is noteworthy that MDF is more environmentally friendly than laminated chipboard. Boards made from wood waste are covered with a waterproof and durable protective film made of plastic, natural veneer, enamel or PVC film. Judging by the reviews, metal doors are much more durable and look very impressive. Glass doors are mainly installed in kitchen cabinets. The interior with such elements looks quite elegant. In general, preference should be given only to certified industrial products. This guarantees a long service life and durability of the furniture and its individual elements.
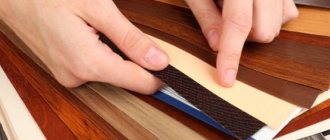
Glue + sawdust
The solution is as old as time, and it should be noted that it works well. Perfect if you have a piece of chipboard torn out.
The idea is simple - we take sawdust (you can take it from a chipboard, a piece of which has been torn out), or find it near furniture factories, next to large construction supermarkets (usually there are pieces lying around that no one needs), crush them, mix them with glue (previously we used PVA) this Apply the mixture to the broken areas and let dry. And that’s it, tighten the “screws”. It's holding up well.
However, now there are a large number of adhesives; on the Internet I even saw a guy pouring a lot of glue from a glue gun into broken places. And everything seems to be holding up
I used to repair hinges in the kitchen a long time ago. BUT due to the fact that the sash was used often, it broke quite quickly.
So this is again an option for a while, for constant use (10 - 15 openings per day), this is not the best way.
About fastening mechanisms
Before wondering how to hang swing doors on a closet, you should familiarize yourself with the types of hinges. In general they are:
- Invoices. The shape of the plates in this fitting is different. The surface of the box and the canvas became the place for their fastening. When the door is closed, the plates move into each other. For a hallway closet with swing doors, this type of hinge is suitable. The structure has a bowl-shaped base and is connected to the panel with self-tapping screws. The bases are equipped with mechanical inserts that are fixed to the side panel and door. It is best to get overhead devices equipped with four hinges. Many home craftsmen also call such products “frogs.” These fasteners can be recommended for any structures with swing doors. For the manufacture of all hinge elements, alloys are used, thanks to which the product is not subject to mechanical deformation and corrosion processes.
- Mortise. The plates are installed so that they enter the material (exactly how much depends on the thickness of the fittings).
- Secretive. They are used to equip the door leaf.
- Screwable. The plates in the fittings are replaced with pins that are screwed into the material.
Sliding wardrobe panels
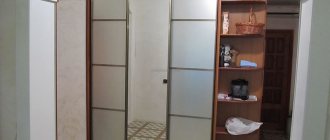
The sliding wardrobe is the most popular furniture today. This is facilitated by the ability to rationally use living space. Often the closet occupies the entire space from floor to ceiling, has a large capacity and, when using a sliding door, does not at all interfere with the movement next to it.
In order for such storage furniture to serve for a long time and without failure, it is important to correctly assemble the entire structure. The main role belongs to the flawless installation of sliding facades. By precisely fulfilling the requirements and recommendations of specialists, a person with the skills to use special tools can install the cabinet door system with his own hands.
What do you need for work?
Before you start installing the door yourself, check that you have the necessary components for the sliding system in the closet. In addition to the facades themselves, the following must be prepared:
- Bottom and top rails or guide profiles. These are the main parts that ensure the movement of the door leaf.
- Motion limiters and stoppers. Parts that help the door move smoothly along the guide rail and stop the movement at a certain point.
- Closers are mechanisms that ensure the sliding of the door panel.
- Accessories for façade systems. For example, seals, screws, rollers, etc.
Prepare your tools:
- electric drill;
- metal drill with a diameter of 4 mm;
- a set of straight and Phillips screwdrivers;
- spirit building level;
- imbus key;
- plumb line;
- sandpaper;
- pliers;
- hammer;
- stationery knife;
- roulette.
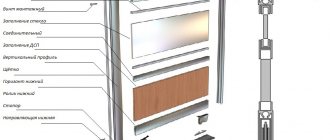
Carefully familiarize yourself with the main structural elements of the sliding wardrobe door and their location.
What do experts recommend?
In addition to the question of how to install doors on a cabinet, many beginners are interested in how to choose the right fasteners and how many fasteners to choose? For double doors, you need to get right-handed and left-handed hinges. It can be difficult to choose a direction for a single-leaf structure. The hinges must be inserted into the side of the door into which it will open. If the fasteners are located on the right, then they are considered right-handed, and on the left - left-handed. When everything is decided with the direction of the fasteners, all that remains is to correctly calculate their number. At the same time, experienced craftsmen recommend taking into account the weight of the door itself. It would be best to equip a single-leaf design with three fastening mechanisms.
In a double-leaf door, you will need at least two hinges for each leaf. When buying fasteners, do not forget to check them so as not to get defective. It would be more advisable to buy a few extra fasteners. Read more about how to hang doors on a closet below.
How to adjust the hinges on a cabinet door yourself: detailed instructions
If the doors become loose, begin to close poorly, or become deformed after transporting furniture from one place to another, the cabinet hinges need to be adjusted. The causes of malfunctions may be temperature changes or high humidity. Also, the procedure is often necessary after purchasing and installing new furniture. No special skills are required to adjust the awnings. All you need is tools.
The process itself is simple and takes little time, so you can adjust the doors yourself. You just need to follow some rules and subtleties, since each case requires its own specific method of adjustment.
What you might need
Before hanging swing doors on the closet, prepare the following tools:
- Pencil or chalk.
- Roulette. You can also use a ruler.
- A set of screws and self-tapping screws. Mostly they are included in the kit for hinges.
- Drill with attachments of the required diameter.
- Screwdriver. If this power tool is not at hand, then replace it with a regular screwdriver. In this case, you will have to screw the screws into the canvas manually.
Other types of furniture hinges
Card, piano, and hinge hinges are rarely used for installing cabinet doors. They do not have three-level adjustment and do not lock the door in the open and closed position. An additional fastener is needed. Today they are more often used as an additional decorative element. For example, antique.
Mezzanine
For installation of horizontal overhead panels that open upwards.
Mezzanine
Secretaries
Used for hanging downward opening facades.
Secretary room
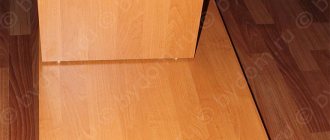
We have learned in our practice how proper installation and adjustment of hinges affects the operation of the cabinet as a whole. Some time after assembly, the door of the wardrobe or kitchen cabinet stopped closing - the upper part of the door rested on the frame.
To correct the misalignment and use the cabinet normally, I had to readjust all the hinges. Therefore, during installation, it is advisable to prevent any deviations; any gap can lead to deformation of the entire cabinet structure.
Second step
Once you have decided on the number of loops, center the fabric and make precise markings. For this purpose, place the doors against the cabinet and, using a pencil or chalk, mark the places on the canvas where the hinges will be placed. It is advisable that the fittings and shelves be at different levels. Otherwise, the locker doors will not close. If you decide to replace old hinges with new ones, then when removing fasteners, try not to loosen the grooves. Most likely, you will have to attach the hinges in a different place on the canvas. The distance between the hinges will depend on the size of the door. It is advisable to step back from the edge by 150 mm. Next, you need to attach the loop to the canvas and carefully trace with a pencil the place where the base bowl will be located. After completing these steps, you need to carefully drill a niche for the hinge in the canvas.
At this stage you will need an electric drill with the appropriate attachment. It is desirable that the recess is at least 1.3 cm.
Installation of guides
- All actions must be performed exactly in the sequence in which they are indicated in these instructions:
- Take measurements at the top of the opening - where the top guide will be located.
- Measure the resulting opening width minus 2 mm on the guide. Using a ruler or triangle, draw an exact perpendicular line.
- Cut exactly the piece of guide that is required - to do this, use a grinder or a hacksaw.
- Prepare holes for self-tapping screws - every 40 cm along the entire length of the guide.
- Drill the previously determined number of holes - their edges should be sanded so that they are smooth.
- Now the profile can be installed by attaching it with screws or self-tapping screws of the appropriate diameter.
- A stopper should be installed at the right and left ends of the guides: in the case of the right door leaf - in the recess on the right, in the case of the left - in the recess on the left.
- You need to do the same with the lower profile. You can check the correctness and accuracy of fastening using a level. When this stage is completed, you can move on to the next one.
What to do next
When the niche for the cup of the fittings is ready, insert the base into the recess and align it in a horizontal plane. Then you need to drill a few centimeter holes for fasteners, through which the base cup will be fixed to the canvas. Experienced craftsmen recommend placing the door in a horizontal position, otherwise the accuracy of the connection will be impaired. Before drilling, mark the locations for the holes with a pencil. Next, they are drilled and the fittings are mounted to the door with self-tapping screws using a screwdriver or screwdriver. It is very important that at this stage no chips or cracks form, and that the fasteners fit into the prepared grooves smoothly and are not skewed. Therefore, keep the power tool vertical. If you do not hold the drill at an angle of 90 degrees, the doors will turn out skewed. After completing these steps, make sure that the hinges are located on the same axis. Only in this way will the load of the canvas be distributed evenly. If you ignore this recommendation, and after some time the furniture will need repair.
Kinds
Four-hinged hinges come in different modifications, which can be selected depending on the location of the panel relative to the box and the cabinet itself in the room.
Invoice
The canvas attached to this loop is completely perpendicular to the body and covers the stand. Used when the door overlaps the side rail of the cabinet.
Invoice
Half waybill
It is used when two doors need to be hung on one rack. Each facade overlaps the end of the rack by half.
Insert
The door leaf is perpendicular to the post, but does not overlap its end.
The overhead hinges also differ in the angle of inclination. This is necessary for installing corner cabinet doors. Depending on the difference between the angle of the facade and the perpendicular to the stand, you can select hinges with an opening angle: -25 °, 30 °, 45 °, -45 °, 90 °.
Insert
Transformer
Used to create composite facades from several doors or in cabinets with drawers that are hidden
Most four-hinged hinges are made with a built-in closer. This makes the door movement smooth and silent.
Transformer
Eight-joint
It has all the characteristics of a four-hinged hinge, only without inserting the cup into the facade body. It is attached with self-tapping screws, so it is only suitable for fabrics with a dense texture.
Eight-joint
About door installation
Once the door is equipped with fittings, it can be attached to the frame. How to hang doors on a closet? They do it as follows. First, the prepared door is placed against the cabinet body and, if necessary, its position is aligned. Next, with a pencil or chalk, mark on the body the places where the strikers will be installed. Then the marked points remain to be drilled with a drill of a certain diameter so that grooves with a depth of 1.3 cm are obtained. Self-tapping screws are then screwed into them using a regular screwdriver or screwdriver, which will secure the plank.
Regular matches
Everything is simple here, if your broken holes are not large, say, a piece of chipboard has not fallen out, then you can use ordinary matches.
How it works? Just hammer a match into the hole (great if the diameter is not large). And then we screw the screw in there. The match is pressed against the wall and thus the fastening is restored.
However, it is not suitable for heavily loaded doors that you rarely use. If you constantly open or close the sash, it will not last long . BUT as a temporary solution, why not?
Final stage
Now all that remains is to connect both halves of the fittings to each other. To do this, you need to attach the door to the cabinet body and tighten the screws on the corresponding strip.
Judging by the reviews, after installing the fastening mechanisms, the doors are difficult to open. The reason is that the loops have not yet been developed enough. Also, it wouldn't hurt to lubricate them. For this purpose, use machine oil. A few drops will be enough. After lubrication, carefully remove excess with a piece of absorbent cloth.
Leveling and Adjustment
Furniture fastenings need adjustment. To do this, during the installation process, their fixation in depth and distance is checked. This can be done with horizontal or vertical position of the cabinet parts. After assembling the furniture, all preliminary calculations will turn into results, so it is important to spend more time on marking and connection parameters in advance.
When choosing, you must first of all pay attention to the strength of the product; it should serve throughout the entire life of the furniture.
After installing the fasteners on the cabinet doors, you must carefully try the doors against the sides so that they match exactly. Mark the joints with a pencil. Fix the door and do fastening work on both sides. It is important that the accuracy of all cabinet parts is one hundred percent. Finish assembly and check operation.
When opening and closing for the first time, the doors may move somewhat stiffly if the hinges are not yet lubricated and developed.
After attaching the hinges to the cabinet is completed, it is recommended to drop a little machine oil inside the mechanism. Then you need to wipe the surface with an absorbent cloth.
Check that all elements are working properly.
For a cabinet made of chipboard, it is better to take wide hinges, since the base material can crumble.
The better quality all the elements of the assembled furniture are, the more reliable their operation will be.
When installing hinges on cabinet doors, do not forget that after a while the doors may sag under their own weight, especially if they are often left open. Therefore, it is necessary to periodically strengthen the hinges by tightening the screws. In modern fasteners this is easy to do - there is an additional recess in the oval part.
Try to adjust the parts carefully so as not to loosen the grooves.
It is also necessary to lubricate the cabinet hinges from time to time to prevent them from rusting or squeaking. When adjusting the fasteners, it is necessary to fix not only the screws connecting the cup or bar, but also the parts of the closer. The mechanical part may wear out from use. Therefore, it is important to have 2-3 spare elements to replace a broken part. “Drawdown” is indicated by distortion and loose cover. Work is carried out more often in rooms with uneven floors and high humidity.
If adjustment does not help, you should replace the old parts with new ones.
When changing fasteners on used furniture, you need to look at how suitable they are for it. It may be necessary to change the location of the new hinges due to loosening of the grooves.
In this case, it is recommended to disassemble the furniture and perform all installation operations again.
After adjustment, check for gaps, tight fit of the doors when closing, overall mobility and evenness of the sash along the axis.
When installing several fasteners, you should make sure that their location does not get on the internal elements of the furniture.
How to replace it correctly with your own hands
Correctly replacing a broken furniture hinge consists of the following steps:
- You can replace it if you call a specialist, but in order to save money, you can replace the furniture hinge yourself. In place of the old hinge there are holes from screws or screws. Just take a special glue with the addition of small sawdust and cover the holes with a viscous composition. Wait a couple of hours and tighten the screws again. But we warn you right away, this method is not durable if you screw it in without the glue drying.
- Cover it with the same glue with furniture sawdust, then let it dry. We screw the hinges into the old place, only we choose the depth 3 millimeters deeper, but leave the same diameter. It has been tested more than once and the fasteners last a long time.
- It is necessary to move the bases of the sang and screw them on. Tip: replace the old fastener with a new one, because over time the hinge may become deformed.
- If, due to frequent breakdowns, the place for fastening has turned into a sieve, then you can make a small overlay from any material and screw the hinges back on. Using a special screwdriver, tighten firmly until the end.
With the knowledge gained, we can confidently say that if any of the above breakdowns occur, you will be able to cope on your own.
Source: pro-dom-mebel.ru
Marking
An important stage in the installation of furniture hinges is the preparatory process, which consists of taking measurements and preparing blanks. Before taking measurements, it is important to decide how many hinges the door will be held on. However, this is not a complicated process; you just need to know about the dimensions of the cabinet. Below is the detailed ratio:
- A door with a height of 2 to 2.5 meters and a weight of 20 kilograms requires 5 hinges.
- A door 2 meters high weighs 20 kilograms - 4 hinges are enough.
- If the door is from 1 to 1.5 meters and weighs 15 kilograms, we use 3 fasteners.
- For a door up to 1 meter with a weight of 9-10 kilograms, only 2 fasteners are needed.