The question of how to make a cabinet with your own hands sooner or later arises in every person who wants to save on new furniture. Not everyone has the opportunity to purchase a cabinet in a store, because such a purchase can be very expensive. There is another obstacle - choosing an item for your garden or home, which can be especially problematic due to the lack of the required model. Therefore, self-production is an excellent alternative to expensive store-bought furniture and additional savings on the family budget.
Stage 1: determine the dimensions
The dimensions of the swing closet are determined based on the installation location:
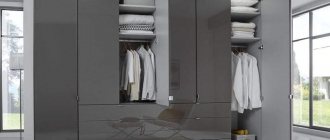
- Height. If you want to take up the entire available height, make a built-in wardrobe. For cabinet furniture, it is necessary to provide a space of at least 150-200 mm.
- Depth. There is usually little space in the hallway, so narrow cabinets are installed. The width of hangers for adult clothes in IKEA is 42-43 centimeters. If you want to place a standard rod in a closet, make the cabinet at least 450-500 mm in depth. If it is less, you will have to install a transverse rod; it is less convenient and roomy. In our case, the cabinet depth will be 450 mm.
- Width. The parameter is limited only by the length of the wall.
Varieties
Three-leaf structures can be of different designs. Eat:
- straight;
- corner;
- radius.
By placement method:
- free-standing;
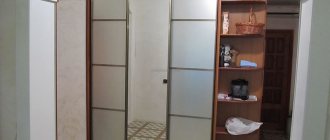
- built-in
The latter are often installed in apartments.
According to the door opening mechanism, models can be:
- swing;
- sliding;
- with folding doors.
The most common are three-leaf cabinets with drawers on the outside or a mezzanine.
Stage 2: designing a cabinet in the program
First you need to model the cabinet. A free demo version of the furniture design program “PRO100” is suitable for this; you can download it from the official website. The program interface is simple and understandable even for a beginner. The program recreates the process of creating furniture and allows you to work both on the overall 3D view and on each element separately. This is much more convenient than drawing all the details on a piece of paper and then calculating the dimensions. Everything will be clear and there will be less chance of making mistakes. Cabinet design process:
- After starting the program, create a new project.
- In the “Room Properties” section, enter the dimensions of the furniture: length, width and height.
- On the side panel, using the “New Element”, we model the cabinet parts. This is the main tool in the program. The size of each element can be specified in numbers or adjusted manually.
- Next, you need to determine the dimensions of each part, taking into account your parameters. In our case, the cabinet dimensions are as follows:
Indicate the dimensions of the room (cabinet)
- height - 2300 mm;
- depth - 450 mm;
- width - 1500 m + shoe shelf 500 mm;
- Chipboard 18 mm thick, edge 2 mm.
- To get the height of the side wall of the cabinet, subtract the thickness of the chipboard from the total height, since the ceiling will also have a cabinet roof: 2300 – 18 = 2282, round the height to 2280 mm. The second side wall in the program can be duplicated via “Copy-Paste”. For an accurate fit, you need to use your mouse wheel to approximate the angle of connection of the parts. The parts need to be fitted close to each other so that the second side wall is close to the top part.
To protect against changes, the thickness of the parts should be checked.
- After measuring the box, you need to decide on the internal contents of the cabinet. Since the cabinet is three-section, you need to add 2 partitions the same size as the side walls.
- The next step is to calculate the size of the shelves. From the width of the cabinet you need to subtract 4 thicknesses of laminated chipboard (18 * 4 = 72) and divide the result by the number of sections (3): 1500 – 72 / 3 = 476 mm, subtract another 1 mm so that the shelves easily fit into the niche = 475 mm. The depth of the part is calculated by subtracting the thickness of the doors and edges on the shelves from the total depth of the cabinet: 450 – (18+2) = 430 mm. Next, you need to decide on the number of shelves in each section. In our case there are 6 of them.
- Since there will be a bar in the last section, we will leave only 2 shelves there: upper and lower. We install 2 partitions between the sections.
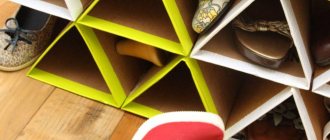
- We design a small bedside table for shoes in the same way.
- We complete the process of designing the internal filling of the cabinet by installing doors. Between the doors you need to leave a small gap of 2.5 mm on each side so that the doors open comfortably. The size of each door was 2239x480 mm.
- Double-clicking on each part in the program opens a window with dimensions. The parameters must be entered into the general table, since the free version of the program does not allow automatic calculation.
Selecting shelves via Ctrl into a group of parts allows you not to copy each element separately, but to insert a section at once. Please note that once parts are copied, they often extend beyond the edge of the cabinet. You need to correct them manually.
There is no need to repeat the names of identical parts. It is enough to indicate their number and sizes for one element.
Separately, you need to note the edge and the places where it is needed. The sides of the chipboard that will be joined to other parts do not need to be edged. If you are not sure, you can edge all sides, this will release less harmful substances from the chipboard, but this will increase the cost. A 2 mm PVC edge is suitable for visible corners, and 0.4 mm for the remaining corners. When calculating dimensions, take into account the thickness of the edge.
Coloring and decor
Three-leaf cabinets come in matte, glossy, dark and light colors, and are decorated with various elements. When choosing, it is important to maintain the style in which the apartment is decorated.
The most commonly used colors are shown in the table below.
| Interior type | Design |
| Classical | Restrained colors, but a wide range of materials - wood or its imitation. Strict forms |
| Scandinavian | Light wood or its imitation. Contrasting inserts of dark tones are possible. Simple shapes, straight lines |
| Modern | Lots of mirrors, glass, glossy surfaces, curved planes, three-dimensionality, metal elements |
Stage 3: cutting
You can contact any company that deals with cutting with the dimensions and quantities of all parts. It is better to take laminated chipboard with emission class E1 or E0.5 - this is the most environmentally friendly option (manufacturers Egger, Kronospan). The cutting time, depending on the chosen material and furniture design, is 3-5 days.
The total cost of materials is 14,000 rubles. In stores you can find ready-made options at a slightly more expensive price, but they will be of worse quality than laminated chipboard and will not occupy the entire height of the room. If you order the same cabinet from furniture makers, they ask for at least 40,000 rubles for it. Maybe in your city the prices will be different.
It is worth separately agreeing on the marking of the holes for the hinge. Otherwise, you will have to make the “additive” yourself and buy a special drill.
Manufacturing
Once the drawings are ready, you can begin manufacturing the necessary parts. Sawing boards is a rather difficult task, and it is better not to test yourself, but to order this work from professionals. As a rule, such a service is provided at the place of purchase of chipboard sheets. The difficulty is that a machine for sawing chipboard is quite expensive, and purchasing it for one cabinet is pointless. Many people prefer to cut it themselves with a jigsaw, but this results in chips, so it’s better not to risk it.
You need to decide in advance on the door opening system: sideways, up, down, move like in a coupe. Taking into account the number of shelves, drawers, doors, you can calculate the required number of European screws, rivets for them, guides for drawers, and holders.
Separately, it is necessary to say about drills. They should only be made from wood, which will allow you to make an accurate hole yourself without the use of additional force. Their characteristic difference is the presence of a blade in the center and a flat profile (and not a cone, as in other types). Before assembly, it is important to practice drilling on unnecessary scraps that will remain after sawing the chipboard.
To avoid measurement errors, you need to use high-precision instruments. You should avoid tape measures and give preference to a metal meter and half meter ruler; it can be purchased at every stationery store. But beware of Chinese-made plastic analogues; they often contain errors that can turn out to be a serious drawback when assembling the product.
Felt pads will help make further movement of the cabinet easier. They should be glued to the places where the object stands.
Stage 5: furniture assembly
Since the design of the cabinet does not provide for a back wall, we begin the assembly process not “lying down”, as usual, but immediately by installing it against the wall. For quick work, you will need 2 screwdrivers, so as not to change the bit with the drill every time. If you pre-drill the parts, you can get by with one tool. Step by step assembly process:
- Assembly begins by connecting the sections: we assemble 2 side walls and 2 shelves between them. Then install the top part.
- The places for fastening the shelves must be pre-drilled, this will ensure a more accurate fastening.
- After installing the cabinet box, you need to install the remaining shelves, aligning them level.
- The final stage of the assembly process is the installation of the doors. If you didn’t drill the holes for the hinges when cutting, you will have to do it yourself using a special forstner drill. The distance from the edge of the door to the center of the hinge should be at least 20-22 mm.
- After installing the doors, adjust their pressure using two mounting screws that need to be tightened.
- For stability, the cabinet is attached to the wall with metal corners.
You can assemble a cabinet from sawn materials in 4-6 hours. Plus it will take time to plan, cut and purchase materials. You can get an individual wardrobe for your apartment, with convenient filling, cheaper than store-bought options and even more so made to order.
Of course, this design can be further improved. If desired, you can add a plinth and install a back wall made of fiberboard for rigidity and protection from dust. The fastening of the main parts can be done not on the corners, but on confirmations, this will be more reliable. The shelves do not have to be rigidly attached to the walls; they can be placed on furniture shelf holders.
Source: DIY YARI channel.
What materials will be needed?
If you decide to start making a cabinet yourself, you need to make sure in advance that you have all the tools that you will need during the work at hand.
Of course, the set of tools is quite large, but all its components will definitely be needed during the work process:
- hacksaw and grinder;
- roulette;
- a protractor, with which you can perform the necessary measurements with great accuracy;
- dowels made of wood and fasteners made of durable metal;
- mastic and acrylic paint. It is better to use water-based paint and the color that was previously selected.
Once all the necessary tools have been collected, you should not wonder how to make a cabinet with your own hands. You need to go to a hardware store to choose the material for making the cabinet.
There are three basic principles for designing a cabinet:- wood board - this option is considered the best. Because the boards are made from birch and oak. Wood has high strength and wear resistance characteristics, which increase the durability of the material. Moreover, furniture made from such boards is highly resistant to the negative effects of external factors;
- Chipboards - this material is no less in demand than wooden boards. Their technical characteristics are quite acceptable, and the price is much lower than that of wooden boards;
- plywood is a multilayer material that has good strength and is environmentally friendly. Therefore, plywood furniture can also be installed in a children's room. Making a sliding wardrobe with your own hands from plywood is much easier and this is important.
The choice of material largely depends on what budget the buyer has. The most expensive raw material, of course, is wood. Therefore, you can replace it with any other material.
Moreover, experienced craftsmen insist that it will be more convenient for beginners to work with plywood or chipboard. This is explained by the fact that these materials are very malleable.
Real wood is much more difficult to process. Therefore, this will require certain skills and work experience. A beginner may simply not be able to make a wooden cabinet on his own.
Therefore, in such a situation, it is better to give preference to more pliable raw materials, which even a person with no work experience can handle.
Stylish kitchens. Custom-made kitchens made to measure
The Stylish Kitchens factory offers custom-made kitchen furniture in individual sizes. You can become the owner of a kitchen set that matches the characteristics of the room and your needs. As a manufacturer of kitchen furniture, we are ready to take into account your financial capabilities. Just tell us about your wishes for the style, color, texture and other characteristics of the kitchen units. To create kitchen furniture with individual parameters, only high-quality materials are used. We employ experienced craftsmen who can implement any requests or wishes. We pay special attention to the compliance of kitchen furniture with modern standards and high quality standards.
Advantages of making custom kitchen furniture
A custom-made kitchen set can be:
- With maximum precision it is possible to fit into any non-standard room.
- Equip with only the necessary equipment, and also provide modules for switching on purchased devices for the future.
- Design in such a way as not to violate the overall concept of interior design and take into account the style of the room.
We strive to create even the most inexpensive projects, focusing on current trends and in accordance with modern requirements.
By ordering a kitchen from a well-known manufacturer, you receive products of high quality, optimal cost and warranty and post-warranty service.
If necessary, our factory will provide installment plans for any models and equipment you like.
Kitchen set “Anta Vetro”
In the model with glass facades “Anta Vetro” it was possible to express fashion trends and demonstrate the possibilities of using glass.
Price from 118,762 rub.
Add to favorites Remove from favorites
Kitchen set “Anta Gola”
Article on the topic: Do-it-yourself cabinet for gas cylinders
An original model with an Anta Gola handle profile, rounded sides, open artificial stone elements and an interesting color combination. The result is a stylish and fashionable model.
Price from 92,635 rub.
Add to favorites Remove from favorites
Kitchen set “Donato”
For the manufacture of facades of the Donato model, MDF is used, lined with Yellow Pine (American pine) veneer or oak veneer, and decorative elements are made from solid wood of these species.
Price from 89,438 rub.
Add to favorites Remove from favorites
Kitchen set “Sergio”
This kitchen model is interesting for its original facades with milling around the perimeter and decorative elements with Swarovski crystals.
Price from 89,980 rub.
Add to favorites Remove from favorites
Kitchen set "Telaya"
A model in the neoclassical style, which managed to combine square knob handles with facades characterized by warm colors and wood texture of open elements.
Price from 83,945 rub.
Decoration of the facade
After final assembly of the cabinet, it is necessary to carry out finishing work and provide lighting to make the use of the storage as comfortable as possible. There should be no defects on both external and internal surfaces that could lead to damage to stored items. All sharp heads of self-tapping screws must be closed; there cannot be any cracks, streaks, or crevices.
Decorating a built-in wardrobe is quite difficult, because the main decoration is the doors. Mirror canvases are hung on them for the convenience of trying on things or glass, which adds light to the room. As an option, surfaces can be painted, the sketch and colors are selected to match the overall design of the room.
If the built-in closet is large, lighting will be useful for it. It is better to provide it in advance in order to cut out sockets in the frame to accommodate the lamps, and also to mark the gaps through which the wiring will go. LED elements are suitable for illuminating built-in furniture. They are economical and provide enough light for comfortable use of the storage. The most significant nuance is low heating; wooden parts and the things themselves will not be able to catch fire due to overheating.
Some cabinet options can be designed to automatically turn on the light when the doors are moved or opened. To do this, a sensor or switch is placed in the guide, activated by the movement of the sash. This idea will allow you to find things faster and will become the highlight of the storage room.
Article on the topic: Do-it-yourself wardrobe in the garage
You can make a built-in wardrobe with your own hands, but subject to the following conditions: a high-quality drawing must be drawn up, and the correct elements must be found. Such work requires preparation, so if you are unsure of your abilities, you should choose masters. Sometimes it is cheaper, because mistakes entail repairing the built-in wardrobe, which requires not only money, but also time.