Using self-adhesive film you can update the design of any furniture. The properties of the material imply its use for restoration purposes. They can replace cracked laminate and veneer, hide partially or completely damaged facades, completely cover an old cabinet (table) and give them a different look or improve their performance characteristics. The process of updating furniture using self-adhesive film is simple, but it requires some patience and knowledge of the sequence of how to cover an old cabinet with self-adhesive film and what tools will be needed.
How to cover furniture with self-adhesive film.
Man is designed in such a way that he needs to periodically update his environment.
If finances allow, this can be done by purchasing new furniture. But if the family budget does not allow for such expenses, then simply update the façade of the old set using self-adhesive film. With its help, you can give furniture a new look and eliminate defects that appear during its operation.
Recently, self-adhesive film intended for various furniture has become increasingly popular.
How to choose film for furniture
To give your furniture an unforgettable look, you need to choose the right self-adhesive decorative film. Modern industry offers various options for this material. From cheap polypropylene and polyethylene models, to practical polyvinyl chloride cladding.
Every potential buyer can count on a variety of textures and colors.
Strength and durability, maximum safety in use, and a variety of design options can be noted.
In addition to the material that forms the basis of the furniture film, you need to pay attention to the presence of a protective layer. In the kitchen, such a layer is important for protection from high temperatures and high humidity. If self-adhesive film is used to cover children's cabinets and tables, then the protective layer plays an important role here too.
It will help protect furniture from careless handling by a child.
If direct sunlight falls on the set, then cover it with a cladding that has a layer that protects from ultraviolet radiation. Today you can buy transparent models with such a layer.
Without hiding the facades, it will protect them from fading.
The presence of a protective layer adds additional cost to this material. But it’s impossible without him. If you are going to use cladding in the bathroom, be sure to ensure that it has a high degree of moisture resistance.
The coating can be matte or glossy, imitating various materials.
Pasting of objects located near heaters, stoves and other similar appliances is done using a self-adhesive film based on a thermally stable polymer.
The modern assortment is amazingly diverse, so you are sure to find a suitable option for yourself.
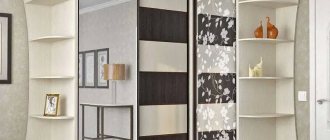
The decorative layer can be made to resemble stone, ceramics, fabric and wood. For furniture, “wooden” cladding or marbled material are suitable. Photo wallpapers have become popular lately.
Especially if they are used for pasting wardrobes.
In addition to furniture, old doors, glass and even walls are suitable for processing with this material. Surfaces covered in this way can be easily washed.
Even a material that is not protected from moisture easily tolerates short-term contact with a wet sponge.
Surface types
The surface of the material plays an important role in pasting furniture of various styles and decorating the room. It can be divided into several types:
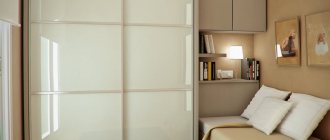
- Glossy. This film is used mainly in those rooms where daylight does not penetrate, or in rooms whose windows face north.
- Matte film is preferred when decorating spacious and bright rooms.
- Transparent is used for gluing glass surfaces as a means of protection against mechanical damage.
- Holographic will be appropriate in any room, as it refracts light. Depending on the lighting angle, its shade may change. The volume of the pasted piece of furniture visually also changes.
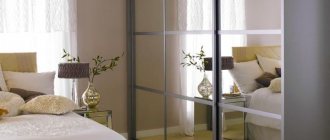
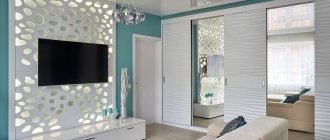
- It is better to use mirror film if the room is small. This way you can visually enlarge it. You can cover the door and cabinet. By correctly combining structures and colors, it is quite possible to achieve a very harmonious and stylish solution.
How to cover furniture with self-adhesive film
One of the advantages of this material is the ability to work with it yourself. There is no need to look for specialists and pay for the service. You can easily cope with this task yourself.
You can successfully use self-adhesive film to protect tables, window sills in any room, countertops and furniture in the kitchen.
The most important stage in facade processing is preliminary surface preparation.
- It needs to be inspected for defects, dirt, loose layers of paint or varnish, protruding pieces of glue, etc. must be removed. Use sandpaper.
It is necessary to clean the base from dust, dirt and uneven surfaces.
Rough and porous surfaces must be primed before gluing the film.
Ideally, the surface should be wooden and varnished.
After cleaning the surface from contaminants, it must be degreased. Thanks to this procedure, you can avoid the appearance of wrinkles during pasting.
Any detergent or alkaline solution is used as a means to degrease the surface.
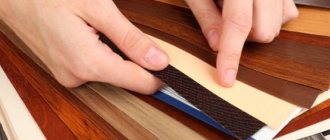
After preparing the surface, we proceed to cutting the material. Sheets need to be cut with a margin. This makes them easier to stick to the surface. If you need to take into account the pattern, then a margin of 2-3 cm is required. Without it, it will not be possible to accurately adjust the drawing. Excess pieces are carefully cut off after pasting the furniture.
To make cutting the material easier, manufacturers print a centimeter scale (grid) on its back side.
Sticking the self-adhesive film is not difficult.
- You need to take a piece cut from the roll and separate the paper from its upper part. The paper should not be separated completely, but by 5–7 cm.
Try to pull the paper evenly.
Carefully smooth the film, it should lie well and no defects should be allowed.
To prevent the appearance of air bubbles between the surface of the furniture and the material, you need to smooth it by hand during the gluing process.
If it is not possible to eliminate bubbles, they can be easily removed by piercing the lining with a thin needle. After gluing, the puncture site will not be visible.
Questions and answers
How to remove old film?
Usually the old film is easily removed from the surface. If the glue sticks very tightly, you can remove it with a scraper; if necessary, the surface can be polished.
What can be used to degrease surfaces other than alcohol?
Any organic or non-organic solvent can be used, but care must be taken that the solvent does not affect the top layer of the furniture.
How long can such a film last?
On average, film can last for 2-3 years without loss of external qualities.
Is it safe to use baby film?
The film should only be of high quality. Poor quality materials may release unsafe compounds.
How to wash film to remove dirt?
Only with a damp cloth using regular detergents. Aggressive agents can damage its surface.
Nuances that may appear when using self-adhesive film
Pasting smooth surfaces will not cause problems for those who are faced with such work for the first time. Difficulty may arise when gluing corners. And here you can use a trick.
To make it easier to bend the corners of the sheets, you need to take a regular hand-held hair dryer and heat the material with it.
It is also difficult for a person who is encountering self-adhesive film for the first time to compose sheets of material. To prevent a gap from forming, the sheets must be glued so that the next sheet overlaps the previous one by 1.5 cm. Then we apply a ruler to the central part of the allowance along the entire length. And along it, using a sharp knife, we make an incision.
Remove the unnecessary strip. The joint will be perfect.
Lighting is important when working with this material. If it is not enough, then it is easy to overlook minor flaws. They will become visible against the general background or in bright light.
Using film you can create unique interior and decorative solutions.
If you purchased a self-adhesive film that sticks to the surface too quickly and is difficult to work with, use powder or talcum powder.
Sprinkle the surface with powder over the entire area and you will not experience any difficulties when adjusting the sheets.
Other stages
Film with a large pattern
How to glue self-adhesive film to furniture with patterns?
You should take the pattern and separate its top layer from the backing.
You should not immediately glue such a film tightly.
It is best to first apply this coating to the surface and find out whether its shape and size fit well with the selected part of the furniture or walls.
Experts recommend gluing this material little by little.
This means that you first need to apply the first 5 cm of such a canvas, then the next 5 cm, etc.
At each of these stages, the film should be distributed over the surface with gentle movements. At the same time, you need to constantly ensure that there are no creases or bubbles.
To do this, it must be ironed immediately using a dry cloth. In order to prevent bubbles from appearing on such finishing material, you should act according to the following principle.
If the film suddenly swells in some places, its surface should be immediately leveled. This needs to be done before it can completely stick to it.
To do this, carefully peel off the film and re-glue it in the same place. If such a coating is applied to a bathroom wall, be sure to pre-coat its surface with wallpaper glue. The film should be glued while the mixture has not yet dried.
The fabric must be smoothed with a dry cloth. Directions of movement should go from the center in different directions.
How to remove self-adhesive film from furniture
Sometimes the problem becomes removing old cladding from furniture. If the material is of high quality, then removing it will not be difficult. But, if you are unlucky and it is very difficult to remove, then heat the surface. Use the same hairdryer.
Warm up the material with it, and it will come off without much difficulty.
Self-adhesive film is an inexpensive modern material that will help update the appearance of furniture and protect it from moisture and ultraviolet radiation. It's not difficult to stick on. The main thing is to do everything carefully and follow the tips described in this article.
Now you know how to decorate and protect furniture and various surfaces with self-adhesive film.
Useful tips
Here are some useful tips regarding applying and caring for the material.
- You should always purchase material with a small reserve. Its size should be approximately 20% of the total amount of coverage. This will avoid trouble in case of errors.
- It is most convenient to cut the film along the internal markings. Usually it is in the form of squares with a side of 1x1 centimeter.
- To glue the corners, it is better to heat the material (with a construction hairdryer or a regular hairdryer). Otherwise, there is a high probability that the self-adhesive film will lie unevenly.
- Clean pasted furniture with a cloth soaked in soapy water. Do not use rough sponges - they can damage the material. The use of aggressive household chemicals is also not allowed.
- Before purchasing a decorative covering, look for photos or videos that show furniture covered with it. Sometimes the film may not adhere very well to the surfaces being treated. It is impossible to understand how good it is in the store.
Rules for pasting furniture with self-adhesive film, recommendations
In order to hide scratches and defects received during the use of furniture or to renew the surfaces of facades and panels, a special film is used. It is durable, has an attractive appearance and a rich color palette. To figure out how to glue self-adhesive film to furniture, you need to consider in detail its features and application methods.
Decoration methods
Don't be afraid to radically change the appearance of your furniture. Nothing is impossible for creative people. Restoration techniques have long been developed. Follow the instructions and you will succeed. To update furniture use:
- decoupage;
- painting;
- templates;
- mosaic;
- artificial aging.
Below we will look at each of these techniques in more detail. Before using any of them, you should definitely repair your furniture (if necessary). It is also advisable to remove the fittings so that they do not interfere with creating beauty.
Material characteristics
Furniture film helps to visually refresh furniture panels that have become boring over time in a short time. With the help of simple manipulations, the procedure can be done with your own hands in a few hours. To do this, you only need the material itself and sharp scissors or a construction knife.
Today, the range of this raw material occupies a leading position among other methods of furniture restoration. Using the material, you can bring any design solutions to life without spending a lot of money.
The popularity of using self-adhesive is due to its following advantages:
- the material is supplied in rolls, making it easy to cut rectangles and squares of the required dimensions;
- the film helps protect furniture from future scratches and chips, and if they do appear, replacing the material will not be difficult;
- self-adhesive film will help save the family budget: you won’t have to purchase a new set if it is possible to update old products;
- no additional tools are required for work;
- well suited for kitchen furniture, protecting it from grease, dirt and other damage;
- the material is easy to clean, self-adhesive compounds can be treated with detergents and gels.
Cost, popular manufacturers
Self-adhesive film for furniture from German manufacturing companies is considered to be the highest quality on the modern market:
- "DC-FIX"
- "FRIEDOLA"
- "ALCOR"
Analogs from are slightly more expensive and their cost averages 150 rubles/linear. m.
When deciding to modify furniture using self-adhesive film, you must first think through its design. If you are not confident in your abilities, you should involve specialists, because only with a competent approach can you create a unique interior of the room as a whole in this way.
Choosing a film based on the type of room
In order for pasting furniture with self-adhesive film to be successful and to serve for many years in the future, you need not only to purchase high-quality material, but also take into account the type of room in which the surface will be used. Raw materials for the kitchen and bedroom have their own characteristics, so when choosing, use the following tips:
- film for furniture intended for the bedroom or living room should not only have an attractive appearance, but also fit into the interior. If previously the fronts of cabinets and tables had a certain color, it is not at all necessary to repeat it - you can purchase rolled products of a different shade, but do not forget about compatibility with upholstered furniture and decoration. For well-lit rooms, a matte film is ideal - its structure will be perfectly visible in sunlight. When choosing a self-adhesive base for the bedroom, pay attention to products that imitate natural materials. Such options would be appropriate for decorating the facades of cabinets and chests of drawers;
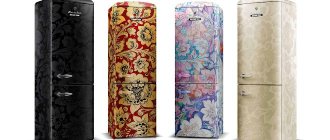
- To make the kitchen set look like new, it can also be covered with vinyl material. For this room, the strength characteristics of the raw materials and the ability to constantly withstand mechanical stress are very important. Gloss would look good here, but remember that the surface requires careful care. Many designers recommend using self-adhesive compounds with photo prints and bright images. The pattern of citrus fruits will suit the kitchen space;
- You can also update the furniture in the bathroom or toilet using this raw material. Thanks to its properties of not absorbing moisture, the pasted surface will not only look beautiful, but also be practical. For the facades of cabinets and cabinets in the bathroom, use options that are consistent with the color scheme of the floor and wall tiles;
- To freshen up the children's room, glue on material depicting your favorite cartoon characters. Children always enjoy new things, and such a surprise will delight them. An assortment of films with fairy-tale characters will help your child make the right choice. The raw material is used to process wardrobes, bedside tables and even tables for doing homework. If your plans do not include a complete replacement of the appearance of the furniture, you can stop at using individual patterns for decoration.
To update the outside of glass cabinets and display cases, treat the furniture with a transparent self-adhesive film. This material often has a small printed pattern that will help diversify glass facades.
When choosing a material, think carefully about the future design. Some varieties of holographic or glossy films can have the opposite effect and create a cluttered feeling in the room.
How to cover a kitchen set with your own hands
You can improve the appearance of your kitchen set using a technique such as pasting. There are more than enough options, it all depends on tastes and preferences. The choice can be made in favor of:
- self-adhesive film;
- interior stickers;
- decoupage techniques;
- photo wallpaper.
During restoration, interior stickers can be used; they are made of PVC, which is resistant to moisture. This characteristic is very important for using the material in the kitchen.
Designers will reveal the secrets of a unique headset upgrade.
Applying such pictures on different surfaces is easy. But there are some rules. With their help you can do the work at a professional level:
- the surface for applying the pattern must be cleaned of dust and dried;
- smoothing occurs in two stages: from top to bottom and from the center to the edges;
- the application of the sticker must be consistent;
- After completing the work, go over the design with a soft cloth.
Using this material, you can play with the design, transform the room, and place emphasis on individual fragments.
It doesn't take much effort to breathe new life into old kitchen furniture.
The decoupage technique is not inferior in popularity. The technique is based on cutting out various elements and materials such as:
- textile;
- paper;
- leather;
- napkins and so on.
Maintaining the correct sequence of actions will help you produce high-quality and attractive work.
For an interior in an ethnic country style, Provence restoration of a kitchen set may involve the decoupage method, which is widely used by modern designers.
Waterproof wallpaper will also be an excellent solution for decorating some part of the kitchen.
Important! Photo wallpaper can only be applied to the front part of the kitchen unit. To ensure that the side parts do not differ in appearance, they should be pre-painted, choosing the color of the paint to match the general appearance of the photo wallpaper. The paint should be applied in two layers.
It is noteworthy that it is possible to update the kitchen façade using this method even on plastic coverings.
Vinyl film
The price per square meter of film has a significant range, this is due to the quality of the product. In order for the renovations to retain their pleasant appearance for as long as possible after restoration, you should not skimp, it is better to give preference to options in the mid-price category.
Pasting kitchen facades with self-adhesive film is the most budget-friendly option for updating an old kitchen set with your own hands.
You can do the pasting process yourself by following the correct sequence of steps:
- Dismantling the fittings, removing dirt from the surface and degreasing.
- Opening the film (this is done from the wrong side according to special markings).
- Rolling out the film around the perimeter of the facade with gradual removal of the protective layer.
- Leveling the pasted surface using a special spatula (it is important to perform the movements correctly, from the middle to the edges).
- If necessary, seal air pockets.
This sequence will ensure a high-quality finish.
Manufacturers offer a wide range of self-adhesives of different colors and textures: matte or glossy, textured and smooth, with or without patterns.
Note! If the layer of adhesive paper is distorted, it must be immediately removed and replaced with a new one. You cannot reapply the same piece!
Application technology
Before sticking the self-adhesive film on the furniture, you need to prepare the tools for the job. These include:
- scissors and a sharp utility or construction knife
- soft fabric to smooth out wrinkles;
- roller for removing air from the material;
- solvent;
- primer mixture;
- medium-dispersion sanding paper.
In the process of pasting furniture with film, it is first necessary to prepare the surface of the products by treating them with a special composition. For this, a primer is used, which improves the adhesion of the two planes.
Preparation proceeds as follows:
- tighten all hinges and fasteners of the furniture product. Also check that all screws are screwed in completely; if this is not done, small protrusions will be visible on the glued surface, which will significantly affect the aesthetics of the appearance;
- examine the furniture for cracks and chips. If there are any, they must be removed using putty. Gently apply the mixture to the defect areas and fill the voids. After drying, treat the areas with sandpaper - this will give greater adhesion to the surface to be pasted;
- The next step will be degreasing the plane. Before gluing the film to furniture, soak the fabric in a solvent and go through all the corners and hard-to-reach areas of the furniture panel that will be treated with the material.
When the surface preparation is completed, we proceed directly to the gluing process itself. To avoid shortcomings, follow the proposed algorithm of actions, which can also be found in the video in the article:
- take the necessary measurements of the furniture to cut the required pieces of material;
- using scissors, cut from the roll exactly as much as is necessary for gluing the surface;
- before gluing the furniture panel, remove the material by 10 cm from the protective layer so that the adhesive base is exposed;
- attach a piece of raw material to the furniture with an adhesive layer and gradually, smoothing the film with a roller, remove the remaining material from the protection;
- It is necessary to smooth the plane from the edge that is already glued to the area that you are going to glue. In this way, it will be possible to avoid the formation of folds and wrinkles on the surface being pasted.
There is another method of treating furniture with film, which is based on the use of a wet solution of water and soap. Here, gluing the raw materials correctly will not be difficult. In this case, the protective layer is completely removed and the material is placed on the floor, face down. The solution is applied to the adhesive layer using a sprayer, after which the film is applied to the surface. It is appropriate to stick the material using this method when there are large areas of finishing, when it is difficult to achieve a perfectly smooth surface.
How to cover furniture with self-adhesive film: master class + tricks and tips
About the types of self-adhesive film, about its properties, the subtleties of its gluing and care for it - in our review.
Self-adhesive film is a simple and affordable way to quickly update furniture and hide its defects (scratches, abrasions). Of course, in terms of resistance to external influences, the film cannot compete with, for example, wood or natural stone, but with proper care it can last for quite a long time, and besides, it can be quickly changed.
Painting furniture: 5 main rules and master class
What is self-adhesive film and how to choose the right one
* Self-adhesive film, also known as self-adhesive film, is a film with a decorative design on one side and an adhesive layer on the other side. To protect the adhesive layer from dust and damage until use, it is covered with a paper backing. When gluing, the paper base is removed, and the film is glued to the surface to be decorated with the adhesive side.
Wood-effect film on a coffee table
* The top layer of self-adhesive can be different: it can be made of glossy or matte vinyl or plastic, it can be dense or translucent, metallized or paper. Plastic and vinyl films are usually the most durable and can be wiped down and washed frequently. Metallized is usually more susceptible to water, its top layer can be damaged, so it is better to use it on those items that will get dirty less and be wiped less often. It is generally better not to expose paper film to water.
It is better to use metallized film to cover surfaces that are not very exposed to external influences.
* The base most often has markings - this is convenient.
* Thick film is usually used to cover furniture, window sills, doors, while translucent film is used for glass and mirrors. There is also a special colored translucent stained glass film for creating a stained glass effect on glass.
Translucent matte film on glass
* In terms of color and texture, the film can be very different - for different types of stone, wood, fabric, leather, plain, with a pattern, patterned, textured, glossy, matte, velor and so on.
* The film can also be protected from ultraviolet radiation - this means that, when exposed to direct sunlight, it will not fade or change its color.
* The choice of film also depends on the surface you are covering. For a surface that is not completely smooth, it is better to choose the so-called cast film. It is somewhat more expensive, but more flexible. If there are protruding heads of screws, rivets, or nail heads on the surface, it is also better to use cast film. The so-called clandered film is usually cheaper, but not so flexible: it is better to use it when you need to cover large, flat surfaces.
* Textured, textured, patterned film will help hide flaws and unevenness of the original surface. And smooth, metallized, glossy, on the contrary, will emphasize them.
*Usually, water, a cloth and liquid detergent are enough to clean the film. Do not use abrasives or acetone.
How to paint a carpet (and why to do it): master classes + ideas
How to work with self-adhesive film: master class
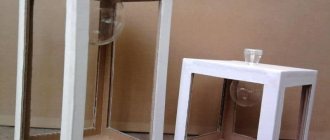
To understand the stages of work, let’s look at a simple project: covering the top of such a bedside table with film.
You will need:
- ruler or measuring tape;
- to smooth the film - an unnecessary credit card, a plastic spatula, a dry soft cloth;
— depending on the condition of the surface, you may need medium and fine-grained sandpaper, primer and putty.
Step 1
First you need to prepare the surface. Wash it, dry it and degrease it, wiping it with alcohol. If the surface has significant unevenness, it may be necessary to fill the holes and/or sand it first with coarser sandpaper, then with fine sandpaper. After sanding, carefully remove all dust and degrease the surface. In some cases, you can apply a layer of acrylic primer (if the surface is not perfectly flat, if the pasted item will be subject to mechanical stress and you need particularly strong adhesion to the film). It is better to cover a wooden surface without varnish with a layer of polyester or primer varnish.
Step 2
Try on how much film you need to cut. For a small surface, simply apply the film, measure the larger surface and transfer the dimensions to the film.
Step 3
Cut the film with a margin of several centimeters.
Step 4
Peel off a section of the paper base from one edge and apply the film to the surface to be pasted.
Step 5
Press the film, starting from the middle, and smooth it to the sides.
On wide surfaces, glue the film in the sequence shown in the photo: from the center to the sides.
Step 6
Do not glue all the film at once. Gradually separate it from the paper base, glue it and smooth it with a card or spatula. If the film lies unevenly, you can peel off a piece and re-glue it.
Step 7
Having reached the corners, cut the film as shown in the photo...
...and glue the pieces one on top of the other, overlapping.
Step 8
Glue the film on the end sides in the same way, first by hand, then smoothing it with a card or spatula. If there are excess pieces of film remaining, cut them off with a breadboard knife.
Step 9
Finally, for the best fit of the film, walk over it with a soft cloth, pressing well.
Short course of rehabilitation
It happens that we inherit old cabinets from our grandparents. They are very strong, made not from MDF or chipboard, but from solid wood. Which in itself is valuable. But the appearance of such products does not always meet the requirements of modern design. Therefore, it is a pity to throw away old furniture and cannot be used. Restoration helps correct the situation. There are expensive, there are budget options and techniques. A detailed review will help you find out how to decorate your closet. But first you need to find out how to prepare for work.
An easy way to restore a cabinet Source avatars.mds.yandex.net
Restoration must begin with an inspection of the object. Then dismantling is carried out. You need to remove the doors and shelves, disassemble the box, replace fasteners and fittings. If this is not possible, you should clean the removed metal parts from corrosion with sandpaper. Afterwards, the dirt is cleaned and the old coating is removed.
It all starts with preparation for restoration Source avatars.mds.yandex.net
To do this, first, the disassembled elements are thoroughly washed with water, then they are dried for at least two days. The next stage is sealing defects. Construction stores sell special putties for wood. They are suitable for filling large cracks, holes left by nails, and scratches.
Putty is a quick way to eliminate minor defects Source www.woodguide.org
The mixture is applied in several layers. A new layer is applied to the well-dried previous layer. Minor defects can be removed with furniture wax. You can start decorating the old cabinet only after the preliminary work has been completely completed. The following solutions are suitable for this.
Gluing wallpaper
It is better to use vinyl rolls and special glue. They are glued to the furniture point by point. You can use them to decorate all external and internal parts of parts. In both the first and second cases, drawings and patterns are first made, with the help of them pieces are cut out from the rolls, and they are already glued to the surface of the cabinet, smoothed with a dry cloth or a soft rubber roller. Once reassembled, the result is fun furniture.
Wardrobe decor with wallpaper Source img.superdom.ua
Decor with wallpaper in Shabby Chic style Source i.pinimg.com
Wallpaper and painting of an old shelving Source kakpostroit.su
Applying a three-dimensional drawing
You can decorate the cabinet using textured plaster. Using it, a three-dimensional pattern is applied to defective areas. To work you need the mixture itself, a spatula and a stencil. It is prepared in advance according to drawn sketches or purchased at a hardware store.
Putty using a finished stencil Source stroyfora.ru
The stencil is glued to the surface of the furniture with tape. Using a spatula, decorative plaster is applied directly on top of it. After it sets slightly, the stencil is removed. The drawing is thoroughly dried. At the final stage, it is coated with acrylic varnish. The result is an ornament that looks very interesting, and this is once again proven by the following photo.
Drawing created on a wooden base using textured plaster Source ckbo1.com
If you want to decorate old furniture using painting or stenciling, you should choose no more than three colors to create them. It’s good if they match the colors of the decoration or textiles. In such a situation, the restored cabinet will become part of the interior and will not look like an alien object.
Using putty you can create even complex bas-reliefs Source avatars.mds.yandex.net
We cover it with fabric
Another original, affordable way to restore a cabinet is to cover it with fabric. You will need cotton material of a suitable color and pattern, PVA glue, acrylic paints and acrylic varnish. When everything is assembled, proceed as follows:
- carefully coat the surface of the wooden elements with glue;
- carefully apply the pre-made fabric blanks;
- use a roller to smooth out the formation of bubbles and wrinkles;
- Apply a second layer of glue on top;
- we apply additional decor (buttons, beads), apply braid (to secure it all well, it’s worth putting everything on Moment glue);
- thoroughly dry the surfaces;
- Cover with a layer of acrylic varnish (twice).
It is better to cover doors and sides of cabinets with fabric.
Wardrobe with fabric trim Source www.bestfurniture-bg.com
Restoration of furniture with fabric Source magazin-mebeli-spb.ru
Mastering decoupage
A beautiful wardrobe decor is achieved by making an applique on wood. Art stores sell ready-made kits that contain everything: PVA glue, paints, fixatives, paper napkins with a pattern. The technique for creating decoupage is extremely simple:
- the surface of the cabinet is first cleaned of the old coating;
- then degreased with white alcohol;
- after the base has dried well, it is coated with glue;
- carefully remove the top layer on which the design is printed from the paper napkin;
- it is applied to a surface coated with glue and gently stretched on it;
- another layer of PVA glue is applied on top;
- when the drawing dries well, it can be further refined with paints and brushes, draw an outline, create shadows;
- At the final stage, the cabinet is completely coated with acrylic varnish in two layers.
Decoupage - a simple restoration technique Source modernplace.ru
One technique in the design of different pieces of furniture Source pbs.twimg.com
The decoupage technique is easy to master; it helps to significantly transform the appearance of furniture. Many designers use this decoration technique and deliberately age new interior items. In this way, they emphasize the chosen style and create a cozy, homely, warm living space.
Decoupage in Provence style Source avatars.mds.yandex.net
Decoupage of an antique cabinet Source vseme.ru
We paint old furniture
Experts, talking about how to update an old wardrobe, advise conducting “experiments” with paints. To do this, you need to buy paints of dark and light shades, two or three bright colors, transparent acrylic varnish and shellac, furniture wax and fine-grained sandpaper.
Painting and decoupage of an old cabinet Source avatars.mds.yandex.net
Transforming an old cabinet with paint Source i.pinimg.com
Using all this, you can restore furniture, emphasizing the effect of its wear. It is formed as follows:
- the thoroughly pre-cleaned surface is covered with dark paint;
- after it has completely dried, a layer of light paint is applied on top;
- The surface is fragmentarily cleaned with sandpaper and abrasion is imitated;
- The painting is manually applied with bright colors (you can also use a stencil);
- after drying, the pattern is treated with furniture wax, it is rubbed thoroughly with a brush, the ornament is completely covered with wax (it is important to achieve a uniform shade);
- After twenty-four hours the cabinet is varnished in two layers.
If you then attach new fittings to it, the restored furniture will look more presentable.
Paint can completely change the appearance of old furniture Source remont-samomy.ru
Old and new version Source i.pinimg.com
Tulle instead of stencil Source i.pinimg.com
Making craquelure
There are compositions on sale that help turn old cabinets into antique pieces of furniture. To create this, you need to buy two-phase craquelure varnish, acrylic varnish with a mat texture, gold powder (it is made from fine powder of non-ferrous metals - bronze, aluminum, copper), and then perform the following procedure:
- apply craquelure varnish in one layer to the cleaned surface of the cabinet, wait until it sets, but does not completely dry;
- apply a second layer of craquelure varnish;
- We wait until characteristic cracks appear and dry well;
- dip a soft sponge into gold powder and rub the cracks with it;
- We cover the top of the product with acrylic varnish.
Craquelure paint and old patina give a special look to the design on the cabinet Source berkem.ru
Craquelure paint for furniture Source mebburo.ru
Patination of craquelure in restoration Source deko-kom.ru
Anyone who doesn’t know how to decorate an old cabinet can watch a master class. It describes in detail each stage of working with special compounds. Instead of gold powder, sometimes specialists use bitumen wax or “dry pastel”. These are special compositions used by furniture manufacturers to create special decorative effects.
The video gives a detailed overview of craquelure compositions:
How to reliably cover a cabinet with film?
To improve the design of a room, it is not necessary to resort to buying new furniture. You can use the option of covering the cabinet with film. This method will give old furniture an unforgettable look and will save the family budget. To do the work yourself, you need to familiarize yourself with the gluing technology, prepare the necessary tools, and study all the possible problems that you may have to encounter in the process.
Decorate with mosaic
Mosaics from broken tiles are very easy to make with your own hands. The article “Creativity from leftover tiles” has a complete guide to action. Such a wardrobe or chest of drawers will look especially elegant in Mediterranean styles. You can also purchase ready-made mosaics in blocks.
Criteria for choosing self-adhesive film
Before choosing film for a cabinet, you need to know what it consists of and what criteria to choose. The film has 3 layers:
All layers play their role. The very first one is made from:
- Vinyl, PVC or polyester are the most durable materials, the use of which allows you to glue the film to the front sides of the cabinet and are not afraid of damage.
- Staniol is a material that is susceptible to damage, so gluing should be done on the surface of hanging cabinets.
- Paper is a fragile material, easily damaged, it is best used for pasting the end sides of racks.
The film can be single-layer or double-layer. Single-layer is more durable, formed into rolls. Two-layer is made of a base and a top layer, but is less durable.
When buying self-adhesive film, you need to take into account the moment on the surface of which furniture it will be used. If it is in the kitchen, where it is constantly exposed to temperature changes, or in a children's room, where there is always a threat of spoilage, a protective layer is needed. The protective layer has:
- moisture resistance;
- protects against ultraviolet radiation;
- thermally stable.
Cheap options do not contain a protective surface.
Cover with fabric
This method gives a smoother, more textured look than wallpaper. It is better to cover large elements such as wardrobe doors with fabric, fasten them with a furniture stapler or with glue. It is interesting to choose leatherette as a fabric for a luxurious look.
Fabrics made from pieces using the patchwork technique will make your closet more comfortable and will help you fit it into a child’s room or into styles such as Provence and country. The style can be embodied with wallpaper or film if you cover the panels of the drawers with materials with different patterns.
Wardrobe pasting
Before starting work, preparation of the necessary raw materials and tools is required. Everything is prepared taking into account all the problems that may arise.
Required tools and materials
Tools and materials:
- Wood putty, primer - will be needed if the surface of the cabinet requires correction of unevenness.
- Coarse sandpaper.
- Self-adhesive.
- Pencil, ruler or tape measure.
- Sharp scissors, knife.
- Dry, soft cloth, rags - smoothing the material.
- Degreasing mixture.
- A roller or special devices for smoothing the surface and removing air.
- Spray bottle with soap solution.
- Talc, powder.
- Hair dryer.
Preparation
Preparatory steps are important in the process of gluing old cabinets. Preparation stages:
- Check doors and walls for protruding nails and screws. Additional furniture elements should be tightened well. Everything must be hidden and tucked up, otherwise it will affect the quality of the pasting and the appearance of the finished product.
- The cabinet should not contain cracks or irregularities. If they are present, use putty to correct: The mixture is applied in a neat layer to the defect.
- Wait until completely dry.
- Sand the surface with sandpaper to make it smooth.
Restoration of facades with decorative film
The appearance of the kitchen largely depends on the cladding of the facades. If your kitchen has smooth doors without a relief made of chipboard, then they can be easily covered with vinyl film.
Updating kitchen MDF facades with convexes will be easier if you use an industrial hair dryer. Only a well-heated film can take the desired shape. If there are decorative details on the facades, they must be removed before pasting.
Replacement of the old film is carried out only after removing the previous layer. Remember that decorative film is only applied to prepared surfaces.
It should be taken into account that in production, MDF film facades pass through a special press, which makes it possible to obtain a smooth surface without flaws. At home, MDF can only be covered with self-adhesive.
Possible problems when gluing the cabinet
Every job can cause problems. When pasting a cabinet, a person may encounter some difficulties:
- Taping corners can cause the problem of poor bending. To solve this you will need a hairdryer. It warms up the film and it becomes more elastic.
- An even joint cannot be obtained; the material diverges, forming a gap. To solve this problem, each subsequent canvas is superimposed on the previous one with an overlap of 1 cm, then a metal ruler is applied along the center and a cut is made with a stationery knife.
- Using the dry method, problems may arise with the rapid gluing of surfaces. This can be avoided by using talc or powder sprinkled onto the surface.
- If, after gluing, large inaccuracies are noticed, it is better to remove the film. To do this, use a hairdryer, it will heat the surface and the adhesive base can be removed without difficulty. Remove the remaining adhesive base with solvent.
- When bubbles form, take a regular needle and pierce the place where the air accumulates. Then, by lightly pressing, the air is expelled, the film in this place is smoothed out.
Paint
Paint will be a real savior in furniture restoration. Before applying paint, sand the surface and coat with primer.
You can simply paint the cabinet in 1-2 colors, or you can paint a real picture on it. If you don’t have enough artistic skills for painting, you can make a drawing using a stencil. Geometric lines and shapes can be easily created using masking tape - it will serve as a smooth border for the paint. And for more complex patterns and pictures, the stencil will have to be made specially.
We talked about ways to transfer images to surfaces here: “The Happiness of Drawing on Walls.” And this link contains detailed instructions for using stencils: “Experiment: painting a wall using a stencil.”
How to cover an old cabinet with self-adhesive film
Using self-adhesive film you can update the design of any furniture. The properties of the material imply its use for restoration purposes. They can replace cracked laminate and veneer, hide partially or completely damaged facades, completely cover an old cabinet (table) and give them a different look or improve their performance characteristics. The process of updating furniture using self-adhesive film is simple, but it requires some patience and knowledge of the sequence of how to cover an old cabinet with self-adhesive film and what tools will be needed.
Similar articles:
DIY cabinet decoupage DIY cabinet repair DIY cabinet decor How to paint a cabinet with your own hands
Selection of self-adhesive film
To choose a self-adhesive film for decorating an old cabinet, you need to familiarize yourself with the properties and characteristics of this coating, pay attention to the structure, base material, type of surface, decorative design and purpose.
All films are based on polyester, propylene and polyvinyl chloride. Additionally, plasticizers, stabilizers, pigments, paper, natural and synthetic fabrics can be added.
Self-adhesive film consists of three main parts:
- The surface is made from paper, polymer film or metallized foil.
- Acrylic or rubber adhesive base.
- Protective backing made of siliconized paper. Retains the adhesive side of the film and peels off before gluing.
There are calendered films that can stretch under the influence of high temperatures and shrink during the cooling process. They are best used to cover cabinets with even, smooth fronts. If you need to decorate rough or corrugated facades with self-adhesive film, or hide existing protrusions, preference is given to injection molded materials.
The surface fabric differs in structure, it can be:
| Single layer: | All the constituent components, including resins, plasticizers, stabilizers and pigments, are mixed together and formed into a thin film by hot roll rolling or extrusion. |
| Double layer: | It is produced by applying polyvinyl chloride resin to a fabric or paper base. The result is a plastic material. Its technical characteristics are slightly lower than those of a single-layer one. |
If all quality characteristics affect durability and scope of application, then the appearance of the furniture depends on the type of surface. The following types are distinguished:
- Glossy film – has high reflectivity. It can be used to cover the façade in dark and small rooms.
- Matte – has a soft surface. The canvas is used in good lighting.
- Mirror.
- Transparent coating - excellent for treating glass elements in facades.
- Holographic material.
When choosing, take into account the size of the parts that will be pasted over. You need to purchase the most suitable roll of film to avoid a lot of waste. The length can be 2 and 15 m, the width is 45, 67.5, 90 cm.
Which film should I choose?
First of all, you need to look at the thickness of the material and the manufacturer. German “self-adhesive” tapes are of good quality; their price depends on the thickness.
Dutch and Italian manufacturers have proven themselves to be excellent. You can choose something from budget series or take a closer look at exclusive products, but then the price will be quite high.
The most inexpensive are Chinese adhesive decorative materials from unknown manufacturers. However, low price should not be the main selection criterion, otherwise a beautiful kitchen decorated with self-adhesive vinyl film can quickly lose its appearance.
Not all adhesive materials intended for promotional products can be used in the interior. Some of them are designed for short-term use. Choose high-quality decor, and then the restoration will be durable, and a simple kitchen cabinet will become an interior decoration.
The color can be any. If you want to take a creative approach to kitchen design, place photos of fruits, vegetables or flowers on the facades, thereby decorating ordinary old furniture. The drawing can also be applied using photo printing.
Wardrobe pasting
The process of updating furniture using film is not difficult, but it requires patience and knowledge of how to cover a cabinet and what tools will be needed.
Required tools and materials
To start updating your cabinets, in addition to adhesive tape, you will need a number of available tools:
- ruler or tape measure;
- pencil or marker;
- scissors, stationery knife;
- silicone spatula or dry rag;
- spray bottle with soapy water;
- hairdryer
Preparation
Gluing a polished cabinet with self-adhesive film begins with preparing the surface. From the very beginning, all removable fittings are removed. For convenience, you can remove the doors from their hinges.
All furniture must be carefully inspected for protruding fasteners, chips and cracks in the coating, since all these defects will appear in the future. Self-tapping screws and bolts can be easily tightened with a screwdriver or wrench, but unevenness will be more difficult to deal with. You will have to level the surface with putty and then sand it with sandpaper.
After leveling, begin cleaning and degreasing using any detergent and ethyl alcohol.
If the cabinet is made of wood, MDF or chipboard without additional coating, you can apply a thin layer of furniture primer and let it dry to enhance adhesion.