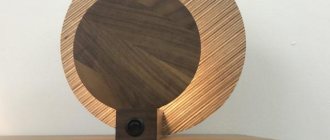
I've been thinking about making some of the lovely hardwood floorboards left over from my uncle's house, it was a shame to see such a great material go to waste. After watching a lot of videos on the Internet on how to make a mug out of wood, I decided to make a larger mug, but improved the idea a little. I also had a piece of deer antler, and I decided that it would make a good handle for a mug.
This mug is suitable for anything - you can cosplay as a Viking and have it hanging on your belt, you can use it for butterbeer in a Harry Potter role-playing game, or just to impress your friends.
Preparing wood, dissolving boards into blanks
First of all, the board must be dissolved into slats from which the mug will be assembled. This can be done using a stationary circular saw or a hand saw with a ruler. The thickness of the slats must be at least 1.5 cm. Otherwise, there will subsequently be problems with fastening the handle.
The board unfolds into slats of the required thickness PHOTO: youtube.com
Each slatted piece is carefully processed using an electric planer. But here it is quite possible to use a regular manual one.
The slats should be as smooth as possible PHOTO: youtube.com
Next, each rail is aligned in width. By the way, when working with machines, do not forget about safety precautions. Violations can lead to serious injuries, sometimes even incompatible with life.
The slats need to be aligned not only in thickness, but also in width PHOTO: youtube.com
When long slats are processed, they must be cut into pieces of the required length. The result should be wooden blocks with dimensions of 15x30x180 mm. Further work will be done with them. In order for them to be tightly connected, you will have to use a milling machine, with the help of which one of the edges of each block will become convex, and the second sunken.
The blocks are ready, you can start working with a milling cutter PHOTO: youtube.com
Making a handle from the same solid wood
To make a handle, you will first need to make a pattern out of cardboard, and then cut out a part using it. The handle is processed and fitted into place. If everything is fine, then you can proceed to fixing it on one of the wall elements.
The handle has been tried on, everything fits perfectly PHOTO: youtube.com
Attaching a handle to a wooden mug
2 holes are made in the handle into which dowels are driven with PVA glue. They are used to mark the drilling locations in the sidewall of the mug. You need to drill the sidewall with a limiter that will not allow you to make a through hole.
Holes for dowels are drilled in the sidewall PHOTO: youtube.com
The tongues are lubricated with glue, as is the plane on which they are located, after which the handle is connected to the mug and the parts are tightened with a clamp. You shouldn’t take it off for the next 5-6 hours.
The tongues are coated with glue, after which the handle can be installed in place. PHOTO: youtube.com
So let's get started and check out this new path!
DIY stepladder made of wood
Referring to my first inscribed mug, which I wrote about above, I should mention that it stayed for quite a long time: about 10 months. After this, the graphics disappeared and left no traces, so they can be applied again. I think its longevity is compromised by washing on the rough side of the sponge, which is not recommended for mugs decorated with these markers. Therefore, if you want to enjoy your design or lettering for as long as possible, wash it only on the soft side and never put it in the dishwasher.
What you need:
– marker – I bought a sharp industrial one (for all surfaces). – ceramic cup/plate (depending on what you want) – remember to use dishes that can be used at high temperatures. – idea – you can write words from your favorite songs, draw something funny or personal – be creative.
How to do it:
1. Write on the mug with a marker. 2. Correct the previously applied inscription if there are any inaccuracies. 3. Bake the mug for 45 minutes at 220 degrees in the oven
It is important to put it in a cold oven so that it warms up gradually and does not crack
Improved idea: Here's what you've been waiting for. My last idea will help your graphics continue to emerge unscathed. What is this? two-step baking! It is so simple. So once you've made your creation, wait until the cups have cooled completely (this could be the next day). Trace all the lines again with a marker and bake again for 45 minutes at 220 degrees. I guarantee you will be satisfied.
And here you can see the baking process. My second mug is signed on both sides. I wrote: "I put redbowl in my coffee and now I can see sounds" - I thought it was funny when I first came across it online. On the other side of the same cup I wrote: e = mc2 energy = milk * coffee 2. and agree with my daily recipe. I always make 1/3 cup with milk.
Printing on a mug at home
Decoupage
This is a low-cost technology: you will need a regular color printer, a sheet of photo paper, acrylic paint, PVA glue and a mug.
- Print the image. Cover the outside with several layers of varnish. After it dries, wet the underside of the photo with water and carefully remove it.
- Wipe the surface with a swab soaked in alcohol. After drying, apply acrylic paint (1-2 layers).
- Cover the bottom part of the photo with PVA and glue it to the mug. Remove any unevenness with a sponge or brush. When the image is completely dry, you can coat it with varnish.
The pasted paper makes the drawing stand out. However, such cookware is not intended for intensive use. The drawing may come off. In addition, the decoupage product should not be placed in the dishwasher or washed with very hot water.
Cold decal
To avoid distortion of the design, take a mug with a smooth surface. The color does not have to be white, as long as it matches the colors of the photo.
- Select a high resolution image. Check if it matches the dimensions of the cookware.
- Print the photo on paper that allows you to transfer the design onto the mug. This paper is sold in office supply departments.
- Coat the paper with acrylic varnish, it is sold in building materials stores. Let it dry.
- Cut out the dried picture along the contour and soak in water (1-2 minutes).
- Peel off the backing and apply the design like a decal. While the paper is wet, you can adjust the position of the design.
- Once the photo is in place, let it dry. Drying time depends on the type of transfer paper and is indicated in the instructions for use.
- Ceramic dishes can be placed in the oven for a few minutes and heated so that the paint particles bake.
- To remove dirt, wash the mug thoroughly. After this, the drawing can be varnished.
The design applied using cold decal is distinguished by clarity and color saturation. It is less susceptible to mechanical stress than decoupage, but is washed off with water over time.
New Year's flying cup
DIY wooden stools
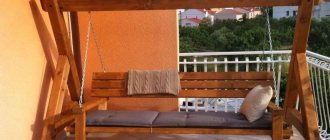
A floating cup in New Year's style will become an original decoration of the New Year's interior. Snow made of cotton wool or padding polyester, a Christmas tree made of a pine cone or a cypress branch, a small figurine - what could be easier to create a winter New Year's entourage!
Christmas trees can also be made from New Year's green tinsel. White paint or a simple note corrector can imitate snow on them. You can determine the characters yourself when creating your New Year's story in a floating bowl!
A candle will add warmth and light to your cup
Winter cup with snow sparks
Multi-colored garland
You can create decorative elements for a cup with your own hands from almost nothing; for example, making such small gift boxes will not be difficult. You can leave a note with your wishes in the form of a small envelope.
A flying cup decorated with Christmas-style candles, flowers and New Year's balls will give you a festive Christmas mood.
Reveals the secrets of creating a festive New Year's flying bowl in his master class by Nika Shvetsov:
Other winter concepts
DIY wooden hanger
There are options that require a small height between the parts. You can do without a metal frame by simply laying the mug on its side. As a decorative element, a figurine of a polar bear looking out from a winter snow-covered den located in the depths will look interesting.
You can make a cup and saucer craft in a Christmas style, here biblical motifs will come to the rescue. Figures can be purchased ready-made or made independently, for example, from polymer clay. Since the plot will most likely be large, you should take a large dish or plate to accommodate the entire scene.
Ceramic tableware
DIY wood stain
Ceramic mugs fully reveal the taste and aroma of hot drinks. Other advantages:
Ceramic cups maintain temperature well, which is very important in winter and autumn. This is also convenient in the workplace if you are used to pouring hot tea and drinking it slowly between times. Ceramics is an environmentally friendly and safe material. Any design of mugs according to your order is possible. But when choosing such a mug, remember that ceramics easily absorbs the smell and taste of a certain drink, so it is better to always drink only tea or only coffee from one cup
The appearance of ceramic mugs is specific: they are quite massive and will not look harmonious in every interior.
But when choosing such a mug, remember that ceramics easily absorbs the smell and taste of a certain drink, so it is better to always drink only tea or only coffee from one cup. The appearance of ceramic mugs is specific: they are quite massive and will not look harmonious in every interior.
Necessary equipment
Before purchasing equipment, you need to decide on the location where the workshop will be. The equipment takes up a lot of space. A barn, garage or spacious room will do. Room temperature must be maintained at 18-22°C.
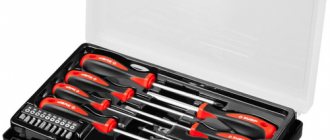
The set of necessary equipment includes:
- grinding device;
- drilling machine;
- lathe;
- a circular saw;
- electric plane;
- set of cutters;
- chisels;
- needle files;
- files;
- jigsaws;
- carpenter's plane.
This is a professional set that involves in-house production. Such a device will cost about 40,000 rubles.
Craft materials
A person who sees this product for the first time has a question: how does a floating cup with flowers without support maintain balance in the air? This happens thanks to a little trick carefully hidden behind the decorations. If you want to surprise your friends or add a touch of originality to your interior, you will need the following:
- Cup and saucer.
- Reliable adhesive (Second, super-moment, Mars), designed specifically for smooth materials such as glass or ceramics.
- Thick wire, plug or two-core cable.
- Thermal gun.
- Scissors, pliers.
- Decorations according to your idea - shells, roses, pine cones, small toys, sweets, beads, buttons, tinsel.
- Modeling compound or super plastic.
It is best to use dishes from a coffee set, as they are usually small in size. A glue gun is used to work with uneven and rough surfaces, and for the rest use regular Moment glue. A metal hanger or aluminum fork will do.
“Pendant” and “leg” parts
These parts have the same diameter - 10 mm and differ only in length, so one drawing can be made for them. We set the length of the legs a little longer than for pendants, so that the assembled product is more stable during operation and does not tip over (Fig. 55).
Rice. 55. Drawing of the “pendant” and “leg” parts
The pendants and legs are simple in design, so they are best processed with hand tools. The total length of the six pendants and three legs is 750 mm. But making all the parts from one long piece will not be very convenient. Therefore, taking allowances into account, we will take two blanks: one 450 mm long for five pendants and one 400 mm long for one pendant and three legs. The cross-section of the blanks is 15 x 15 mm. The manufacturing technology for these parts is outlined in the technological map (Table 8).
Table 8
Routing. Manufacturing of “suspension” and “leg” parts
Manufacturing and processing of the bottom
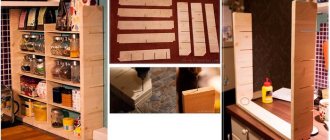
In order to find the diameter of the circle, you need to assemble the resulting wall parts together. For their temporary fixation, it is most convenient to use plastic clamps.
By tightening the ties you can find the diameter of the future bottom PHOTO: youtube.com
Having outlined the required circle, it is necessary to cut out the future bottom and painstakingly polish the planes and side edges. This can be done manually, although machines will greatly reduce the time spent on work.
The cutter is excellent at processing ends PHOTO: youtube.com
Next, after replacing the cutter, you need to chamfer one of the corners of the bottom. This will allow the elements of wooden walls to be placed on it as tightly as possible. But for this, the blocks will still have to be slightly modified.
Using a cutter, a chamfer is removed from one side of the bottom PHOTO: youtube.com
Refinement of parts of the side walls of the mug
Now, having adjusted the reach of the circular saw blade, you need to make 2 cuts on any part of the walls so that you can select a groove. Specifically, the bottom will go into it during assembly. If you have the right tool, this is not difficult to do, although with due diligence and desire, similar work can be done using an ordinary saw and chisel.
When the groove is selected, all the elements are brought together and temporarily fixed with ties.
You can clearly see how the elements are connected to each other PHOTO: youtube.com
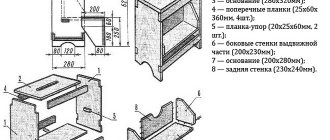
Development of drawings of product parts
Initially, an assembly drawing should be developed. It will allow you to determine the overall dimensions of the selected product (Fig. 52).
Rice. 52. Assembly drawing of the product “cup stand”
For the stand, the overall dimensions are height 350 mm and leg circumference ∅ 220 mm. The diameter of the stand is 35 mm, the angle of inclination of the cup holders is 75° and the diameter of the balls is 25 mm are reference dimensions.
In the specification for the assembly drawing we write that the product consists of a stand 3, three legs 1 with balls 2 and six pendants 4 for cups. The material of all parts is wood. As the material for making these parts, I chose hardwood - birch.
After the assembly drawing has been developed, you can proceed to detailing - developing drawings and drawing up technological maps for all parts.
Turning the internal volume of the bowl
Clamp the tab into the jaws of the chuck. Make sure that the base of the bowl rests firmly on the jaws after they are tightened. If this is not the case, go back to the previous step and grind the base again.
Press the workpiece with the rotating center and remove excess material to the top rim of the bowl. You need to guide the cutter with a pulling force towards yourself, pressing the cutting edge to the wood.
Retract the tailstock, install the tool rest as shown, and begin selecting the cavity. The movements of the cutter should begin at the rim and end in the middle, gradually deepening.
Continue to gradually deepen the cavity, approaching the bottom. At the beginning of each cut, press the edge of the cutting edge against the side of the bowl and then move the cutter forward.
Stop working when the thickness of the bowl walls reaches approximately 10% of its diameter. This 250 mm blank has walls 25 mm thick. To measure, it is most convenient to use a caliper like the one in the photo.
Pre-treatment is completed, you need to dry the damp bowl for six months. Apply a special sealant or latex paint to the outside and inside, then leave to dry in a cool, dry place to avoid cracking.
What is topiary
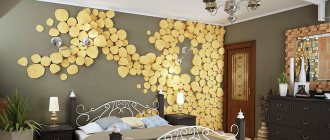
Topiary is a decorative figurine symbolizing wealth and abundance. Typically, topiary is a tree decorated with coins, coffee beans, shells, and, in general, various little things. The variety of elements that can be used to create a souvenir provides room for imagination. Using the same scheme, but using different materials, you can make completely different topiaries.
Previously, topiary was the name given to the special cutting of trees, which later developed into the creation of ornamental plants, where the crown was depicted in the form of various gizmos. At the same time, you can make such a small and beautiful tree from any materials; the simple scheme of work allows you to make something like this even for children.
Currently, in addition to trees, they create various compositions where the tree is not present at all. It's all about technique - gluing the elements onto the base tightly to each other. You can decorate the craft with various details, paint them, tie ribbons to create a unique gift and attract wealth to your home.
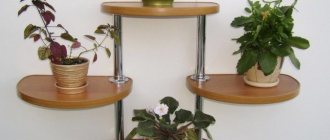
Idea 4. Topiary for kitchen or home decor
Topiary is a small decorative tree that is used to decorate a dining or coffee table, chest of drawers or mantelpiece. And topiary is an excellent addition to a gift, especially if you decorate its crown, say, with candies or flowers. Making such a craft with your own hands does not take much time, does not require the use of expensive materials, and even beginners can do it. Once you master the basic principle, you will be able to create topiary for any occasion, any shape and design. Take a look at our selection of DIY home decor photo ideas, you're sure to find something you'll like!
Kitchen Decor Idea for Halloween
To make this craft you will need:
- Base made of polystyrene foam, plastic or floral foam in the shape of a ball or other desired shape;
- A trunk (a straight tree branch, a pencil or any other small stick);
- Decorative elements for creating a crown: coffee beans, artificial flowers, pine cones, colored beans, etc.;
- Decor to disguise the pot filler, for example, moss, pebbles or sisal fiber;
- Flower pot;
- Filler for a pot that will fix the trunk. For example, cement mortar, the same polystyrene foam or alabaster (the best option) will do;
- Thermal glue in a gun;
- If necessary, you will need paint to decorate the trunk, base or pot. The trunk can also be decorated with ribbon or twine.
Basic instructions:
- To begin with, it is advisable to paint the base in the color of the crown elements so that possible bald spots are not noticeable. You can also paint the trunk and pot and leave them to dry.
- Cut a hole at the base of the crown, a couple of centimeters deep, for the trunk, fill it with glue and secure the trunk.
- Take the base of the crown and start gluing the decorative parts one by one. The principle of action at this stage is simple: first, large parts are glued, then medium-sized and, finally, small elements fill in the bald spots. You need to glue the decor quickly, before the glue is absorbed into the base.
- Dilute the mixture to fix the trunk in the pot according to the manufacturer's instructions and fill the pot with it, not reaching a couple of centimeters to the edge. Next, insert the barrel, hold it for a while and then leave it to dry for a day.
- Disguise the filling of the pot with a decorative “cover” (you can fix it with a little glue).
For detailed master classes, see the materials:
- How to make topiary with your own hands - 4 instructions for beginners and more
- Topiary of cones, acorns and chestnuts - photo ideas and 2 master classes
- How to make topiary from coffee
Unusual flying cups
Instead of a flying cup, you can make a flying teapot. This composition will look very original on your kitchen table. When performing such a craft, it is better to choose a teapot of small size and weight so as not to overload the structure. It is better to make a “stream” from a teapot from thin, strong wire (for example, knitting needles) and superplastic.
Hanging flying cups with flowers can become an original decoration! The main thing is to securely fasten them.
A floating cup can be imagined as a mountain waterfall. Moss made from natural sponge or sisal, pebbles and a bear will complete this mountain landscape in miniature)
With the help of LEDs, the bowl can be used as a lamp
Happy creativity and inspiration! Author of the article: Tatyana Babikova
SHARE! "Cross" will not give bad advice!