SHARE ON SOCIAL NETWORKS
FacebookTwitterOkGoogle+PinterestVk
Beitz is not just one type of coloring composition. This is a product that breathes life into old furniture, stairs, floors, doors and window sills that have long lost their presentable appearance. From this article you can find out what tinting abilities wood stain has: colors used to create an exotic interior, shades that imitate expensive species, as well as interesting combinations that allow you to achieve beautiful effects.
Stain is a tinting mixture that can be used to give any wood product the desired shade.
Features of the material
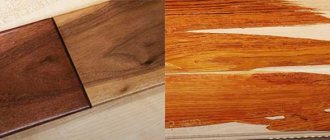
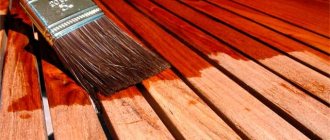
Stain is produced in liquid form, more often it is a dark-colored composition that can give the wood a translucent tint. With its help you can radically change the appearance of furniture. The liquid penetrates deep into the wood, changing its color without disturbing the texture or pattern. Special varnishes are used in the restoration of all kinds of products, for bleaching and lightening.
The main feature of multifunctional compositions is the absence of a film after drying, revealing a natural pattern. The surface becomes contrasting and juicy. Staining is the most effective way to protect wood from rotting and deformation. When working, you can combine different shades of the mixture for all species - pine, oak, walnut, rosewood.
Characteristic properties
Wood stain is a unique and multifunctional material. When used, a specific film is formed on the surface of products, providing protection from the adverse effects of humidity, mold and microorganisms. As a result, these products can last longer.
With the help of stain, you can emphasize the texture or radically change the color of the wood, showing the versatility of your imagination and creativity. Using different colors of wood stain, you can easily give any surface the desired color.
Types of stain
The main component of the stain can be oil, water or alcohol. A typical division allows us to distinguish several types of material, each of which interacts with wood differently. Some penetrate deeply into the wood, while other mixtures change the tone of only the top layer.
Water based
The largest group of impregnations. The mixture is available in ready-made form, which does not require additional preparation for application, or in powder form. The second option is preferable, since it becomes possible to independently adjust the shade. The color saturation will depend on the amount of bulk substance.
Water-based stain can be used indoors and outdoors. It has no unpleasant odor and is absolutely non-toxic. The composition has low consumption and is easy to apply. Among the disadvantages, poor water resistance can be noted. After application, wood fibers rise, which opens the way for moisture. The painted surface takes a long time to dry – 12-15 hours. Not recommended for use on resinous wood species.
Working with water stain is easy with your own hands. The technology consists of pre-wetting and sanding the parts. Sandpaper works well to remove raised hairs. Before use, filter the mixture and mix well. Moisture resistance can be increased by using a finishing varnish coating.
Oil based
Universal oil-based mixtures include special oil-soluble dyes. This stain dries quickly (2-4 hours), is easy to apply, lays flat on any surface without swelling the wood fibers. With this composition you can easily cover the wood evenly and without streaks.
In preparation for application, oil stain must be diluted with a solvent. In addition to decorative functions, the composition has excellent protective properties. The oil penetrates deeply into the top layer of wood, does not allow it to become damp under the influence of external factors, and maintains air exchange.
Drying oil mixtures can be applied with any tool and method, manually or with a spray gun. You can achieve different shades, even those not typical for the breed, by adding a dye of the desired color. In this way you can make white, green, red stain. It will retain the richness of the shade for a long time, since it does not fade in the sun and does not wear off.
Alcohol based
Mixtures based on denatured alcohol are produced in ready-made liquid form or as powders. The cost of such stain is significantly higher than other analogues. The question of why use an expensive composition finds an answer in the high quality and special characteristics of the varnish.
Colorants are instantly absorbed into the surface, reducing drying time to 15 minutes. The obvious advantage can also be seen as a disadvantage, since deep and rapid penetration when painting will create big problems when removing the top layer in the future. Among the disadvantages, one can also note the difficulty of application and the unpleasant pungent odor. You can avoid such consequences if you apply alcohol stain correctly:
- Distribute evenly over the surface;
- Work quickly, thinking through the painting sequence in advance;
- Use a spray bottle.
Acrylic stain
New acrylic-based mixtures do not have many of the disadvantages inherent in oil solutions. The main advantages are the creation of a beautiful surface, the possibility of tinting in any color, and imparting water-repellent properties. Acrylic stains are often used to decorate individual areas of wood. Due to their high wear resistance, they can be used for painting plank floors and parquet boards.
Acrylic-based solutions are safe for humans and animals during work and during the operation of treated items. Such stains do not emit toxic fumes, do not have an unpleasant odor, and fit perfectly on flat surfaces.
The only negative is the high cost. It is better not to use acrylic mixtures as a starting coating before applying varnishes and polyurethane mixtures. The solution is not absorbed into the wood and forms an additional protective layer on the surface.
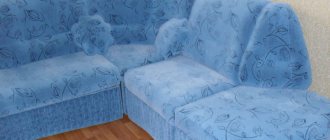
Wax stain
Used for restoration of old wooden coverings. With the help of wax stain, color discrepancies are painted over, the design is complemented, and faded and darkened areas are hidden. The compositions have high moisture resistance and create a dense film on the surface. Stains are presented in a huge range of colors. A significant drawback is vulnerability to mechanical damage and the need for subsequent varnish coating.
The wax stain is applied using a piece of cloth or a tampon by gradually rubbing it in. The mixture has the consistency of soft wax and is available in small containers. Before use, the wax stain is heated, increasing its penetrating ability. The wood is painted along the grain in several layers until the desired shade is obtained.
When choosing wax compounds, it is necessary to take into account that they do not impregnate the wood, but only create a protective layer.
Stains with whitening effect
White color will make any interior elegant. These can be bleached floors, plain walls, ceilings, pieces of furniture. Achieving the required degree of whiteness of wooden objects is very simple. One of the available means is stain with a whitening effect.
Wood can be processed in several ways. The choice of method and additional materials will depend on the location of the wooden object. If the wood will be located indoors, you can use a product for bleaching that emphasizes the direction of the fibers and the natural shade. Often used for artificial aging in antique style. In this case, the wood pores must be deep and sharp. Gray oil, acrylic, and wax stains are used. The main task of stains for outdoor use is to protect wood from rotting and blueing.
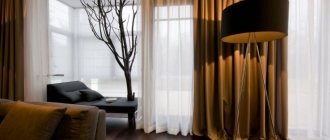
Examples of interiors in wenge color
In the dining room and kitchen, it is better to use a classic scheme, according to which dark shades are given a place below head level. In this case, the room will seem more spacious. In addition, dark brown has a relaxing effect, which is not entirely appropriate in the kitchen, where the housewife needs a lively mood for preparing holiday dishes.
Wood tones are not necessarily present in furniture and flooring. Wenge can find a place for itself on the ceiling in the form of a tier of a multi-level ceiling. This solution is quite suitable for high walls. In this case, black wall cabinets are hidden, creating a niche effect, and do not compete with the nobility of the African guest.
What to do if you want dark brown walls? Maintain this shade in the chandelier, chandelier and tabletops. Decorate the walls and floor in creamy tones. Decorative accents of red, burgundy, and green are allowed.
Can wenge make friends with toffee? Yes, if you mix it with golden veins. A dark shade will emphasize the depth of the niche in the kitchen set. And so that he does not feel lonely, we will give him a door, a chandelier and lamps as companions. The chocolate napkins are the icing on this cake.
I really want tsavo, but the kitchen is small. And the hostess likes there to be a lot of light and space. What to do?
The solution is actually very simple. Order a white set with a horizontal contrasting stripe on the fronts of the wall cabinets. If you want even more contrast, use the same shade in the fronts of the lower cabinets. At the same time, white or steel narrow stripes will create movement dynamics. An excellent solution for modernity.
To relieve the feeling of hospital sterility, lay cocoa-and-milk colored tiles on the floor.
Wenge is a great place for creative ideas. At the same time, this color loves to be surrounded by milky and creamy tones interspersed with natural pink, purple, red and yellow shades. Create exquisite interiors that are characterized by luxurious simplicity and VIP class elegance.
Color variety
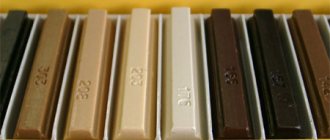
The most popular are natural shades of stains, which best harmonize with the wood. For furniture finishing, bog oak and walnut are often chosen. Wenge, mocha, and nutmeg will give wood a browner color. The burgundy palette includes mahogany, maple, and cherry.
You can achieve the desired shade by mixing several types of stains. It is important to maintain proportions and use mixtures from only one manufacturer. For larch and pine, both dark and light walnut options are suitable. This paint is classified according to the international standard. Each color has a name and its own code.
When choosing a mixture, a test coloring of the wood is carried out. The resulting shade will be influenced by the natural color and type of material. The quality and density of solutions is of great importance. Compositions with the same numbers from different manufacturers can produce shades of different saturation and depth.
Which wood stain is better: photos of colors and palettes of different compositions
Stain allows you to refresh an old interior and transform the appearance of your home, both inside and outside. There is no need to buy new furniture or replace doors and windows. It is enough to apply a decorative coating to a previously prepared wood surface.
When choosing a high-quality stain, you can be sure that it will protect the wood from excess moisture and negative external influences
Stain, unlike paint, forms a transparent layer on the surface. It penetrates deep into the wood, giving the material the necessary shade, which can vary from walnut to mahogany and mahogany. If you look at a surface treated with a tinting composition, the color result can easily be confused with a natural color. You may get the impression that the tree is in its original form.
Rules and methods of application to the surface
There are several ways to apply stain to the surface. When choosing, it is necessary to take into account the type and type of wood, since the texture will appear differently on each one. The following staining methods are used:
- Using a spray gun. Suitable for alcohol and nitro stains used over large areas. Device settings affect color effects. Using spray guns is the best option for an even application.
- Pouring or dipping. Used when applying mixtures of low viscosity and quick-drying, for example, water-based stains. Positive aspects - material savings, high productivity. Due to the absence of the human factor, ideal tone repeatability is noted. In hard-to-reach places, the formation of unpainted areas is excluded.
- Tamponing, impregnation with rags. As a tool, you can use foam rubber or cotton materials that do not leave fibers behind. The thickened wax and acrylic mixture is used in small areas. It is carefully spread over the surface until the desired color is obtained.
- Painting with a brush. Devices with natural bristles are suitable for oil mixtures, and synthetic fibers are suitable for water ones. The brush should be strong and of medium hardness. If the surface is large, the device should also be massive and wide. It is better to start working from the top edge, moving down.
Master class on wood tinting
It is easy to do the tinting of any wood or part of furniture with your own hands at home. The procedure will enhance the texture, give a refined shade, mask defects, and, if necessary, radically change the appearance of the wood. First of all, you need to decide on the tone of the stain, choose an application technology and check the color on a piece of wood of the same species. The process of applying the mixture itself takes place in several stages:
- Surface preparation. The base is thoroughly sanded and cleaned. Then moisten it with water and remove the standing fibers using sandpaper.
- Applying the tinting mixture. Start painting after the wood has completely dried. Apply one layer of color and remove excess stain with a cloth.
- Drying. Each type of tinting composition has its own drying time. After a certain time, we check the consistency of the shade and, if necessary, apply a second layer.
- Varnishing. Applying a protective layer is necessary to give the surface greater strength.
Summary
If you decide that wood will be the finishing material for your interior, there is no need to be afraid of monotony and boredom. Modern solutions offered by wood stains make it possible to bring out many of the original colors, while maintaining the natural appearance of the raw material.
After reading this article, you can learn everything about coloring yourself and try to do it yourself. With all the information gathered, you can learn which stain to choose for which type of wood, how to prepare the surface before application, and even step-by-step how to create your painted products. You know the technique, the rest is a matter of imagination.
Flow calculation
The main indicator that must be taken into account when calculating consumption is the degree of porosity of the base material. Any stain has excellent absorbency. On average, one liter of composition is required per 15 m2. It is also important to consider the intensity of the shade. Conifers have low absorbency, so they will need to be processed in several layers to achieve the desired pattern, which will at least double the consumption.
The amount of material used is affected by the shape of the surface to be painted, the presence of corner locks, and hard-to-reach places. On each container of the mixture, manufacturers indicate how much mixture must be used to obtain a certain pattern. The exception is oil compositions, the task of which is to saturate the wood until the pores are completely filled. In this case, the type of tree and its condition are taken into account.
To reduce stain consumption when painting coniferous wood, it is necessary to remove tree resin from the base in advance.
What to consider when choosing?
The following factors will help you decide:
- Purpose. There are products for external and internal work, with varying degrees of health safety, covering power and coloring results.
- Additional options. We are talking about protective properties and visual effects: mother of pearl, frost, patina.
- Type of wood. For soft conifers, wax, acrylic and oil stains are preferred, which apply evenly.
- Consumption. It is always indicated on the packaging. If there is a large area to be processed, the issue of economy comes to the fore.
- Color code. It is standard, for example: “walnut”, “cherry”, “mahogany”, but the shades from different manufacturers differ, so it is better to purchase the stain you like with a reserve.
How to choose a stain
The choice of stain is influenced by the purpose of the item being processed and the method of its application. To tint furniture items, choose safe mixtures with a minimum amount of volatile compounds. Wax, oil, and water-based formulations are suitable.
To treat window frames and doors, it is better to select alcohol stains. The mixtures are easier to apply to smooth surfaces, which minimizes staining. You can restore old tables, chairs, cabinets with small blue stains using oil and wax compounds using any tool. When choosing a tonic, you should pay attention to the following characteristics:
- Drying speed. Alcohol compositions dry almost instantly; stains on water take 2-3 hours. Oil solutions will require at least 24 hours to dry completely;
- Toxicity. The safest stains are oil, water, and wax. Acrylic and alcohol mixtures are applied in protective clothing and a respirator;
- Resistance to fire and mechanical damage. Fire resistance depends on the thickness of the layer. Oil and wax stains have the lowest degree of protection against scratches;
- The degree of filling of wood pores. Oily compositions have the highest pore filling rate;
- No smell. Water-based and acrylic stains are completely odorless. Vapors from oil mixtures dissipate within a few days.
About work safety
When getting started, remember that painting with stain is far from safe, especially with nitro or alcohol-based compounds.
Avoid contact of stain with unprotected skin, especially mucous membranes and eyes; if contact occurs, rinse immediately with plenty of water.
Wear safety glasses and gloves, long sleeves, and a hat.
When working with a spray gun, a respirator of the RPG-67 type or similar models is required. Leave your tips and comments below. Subscribe to our newsletter. Good luck to you and good luck to your family!
Dealing with defects - what to do if the stain is applied incorrectly
Quite often, after applying stain, various defects form on the surface. They may not appear immediately, but only after drying. The sooner measures are taken to eliminate them, the greater the chance of complete restoration of the applied layer. Most often you have to work with the following defects:
- Streaks. If the resulting drip is noticed at the time of applying the stain, it must be impregnated with varnish, which will dissolve the bottom layer. Then the area should be wiped with a clean rag and treated with the mixture again. The already dried streak is first softened with a solvent, then removed with a knife, plane, or sandpaper.
- Stains. First of all, it is necessary to determine the cause of their occurrence. The problem may be poor quality wood that has black areas that unevenly absorb the stain. In the case of external solid wood, a plane will help; all the veneer will need to be removed from the plywood. It is better to re-coat the area with a thick wax mixture.
Such a different “white oak”
The peculiarity of this method of painting wood is that experts try in every possible way to achieve a pronounced contrast between the color of natural wood and the texture of the bleached wooden surface. The stronger the contrast, the more valuable the coating is.
However, implementing design ideas, using the “bleached oak” technique you can create different colors of wood:
- light or dark tones
- with an element of “aging”
- with a yellow or pink tint.
Particularly valuable among specialists is the grayish tint of the wood, on which a light lilac note appears. Given such a variety of options, bleached oak can be combined with various design delights and adapted to different artistic interior styles.
Waxing furniture after bleaching wood
When treating a surface with wax, it must be applied evenly and then rubbed into the surface with a cloth or steel wool. At this stage, special emphasis is placed on the texture of the wood. The applied layer of wax must be allowed to dry, after which re-processing is carried out. Unabsorbed wax is immediately removed from the surface of the wood.
After the microcrystalline wax dries, the surface of the wood acquires good impermeability, and the pronounced “white oak” structure gives the furniture an ultra-modern look. Therefore, by using the “Bleached Oak” technique, you will make your interior stylish and interesting without any special expenses.
Like
- Tweet
Like and get a discount!