DIY folding table on the wall
Sometimes finding space for a desk in a crowded apartment can be a challenge, but there's a perfect solution by making a DIY wall-mounted folding desk . This solution makes it possible to save space and organize any space without changing the overall interior design. Wall-mounted folding tables have specific strength, compactness and design features that make them unique. Making a folding table , unlike traditional models, is much simpler and cheaper. This wall design will fit perfectly into the decor of any room, will allow you to use every centimeter in the room and solve the problems of free space with maximum ease. The kitchen folding table is ideal for those who want extra space in the kitchen to prepare their favorite dishes and enjoy a meal with company. A folding desk will come in handy in a bedroom or any small room. Small folding tables are also extremely functional for children's rooms, bathrooms, small studios or balconies. Here are different options with instructions on how to make a folding table with your own hands , there is even an example of a wall easel . I hope you will enjoy.
Step 4: Choosing a Height for a Wall Desk
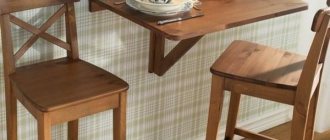
Choosing the right height for your desk is an important part. A few centimeters of error can lead to great discomfort for you. For my wall-mounted table, the height of 70 cm from the floor turned out to be convenient when sitting on a stool in the kitchen.
Mark the height on the left and right using masking tape (paper) or draw a line with a pencil.
Use some objects to position the folding table at the desired height.
Stage 6: Leveling the table
If you doubt that you have fixed the table to the wall strictly horizontally, then it would be a good idea to check it using a building level. This will help clear your doubts or indicate that adjustments are needed.
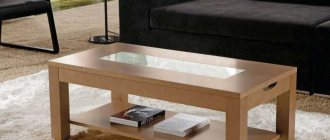
Stage 8: The folding table is ready
This is how the table turned out!
Tip : Keep minimal items on your desk so you can stack it as often as possible. Good luck!
Step 3: Preparing the Holes
Drill pilot holes in the plywood. To prevent through drilling, place a piece of plywood (as shown in the picture) and make sure that the drill does not penetrate the front surface of the countertop. When drilling, the chuck will rest against this piece and protect you from drilling too deep.
We place the washers over the resulting holes. The washers were included with the folding mechanism.
Secure the brackets using self-tapping screws.
Stage 7: Checking the folding mechanism
After installing the table, you need to check how well its folding mechanism works.
If the brackets are not installed parallel or at the same level, this will lead to friction between the bracket and the surface of the tabletop or will not allow the table to be folded at all. This can be avoided if everything is done well at the second stage.
What does the build process look like step by step?
Having selected the tabletop, as well as choosing the folding table mechanism (hinges), all that remains is to assemble this entire structure.
The actual assembly involves a few simple steps:
- attach the workpiece to the wall, determining the optimal height;
- use hinges to secure the support strips to the tabletop;
- also install the tabletop on the wall on the hinges;
- check the quality and performance of the mechanism, as well as the strength of your folding wall table.
There is nothing fundamentally complicated here. You can assemble a folding table in literally an hour.
It all depends on how complex and original the format of the tabletop itself you have chosen. To do this, it is worth looking at some interesting ideas.
Advantages
The advantage of this design is the ability to fold it if necessary.
The most useful and noteworthy advantages are presented.
- Compactness and ergonomics - a folding table with wall mounting is largely attractive precisely because of these qualities.
- It will not take up much space when folded; in addition, the tabletop will fit perfectly into any interior.
- Multifunctionality - a table with a folding tabletop can be used both for its intended purpose (dining furniture function) and for other needs. For example, it can easily perform the function of an ironing board.
- Simplicity and convenience in everyday life.
- Safety.
- Reliability.
- Nice price.
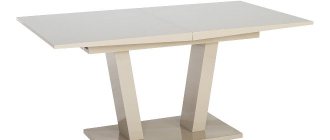
White folding computer desk
How to make a folding table with a wall mount with your own hands
The question of how to make a folding table for the kitchen, living room, dining room, nursery, hallway, or any other room with your own hands is easily solved. First, they purchase the necessary materials and tools, make a drawing, select fasteners, then assemble the structure and mount it to the wall. With the right approach, the entire process of making a table will take no more than three hours.
You can build a simple model of a folding table with your own hands.
Required tools and materials
The most commonly used materials are MDF and chipboard - these are low-cost, easy-to-process materials. It is easy to make a table of any shape from them. Natural wood (birch, oak, linden, aspen, hornbeam, larch) is used less frequently - it is more expensive, but durable, looks beautiful in any interior, and creates a feeling of comfort. Impact-resistant glass is used even less often - it is cold to the touch, but does not weigh down the interior. Plastic structures with metal legs are not durable, but are easy to install and clean from dirt.
Let's look at a step-by-step master class on making folding furniture using a solid table as an example.
To work with wood, chipboard, MDF, you will need the following tools:
- perforator;
- drill;
- building level;
- hammer;
- keys;
- crosshead screwdriver;
- square;
- ruler;
- pencil.
The list can be expanded with materials for additional components of the original model and tools.
Additionally, purchase mounting anchors and door hinges of a suitable size. If you plan to decorate the product, buy varnish or paint, brushes, containers for painting, self-adhesive films or natural veneer.
If you are making a countertop from chipboard, you can cover it with self-adhesive film for originality.
Drawings of a transforming table
The drawing of a folding transformable table shows the tabletop itself, the bar mounted on the wall, the stop and the stop arm, hinge connections, and a limiter. A similar design can easily be placed on a balcony, bedroom, kitchen, children's room, or cramped studio apartment. It is important to correctly calculate, mark, cut the available material, and select the appropriate fasteners.
You need to start work by taking measurements and drawing up a drawing.
Making tabletops and supports
When making a wall-mounted dining or work table, the sequence of actions is approximately as follows:
- Select the installation location, taking into account that the mounting surface is made strong and can withstand the weight of the table top and accompanying elements. When unfolding the structure, the process should not be interfered with by other objects standing in this room;
- Holes are drilled in the timber prepared to create the frame, maintaining a distance of 20-25 cm;
- The block is applied to the wall, the location of the first hole is marked at the desired level;
- The hole is drilled - its diameter is 7-9 mm, depth - 9-13 mm. longer than the anchor length;
- The beam is attached to the anchor so that it moves freely;
- Next, the beam is placed horizontally, marked, and all other holes are drilled in the wall;
- After installing the expansion anchors, tighten them tightly - the frame base is ready;
- Using door hinges, legs are attached to the edges of the table plane - they are mounted so that when folded they do not interfere with the table’s tight fit to the wall surface;
- The hinges are attached to the tabletop, and the tabletop itself is mounted with self-tapping screws to the frame beam fixed to the wall;
- The tabletop is installed in the working (horizontal) position, the stop legs are placed against the wall, and the location of the locking bars is noted. The latter are firmly fixed to the wall surface with anchors;
- To test the design, you need to raise and lower the tabletop several times - movement should not cause difficulties. If there are legs, they need to be placed on the floor.
To correctly determine the height of the tabletop, it is better to take a chair, sit on it and imagine a table in front of you, “placing” your hands on it.
How to secure a table yourself
The easiest way to secure a finished table is using hinges and one support. Markings must be done - if the surface does not come out strictly horizontal, it will not be possible to place any objects on it, they will fall. Usually, the table itself is assembled first, and then the entire table is mounted to the plank on the wall.
On the reverse side of the tabletop, markings are made for the mechanism, which is fixed to the surface.
In suspended structures, stationary fastening options or bolts, angles, and hinges are used. The latter are usually used for folding surfaces. In the configuration of the table it is permissible to use backlashes and closers. Installation of large, heavy products is best done with two people. A properly secured table does not interfere with movement around the kitchen, saves space, and increases the functionality of the kitchen set.
To ensure that the base bar is positioned strictly horizontally, you need to use a level.
You can make and attach a table to the wall with your own hands, if you have suitable fasteners and tools. It is important to choose the right item for the kitchen set, and make sure that the product does not interfere with movement around the room. Drawings are developed independently or found on the Internet, on websites dedicated to furniture making.
Such furniture helps turn even the most cramped home into a spacious home, in which there is room for not only the owners, but also the guests.
Drawings of a folding table for the balcony
First you need to think through the project. You need to choose the material from which you will make the table, think about the appropriate dimensions and design features. Also at the preparatory stage you will need to prepare tools for work, fasteners and fittings.
Next, it is recommended to follow the instructions:
- The shape of the table is cut out. Usually they choose a semicircular one, but to simplify manufacturing, you can choose a square or rectangular one.
- Production and preparation of structural structural parts - so that the table holds well and can withstand normal loads.
- Processing of all workpieces. It is necessary to remove burrs and process the edges so that they do not leave splinters.
- Assembling the product, using purchased accessories. It should be noted that you need to choose expensive and high-quality fittings, even if the other materials are budget. The convenience and service life of the finished table directly depend on it.
- Final work, which includes the use of finishing materials, aerosols, paint and others.
Fastening mechanism for folding table
At the moment, in a specialized store you can buy a separate and completely finished mechanism for making a folding table. Usually they are universal retractable structures that can be used regardless of the planned dimensions of the product.
You can make the mechanism yourself. To do this, use hinged corners, which are attached to the base and folding wooden device. They are installed on self-tapping screws using a drill.
If you use a support, then no mechanism is required. Although this design device is quite unreliable, if it is possible to use a good mechanism, it is not recommended to abandon it.
Folding table diagram
To properly prepare a drawing diagram, you need to carefully consider what product you will make with your own hands. You can choose standard and traditional options:
- With support. This option will be the easiest to implement; it can be done literally in one day. No fittings are used here; the horizontal position is held by a support;
- Folding table with extendable support. Its peculiarity is that the support, when folded, is located between the table and the wall. When folded, the table protrudes only 4-5 cm in width, which makes it an excellent option for a small room;
- Rectangular folding with fittings. This option is suitable if several people will be sitting at the table at the same time. It is more difficult to make than previous options.
- With roll-out wheels on hinges. This design option is used for large tables. Usually they make several rollout options. For example, when one person uses a table, he puts out only 1 part, which will be enough for him. If there are more people, they put out all the parts, and the size of the table increases several times.
Stage 2: Screw on the folding mechanism
Place the folding brackets at a distance of about 6-7cm from the edge so that the mechanism is accessible to the hands and at the same time visually hidden.
In order to ensure the perpendicularity of the bracket and the table, we attach the entire structure to the wall.
Mark the holes for fastening to the tabletop.