how to make a table with lighting
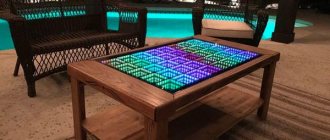
-Have you seen a light table with an infinity effect , but not in the photograph? It's really cool, like a fairy tale. In fact, making a backlit table with your own hands is quite simple. There are different options, here you will learn ways that will help you make your own glowing table with your own hands with different effects. LED tables are great for creating interesting decor in your home. They will immediately create a festive atmosphere anywhere - a great thing for a party. Check out this selection of ten tables; there isn't a single example you couldn't make yourself. These are mainly backlit coffee tables , but there are also practical options for backlit desktops , on which you can draw, sketch, solder and do many other useful things. Check out all these wonderful projects and today, with the help of the instructions and step-by-step photos presented here, you can start making your own light table .
Examples of finished tables
Let's consider what tables with a 3D effect can be and how they look in the interior.
- A neat wooden table with white LEDs that give off a light blue tint.
Table with white LEDs.
- Low wooden table with green and olive LEDs. Shades of green and wood combine harmoniously with each other.
Table with green lighting.
- A futuristic table with lilac diodes is complemented by three details that create the effect of endless columns.
Table with lilac lighting.
- Tables can be of any shape, for example, as in the photo - in the form of a cylinder. The silver color of the case goes well with the white LEDs.
Cylindrical table with white diodes.
- In the next example we see a beautiful combination of red LEDs and dark wood.
Table with red LEDs.
- In conclusion, consider a table made of dark wood with white LEDs on a blue background.
3D table with blue background.
Thus, we learned how to make a table with an infinity effect with our own hands. The cost of such an exclusive item will be small, but the effect will be stunning!
Video: making a table with an infinity effect.
Football battles
Who among us doesn't love football? The cohort of amateurs includes not only players, but also crowds of fans around the world. So why not bring football into your home, even in this slightly eccentric form?
Soccer ball
With such “accompaniment” why not play a game on Nintendo, and who said that football is a purely male activity?
For active boys (girls) who love football, this lamp is just a godsend. Already upon entering the room, it will be clear what the owner’s hobbies are. If the opportunity arises, you can say to a stunned friend: “Yes, I was playing football here the other day...” The kit comes with the previously mentioned “crack in the wall” sticker. However, nothing prevents you from creating your own football on your own field. For this, use photographs or the coat of arms of your favorite team, a green map of the football field.
Design option
The “Football” lamp is suitable not only for a child’s room or a true fan’s room. It is quite appropriate to install it in an editorial office commenting on world football. You can also designate it as a cup during a school friendly match.
Kitchen work area lighting
It has been established that optimal lighting for a kitchen countertop should be at least 40-50 W/m2. This is true for fluorescent and halogen lamps. For LED-based lamps it requires approximately 10 times less. Since LED backlight consumes about 10 times less power with the same luminous flux.
Fig.1.
How to properly place spotlights in the kitchen. Illumination greatly depends on their location. For countertops, lamps should be placed under wall cabinets.
The lighting of the kitchen work area must have a certain radiation direction. For comfortable work, you should concentrate all the light on the tabletop and prevent it from spreading towards your eyes.
Fig.2.
To prevent lamps from being blinding, lamps with a diffuser are often used. Thus, the light is distributed evenly and does not hit the eyes.
Where should lighting be installed? It is necessary where cooking, cutting food and washing dishes is carried out. Above the stove, the light source is usually built into the hood and does not require any addition. Lighting the countertop in the kitchen in the cutting area and above the sink is very important, since in these areas our attention is most concentrated, and, therefore, the load on vision is maximum.
Fig.3.
In this example, the lighting is distributed evenly. The stove is illuminated by built-in lamps in the hood. The cutting and washing area is well lit. This option will significantly reduce the strain on your eyesight.
The place of the meal - well-deserved honor
Why is it important for the dining area to be well lit? Of course, even in general light we won’t be able to carry a spoon past our mouths, but nevertheless:
- Illumination of the dining table has an important aesthetic function and creates the right atmosphere.
- Draws attention to the scene, no matter what you are doing: eating, talking or playing board games.
- It will create the necessary light accent and dilute the uniformity of general lighting.
Lighting affects appetite and mood. It helps create an atmosphere for both formal meals and intimate gatherings. To do this, it is enough just to provide the ability to adjust the brightness.
How to make it yourself
To make an original product yourself, you need to prepare all the materials and tools in advance. In this case, you need to follow the step-by-step instructions for a table with an infinity effect with your own hands. Diagrams with dimensions can be easily found on thematic forums.
Creating a box
To make it, you need to take 4 boards 25 mm thick, 15-20 cm wide, of arbitrary length. Next, they should be cleaned with sandpaper, the frame should be screwed together using self-tapping screws, or the simplest table should be purchased and the table top should be removed. Then, according to the instructions, you need to work on the mirrors or use glass with a reflective film instead.
Make a frame
Using self-tapping screws, twist the frame
Installation of mirrors
You need to glue a mirror to the top of the box. In size, it must exactly match the dimensions of the base of the cabinet, so careful measurements should be taken first. It is convenient to apply the film to 3D tables using a bank plastic card, and instead of the bottom mirror, you can take glass and cover it with an opaque mirror material.
Glue the mirror to the box
Backlight installation
After assembling the box and installing the mirrors, you need to assemble the LED frame for the strip to create “infinity”. In terms of external dimensions, it should correspond to the external parameters of the frame, and in terms of internal dimensions, it should retreat inward from the edges by 10-20 mm. When the box is ready, glue the tape from the inside and screw the frame to the sides of the cabinet. In order for the table lighting to work properly, you need to understand the electronics. But first you need to drill holes to bring the wires out. It is important to carefully study the LED connection diagram so that a short circuit does not occur in the future.
It is easier to use a garland to illuminate the table - it works from an outlet, but additional fixation of the light bulbs will be required.
Drill holes for wire exit
Glue the LED strip
Route the wires and bring them out
Glass fastening
When the backlight is assembled or purchased with an existing programmer, microcontroller, power supply, a translucent mirror or glass with a translucent film should be secured to the frame with special screws. It is better to choose decorative fittings for this purpose. You can also consider countersunk screws.
Assemble the upper frame
Glue the mirror to the frame
Install the top part onto the frame
Assembly of the structure
The final stage is assembly. Thin strips must be nailed along the edges of the frame. In height they should form a single plane with the glass. The top frame should be attached to the slats, which will ensure the strength of the backlit table.
What determines the depth of the tunnel?
The depth of the backlit coffee table tunnel depends on several factors:
- Degree of transparency of the top surface. If you apply a 70% automotive film to the glass, the depth will be less than when using the 92% option.
- The depth of the table tunnel with LED lighting (LEDs) also depends on the distance between the mirror surfaces.
- The brightness of the light source - the more intense it is, the greater the illusion of depth.
An illusory infinity mirror occurs when LEDs are repeatedly reflected between a real and an imaginary mirror, creating a tunnel that tends inward and toward the center. In this case, the translucent surface experiences the main reflection losses, and each subsequent one becomes weaker by a percentage of its transmission capacity. Therefore, the greater the distance between them, the deeper the tunnel will be.
The reflection coefficient can be calculated using the formula: (n2 - n1)2/(n2 + n1)2, where n are the refractive indices of the two media.
Transparency of the top surface
Distance between mirror surfaces
Light source brightness
How the infinity illusion works
The illusion of an endless tunnel is created by reflecting a light source in two mirror surfaces at the same time.
Due to the fact that light has the property of scattering, the effect of its gradual attenuation is created somewhere in the depths.
Due to the peculiar reflection of light, such tables create the illusion of an endless tunnel. An important condition for creating such an illusion is selecting the correct distance between the mirrors. Experts recommend installing mirrors at a distance of approximately 8 cm from each other.
Rules of the world
To create comfort in this zone, you need to pay attention to the general recommendations:
- The light should not be too bright. There is no need to talk about a good appetite and mood if the lighting hurts the eyes and irritates.
- The entire surface of the dining table should be illuminated evenly.
- When highlighting the dining area with light, make sure that it is in harmony with the rest of the decor.
The distance from the tabletop to the lamp should be at least 80 centimeters, so it will not interfere and blind the eyes. The higher the ceiling, the greater the distance. The shape and size of the table also play a role. The larger the table, the higher the lamp is placed. If you have a bar counter or island instead of a table, then you will need several lamps. The size of the lamp should be such that it does not overwhelm with its power. The diameter of the table should exceed it by at least thirty centimeters. And finally: the light in the dining area should be warm, awakening the appetite, and the high color rendering index should not distort the color of the food.
Tips for choosing LED strips
Marking
Let's figure out what the LED SMD 3528 (120LED/m) W IP20 marking means:
- LED – type of device, light source, i.e. LED;
- SMD – execution type, monochrome;
- 3528 – dimensions in mm, 3.5 mmx2.8 mm;
- (120LED/m) – number of diodes per linear meter, 120/m;
- W – glow color, white;
- IP20 – security class, no protection from moisture.
Diode type
Parameters that are taken into account when choosing: type of diodes, density, degree of protection.
Single color tapes (SMD)
They produce a monochrome luminous flux, the abbreviation is derived from the name SMD technology - surface mounted device. White, yellow or blue lighting is suitable as task lighting in the office or kitchen. Based on colorimetric temperature (measured in Kelvin, K), the following types of white color are distinguished:
- warm;
- neutral;
- cold.
To connect a monochrome tape, you need a power adapter.
Multicolor RGB strips
Polychrome ice strips are used in the form of decorative lighting; they are of little use for full lighting. Diodes are mounted on circuit boards:
- red – marking R (red);
- green – G (green);
- blue – B (blue).
The name of the ribbons comes from the first letters. The glow intensity of the diodes is different, their mixing creates shades and colors. RGB strips are much more expensive than single-color LED models.
Diode Density
What it is? Diode density is the number of light elements per linear meter. At higher densities, the brightness of the glow is higher than at lower densities. This data is located in the product labeling, the lowest density is 30 pieces, sometimes up to 280. For decorative lighting, a density of 30-60 pieces/m is recommended, for task lighting – more than 120 pieces/m.
Also, when working, pay attention to the minimum bending radius; this parameter is important when making shaped, geometric contours
Protection classes
The degree of protection is indicated in the marking by the numbers after the letters IP, the first indicates tightness, the second indicates moisture resistance.
According to the degree of protection, LED strips are divided into:
- Each type is designed for ceilings of different types of rooms.
- IP 20-33 - the marking indicates that the product should be mounted in dry rooms, since it is not airtight, the luminous elements are open.
- IP 65 - this indicator indicates that the board is partially moisture resistant, silicone is poured only on the conductor side, it is installed in the bathroom or toilet.
- IP 67-68 - category with full double-sided insulation, filled with silicone, placed in a plastic casing. Mounted in swimming pools and outdoors.
It makes no sense to mount boards in silicone on the ceiling, because the substrate heats up and the light flux loses intensity.
Lighting brightness
The amount of light directly depends on the size of the luminous elements, their density, and the quality of the crystals. So, a single-color SMD3528 with a density of 120 crystals/m2 gives approximately 60 Lm/m², which is equivalent to the lighting from a 40-watt lamp. Decorative lighting relies on taste. It is believed that ice-backlight 10 W/m is suitable for diffuse lighting; more powerful options are suitable for workers. The power parameters are written on the packaging.
power unit
The ice lighting circuit requires a power supply (adapter, driver) to operate. It is recommended to take an adapter that is approximately 30% more powerful than the ice tape. When buying a power supply, compare its characteristics with the operating voltage of the LED strip. If marked 12 V, buy a 220-12 V driver.
How to calculate power: the length of the LED strip in meters is multiplied by the power it consumes and the operating factor. For working light it is 1.5-1.7, for decorative light – 1.3.
Additional equipment
- Controller – changes color, intensity, launches programs. There are simple models that simply switch colors, and complex ones with a special remote control and control via Wi-Fi from your phone. The RGB controller changes shades and triggers effects.
- Connectors, they are used to connect contact wires, otherwise the wires need to be soldered, stripped, and insulated.
The wire
For high-quality boards and adapters, take a copper wire, the cross-section of which is calculated according to the rule - for 10 Amperes of electrical voltage, 1 mm of cross-section is needed.
Process
Getinax needs to be cut into several strips (1 cm wide). We cut a plastic bottle in the same way as getinax. Next in the getinaks you need to make places for the LEDs. The diameter of the holes should be about 5 mm. There should be approximately 16 holes per half meter. We insert the LEDs into the holes and start soldering. We combine groups of 4 LEDs into one circuit. It will be rated for 12 volts. Using enameled wire, we solder our four chains into one chain. Soldering runs parallel. We check the performance of the LEDs under voltage. If everything is in order, put on the heat shrink tube and heat it. This is best done with a hair dryer, but in extreme cases a regular lighter will do.
Interesting table lighting options
A table with an infinity mirror can add an ultra-modern look to any interior. It will fit well into futuristic design, where the latest technologies and materials are welcomed. There are several options for lighting mirrored tables.
| Light source | Application and features |
| LED bulbs | For large surfaces, provide bright light |
| LED Strip Light | Versatile, durable, economical, practical, easy to install |
| Neon lamps or threads | Uniform bright or soft glow, unusual and beautiful in its own way |
Table lighting with LED strip can be single-color, multi-color, flashing or even, and can be operated from an outlet or remote control. It is recommended to experiment with furniture lighting by placing one shape into another, for example, a square into a circle or a circle into a rectangle. Interesting ideas for decorating tables for various purposes with LED lighting:
- toilets with lights or tape around the mirror;
- with a glass tabletop and lighting, but without a mirror;
- computer;
- magazine;
- kitchen and other models.
So, if there is a shelf on stands above the computer, then it can be illuminated with LEDs along the top and sides, attaching them in the shape of the letter “P”. Since, in the absence of a separate office, the work area is often located in the living room, a stylish table will come in handy. Lighting would also be quite appropriate here. A coffee table with an infinity effect, made independently, will also look good if the tabletop is made of transparent, translucent glass and illuminated with an LED strip, especially if the overall design of the room is minimalist or hi-tech.
Interesting, unusual pieces of furniture can highlight the dignity of the interior. And original tables with an infinity effect can become its main accent. If you make it yourself, you can not only save money, but also create a truly exclusive item.