Many fans of seaside holidays bring home various shells of mussels and other inhabitants of the depths after their vacation. With such elements you can easily make the design of each room in your home stylish and original. Making your own decor from shells is not difficult if you choose an interesting idea. For example, doors and scallops are suitable for decorating walls or furniture, creating plates and stylized jars for the kitchen. The attractiveness of creating such products is the minimal waste of time and ease of assembly. They can be fixed with a glue gun or putty, plaster. Additionally, the doors can be painted, varnished or plated with gold or silver. The created products will perfectly complement the modern and classic design of bedrooms and living rooms. They can also be a wonderful gift for friends and acquaintances.
Preparing the shells
The first step is to process the shells. First, check to see if there are shellfish remains in them. If there is a foreign smell, the collected shells should be boiled for about five minutes and then the remains of the shellfish should be removed with long tweezers.
If the shell is empty, dip it in bleach mixed with water in equal proportions for half an hour. In some cases it may take a little longer. Then the dark layer should be removed.
You can use a stiff toothbrush for this work. Thoroughly clean the surface of the shell from plaque.
At the end of this stage, the shell will become dull and lose its shine. For some seashell crafts, the matte effect adds a touch of sophistication. If you need a classic gloss, the shell should be further processed.
Vase
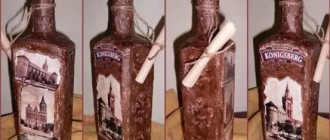
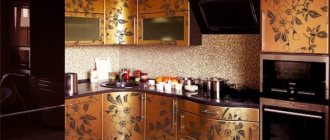
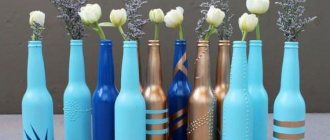
The doors and cones of different shapes and sizes can be used as a filler for vases with flowers. You can use them to make a stylized vase. For example, use them to decorate the top or bottom, or the central part. When using a clay vase or product with matte surfaces, pre-treatment of the walls is not necessary. But if a vessel with a smooth surface is to be renewed, you need to cover it with a thin layer of primer. You can glue design elements with a glue gun. For an unusual stylization, it is recommended to additionally cover the walls of the container with twine, carefully wrapping it around the walls, lubricated with glue. Using a similar scheme, you can stylize bottles of different shapes. They are ideal for custom kitchen designs. Can be used to style bedrooms and living rooms in a loft style.
How to make a hole
For some crafts, small holes should be made in the shells. You can do it in two ways:
- Screwdriver,
- Manually. To do this you will need a hammer and the thinnest nail you can find.
The work should be done carefully. Too much force and the shell will crack.
We recommend reading:
- Crafts from plasticine: the best master class for children at school or kindergarten. 90 photos of the best ideas for creating plasticine figures
- Felt crafts - the best patterns and templates. Step-by-step instructions and master class for beginners (130 photo ideas)
DIY crafts from egg trays - the best step-by-step master class, with description. TOP 100 photos of original ideas for crafts
Order is needed in everything
First, let's do some cleaning. Even if there are no foreign particles or shellfish remains on the surface, the shells should be soaked in a chlorine-containing solution. Any bleach or chlorine detergent will do.
Advice! If the contamination is not severe, half an hour is enough; removing dark deposits will require a long time and additional cleaning with a brush.
A regular toothbrush is suitable for cleaning the surface.
One way is to fill the clams with water and place them in the freezer.
To get rid of live shellfish and their relatively fresh parts, the shells need to be placed in boiling water and the excess removed using tongs. There is another way - heat them in the microwave for 30 seconds and clean them of remains in the same way. If the first half a minute does not produce results, repeat the process until all particles are removed. Next, the material must be disinfected by rinsing in a solution with chlorine.
Add chlorine to the water
If there are chips
If cracks or chips are found, they must be sanded. Regular sandpaper or a sanding block will do for this.
Advice! To give the sink a more beautiful appearance, you can coat it with clear nail or furniture polish, or rub it with oil/greasy cream. If you choose the second method, when gluing the contact points, you must first degrease them with alcohol.
Transforming a shell with glitter polish
Any rich cream will do
Drilling holes
If we are planning necklaces, bracelets, dream catchers and other crafts that require stringing, we drill holes in advance. You can do this in two ways:
- Using a drill or screwdriver, place the shell on a wooden board and glue it with tape. We take the thinnest drill and make a hole right on top of the tape, this will not allow the material to crumble.
- Using a nail and a hammer – we cover the sink with tape (painting paper), draw a mark on the depressed side, place the point of the nail and lightly hit the head with a hammer several times to mark the hole. Next, we gradually expand it with the same nail or awl to the desired diameter.
Advice! The shell structure is fragile, so to avoid splitting, you need to remember a simple rule: the thinner the material, the thinner the drill or nail should be.
Glossy effect
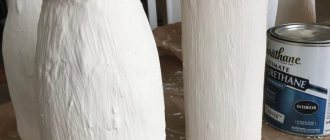
Water-dried shells look less vibrant than the items on store shelves. To achieve a beautiful glossy shine, the parts are treated with acrylic varnish with a transparent or pearlescent tint.
After processing, mother-of-pearl models acquire a lasting shine. It seems that the shell was just taken out of the water.
Step-by-step instruction
First, arrange the shells into three piles - small, medium, large specimens.
Step No. 1. Cover the mirror with newspaper to protect it from glue drops.
Step No. 2. The first row of decoration is laid out from medium-sized parts.
Step No. 3. The next row is decorated with large shells.
Step No. 4. Small shells fill the gaps between the medium and large elements.
After just four steps, you will get a mirror that no one you know has!
Important! When finished, leave the frame to dry overnight, especially if epoxy glue was used during the work.
Craft options
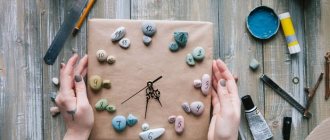
Shells can become a decorative element or represent a single composition. For example, photo frames designed to look like crafts made from seashells, or watches with a dial decorated with seashells, are still popular.
You can create various souvenirs from shells, including:
- Pictures in frames.
- Candlesticks.
- Animal figurines and ship models.
- Jewelry, including bracelets and beads.
- Postcards.
- Interior decorations and much more.
Handmade crafts made from shells will make an excellent gift.
Sequence of actions in the photo frame product
First you need to attach the largest parts, for example, shells and voluminous beads. Then we place smaller ones between the large elements and glue them, trying not to leave any free spaces. You can manipulate the arrangement of photo frame elements as your heart desires.
To create a calm image of our craft, you can glue shells or decorative items of the same size and shape to the edges of the frame. The photo frame can shine under a mantle of sparkles, or shimmer in a variety of bright and matte shades.
Photo frame
Every year, designers come up with new ideas for making crafts from shells that will complement the interior. One of them is photo frames.
We recommend reading:
- DIY crafts from Kinder surprise eggs - 125 photos of exclusive options with step-by-step instructions, master class and video
- Crafts made from twine - an overview of original design solutions. More than 100 photos of new products + step-by-step instructions for creating crafts with your own hands
DIY crafts from candy wrappers: 150 photos of the best ideas from craftswomen. Simple instructions, master class, diagrams and video tutorials on creating crafts from candy wrappers
Materials needed:
- Seashells.
- Glue.
- Acrylic paints.
- Varnish.
- Wooden frame.
Frog
Making an amphibian will be more difficult for children. For this purpose you will need:
- two large and medium, as well as four small shells;
- glue;
- green paint;
- beads.
Two medium-sized shells are glued together. This will be the torso. A pair of large shells (the head) are held together so that they are slightly open. It gives the impression of a croaking frog.
The next step will be connecting the torso and head.
The amphibian's paws will be small shells.
The frog's eyes should be decorated with plasticine or small parts of shells.
The entire workpiece must be painted green, and the pupils of the eyes should be decorated with black beads.
How to do
First of all, we cover the blank frame with acrylic paint of any shade. Then we prepare the shells: remove the mollusks, polish them, and, if necessary, varnish them.
Small shells of various colors are best suited for photo frames. We glue the prepared shells to the base using a heat gun and wait until they dry completely.
After this, you can insert the photo into the frame and hang it on the wall.
Stages of work
First, large and medium-sized shells are glued together. This will be the body and head of the chicken.
Then the child can make a chicken tail, a small comb and a beak from plasticine. All this is attached by the baby to the appropriate places.
Small shells are attached to the sides of the body - the wings of a pockmarked hen.
All that remains is to attach a couple of black plasticine dots to the bird’s head.
Paintings and panels
It is known that children love to make crafts from a variety of materials. One of them is shells.
We recommend reading:
- Crafts flowers - 125 photos of the best ideas from craftswomen. Instructions on how to make it yourself from A to Z. Simple and complex options for crafts + video tutorial
- DIY crafts: TOP-200 photos of the best ideas. Schemes, master classes, modern design, new products, instructions with descriptions
- Crafts from plaster - 120 photos of the best ideas for creating original crafts with your own hands. Master class for beginners with examples and video lessons
One of the most common shell crafts for children are wall panels. They can be decorated not only with shells, but also with sea pebbles.
To make a painting in a marine style you will need attention and perseverance, as well as the following materials:
- White dense paintings,
- Paints,
- Pencils,
- Shells and pebbles.
Memories of pleasant things
A glass vase can serve as a repository for your best vacation memories. If you fly a lot at sea, bring sand from the beaches: you can make real historical layers out of it, and stick stickers on the outside with the location and date of your trip signed. You can make a mixed composition: sand, shells, tickets and other memorable little things. They perfectly preserve memories and photographs, which also look impressive in vases.
For more ideas on how to easily capture memories, read here: Vacation Memories
How to do
The first step is to cut out the base of a certain shape. Then, the cardboard is pasted over with colored paper or painted with paints. And after the background has completely dried, all decorative elements are glued.
Such panels are considered one of the most common children's crafts made from shells. The author's imagination is not limited by anything. Children can glue shells in absolutely any order.
Cute animal
It won’t be too difficult for a child to make a mouse out of a shell.
The shell of the ropan clam should be placed with the hole down. Glue a couple of round shells on top - they will become the ears of a “domestic” rodent. Attach a black plasticine dot-spout to the sharp part of the shell.
The animal's tail can be made from a small piece of cord. All that remains is to attach two more plasticine dots - the mouse's eyes.
In order for the item to serve as a decoration for as long as possible, it must be varnished.
How to do
Sanded sinks should be checked for edge sharpness. The excess is processed with a file or emery sheet.
The cinders should be melted in a water bath and poured inside the shell. Until the candle hardens, you need to place a wick with a bolt or nut attached to it. It is necessary to hold the wick until the paraffin completely hardens.
To make the candle not only pleasing to the eye, but also give a pleasant aroma, you can drop aromatic oil into the melted paraffin. The finished product can be painted or varnished.
"The music of wind"
We take shells with drilled holes and string them on twine of different lengths, securing each with knots at different levels. We tie each rope with attached material to a branch and enjoy the magical chime.
You can add glass beads to the shells
Candlestick
Another craft option that will be useful in every home. A beautiful, unique candlestick will decorate any celebration. It's quite simple to make. You will need wide mollusk shells of different diameters, varnish and glue.
We lay out the shells in the shape of an open lotus and carefully glue all the parts together. We coat the finished composition with acrylic varnish. Place a candle in the center.
This is how you can easily create unique interior items or figurines. A little imagination and patience will help you make a real masterpiece out of a bunch of shells.
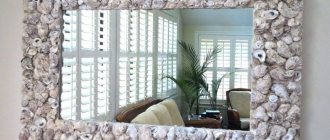
Mirror design
The original design of mirror surfaces and their frames is quite easy to create using a wooden frame as a base. Its design is carried out using a glue gun. If desired, you can also glue dried stars, mother-of-pearl balls, and other thematic elements. This product is perfect for decorating a bright hallway or stylizing a corridor. Such products can be used for hanging in a bedroom decorated in cream, sand or turquoise tones. A large mirror with an unusual design will fit perfectly into the interior of the bathroom. To highlight the frame, you can paint it with silver or gold compounds. To protect against constant exposure to moisture, the paint composition should be protected with a transparent varnish. Otherwise, the paint will begin to crack and quickly crumble.
Photos of crafts made from shells
Did you like the article?
5+
Romantic candles
Sea shells are almost ready-made candlesticks that can be used to create a romantic mood.
Materials for work:
- Large shells;
- Candles in foil (any kind is possible);
- PVA glue.
Step-by-step instruction:
- Remove the candle from the foil and remove the wick by pulling the base at the bottom of the candle. Return the candles to the foil.
- Glue the wick in the center of the shell.
- Melt the paraffin on the stove until liquid and use pliers or tweezers to pour the contents into the shell.
If you are afraid that the paraffin will harden unevenly, first install the shell firmly. After the paraffin has hardened, the candle is ready.