Homemade crafts like knitting potholders are always so nice and help create a warmer, more inviting atmosphere in the kitchen.
A crocheted strawberry potholder can be a wonderful gift for the hostess and a wonderful accessory for the kitchen.
It can be knitted from accumulated remnants of yarn, used for its intended purpose or as a hot coaster.
The strawberry can be knitted in a dense or unusual openwork pattern. There are diagrams, and a video will help beginners.
Crochet strawberry potholder: options
The standard product is a red berry with a green leaf on top. A simple scheme does not imply such complication as white and yellow dots of the berry, or some kind of additional relief pattern.
There are more complicated models, including double potholders, where each side is knitted separately
The pattern of one side of the tack may differ from the other
There are models that need to be knitted tightly, and there are potholders with openwork loose knitting.
How to improve your knitting:
- Try to knit a set - the same pattern, but, for example, berries of different colors;
- The set can also be a collection of different berries and fruits: the same strawberry plus an apple, cherry, raspberry;
- Add decorative details that cannot be tied - satin ribbons, ribbons, etc.;
- Add button beads , if the product is strictly decorative, instead of white or yellow dots on the berry, you can sew white beads.
Knitting can be improved not only by how complex the pattern is, but also by the author’s discoveries. But everything, for the most part, is based on a universal model.
Tack binding and assembly
Tie the edge of the product with single crochets. The thread can be used red or matched by contrast. Start tying from the top of the strawberry to hide the unevenness with a leaf.
Arc tying
Expert opinion
Smirnova Ekaterina Anatolevna
7 years of experience in interior design, professional architect
You can make a nice binding if you use picot. For beginners this may be difficult. A simpler method is tying with arcs of air loops.
Please your family and friends.
Knitting consists of single crochets and 3 chain stitches. between them. The arc begins at the first edge loop and ends at the second. It is advisable not to make omissions.
Tie the leaves in the same way and sew them to the berry. Embroider decorations on the red fabric with black thread in the form of ticks or dots all the way through.
Shell harness
An interesting potholder is obtained by using a shell pattern to bind the edge. To make the product look neat, start tying it with a shell after fixing the leaf.
- Knit a single crochet at the junction of the leaf and the berry.
- In the 3rd loop from the hook, knit 5 dc.
- Single crochet in the third loop from the base of the shell.
- Continue knitting until the end of the binding.
- Finish with a connecting post.
- Cut the thread.
An excellent gift for any holiday.
Berry potholder: simple diagram
If you learn how to crochet this potholder, the rest will be quite easy for you.
For one potholder you will need:
- Crochet hooks No. 3 and No. 5;
- 50 g of red (purple, orange) wool;
- 40-50 g of green wool.
This simplest tack pattern is very easy to implement and you may enjoy the process itself.
Knitting proceeds according to the following pattern:
- Take the green thread and knit a chain of 16 chains. loop, closing it into a ring;
- The first row begins with 6 chain loops, 3 double crochets in 2 and 3 chains. chain base loops;
- Next comes an arch of eight air. loops;
- The next point is 3 double crochets in 3 and 4 chains. loops into the base of the chain from the edge of the hook;
- Arch in three air. loops, 6 double crochets in 5 and 8 chains. loops;
- Arch in three air. loops, 3 tbsp. double crochet in 10 and 11 chains. loops;
- 3 air loops, 6 columns. with a double crochet in the remaining air stitches. chain loops;
- The first row ends with a connecting post;
- The next row is knitted in the same way, slightly expanding the potholder as necessary;
- At the beginning of the fourth row you need to attach a red thread, knit up to the 17th row according to the pattern.
After this, crocheting ends, the potholder needs to be folded in half and stitched.
If you are making a kit where you are going to crochet fruits and berries, they can all be the same color, but have different borders.
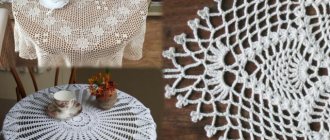
Lace version of the product with manufacturing instructions
It’s impossible not to look at the lace potholders shown in the next photo. I don't even want to use these accessories. These are real works of art.
The good news is that every knitter can create these beautiful accessories.
Sequence of work for beginners
To knit a potholder, you will need the remains of any yarn and a hook that matches the thickness of the thread. The potholder consists of two parts - upper and lower.
Square crochet potholder “Flower”. Bottom: 1 row. Tie a chain of 4 chain stitches and close it into a ring. 4 air loops, close into a ring.
2nd row. *3 tbsp. s/n., 3rd century. P.*. Repeat 4 times, finish connecting. Art.
3rd row. Knit according to the pattern: st. s/n., but in the air loops of the previous row - 2 tbsp. s/n. 4 ch, 2 tbsp. s/n., and then – st. s/n. in Art. s/n. previous row.
Thus, we knit the number of rows you need.
The more rows you knit, the larger the potholder will be. The knitting pattern for the lower part is shown in the photo below:
Top: 1 row. 4 v.p. close in a ring.
2nd row. 3 v.p. rise, knit into a ring *1 tbsp. s/n., 4 v.p.* Repeat 15 times (16 st. s/n.).
3rd row. *6 tbsp. s/n. in 4 v.p. previous row, conn. Art. next 4 v.p. previous row*. Repeat 8 times.
4 row. 3 v.p. rise, * 4 ch, st. s/n. in connection Art. previous row. * Repeat 8 times.
5 row. 1 v.p. lifting, *6 tbsp. s/n., 2st. b/n., * Repeat 8 times.
6th row. 5 connection art. into the shell of the previous row (black arrow in the diagram), *3 tbsp. s/n., knitted together (bump), 3 v.p., cone, 3 v.p., knob, 7 v.p., st. b/n. in middle school s/n. shells of the previous row, 7 vp* Repeat 4 times.
7 and the next rows are knitted according to the pattern.
Upper part knitting pattern:
The round potholder “Flower” is knitted in the same way, only in the round.
Knitting a round shape is even easier than a square one. Diagram of the lower part of the round potholder:
Top diagram:
Each master class presented in this article will help knitters create original and unique potholders for the kitchen. Take this information into your arsenal, take out the remnants of yarn from the bins and create, create, create. Comfort and beauty for your home!
Features of knitting potholders
Perhaps the following tips will help you understand what subtleties lie in crocheting, and what features of making potholders are worth knowing.
To learn how to knit more complex elements, you need to more or less confidently master the basics
Simple tips:
- Start knitting with simple shapes - hexagon, circle, watermelon slice. It’s like training for more complex products; the hand, automatic actions, and understanding of drawing up diagrams are well trained.
- Always knit with the crochet hooks specified in the instructions . As soon as a beginner knits a thing with the wrong crochet, and at the same time experiences quite logical difficulties, he may be turned away from needlework altogether.
- The first potholder can be a square - if you easily read the diagram, you managed to knit an even, not overstretched, not twisted square, and even with a change of color, you will definitely succeed in making a strawberry potholder.
But even from the very first steps, “testing the hook”, so to speak, keep an eye on how creatively interesting and unusual your product is.
Video instruction
If you want to get a knitting lesson in which an experienced master explains in detail how to properly crochet crocheted strawberry potholders from the first to the last row, you should familiarize yourself with the materials in this video.
Dear readers, after reading about how to properly make a crochet “strawberry” pot holder (the diagram and description are given above), you will undoubtedly try to make such a convenient household item for your kitchen. How many of you already have a potholder that you knitted yourself? Tell us what item you made? How did you knit it? If this is your first time doing this and it's a crochet strawberry potholder, this video for beginners will help you. Share your impressions in the comments.
Design tips in knitting
Sometimes the simplest potholder, which even a schoolchild can master in a couple of hours, can be turned into a small handmade miracle from which it is impossible to take your eyes off. And all thanks to the author’s finds and decor of the products.
Double tack can be sealed inside with felt, paralon or padding polyester
For example, you can use post-dying of yarn. Literally paint a white potholder made of coarse yarn with fabric paints (remember the same batik). The product will be strictly decorative, but it certainly will not go unnoticed.
Stylish unity is what the housewife should observe in the interiors of her rooms. For example, you are an admirer of the Scandinavian style. And there a lot of attention is paid to textiles. And hand-made is encouraged too. Therefore, in a kitchen in a coffee and milk color scheme, potholders of the same colors with a modest but “tasty” ornament will look great.
Finishing
Trim all protruding thread residues at the fastening points and hide the ends in the fabric.
Give warmth and joy to your friends, family and loved ones.
Wash the finished strawberries in warm water with liquid detergent. Dry by spreading onto fabric. Knitted items may become deformed at high drying temperatures.
Decorate your kitchen with these potholders and other decorative items.
There are many options for MK strawberry potholders. A very beautiful model is obtained by using the pineapple pattern with shell trim. But such a thing is not suitable for practical use. Many holes in the fabric of the product will not protect your hands from a hot pan in the kitchen. Some craftswomen knit double openwork potholders with an insert between the sides of dense flannel fabric.
Such potholders will not only lift your spirits, but also add coziness to your home.