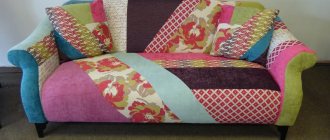
For sewing beginners, oven mitts are the best option for honing your skills. Diversify your interior with designer textiles at no extra cost.
Materials and tools for tacks
What you may need in the process of creating “grabs” for hot things:
- Scraps and cuts of different fabrics: calico, satin, cotton and chintz;
- Textiles for lining: batting, drape, interlining, felt, slimtex.
- Scissors;
- Threads, needles;
- Sewing machine;
- Crochet hook and knitting needles;
- Balls (wool, cotton) with threads;
- Buttons;
- Braid, tape;
- Cardboard, pencil, ruler for patterns.
Depending on the technique used, other devices may be needed during working hours.
How to sew oven mitts for the kitchen with your own hands for beginners:
An oven mitt is a must have item in the kitchen. It protects your hands from burns when using hot utensils. Of course, today you can purchase these kitchen accessories at a regular hardware store. But it is much more pleasant to use potholders made by yourself, especially since for sewing potholders you will only need the skills acquired in labor lessons at school.
everything you need for work
To start sewing potholders, you first need to assess your strengths and, based on your skills, choose or come up with a model for the future product. If your skills end with sewing on buttons, then it is better to sew a potholder more simply, using simple options for shapes and decor. But if you are already an experienced seamstress, then it will not be difficult for you to make a product in the patchwork style or come up with unusual decorations for it.
Once you have made your choice, start looking for the right fabric. The advantage of sewing potholders is that they are made from unnecessary things. Old coats, shirts, dresses, skirts - everything will be used. But there is one caveat: potholders must be sewn from natural fabrics, since synthetic ones are easily flammable and melt at high temperatures.
An excellent option would be:
- linen;
- chintz
- cotton;
- denim.
A potholder made without filler will not be of any use, so prepare material for the inner layer.
As a “filling” you can use:
- felt;
- fleece;
- padding polyester;
- denim fabric.
To make the finished product look beautiful, prepare edging tape and decoration items.
how to make a pattern
On the Internet today you can find the most bizarre types and forms of potholders, but the following are considered classic:
- square;
- circle;
- mitten.
Making a pattern for potholders is not difficult, because unlike clothing, there is no need to create complex designs. For patterns, you can download ready-made ones from the Internet or trace an old potholder. A square or circle can generally be drawn using ordinary stationery.
No matter how simple the shape of the future potholder, to create it we recommend making a paper pattern and using it to transfer the design onto the fabric. This will prevent uneven parts during the sewing process. The material itself should be washed, dried and ironed before cutting out.
To sew a potholder, you need to make two parts from the filler and two parts from the main fabric. In total you will get four pieces of the future kitchen accessory.
When making a pattern, make sure that all the details are the same, otherwise the finished potholder will have a sloppy appearance. Don't forget to leave an allowance of 0.7-1 cm along the edges of the pieces for seams.
how to assemble the product
Now that you have already transferred the patterns onto the fabric, now it’s time to put all the details together. Depending on where the stitching will take place - inside or outside - the parts should be placed differently.
If the product will be sewn from the inside, then first place the upper parts facing each other, then put insulation on both sides.
If the product will be sewn from the outside, then first of all, fold the insulation parts together, and then place the main fabric parts on them with the front side facing out.
After all the components are combined as required, secure them with a running stitch and then sew them on a machine. If you are sewing a potholder from the inside, do not sew everything completely, but leave a place where you will turn the product outward.
At the very end of the work, sew (if desired) trim along the edges, make a loop and decorate.
The simplest options for potholders
Simple potholders are made using classic methods: sewing a square or a circle. These are classic products for protecting hands from the hot surface of containers.
Square
The entire workflow looks like this:
- Draw a square of the required size on cardboard and cut out a template.
- Using the template, two squares are cut out on the fabric.
- The lining is cut out of an old coat or jacket.
- Sew on the wrong side using a machine or by hand, leaving one side unsewn.
- Next, turn the product right side out and stitch the remaining side, folding the edges inward.
- Then a loop of braid or ribbon is sewn on. Attach a button to the threads that are visible.
Thus, the button, serving as decoration, also covers the threads. According to another sewing option, the product is not turned inside out, but stitched from above, having previously connected all the layers. And at the end they sew on braid, lace or bias tape.
Circle
To sew a potholder in the shape of a circle, it is not necessary to draw a circle on paper. It is enough to take a plate with a diameter of about 18 cm and trace its outline with a simple pencil or a piece of soap. You can sew a “grabber” from two types of cotton fabric.
Having completed the pattern and cut out the necessary details from one piece of textile, cut out - a ribbon, - a bias tape. It will cover the edges of the product. Also, do not forget about the insulation.
You can take the one at hand. One of the best options is slimtex - insulation for clothing. A circle is also cut out of it (preferably two). Next, it’s all stitched on the machine, and bias tape is attached. At the end, add a loop with a button.
Fabrics and fillings
To sew a functional oven mitt for the kitchen with your own hands, it is important to choose the right material and filler.
For such accessories, choose dense natural fabrics (linen, cotton, chintz, denim). Synthetic ones can be adversely affected by high temperatures. Also, before starting sewing, wash the fabric so that it does not shrink when washing the finished product. Check the material for staining - soak in warm water. If the water is even slightly colored, replace it.
Felt, drape, and batting are best suited for filler. You can also use a terry towel as a thermal layer.
If you choose padding polyester, you need to line it with interlining on each side: fabric (face up), interlining, padding polyester, interlining, fabric (face down).
Be attentive to the decor. Buttons, beads, rhinestones, dangling or “furry” elements on a potholder can play a cruel joke on you. Decorate the part that will not come into contact with high temperatures.
These recommendations will help you sew durable kitchen accessories.
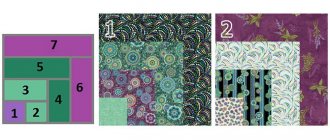
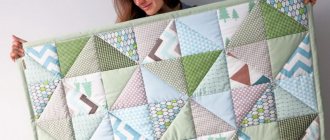
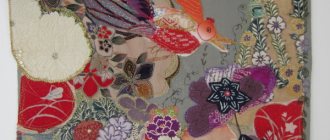
Patchwork
Many craftswomen, starting to work in this technique, sew simple things at first. A potholder sewn in a patchwork style will look very original.
- To work, first cut strips from various fabrics.
- Then they are combined by color and sewn together.
- Using two pieces of scrap fabric and insulation, a pot holder of any shape can be sewn.
- Next, bias tape and a loop are sewn to the product. Flatten the potholder with an iron.
To buy or not to buy potholders
The list of advantages and disadvantages of potholders is inappropriate: as for me, these products have one undeniable advantage that overrides everything - they prevent you from burning your hands.
But one standard question may arise: “why try to invent a bicycle if you can go and just buy it?” Of course, you can buy a ready-made version in the store, but will it be better than something you created yourself?
The answer is simple and consists of at least 3 components:
- hand-made potholders are even more practical than store-bought ones;
- they will help in unifying all accessories under the banner of a single style;
- this same element will add a bit of exclusivity - after all, you won’t find potholders decorated exactly like yours even during the day.
I think that when the advantage of tacks and the need for their creation has been proven, it’s time to move on to more offensive actions.
"Mouse"
The original potholder is in the shape of a funny mouse.
For work they take:
- Two cuts of wound fabric (calico, chintz, textile towels can be used);
- Cutting scissors;
- Threads of a suitable color;
- Sewing machine.
The creative process looks like this:
- The template is traced over the fabric.
- Having cut out the necessary parts from textiles and insulation, we proceed to the mouse’s face. Cut a triangle and two double circles.
- Before sewing, the muzzle is attached to the body using safety pins.
- Both ears are stitched from the inside out (can be done by hand), turned inside out and smoothed with an iron. Then, forming the ears, they make tucks and tuck them behind the muzzle, baiting them onto the thread by hand.
- Next, all the parts are sewn on a machine.
- After this, the excess insulation is cut off and bias tape made of the same fabric as the body of the mouse is sewn on.
Finally, a tail loop is attached to the round side of the textile rodent.
Heart
This pot holder would make a nice gift for Valentine's Day.
To make it you need to take:
- fabric with a “heart” print in two colors - for the central part and the sides;
- plain fabric - for the lower parts;
- synthetic winterizer, thermal synthetic winterizer or flannel;
- ready-made binding or strip of fabric (4 cm wide) for its manufacture;
- decorative button;
- threads to match the color of the material, sewing tools.
Description
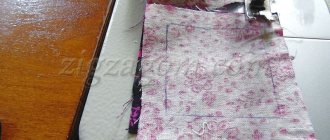
We cut out the templates according to the proposed sample.
We mark and cut out the blank according to pattern A. To do this, fold the fabric in half and apply the pattern to the fold line. If desired, you can make the pattern in a full spread and cut the fabric in one layer
Please note that there is no need to provide allowances when cutting. It is advisable to take into account the direction of the grain thread indicated on the patterns.
Similarly, we cut out the second blank from a plain fabric.
Using the same template, we cut out a blank from padding polyester.
The following photo shows a set of blanks prepared for this stage.
We fold the top and bottom parts with the wrong sides facing each other, placing padding polyester between them.
Using the second template, we cut out blanks for the upper side parts from printed fabric, and from plain fabric for the lower side parts.
Having folded the side parts in pairs with the wrong side facing each other, we secure them with pins.
We process the straight edges with bias tape. To perform this operation, it is better to use a decorative stitch.
We cut off the excess pieces of binding.
Fold the potholder - a heart, connecting the upper and lower parts
We pay attention to the combination of elements along the contour. If necessary, you can adjust the dimensions by cutting off excess
We connect the parts of the potholder with pins.
We process the perimeter of the product with trim. You need to start processing from the top center. At the same time, we leave a small area open in the center. This is where we will sew the loop. The following photo shows how to properly make the joint. We do not fold the beginning of the binding; we lay it over to the other side. We fold the end of the binding and lay it on top.
We make a loop from a strip of binding 15 cm long. To do this, fold it in half and sew it with a decorative seam. We insert the loop from the back, oriented downward, bend it upward, hiding the cuts, and attach it together with the finishing facing. Iron the finished potholder.
Sew on a decorative button.
The potholder is ready!
Knitting needles
The potholder can be knitted in the shape of a square.
- To do this, cast on a certain number of loops, depending on the size of the product (30-40 pieces), and knit with garter stitch until a square is formed.
- Next, you need to knit a second square of the same size and sew them together.
- Then you can crochet it with threads of a different contrasting color and make a loop from air loops.
- If desired, decorate the potholder on the front side with crocheted flowers, buttons and beads.
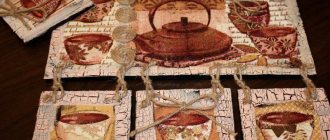
Hot pads made of different materials
Such an interesting detail as a hot stand will never be out of place in the kitchen. It will protect the surface of the table or other furniture from high temperatures, and will also give the kitchen even more comfort. And if you make coasters in the same style as potholders, you’ll get a wonderful composition.
In order to make a stand, you don’t need a pattern, you don’t even need diagrams.
The materials and manufacturing methods are no different from those used for tacks. The only difference is the size. If the stand is planned for a mug, there is no need to make a circle of large diameter (most often the stands are made round, but this is completely optional, you can give them any shape you like).
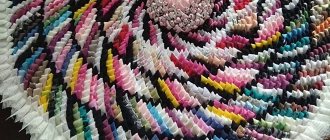
Knitted coasters, made of felt, denim or other fabric, using the patchwork technique - these handmade decorative elements will look harmonious in the kitchen interior and add originality to it.
Round crochet
Crocheted potholders look beautiful. Knitting them is easy and quick.
- Collect air loops and close them into a ring.
- Next, knit a row in a ring with a single crochet.
- Next row: two stitches are knitted into each stitch, starting from the instep loop.
- Then, in each subsequent row, add one loop through one column, the second row through two, the third through three, etc.
- The edging is knitted with another thread and a loop is made from the braid (it can also be tied).
Crochet without patterns or descriptions simply crochets products in the shape of a watermelon slice, apple, pear, etc.
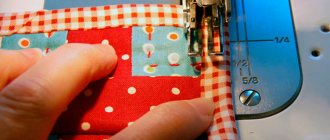
Methods for processing the cut edge of a tack
1. The cut edge is processed with an edge tape matching the color of the fabric or braid. The braid is sewn on in a single line, so if you have little experience, baste it in advance.
2. The edges of the tack, cut and secured with a straight stitch, can be “overcast” with a decorative seam. To do this you will need a thick hand needle and thick threads. You can fold ordinary threads into several folds.
3. The edge can be secured with a zigzag stitch. But this processing option is only suitable for mittens-potholders made of felt or cloth, drape.
Mitten
The classic version of a kitchen oven mitt is a mitten.
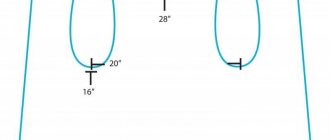
- In order to sew it, they print out a pattern for a pattern from the Internet or draw a pattern themselves.
- Then transferred to fabric and cut out. They also draw on the insulation (such as it is).
- Sew all the parts on the wrong side, and then turn them inside out and iron them.
- The top of the mitten (the place where the hand enters) is trimmed with bias tape or braid. The loop is also made from tape or ribbon.
You can decorate your kitchen with beautiful potholders if you choose the right color scheme and shape that fits your style.
Some housewives sew a kitchen textile set in the same style and color: an apron, towels and potholders. This set or just some potholders are given to mothers, grandmothers, sisters and friends for the holidays.
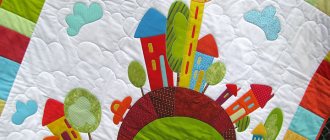
Variety of shapes
The functionality of potholders depends on the cut and design features. When working with hot dishes, there are two options - to grasp or grab, so there are different types:
- Mitten - similar to a loose mitten that you put on your hand to remove hot pans from the oven;
- Square - used to remove pots or lids or multicooker bowls from the stove;
- Butterfly - is made of two identical elements that are stitched together. Used for handling utensils without handles;
- Unusual options - suns, hearts, flowers, cats, owls. They are used not only for their intended purpose, but also as a decorative element.