Patchwork is a thing sewn from scraps of various fabrics. This manufacturing method has been known for a long time - we all remember the multi-colored blankets and bedspreads from our grandmothers. In this article we offer you a detailed master class on how to make such a beautiful and original blanket yourself. This does not require specialized equipment or professional skills. The main thing you will need: perseverance, accuracy and attentiveness. So how do you make a patchwork quilt?
How to sew a patchwork blanket
For beginners, it is better to choose patterns with large fragments, this will allow you to make a blanket faster. For experienced needlewomen, there are many master classes that talk about creating complex patterns from small shapes.
Only the upper part of the patchwork cover is made from scraps, and a whole cloth is taken for the bottom layer. This simplifies the work and increases the wear resistance of the product. To sew fragments together with a machine, it is better to use a regular edge stitch. Undoubtedly, linen stitching is stronger, but it may not penetrate fabric consisting of three layers.
Types of patchwork:
- “Quick squares” - patchwork bedspreads are sewn from square fragments.
- “Watercolor” – special attention to color.
- “Strip to stripe” is a blanket made of long rectangles sewn alternately.
- “Log cabin” - in the central part there is a square, and stripes are sewn around it in a spiral.
- “Magic triangles” - simple or complex shapes are made from triangular fragments.
- “Checkerboard” - the blanks are sewn in a checkerboard pattern.
- “Russian square” – multi-tiered sewing.
- “Honeycomb” is a pattern of hexagons.
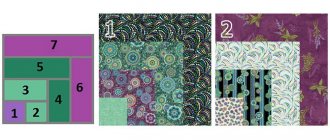
Product diagram
Beginners usually use simple patterns consisting of identical squares. With enough experience, creators like to choose more complex designs. But you must always take into account the size and number of patches, their arrangement and colors.
In traditional patterns, plain patches without a pattern are rarely used; you can combine a single-color fabric with a patterned material. There are no specific rules for repeating patches, but the pattern must be carefully thought out.
Tips for a beginner on where to start sewing using the patchwork technique
Simple tips to make it easier for beginners to sew patchwork bedspreads with their own hands:
- determine the exact size - a lot depends on this parameter;
- choose a color - the organic nature of the entire product depends on their compatibility;
- prepare the fabric - soak for 10 minutes in hot water;
- To make working with textiles easier, it is recommended to starch and iron it;
- cut into fragments of the required size, leaving allowances;
- prepare the backing textile.
Prepare your tools:
- needle and thread;
- scissors;
- pins;
- sample;
- pencil;
- sewing machine
Product sizes
First of all, you need to be guided by the size of the sleeping place, the parameters of the future owner of the blanket and his activity during sleep.
For a single bed, the length of the product is usually 180 cm, and the width is up to 130 cm. For a one and a half length, about 200 cm is taken, the width is from 140 to 180 cm, this should be based on preferences. Double beds require heavier blankets; their length can be more than 200 cm and their width up to 4 m.
Working technology step by step
The main stages of making patchwork bedspreads with your own hands:
- drawing a sketch;
- choice of material;
- stitching flaps;
- formation of the finished product;
- Drawing a sketch.
The most important part of the process, because the appearance of the product depends on it. You can draw a sketch on paper, take it from the Internet, or lay it out on the floor from fragments, following the patchwork style. Many ideas on how to sew a bedspread are available in master classes, which greatly simplifies the creation process.
Material selection
Choosing fabrics to match is not easy, but it is very important. The appearance of the bedspread depends on this. In this matter, it is worth relying on the taste preferences of the craftswoman. For two-color products, the only choice rule is dark and light colors. With multi-colored bedspreads the situation is more complicated. Colored fragments should be sewn not in disorderly chaos, but by laying out a pattern, based on existing patchwork patterns.
Technique of stitching flaps
The sequence of actions when stitching fragments is as follows:
- You need to cut two equal strips from textiles of different colors.
- They are folded inside out to each other, stitched, and ironed.
- Now from the textile of the third shade you need to cut a strip equal in width to the first two.
- The third and first two are folded right sides together and stitched.
This technology allows you to make a double-sided sleeve, from which squares are then cut. Next, you need to decide on the pattern, and then you can start connecting.
Fragments of a certain shape are sewn together in pairs if the pattern is complex. Then you should connect 4, 8, and so on until the composition is complete. If the bedspread is made of squares, the joining technology is slightly different. Square blanks are sewn into strips, and after carefully ironing the seams, they are assembled into a finished patchwork product.
Formation of the finished product
When the front part is ready, you should start sewing the back side. To do this, a piece of selected fabric is laid out on any flat surface, face down. If the bedspread is insulated, then a layer of synthetic padding should be placed on the reverse side.
The front side with a patchwork pattern is placed on top, and the product is stitched around the perimeter. The edging is made from a strip of fabric approximately 8 cm long, sewn along the edge. If the edging according to the sketch is wide, then more fabric is needed to make it.
Types of fabrics
- The most common type of fabric is cotton. A cotton patchwork blanket has the following advantages: medium density, light and tactilely pleasant, does not shrink when washed, does not cause allergic reactions because it is a natural fabric, is easy to stitch, and the material does not fray.
- Linen is also a natural fabric, but craftsmen don’t really like to use it because it wrinkles easily. But the material is soft and pleasant to the body, and at the same time holds its shape well in the finished product, therefore, although not often, it is used to create blankets.
- Denim is an original and attractive material for patchwork techniques. All kinds of shades of blue allow the master to use them creatively and to fantasize about the arrangement of the patches. You can also decorate jeans with some details if you want to dilute the blue, for example, with metallic elements.
- Viscose is also a great material because it is pliable and soft. But there is one caveat - viscose is difficult to combine with other fabrics due to its weak stretch; less elastic fabrics will not work. Therefore, for patchwork, viscose is used as the only type of fabric - the blanket will be very soft and pleasant.
- Silk or drape is also often used.
- Insulated material, like wool, can also be the basis for blankets and blankets. The fabric is natural, usually dried wool is used.
There are fabrics that are used to a lesser extent because they are too elastic. These are corrugated and pleated, thick coat materials, fur, fabrics with metallized threads.
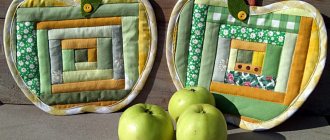
DIY baby blanket in patchwork style
For beginners, the “Fast Square” technology is suitable. To make a patchwork bedspread for a girl, you should choose more pink textiles, for boys - blue.
You will need the following materials and tools:
- 4 types of textiles;
- fleece for the back;
- needle and thread;
- ruler, pencil;
- scissors;
- sewing machine.
The simplest option is children's patchwork bedspreads made of 48 squares. To make such a thing, it is enough to cut the prepared fabric into square fragments of the selected size, adding 0.5 cm to allowances on each side. The squares are sewn together in strips, each seam is carefully ironed. When all the strips are ready, you should sew them.
Spread the fleece on the floor, place the front part on it, carefully round the edges with scissors and sew. The child will be happy to cover himself with such a blanket.
Manufacturing instructions
After determining the dimensions of the product and counting the elements for use, you need to come up with a principle for their location - create a layout.
An important point in creating a patchwork product is the chaotic arrangement of the fragments.
- It is better not to neglect creating a diagram - on a sheet of paper you need to draw at least the main motives from which you can then build on.
- Identical elements can be arranged symmetrically and create a pattern or figure, for example, a cross, a rhombus or a line. For a uniform picture, you can assemble a rapport using all types of materials.
- Cutting. The main point of patchwork sewing is to cut out identical parts and carefully join them. Before stitching, all elements need to be ironed, the backing fabric should be laid out and the scraps should be placed according to the diagram. Thanks to this, it will be possible to rearrange the fabrics if somewhere it doesn’t look right. It is better to soak and dry the fabric before use, and then iron it; if the fabric is of poor quality, this will help improve the work with it. It is desirable that the fabrics match in composition and thickness.
- An edge seam is suitable for joining. The squares are sewn together with strips, then the strips themselves are connected. After stitching, the joining seams are ironed from the inside, and then from the front side.
- A classic patchwork quilt requires the presence of filler, for example, padding polyester. The lining is secured to the front part on one side, then the filler is inserted. All layers are smoothed from the center, stitched around the entire perimeter and secured with pins.
- The border can be made by folding the edge, while the seam is decorated with braid. There may also be another option - strips of fabric that create a frame for the patchwork product. Another way out is to place the scraps end-to-end against the edges of the blanket.
- The final stage is tamping, done manually or by machine. To add volume, additional diagonal lines are created.
DIY patchwork bedspread master class
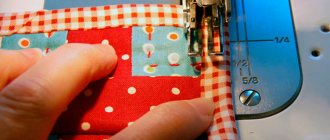
To ensure that all the squares are even, you need to use a ruler. For the same purposes, the fabric is laid in several layers. In our case, the patchwork bedspread will be two-color. Having laid each type of textile in a double layer, we cut off the edge to even it out.
Using a special ruler, mark the width and cut off the strip. You can use a regular ruler, but then it is better to secure the fabric with pins before and after the cutting site.
Here are the cut square pieces, ready for stitching. Their number and size are determined by the dimensions of your product.
The synthetic winterizer also needs to be cut into squares to make the quilted patchwork bedspread warm.
Now you need perseverance. We take a fragment of padding polyester.
Cover it with a yellow cloth.
Turn it over, cover it with textiles with a pea pattern, and secure the “sandwich” with pins.
Now we need to mark the lines in the middle. To do this, take a pen, apply a ruler at an angle of 45 degrees and draw.
When the square piece is stitched diagonally crosswise, you can put it aside and move on to the next one.
The photo shows the process of creating fragments. Also in the left corner there are two stitched squares.
We continue to make preparations.
This is how the fragments will be arranged - in a checkerboard pattern.
First we sew in pairs, then in 4 pieces. The photo shows 3 blanks consisting of 4 squares.
But 8 pieces have already been sewn.
To decorate the seams, you can use scissors to make cuts and unravel the threads. Use scissors carefully so as not to cut the seam.
Colors and prints
The appearance of the blanket directly depends on properly thought out decorative elements. You can use an equal number of squares of different patterns, or you can make sure that some are repeated more often than others.
In order to emphasize variety, striped or asymmetrical patterns are placed differently, rotated 90 and 180 degrees.
If you have a large blanket with small elements in mind, you can combine more complex patterns using triangles and squares. The themes can be different - movies, plants, animals, space - sometimes they can even be combined with each other.
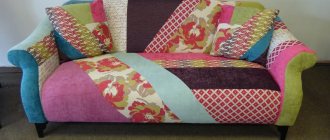
Patchwork bedspread in a modern interior 61 photos
Examples of original ideas can be seen in the photographs. Here are bedspreads made in patchwork style that fit perfectly into the style of the home. Products can be cotton, cotton and others. The color should “echo” the main color chosen for the design of the room.
Handmade things retain the warmth of the craftswoman. The tutorial above shows that even something as large as a bedspread is easy to make. The only thing a beginner may lack in the process is patience.
Author: Galina Kanashchuk