An unusual handmade rug can be a great decoration for a living room or bedroom. But you can choose options for use in other rooms of the apartment or cottage. It's quite easy to do using a crochet hook. There are many different crocheted rug patterns, varying in shape, pattern, size and texture.
Knitting methods and techniques
Quality bead crochet takes time and practice. Below we will present the main methods of knitting beads.
Russian
Russian knitting technique is one of the most common. It is considered the easiest and is perfect for a beginner.
Knitting technique:
- String all the required beads onto a thread and cast on air loops. Make two chain stitches and knit the first row with single crochets.
- Move the bead to the hook, put it in the loop and grab the thread behind the bead with the hook and knit it in a stitch. Knit each bead of this row in this way.
- Make two chain stitches again and knit the next row counterclockwise.
- Knit the first stitch, move the bead and insert the hook into the loop behind the bead. Direct and knit the thread towards you and immediately make a single crochet. In this way, knit the required number of rows of the product.
English
In the English method, mating happens the other way around:
- First, you move the bead in, and then make a single crochet.
- Using a crochet hook in the first chain stitch, make a single crochet to connect the chain stitches into a ring. Do not use beads in the first row.
- Knit with a single crochet in a circle without lifting loops. Add beads starting from the second row.
- Move the bead, insert the hook under both loops of the post and grab the thread with the hook.
- Move the bead, grab the thread behind it and knit a single crochet.
- So knit the product in a circle to the desired length.
Turkish
Progress:
- Knit the first chain stitch.
- Move the required number of beads (four pieces), grab the thread behind the 4th bead and knit a chain loop. Repeat the second stage of work two more times. This will give you three loops with beads.
- You knit two air loops, move a new group of beads, and thread the hook itself into the loop between the 4th and 3rd beads of the first loop already made, grab the thread and knit a new loop.
- Knit two loops together. Then beading is repeated.
(Photo source – https://needlewoman.org/22-zhgut-iz-bisera.html#6)
Tunisian
Stages of the Tunisian method of crochet with beads:
- Make air loops according to the diagram (plus one loop for lifting at the beginning of each row).
- Insert the hook into the penultimate chain loop and pull it onto the hook so that you get a full row of loops on it.
- At the beginning of each row, pull the thread through one loop on the hook.
- Grab the thread with your hook and pull it through two loops to the end of the row.
- Now a row is knitted, as if from a chain with air loops.
- The next row is knitted with beads. Make the first loop without beads and pass it through only one loop on the hook.
- Behind the bead, quickly pull the thread through two loops on the hook and repeat with each bead until the end of the row.
In the Tunisian method, the beads are located on the front side, on the back side only the knitting of the thread is visible.
Square
To master the square technique, the needlewoman will need some experience, since this technique is considered one of the most difficult. If you are training for the first time, we recommend creating your first bead work from three colors.
String 4 beads and close them into a ring (it turns out to be a cross). Now we will weave side walls to each bead on the bottom. The whole process of the square weaving technique consists of weaving the side walls with beads. To each bottom bead, side beads and a top bead are added, from which the next rows of side walls will be woven. The harness can be made either in one color or with different color combinations. To weave a square strand of beads of the same color, you should reliably practice this weaving technique on three-color beads.
A square rope can be imagined as cubes piled on top of each other with an independent base. To make the rope better using the square technique, choose beads of the ideal, uniform size.
Openwork
Many needlewomen like knitting with beads using the openwork method. For this technique, beads of one or more colors are used. The whole technique of this weaving consists of putting three beads on a needle and passing the needle with them through the top bead of an existing petal to the required length of the decoration. At the end, we simply tie a knot and pass the thread along the entire edge of the weave. We hide the thread inside the decoration. Already experienced needlewomen can combine openwork beading techniques with others to get unforgettably beautiful jewelry.
Flat
The flat plait is woven wide enough. To create it, a stretchy elastic band is used. The weaving process itself is simple and resembles making a regular rope, but only using an elastic band. When the diagram is completed, we begin to design the ends of the harness. To do this, cut the elastic, knit several more rows of thread without beads, while reducing the number of loops. The thread is firmly fixed and the ends are cut off. Install the accessories for the harness.
Flat braid weaving pattern:
Mosaic
When creating a mosaic strand, the number of beads in a row should be odd. For beginners, it is better to take two contrasting colors of beads number 9.
Beading technique:
- Place two beads of the first color and two beads of the second color on a double thread. Close these 4 beads in a ring to get a cross. In the future, when casting beads, keep in mind that you start casting the first beads of the color from which your thread comes out.
- Pick up a bead of the desired color and pass into the next bead from the rope until the row is closed. When the row closes, pass the needle into the bead of the next row.
- Next, you pass the needles through the beads at the tops of the woven rope.
When the rope begins to form, it becomes more convenient to weave, since the top beads into which the thread should be threaded are immediately visible. The pattern can be woven in different directions, this will allow you to get a zigzag in the pattern. The stages of weaving a mosaic strand are shown in 4 stages in the pictures:
Snake
The milk snake pattern is contrasting and uncomplicated, so it is chosen by novice needlewomen.
Stages of work:
- Cast on 10 chain stitches. Connect them into a ring using a connecting post.
- Knit 4-5 rows with a single crochet without using beads, so that you can then attach a lock to the thread for the product.
- Move 10 beads closer. Insert the hook into the first loop, move one bead to the hook, grab the thread and knit two loops of the hook at once in turn. This is how you knit each bead. There should be 10 beads in a row.
- The second row is knitted using the stitches of the first row and so on with each next row.
Fishing line, monofilament or nylon thread
The choice of material on which the beads are strung depends on their size and the technique of making the decoration. It will be more convenient to weave the first cord on a fishing line with medium, not small, beads.
Thin needle and hook No. 1 or No. 2. In another way, such a needle is called a bead needle. The product can be made entirely with its power or crocheted.
In the photo of bead strands you can see the basic manufacturing techniques
- Crochet. When creating decorations, columns and half-columns are used.
- Mosaic. There is an odd number of beads in each turn, and the next row is attached to the previous one alternating.
- Square. It is assembled using a needle and an equal amount of beads of the same diameter along the edges; in cross section it looks like a square. Quite a complex scheme.
- Flat. It is created similarly to the knitted version, but around the elastic band, due to which, in cross-section during operation, it looks more like a flattened oval than a circle.
- Openwork. Excellent for a set of thick cord, from different types of beads. It turns out airy and soft - there are small gaps between some beads.
- American. It is easy for beginners and is especially beautiful when using at least two different colors. As a result, two beaded ribbons appear to be intertwined, enveloping each other.
- Turkish. A simple option, it differs from other methods by the presence of glass beads and elongated beads. Created by crochet.
Calculation of beads for a product according to the type of strand
It is very difficult for beginners to calculate the number of beads needed for one product.
The formula is often used:
A*B=C, where:
A – the required length of the product in cm;
B – the number of beads in a row of rope;
C – thread length in cm.
If you want to make a rope 20 cm long, you will need 240 cm of thread (20*12=240).
To calculate beads, it is very convenient to use “Crochet Bead Paint” - an online editor of patterns for crocheting beads. There are many convenient functions, one of which is bead calculation.
After entering the data, the program will knock out the required amount of each individual color of beads in grams and pieces.
Price - 560 rub./per skein (200 m)
Approximate consumption of polyester cord:
- for a rug with a diameter of about 50 cm - about 150-200 m (i.e. 1 skein)
- for a rug with a diameter of about 120 cm - about 600 m (i.e. 3 skeins)
- for a carpet with a diameter of more than 2 m - more than 2000 m (i.e. 10 sq.m.)
However, the cord consumption (very) depends on several conditions:
- Your crochet style (if you knit tightly, you may need less cord than calculated), and vice versa, if you knit loosely, you may need more cord.
- From the pattern (if the pattern of the rug is simple, without convex elements, then less cord will be required than for a rug that has a lot of relief elements, for example, popcorn, lush columns, etc.)
You can order:
- polyester cord for your carpet (any quantity and any shade);
- ready-made set (polyester cord + carpet model: description and video).
Working material
It is important to choose high-quality materials that you will be comfortable working with. Do not forget that the durability of the product depends on the chosen material.
Beads
Needlewomen most often use Czech beads. You choose the number of beads depending on the chosen pattern or personal preferences. Only a person with good eyesight and nerves can handle small beads 11/0 and 15/0, although it is believed that 11/0 beads are the most common. 8/0 beads are often used. 6/0 beads are used as an addition to the main beads.
fishing line
For some needlewomen, fishing line is a more durable material, while others prefer thread. Many needlewomen believe that ropes on fishing line hold their shape better. Austrian and German nylon monofilaments are considered the best.
A thread
Dacron-based threads are often used. They are very durable. The color of the thread and its thickness depend on the selected beads. The beads should not ride on the thread, but fit comfortably into the hole of the bead.
Needle
Fine tapestry or embroidery needles (long eye) are suitable for medium-sized beads.
Hook
Crocheting with beads is always a challenging task for beginners. The main thing is that the hook is comfortable to hold in your hands. In patterns for crocheting beaded strands, the sizes of the hooks are most often indicated. Suitable hooks for beading are from 1.65 to 1.75 mm. A 1.3-1.6 mm hook will be needed for smaller beads. Crocheting with beads is more convenient than knitting, especially if you want to create a bracelet or necklace.
Before crocheting a rope, practice on small items to find the most convenient hook for yourself. Crocheting with beads will begin to work out faster with daily practice.
Spokes
Knitting and crocheting with beads are unique techniques. Some needlewomen use knitting needles instead of a crochet hook. The main difference is that it is difficult to string beads onto yarn. When knitting with beads, the fabric is not so dense, so knitting needles are practically not used in rope knitting. If you still use knitting needles, then for 11/0 beads use knitting needles No. 1 or No. 0.75.
Scissors
Always use sharp scissors. Some needlewomen use ordinary office scissors, but it is much more convenient to use thin manicure scissors.
Lock
The choice of ends and caps for beaded strands is very diverse. In specialized stores you can find something for every taste and color.
Tips for beginners
There are no particular difficulties in creating strands with knitting needles; it is enough to devote some time to studying the types of loops to create a pattern. A significant amount of patience and perseverance will also be required. For knitting you need to get knitting needles and pins. The following tools will be useful as additional materials:
- Special knitting needle. It is slightly curved where the center is. Such a knitting needle will be needed not only when knitting a rope, but also a braid.
- The size of the auxiliary tool should be smaller than the main one. This will add neatness to the drawing.
- If you don’t have a special device, you can use a knitting pin.
Recommendations:
- To knit a flagellum of a certain width, you will need threads suitable for the size of the pattern that is selected. For example, with a wide pattern, thick and fluffy threads are needed. For a subtle pattern, use cotton.
- The pattern can affect the width of the fabric; this must be taken into account when purchasing threads and counting stitches.
- The pattern has only two directions; it is corrected using an auxiliary knitting needle. If the braid is located behind, it is directed to the right side, in front - to the left.
Description of work
You can knit strands of beads using a half-cable or a single crochet. Many needlewomen believe that crocheting with beads in a column is more perfect, since the pattern is clearer and the threads are not visible on it. The beads lie flat and tight in a column.
We suggest going through a small tutorial “Bead Harness” in each technique. Try and choose the most convenient way of knitting a rope for yourself and use only it.
Column
Many beginners do not know how to knit a beaded rope correctly. The knitted rope of beads turns out elegant and thin. For knitting with beads, hook 1 is used; some needlewomen use even thinner hooks - 0.9 or 0.7.
How to tie a string of beads in a column will be described below:
- Cast on air loops and close them in a circle with a connecting loop.
- Insert a hook into a nearby air loop from the circle (it already produces two loops). Pass the thread through one loop with the hook, two loops will form back on the hook. And now you crochet the thread for the second time through these loops.
- Now we knit with beads. The bead moves close to the hook when you skip the first loop.
It takes a little longer to knit a string of beads in a column compared to the half-column technique due to the fact that the needlewoman has to knit more loops. However, this allows you to weave thick strands starting from 10 beads in a circle.
Half-column
To understand how to crochet a rope from beads, you can use a technique called a half-column. Crocheting a rope of beads in a half-stack is done with only up to 10 beads in a circle. This type of crochet with beads always turns out delicate and graceful. If you have already worked in the column technique, you will understand exactly how to crochet a rope of beads using a half column. This is due to the fact that in the stitch technique it is necessary to pass the thread through two loops twice, but when weaving with a half-column this happens only once. In a half-stitch, you simply insert your hook into an adjacent stitch on the bottom row and bring out one new stitch.
When crocheting a rope of beads correctly according to our master class, only the beads should be visible in the product, the thread itself remains inside the product.
Single crochet
Many beginners do not know how to weave a rope of beads using single crochet crochet. Such needlewomen believe that single crochet crocheting is another additional method of beading. However, if you see cable knitting patterns that indicate single crochet, this means beading with a regular stitch.
Reading the schematic
A strand of beads is crocheted according to a pattern, and at first glance it may seem that it is quite difficult to understand the pattern. However, if you once understand the principle of reading a diagram, this process will not cause difficulties in the future.
To obtain a design, beads are strung on a thread in a certain sequence. The diagram will help with this.
The information on the first line is the number of beads in the row. Here the strand consists of 12 beads.
The next line is the number of beads in the pattern. This parameter determines whether the tourniquet will be thin or thick.
Color schemes:
- draft – the position of the beads during the weaving process;
- corrected – reversal of the tourniquet;
- simulation – a type of finished decoration.
The squares on the right - information about how many beads in what sequence need to be placed on the thread to get the desired pattern. The beginning of the set is the left column, from top to bottom.
Application of bead strands
A string of beads is used for:
- pendant earrings and tassel earrings;
- thin and thick bracelets;
- short and long necklaces;
- souars with stones;
- lariats and other decorations that only the imagination of the needlewoman can create.
Round strong cord
In the master class, knitting is done from yarn with a density of 100 g per 110 m with a crochet No. 3.5. We dial on 7 in. p. and knit a row of sc.
Turn the lace. We must connect it into a ring. In the photo, arrows indicate loops for knitting the trail. R. RLS.
We made a ring and knit a trail. row. The first of the loops for tying it is the 1st loop - the jumper, obtained when performing the RLS.
Perform the 1st sc after completing the ring.
The finished pole of the new row.
The structure of the lace appears. We continue to work - we find loops - jumpers on the outside of the cord and knit sc through them. In the photo these loops are marked with arrows.
After several knitted rows, the structure of the cord is clearly visible and knitting becomes easier.
Continue to the desired length.
Knitting tips
Our tips and recommendations will help you master the technique of beading strands:
- Before you start knitting a rope, master all the necessary skills and practice regular knitting with a half-crochet and single crochet. If you do not master the minimum skills and immediately start knitting, the process can be intimidating in its complexity.
- While knitting, create a rope exactly according to the pattern and without deviating from it.
- If you are new to beading, use beads in contrasting colors for one embellishment to start with. This will allow you to practice your technique and avoid getting lost in loops.
- Try to match the thread to the beads. For beads of different colors, use beige thread.
- Most experienced needlewomen believe that it is more convenient to knit on thread than on fishing line.
- Buy only high-quality materials.
- Try not to over-tighten or loosen the thread while working.
Irina Vyshivaikina
Professional skills: Clothing designer; Artist
Brief biography and personal achievements: “I am inspired by the things that are around us.” Since childhood, I was interested in art and crafts, so I decided to devote my life to it. She received a higher education in design and released a collection of designer jewelry made from simple materials that can be found at home from any needlewoman. Afterwards, I decided to conduct master classes on creating similar accessories for everyone. She became a blogger and the author of the website domigolki.ru.
Crocheted cord rugs
A polyester cord carpet can be of the following options:
- oval;
- with an openwork pattern;
- with geometric patterns;
- made according to the Grand scheme, etc.
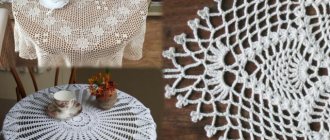
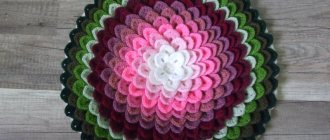
Crocheted cord rug, "Gorgeous" pattern
The knitting pattern for carpets with the “Magnificent” relief pattern involves making a product with a diameter of about 1 m. Drawings are available in online sources. Air loops are used in this work. Several rows are knitted with relief purl loops, each semicircle is framed with air loops (3 rows each). The product is suitable for children's bedrooms, recreation areas in an apartment or house.
In addition to the standard design using a hook, manufacturing methods are provided by weaving on a frame and mesh. To perform work on the frame you will need a frame. The frame is selected for the product or fragments of openwork fabric.
Step-by-step sequence of actions:
- Nails are fixed to the frame at predetermined equal intervals.
- The base cord is pulled over the nails.
- Long ribbons are put on through the base and intertwined in a checkerboard pattern, the top row is pressed against the main one.
- Once completed, you need to tie the knots and remove the rug from the frame.
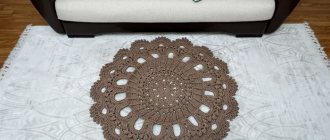
Crochet carpet from cord "Grand"
You can knit a carpet using the “Grand” pattern with a diameter of up to 2.3 m. For needlework you need at least 2200 m of threads, the weight of the finished product is 9-9.5 kg. The “Grand” technique involves openwork knitting in a style similar to the making of napkins. You can create other options based on standard techniques and schemes.
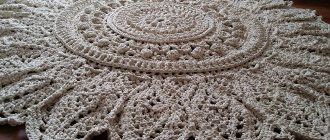
Oval crocheted cord rug
The oval rug is designed to fit the size of the room. Standard canvases are made in dimensions of 1.05x1.4 m. A cord 700 m long is required for operation. The finished product weighs up to 3-3.5 kg. In your work, you can use threads of bright colors and combine them with neutral ones to create an original design solution.
Decorative canvases are optimal for bedrooms, children's rooms, and living rooms. The dense knitting and moisture-resistant characteristics of the material make it possible to produce carpets for bathrooms and showers.
For medium-sized items (with a diameter of 1100 mm) and standard knitting density you need:
- cord 5-6 mm thick, 800 m long;
- hook No. 5-6;
- schematic representation of the carpet (an enlarged drawing of classic napkins will do).
By increasing the size of the product in diameter to 2300 mm, the mass of the finished work will increase. The standard scheme can be modified to suit the author's project by experienced craftswomen. It is recommended to draw up a diagram in advance with combinations of ornaments, types of weaving and options for decorative inserts.
How to calculate the amount of cord
To crochet carpets from cord, you need to calculate the volume of material for the decorative product. For a carpet with a diameter of 1100 mm, at least 800 m of cord is required
When creating an openwork product with a large number of additional elements, it is important to take into account the proportional increase in the required material. The weight of volumetric models is not less than 3 kg
For fabrics with a diameter of 2300 mm, at least 2200-2300 m of threads will be required. The weight of the finished product will be about 9 kg. For a compact carpet made from square patches (55x55 cm), you need at least 200 m of cord. A product in the form of a circle with a diameter of 1 m contains at least 600 m of threads, 1.5 m - 750 m. For a rectangular fabric with a relief texture (70x80 cm) you will need about 600 m of cord.
When calculating the amount of consumables, the following factors must also be taken into account:
- Knitting technique. When knitting with tight loops, the thread consumption will decrease, while using a loose technique, the volume of material will be higher than standard.
- A knitted carpet is made using patterns of varying complexity. Relief ornaments require more thread consumption. For a rug with a smooth surface, material costs are reduced.
- Beginners can determine the size of the carpet by knitting a sample (a fragment of an ornament). Then the height of 1 row of the workpiece is measured, the resulting figure is multiplied by the number of rows in the finished product. The resulting figure needs to be doubled, the indicator will determine the final diameter of the carpet.
Openwork lace
Quite an interesting basic pattern from which you can create many interesting things. Knitting follows an algorithm.
- We collect 4 air loops.
- We make 7 columns under the arch.
- We turn the product over and repeat the weaving of seven pillars under the arch.
- Secure the arch under the outer loop.
- Continue the algorithm until the desired length.
As we can see from the results of the patterns and the type of weaving example, the lace turns out to be very original and interesting.
How to do it yourself?
A beautiful woven carpet is not difficult to create with your own hands. First of all, you will need to calculate the material consumption in order to purchase the required footage. As a rule, the amount of material required is indicated in notes to the diagram in special journals.
- Choose a suitable carpet pattern. You can find both simpler drawings and interesting, but difficult to implement ones. So you need to look for an option that you can turn into reality.
- Choose the right material. Both cotton and polyester cords look equally good, so it's really hard to compare them. Choose what suits you best both in appearance and needs.