Ideas for knitting from bags
You can knit a huge number of things needed for the home: floor carpets, napkins, handbags, slippers, baskets for small items or children's toys and many other items that are no less important in everyday life. More creative and inventive needlewomen create unique and very fashionable creations from this unusual raw material, for example, costume jewelry and fashionable evening bags.
At the beginning of your work, knit a sample for yourself to see what the texture of the product will be. For inexperienced needlewomen, it is better to take garbage bags with a volume of up to 50 liters. They are softer and easier to create with. But do not use very thin plastic bags for knitting bags - the products will not be able to maintain their shape.
History of origin
Knitting itself has an ancient history, and it appeared around the 3rd century AD in Peru, according to some scientists, even earlier. Over the course of many centuries, technology was improved and new patterns were invented. Knitting materials also changed and improved.
Nowadays, no one can be surprised by acrylic yarn, alpaca yarn or natural thin cotton. But in recent years, garbage bags have been used as “yarn.”
“We spin” polyethylene thread
Regular garbage bags and T-shirts from the supermarket are also suitable for creativity. They are all different in color, density, and hardness. To create a thinner fabric with a softer texture, use thin bags for bulk products. Bags of large volume and rigidity are better suited for thick items - this is necessary so that the products retain their shape better. The methods of knitting from plastic bags are not at all different from ordinary ones - using knitting needles or crochet.
In order to build something, you need to divide the bags into strips. You will need a sharp paper knife or scissors. If the package is thin, then we cut the strips wide and vice versa. Let’s say the package indicates a volume of 30 liters. We cut such bags into strips of 2.2 - 2.5 cm. It is better to divide thin T-shirts into strips of 3.5 - 4 cm. Also, do not forget to take into account what product we are preparing “yarn” for, what loads the finished item will experience. The rule for selecting its thickness is the same as when knitting with regular threads: the thinner the polyethylene tape, the softer and more elegant the finished result. Therefore, we knit baskets and rugs from “threads” about 5 cm, and for decorative items we take a width of 2 – 2.5 cm.
We cut the packages, now we connect them along the chain into one long “thread”. There are 2 options for connecting strips. In the first case, we tie everything together at once; in the second case, we put the strips in a box and just start knitting, attaching each next one as we knit the previous one. With the second method, knitting from plastic bags goes faster.
Yarn preparation methods
For many, the difficulty lies not in making the rug, but in the process of preparing the material - polyethylene yarn.
Today, housewives are offered a bright, cheerful palette of any possible shades.
Important! If you have never knitted items like this before, try knitting a small piece from the bags you have. And if everything works out, you can take on a more serious project.
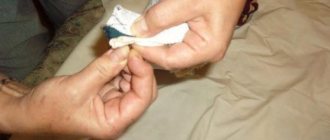
To prepare “yarn” from garbage bags, carefully fold the bags lengthwise and then cut them crosswise into pieces of equal width. To make the process move faster, cut not one bag, but several at once, folding them in a neat stack.
For cutting, it is better to use a utility knife rather than scissors.
We connect the segments together with a “ring to ring” knot.
Another way to connect pieces of polyethylene is during knitting. When one segment ends, the next one is passed through it and work continues.
It should be noted that the density of plastic bags is different, and this fact must be taken into account when determining the width of the strips to be cut. The higher the density, the thinner the stripes should be.
Such an original rug will certainly decorate any interior.
And to create interesting bright models you will need bags of different colors. It is better if the density of the packages is the same, then the mat will turn out even.
Basket with lid for storing small items
To knit a small basket for small items, we need to stock up on five 80-liter garbage bags, thin wire or a rigid rope and a crochet hook. The basket will be shallow - about six cm, it all depends on the length of the wire.
We begin our knitting from plastic bags; a master class on creating a basket will be presented below.
Let's knit a round bottom post. without nak., picking up the wire and tying it. We create a circle as usual when crocheting, adding columns in the right places according to the pattern. Next, we move on to the walls of our basket - we simply continue knitting without adding anything. We knit in height 6 – 8 cm, continuing to pick up the wire.
The lid is made in exactly the same way, only when knitting a circle we increase the number of rows by 2 so that the basket can be freely closed.
We tie the edges, the lid can be decorated with flowers, beads - depending on what purpose you plan to use your product for.
This method is suitable for baskets of any size and purpose, you just need to change the color, density of the bags and the final size.
We knit rugs
Before you start knitting a rug, you need to knit a test section, this will help determine the density of the future product. The color scheme, shape, and pattern are chosen individually, but to streamline the creative process, you can use ready-made diagrams and drawings.
The advantages of such a rug are that it is durable and moisture resistant.
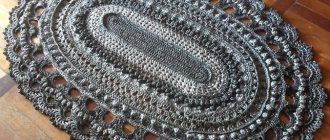
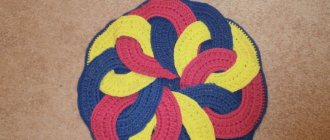
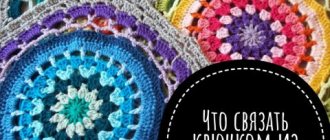
Round rug
Even a beginner can make a beautiful round rug with his own hands; the main thing is to add loops in time and follow the diagrams, otherwise the product risks turning not into a rug, but into something resembling a cup. For work, you can use several colors or make the product monochromatic with a contrasting edging, the choice is up to the master. We will crochet using several shades of yarn alternately.
A round rug looks great in the bathroom
Stages of work:
- We choose polyethylene threads for the center of the rug. We take a strip, knit five air loops from it, and then close them into a ring. We knit the next loop, turn the knitting in the other direction.
- We knit single crochets on each of the five loops in the previous row. In every second and fourth loop we will pass two additional stripes. We knit to the end of the turning loop, unfold the weaving, thereby closing the circle.
- Take the next color of yarn and knit it in the same way as the middle of the circle.
Advice! At this stage, there is a little secret in the work: to make the circles larger, add 5-6 loops, knit single crochets.
Thus, the rug “grows in breadth” from the center of the weave without curling.
- We take the third color and knit it in exactly the same way as the previous one. We finish knitting by carefully hiding the thread in the weave.
Rugs for children's rooms
[Show slideshow]
A stylish, original, cozy rug is ready to delight the eyes of household members with its cheerful diversity. In a similar way, you can crochet rugs of any shape, using ready-made patterns or inventing your own patterns.
Making a round rug
Polyethylene clutch - a fashion accessory
Skilled craftswomen can create a huge number of things needed in the household, fashion accessories, as well as products for interior decoration, practically at no cost. Such things are very durable, are not afraid of sunlight, and can be washed without fear that they will lose their shape. Using a crochet hook, imagination and knitting patterns, you can knit a wonderful clutch - this is a small women's handbag without a strap.
We cut the prepared bags and put them in a box. We take a hook of a suitable size (if it is too thin, it will be very difficult to knit the loops; if it is thick, the holes will be too large). To determine the optimal thickness of the hook, we knit a sample. We collect a chain of air. loops 20 cm long. According to the pattern, we distribute the pattern and knit 30 cm. The result should be a rectangle with sides of 20 and 30 cm. We continue to knit the flap, decreasing one loop at the beginning of each row (knit and purl). When the resulting triangle disappears, we make a buttonhole. We tie it using the “crawfish step” method. We sew along the sides so that we get an envelope with sides of 15 and 20 cm. We trim it with beads, rhinestones or decorate it with flowers. We sew on a beautiful button - and that’s it, a fashionable unique handbag is ready!
Requirements for hand-knitted rugs
Everyone who makes something for themselves tries to ensure that the product turns out to be of high quality and durable . The same goes for rugs made from trash bags.
- polyethylene mats must be durable;
- if the product is intended to be used as a bedding in front of the front door, then it must retain all the dirt;
- all types of rugs should not collect moisture and dust;
- the product should be such that it can be easily washed, not to mention just shaken out;
- environmental safety is an important point, and therefore bags with odors cannot be used;
- price is an important point, since this was originally intended to be a low-budget product;
- the thing should be beautiful, it all depends on the imagination and skill of the knitter, that is, on her own.
Bright beach bag
A crocheted bag can also be useful for trips to the beach. It can be made very interesting and convenient. The most important thing in its execution is accuracy. Let's try to knit a white and green beach handbag. We buy green and white bags, there should be 2 times more white ones. We connect the cut strips in the following sequence: 1 green strip, 2 white, etc.
First, we will need to knit 2 identical oval parts for the bottom. We cut out a thick lining, put it between the bottoms and connect them together with half-columns.
We continue to knit with single crochets in a straight line of 26 - 30 cm. By sequentially connecting green and white stripes, we will get a very interesting marble pattern. On the sides we make tucks in the form of counter folds - not very deep - and knit another 2 - 3 cm. Divide into two parts, add rows separately another 4 cm and sew on a lock. We will tie the handles and attach them to the bag. Decorate to your taste with whatever you like! We have created an easy-to-care and very practical bag.
Crocheted rugs with patterns and descriptions
We will need hooks of different sizes. The size of the hook bow depends on the material from which you plan to make the rug, as mentioned above. Before you start knitting, you need to understand what size and shape the product will be.
It can be of a standard shape - round, oval or rectangular, or it can have the shape of a flower, some children's character, or a favorite toy. Grandmother's paths, knitted in a modern way, are very popular. Let's look at a few of the most popular schemes.
Traditional shaped rugs
To get a round carpet, you need to adhere to the following scheme:
- tie 1 chain loop on the hook;
- 1 row is knitted from 2 chain stitches and 11 double crochets;
- The 2nd row is knitted from 2 chain stitches, from each of which there are 2 double crochets;
- The 3rd row begins to be knitted with 2 chain loops, each of which has 2 double crochets.
The first three rows are the most important; the shape and density depend on them. 4 and subsequent rows are knitted in exactly the same way - with air loops and columns. In order for the rug to expand when starting a new row, you must remember to add 1 double crochet. Upon completion of knitting, tighten the loop and stitch the last row of yarn with dense threads so that nothing gets knocked out and the product does not unravel when washing or cleaning.
- knit 10-15 small squares, then sew them together;
- take thick fabric and knit it with a single fabric - stitches and yarn overs.
Grandma's rugs
They come in rectangular or square shapes and are knitted by adding lots of different colors and using the standard knitting patterns below. The variety of colors allows you not to limit your own imagination and use the maximum number of possible materials for knitting.
Japanese path
Even a beginner can cope with knitting a Japanese-style runner. This style involves the presence of a large number of hollow circles in the product, connected in an unusual way. For ease of knitting, it is better to start by creating a simple round rug.
Rugs of unusual shape
Using a crochet hook you can create incredibly beautiful products. There are no restrictions on size and shape. The easiest way is to knit a path in the shape of a flower. To do this, you need to knit several round paths, and then connect them together using a needle and thread. The largest circle should be placed in the center. Flower petals can also be made oval. In this case, you need to knit according to the pattern presented above.
Knitted slippers for guests
Slippers knitted from bags will come in handy everywhere. You can wear them to the bathhouse, they will come in handy in the pool and at home. It is advisable to buy packages in a more cheerful color. Choose a style of slippers and go! First we make a pattern for the leg. We knit the oval sole according to this pattern very tightly, post. single crochet or half-stitch, and then we knit the top of the slippers, focusing on your preferences (clogs, flip-flops, flip-flops, etc.). Decorate or not is also up to you.
Finally, we sew the slippers to the soles and wait for guests!
Patterns for carpet knitting
Previously, crocheting was limited to scarves and napkins, but now useful things are being realized from simple patterns. To knit beautiful oval carpets in the interior with your own hands, various materials and knitting technologies are used. For beginners, use several simple models.
Square, rectangle
Crochet square fabric
It is recommended to use the simplest shape - a square. They are knitted with a single fabric, using knitting techniques with different motifs. They determine the final result, the design. There is the following selection of carpet patterns:
- A simple rectangular product, which is knitted in double crochet stitches with alternating colors, and finally tied with a row of stitches to create tassels. This product is created from the remains of plain melange threads.
- Make a rectangular shape using multi-colored squares, which are sewn together with a needle.
- They knit a rug from a double crochet stitch with color changes in a diagonal sequence, and there are many other patterns.
Round carpet
A round crocheted product looks great placed on the floor of a bedroom or children's room. They make a designer model for the kitchen, because they can be washed without worry. They are divided into openwork and solid.
The latter are knitted with a simple pattern. This model uses double crochet and crocheting cones. They are suitable for the living room and children's room, as they are more textured, thanks to which they retain heat longer. Openwork models are used as a design solution.
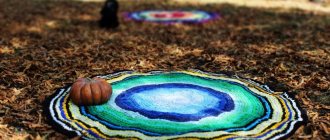
Oval rug
An oval rug is crocheted for the living room, recreation area, and long rooms. They use various patterns and patterns for crocheting. They use different materials, including crocheting an oval rug from plastic bags.
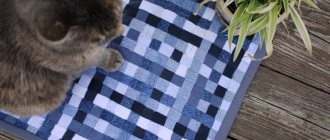
T-shirt carpet
Very often, knitted T-shirts are collected at home in large quantities - it’s impossible to wear, it’s a shame to throw them away, they’re just boring. You can get rid of unnecessary things by creating what you need. Things are cut into strips (15-20 mm), tied (stitched) into a single thread, and an oval is knitted. For work use hook No. 10. If there is not enough material, then purchase knitted thread, which is cut into strips.
Japanese rug
Japanese carpet
The Japanese pattern looks complicated, but when you look at the crochet technique, it involves knitting empty circles connected in series. For a simple product, use a model of four circles, which are “filled” with a double crochet.
Another option is to knit a circle to which a chain of hollow circles is sewn. They are connected using a standard weave. Attach the chains with thread and needle.
Polyethylene flowers for decoration
To decorate things created from bags, you can take flowers knitted from the same material.
To make a poppy flower we need red and black bags. First, the “Irish berry” for the box. We wrap 10 - 17 turns around the finger with black thread and tie them with fifteen posts. without a crochet. We knit a row of posts. without a crochet. In the next row there are 20 columns. without a crochet. We form 20 arches from five air. loops Continue with red thread and knit 20 stitches. with a double crochet on an Irish berry. In the next rows there are 2 columns. with a double crochet in each loop, a total of 40 in the second row, and 3 stitches. with a double crochet in each - in the third. Again we take the black thread and tie the edge of the flower in reverse.
Pattern for knitting from plastic bags of chamomile.
Flowers made in this way will decorate your finished products. You can also knit any others using patterns for ordinary threads.
Preparing material for work
Before you start working on a new project, prepare “threads” from knitting bags. Polyethylene of the selected colors must be stacked and cut into strips. The yarn of dense bags must be made separately from the rest, since the width of the threads will differ.
The result is unique threads that, when twisted, become the same size. You can make a test sample from the resulting threads to evaluate the ease of working with the material.
You will also need a hook, the number of which is selected depending on the knitting technique and the size of the craft, scissors, a ruler and a stationery knife. Any mesh material, for example, insect netting or old tulle, is suitable as a future basis for the product.
You can make the frame yourself from wire or strong rope. Although usually needlewomen stick to factory-made materials that have colored inclusions, as they help create an interesting product without a ready-made pattern.
Crocheting rugs from plastic bags
The “Sheep” carpet for a children’s room is a great idea. It will add comfort and warmth. For the rug we will need beige and dark brown bags, cardboard, and strong threads.
We cut out a ring from cardboard, the diameter of which is 3 cm on the inside and 7 cm on the outside. We make pompoms (43 pieces) from beige bags, tying them with thread. From brown polyethylene yarn we knit a square with fillet mesh to the size of the body of our sheep. Attach the prepared pom-poms (42 pcs.) to the net. The closer they are to each other, the thicker and denser the rug will be. We also knit the tail, head and legs from brown yarn. Attach the last pompom to the tail.
Knitting rugs from plastic bags can be turned into a fun activity. Invite your child to participate in assembling such a fun accessory, and he will be very pleased!
Let's look at knitting an oval rug from plastic bags. This rug is good for the bathroom because it does not slip on the floor, does not absorb water, dries quickly and is easy to clean. We will create it according to the scheme shown in the photo.
Wonderful things made with your own hands from polyethylene are very original, unusual and, certainly, unique! They fit perfectly into almost any interior - from the bathroom to the hallway!
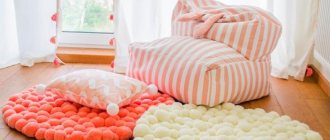
Polyethylene floor mat using pompom technique
Pom-poms connected into a rug transform the room and look interesting thanks to the volume of knitting. The attractiveness of an item depends on the color of the source material. Walking on this surface is like walking on grass. To make this warm and practical item you will need:
- plastic packaging of the desired color;
- cardboard for a template 3 cm wide;
- durable cord for fastening pompoms;
- scissors;
- base (a mosquito net will do).
Procedure:
- Cut the polyethylene into 1 cm wide strips.
- Wrap the ribbon around the template, 3 cm wide, and tie with strong thread.
- Cut the winding from the other edge. The result will be a pompom with a diameter of 6 cm.
- Prepare the required number of polyethylene balls.
- Make markings on the base.
- Sew the blanks onto the mesh.
- Cut off any excess cords. Carefully align the mesh so that no edges are visible.
- When can you exercise after giving birth?
- Pancakes without eggs
- How to extend speed on Beeline