The condition of the ceiling surface depends on many factors, but it is close to ideal only after recent repairs. In all other cases, there are defects on the ceiling - the most visible base of the room - that homeowners strive to eliminate as quickly and efficiently as possible.
The main criterion for the quality of ceilings is their evenness, if you do not take into account some original finishing methods, for example, wooden beams. Only on a leveled base or by hiding the defective surface under a masking shell can a decorative or, at least, classic finishing of this structural element of the room be performed. Let's look at several of the most common ways to level a ceiling with your own hands, depending on the significance of its defects.
Classification of ceilings
The nature of the defects in the “rough” ceiling is influenced by the type of ceilings and the design of the house itself. You need to pay special attention to these parameters when it comes to a new building. Actually, the ceiling is formed from floors, which come in three types: monolithic, prefabricated and precast-monolithic. There are also more exotic types of floors, for example, aerated concrete, but we will not consider them.
- Monolithic floors are typical for monolithic houses. The building structure is a single concrete structure without seams. The absence of seams reduces the likelihood of cracks at the joints. However, in new buildings shrinkage still occurs, which can lead to cracks. Monolithic buildings shrink over the years.
- Prefabricated floors rest on load-bearing walls; this type of floor is most familiar to residents of panel houses. The design immediately provides for tolerances for shrinkage. Shrinkage of panel houses takes 2-3 years.
Separately, it is worth mentioning the shrinkage of brick houses; they can also have prefabricated floors; shrinkage of such a building can take from 5 to 6 years.
- Prefabricated monolithic floors are based on the use of hollow blocks, which are combined into a single structure when poured with concrete.
What are the types of staircases?
In new homes with staircase planning, all ceiling passages must be designed in advance. In a new building with a concrete floor, workers leave an area for stairs equal to a standard slab. Such a passage will have a reserve. As a rule, it is slightly larger than the required space for the stairs. The absence of a hole after construction is completed will not be a big obstacle. In slabs, you can do it yourself using a grinder.
Wooden flooring is not so demanding. If the opening was not planned in advance during the construction of the building, then this can be corrected.
There are several types of staircases:
- Rectangular (square)
- Round (oval)
- Semicircular
- Non-standard
The passage in the ceiling should be safe and comfortable when walking up and down. The most standard and popular is the rectangular option. It is in great demand among residents of the private sector. This type requires a minimum of design effort. It takes less time and effort to create it. The length parameter directly depends on the design and size of the planned staircase.
A more complex type of design on the ceiling is in the form of a circle. This passage is used for spiral staircases. When making such an opening, the main thing is not to miss one point: to place the upper steps below the circle itself.
The semicircular passage is ideal for spiral and flight staircases.
Standard ceiling defects
A significant proportion of defects in ceiling coverings appear due to shrinkage. This is influenced not only by the floor itself, but by the design of the house and the foundation. Joints of different materials become the most problematic places, since elements can shrink with different dynamics. Due to deformations of the base, the finishing suffers: the plaster cracks, defects appear on the drywall.
Experts recommend starting the “rough” leveling of the ceiling only after 2–3 years, when the main shrinkage processes have completed. If it is not possible to postpone repairs in a new building, you need to carry out certain procedures to protect the surface.
To protect against shrinkage, plaster in new buildings must be reinforced.
Monolithic floors have the smoothest surface, so leveling them will be the easiest.
Prefabricated floors often have significant deviations from the horizontal. Two slabs may have different levels.
List of required tools and materials
You will need:
- Spatulas of different sizes. These tools are convenient for removing old ceiling coverings, as well as applying mixtures.
- Drill with mixer attachment.
- Plates that will be used for grinding.
- Malka for mixing plaster.
- Maklovitsa and roller.
- Painting cord that allows you to mark a control line.
- Rules 2 and 3 meters long.
- Plaster or putty.
To ensure safety, it is important to have reliable mobile ladders and platforms.
Methods for leveling ceilings
The variety of ceiling leveling methods can be divided into two types: “dry” and “wet”.
- “Wet” leveling methods involve the use of materials that are adhesively bonded to the base. Examples include plastering, tiling, putty, and various adhesive modules. For “wet” methods there is a drying period.
- “Dry” leveling methods do not involve the use of binders that are adhesively bonded to the base. Only the frame is used, which is mechanically fixed to the base using hardware. The frame is sheathed with sheet material or serves as a basis for tensile structures. This group includes rack, cassette, tension, and suspended types of ceilings.
Decor elements
Surely the reader will find the list of decorative elements sold specifically as decor for the ceiling and adjacent walls useful.
- Ceiling plinths are made of wood, polyurethane and polystyrene foam. They mask the junction of the ceiling and the walls, hiding its defects and rounding right corners.
Ceiling plinths can be very wide and have a very complex pattern.
- Decorative cornices for hidden lighting are mounted ten centimeters below the ceiling. They contain an LED strip that is invisible from below.
- Borders and moldings separate the upper section of the wall, painted to match the ceiling, and the lower part covered with wallpaper. This design makes the room seem taller.
- Ceiling sockets are mounted above a chandelier or other ceiling lamp.
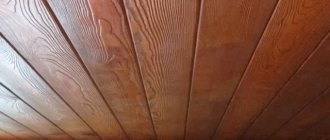
- Installation of decorative overhead beams that imitate the ceiling of a wooden house in an ordinary city apartment.
Before us is an ordinary city apartment. The beams are just an imitation.
How to level a concrete ceiling
At the first stage of leveling a concrete ceiling, it is usually necessary to determine which method will be used. It makes sense to use wet methods in cases where there is no large difference in level (no more than 50 mm). This is due to the fact that increasing the thickness of the layer will affect the weight of the coating, which is attached to the base only by an adhesive method (glued). In addition, large differences make it impractical to use plaster when leveling the ceiling with your own hands due to the significant costs of the material.
Particular attention should be paid to preparing the base and calculating the required amount of materials. You should also take into account the age of the building: new buildings, as mentioned above, shrink, so some types of finishing cannot be done until shrinkage is complete.
If the concrete floors are prefabricated, then slab joints (rusts) are often visible on them. For wet types of finishing, the rustications need to be embroidered, filled with polyurethane foam, and then plastered or puttied. If the “dry” leveling method is used, then sealing of rustications may not be necessary, since they will still remain inside the frame of the suspended structure.
Where do the irregularities come from?
Irregularities can arise due to slabs that lie one higher and the other lower, deep seams are formed at the joints, and the horizontal plane of the future ceiling is disrupted. This problem is relevant for residents of Khrushchev.
In modern houses, monolithic concrete is often used instead of floor slabs. But even in this case, defects arise: seams, concrete sagging in places where the formwork sheets are joined, the formation of “sinks” on the ceiling surface or horizontal slopes due to unevenly aligned boards.
If you do not level the ceiling, the defects will be noticeable, and further finishing will only worsen the flaws.
Ceiling preparation
With “wet” methods of leveling the ceiling, you need to be especially careful when preparing the base, because mistakes made at this stage can lead to peeling of the plaster in the future.
- Removing old plaster - if the ceiling has already been plastered, then the coating does not always need to be removed. This issue is resolved separately for each specific case, since this procedure is quite labor-intensive if you do the ceiling leveling yourself. If you hire a professional, dismantling the old coating will increase the cost of the work.
To make a decision on old plaster, it is necessary to carry out diagnostics. The reason for removing the finish may be cracks on the surface or mold stains. You should also try to tear off the coating with a spatula; if it begins to crumble, the plaster will have to be removed. You can also tap the plaster for diagnostics. If the surface “swells”, then voids have formed underneath, such a layer will be a poor base for a new finish.
To remove old plaster, you can use a hammer drill, axe, hammer or narrow spatula.
- Washing off the whitewash is a mandatory procedure before plastering work. Whitewash was commonly used in older homes. Lime whitewashes are especially dangerous: over time they crystallize and lose adhesion - the weight of the plaster can tear it away from the base.
- Cracks must be repaired using plaster or putty. You also need to add reinforcement; perforated tape or sickle mesh is suitable for this.
Read more about sealing cracks with putty in the article » » on the website.
- Sealing rust - this architectural element spoils the appearance of the ceiling, so it must be dealt with in the same way as with cracks. Before embedding, it must be expanded by 2-3 cm. To do this, you can use a hammer drill. Then the recess is filled with polyurethane foam and puttied. A serpyanka mesh is glued onto the putty layer, then a finishing layer of putty is applied on top.
Installation work
Regardless of the chosen type of rough base for putty, it is important to properly prepare the ceiling itself for subsequent work. This event is carried out with equal attention for subsequent plastering or plasterboard covering. The reason is that decorative finishing is carried out over the entire area of the ceiling, which means that there will be no possibility of visual monitoring of the condition of the ceiling for a long time.
One of the options for the actual state of the ceiling before repair Source sibnovosti.ru
The work is as follows:
- old decorative trim is removed;
- weakly adhering and peeling areas are dismantled;
- identified areas with fungal formations are disinfected;
- rust is removed;
- repair of cracks with reinforcement is carried out;
- preventive treatment with antifungal and anti-corrosion agents is carried out;
- Oily stains present on the surface are degreased.
If you plan to replace or lay new hidden communications on the ceiling, then this must also be done before work on leveling the ceiling. In the case of plaster, grooves are made. Above suspended structures, it will be enough to securely secure pipes and cables using fire ducts. After the above steps, you can begin to create a level area.
Preliminary installation of wiring in corrugated pipes Source fasad-lider.ru
Rough alignment
You can level the ceiling for painting in various ways. If the differences in plane and level are insignificant, then it would be more rational to stick with plaster. For more comprehensive work with sufficient wall heights for comfortable living, in terms of budget and complexity of installation work, it is better to prefer structures with sheathing and cladding materials. Here today, most craftsmen recommend stopping at drywall. Let's consider each of the options in more detail.
Plastering
Before plastering, the base repaired and treated with protective compounds must be primed. Unlike walls and floors, an additional criterion for choosing a material here is high tear strength. Among the optimal solutions, craftsmen often choose acrylic primers containing quartz filler. Such compositions are best known by the name of the primer from Knauf - “Betonkontakt”. It can be applied with a brush or short-haired roller (foam rubber quickly becomes unusable).
Betokontakt soil from Knauf Source materik-m.ru
See also: Catalog of companies that specialize in finishing materials and related work
The next step is to install beacons. This is not always necessary. In the case of cosmetic repairs to the ceiling for painting, you can only localize, using the rule, to smooth out noticeable depressions in the plane. If you need to maintain a horizontal level, then you can’t do without beacons. It is worth noting that when using a metal profile or wooden beam, the landmarks will need to be dismantled after the plaster begins to set. It is better to fill the remaining grooves with the solution before the total mass of the leveler hardens.
Next, the site itself is leveled. The solution is first thrown on or applied using a spatula, trowel, or falcon. Next, the rule removes the excess. After the plaster has set, large strips with holes are filled with fresh composition. Additionally, you can use a trowel to grout the surface to make it easier and faster to apply the putty and reduce its consumption.
Example of a plastered ceiling Source ms-stroy.com
Sheathing with plasterboard
OSB boards or plywood can also be used as cladding material. But gypsum board is still more often used. The canvas is secured to a pre-assembled metal profile frame. The sheathing consists of guides around the perimeter and rack elements in the center. It is better to attach the former to concrete or block walls with a damper pad to dampen vibrations so that cracks do not appear. The latter are additionally secured with the help of rods and suspensions to the ceiling base in order to prevent the structure from sagging under its own weight. Plus, this approach allows you to align the position of the frame according to the level and plane. If desired, the work can be complicated by assembling boxes, steps, niches for lighting and other installations.
Plasterboard ceiling cladding Source terraskom.ru
Finishing preparation
Now let's look at how to properly putty a ceiling for painting. Here, most often, the choice of material comes down to the popular mixture from Vetonit - LR+. But this solution has a lot of advantages only for leveling the base, for example, for wallpapering. There are also restrictions on use - dry heated rooms. That is, before painting it is necessary to carry out finishing preparation with two types of putty. They must necessarily correspond in their technical characteristics to the climatic conditions in a particular room where the ceiling repair is being carried out.
An example of a special putty for working with OSB boards Source vseinstrumenti.ru
Ceiling markings
At this stage, you need to measure the horizontal level of the new ceiling. To do this, you need to find the most protruding point on the old base. To do this, you can use a long rule or a bubble level. The level must be applied in different directions and the readings checked. From the most protruding point we measure the thickness of the future ceiling and mark it on the wall. Then this mark must be transferred to all walls. To always see the level, you can screw self-tapping screws into the wall and stretch a rope between them. You can also leave a line on the wall using thread and paint.
If you have a laser level, then measuring work is greatly simplified. The device allows you to project a laser beam onto all walls in the room.
Formation of beacons
Beacons help maintain a uniform level during plastering work. The installation step is usually made so that it is no more than the length of the rule (100 - 130 cm). Galvanized slats, wooden blocks or mortar can be used as beacons.
Before installation, the appropriate locations must be marked. For convenience, you can stretch strings in these places.
In the places where the beacons are attached, small piles of mortar are glued in increments of 30 cm. You need to use the composition of the mixture that will then be used to level the ceiling.
A galvanized profile or bars are glued onto the solution. You need to press in until the level of the beacon reaches the level of the mark.
If the solution itself serves as a beacon, then you need to lay it out in a long strip, and not pointwise. The correct installation is checked with a bubble level. This method is more difficult, since it is more difficult to form an even strip of solution.
Is it worth installing the tension structure yourself?
Installing suspended ceilings is also considered the best way to level the ceiling. This method allows you to simultaneously organize the final surface finishing.
The process is carried out in several steps:
- First, marking is done. The location of the profile strips and the final ceiling height are determined.
- A person without extensive experience in this field should use the glazing bead method of attaching a baguette. To do this, holes are made in the wall and filled with dowels. Attention must be paid to the reliability of the fastening, which is designed for heavy weight.
- Now you need to fix the lamps. You need to think about the power of the lamps in advance. The wiring is laid in such a way as to avoid contact with the fabric after it is tensioned.
- The temperature in the room rises to 40 degrees. This allows the material to heat up and expand in size.
- Now the canvas needs to be secured in the profile. The process starts from the corner and spreads around the perimeter. Reliable fixation of the ends of the canvas is important. At the end of the action, all that remains is to trim off the excess.
- It remains to wait for the canvas to cool. Wrinkles that appear during the process are removed by local heating and smoothing.
This work requires a certain level of qualification and the availability of special tools. Considering the high risk of miscalculation in the absence of experience, it is better to entrust the matter to specialists.
How to choose a putty composition for the ceiling?
There are finishing and starting putties. The former have a finer grain fraction, so they can be applied in a thinner layer. The starting putty is usually laid in a layer of 10 mm to 30 mm. The finishing layer has a thickness of no more than 0.5 - 1 cm.
Also, putties vary depending on the initial readiness. Ready-made mixtures are supplied in buckets and are immediately ready for use; dry mixtures must first be mixed with water. Ready-made compositions have the finest fraction, so they are designed for laying in a thin layer. Also, ready-made formulations are not suitable for storage at subzero temperatures. Dry mixtures are more suitable for laying in a thick layer, so they are more convenient for “rough” leveling of various surfaces.
When choosing a putty, it is important to consider the conditions in which the room will be used. For wet rooms, it is better not to use gypsum-based compounds; in this case, it is better to use cement mixtures.
Hole around the riser
A hole around the risers of communication systems does not form so often, but you still need to know the solution to such a problem.
In this case, sealing the holes in the ceiling is done as follows:
- A small gap, up to 0.5 cm wide, can be filled with silicone sealant. This material is characterized by good ductility, so it will not interfere with thermal expansion of pipes.
- If there are large holes, the work becomes somewhat more complicated. In this case, before sealing the hole in the ceiling, additional reinforcement is required, for example, with welding electrodes. Further actions involve filling the hole with polyurethane foam in several layers. Excess frozen foam is cut off with a knife and sealed with putty. If the problem occurs in a dry room, then you can use gypsum-based material. Otherwise, it is recommended to use acrylic putty.
In conclusion, it can be noted that you can repair a hole in the ceiling, regardless of the cause, with your own hands. Moreover, the work is accessible even to a home handyman without experience, if he knows how to cover up holes in the ceiling.
Ceiling putty
The putty can be applied with or without beacons. In most cases, putty is applied after plastering to complete the leveling for painting. If you apply putty without plaster, this will significantly increase the consumption of material.
The starting putty is usually applied in several layers. The first must dry before applying the second coat. After drying, the surface is treated with sandpaper. To do this, it is convenient to fix the sandpaper on a grater or wrap it around a block. With this tool you need to make circular movements along the surface of the ceiling.
Read more about puttying walls in the article “” on the website.
To apply the composition to the ceiling, use two spatulas (wide and narrow) or a spatula and a trowel. It is better to move the tool diagonally so that the layers overlap.
The finishing putty is applied after the starting layer has dried; it is needed if the surface is to be painted.
Technical features of the event
Ceiling putty for painting is done to create a smooth surface with a dense structure. The point of the event is to ensure that the thin-layer coating does not reveal irregularities, cracks and pores, which will look like dark stripes and black dots. The fact is that most paints penetrate well into a moisture-absorbing substrate and do not have the property of filling small defects. Moreover, lighting fixtures almost always perfectly illuminate the surface of the ceiling.
The next feature is the technical characteristics of the putty. The compositions are in finished form a paste-like mass that contains fine-grained filler. Compared to plaster, the permissible layer thickness here rarely exceeds 2-3 mm. It is also worth considering the fact that only finishing compounds are used for touch-up. That is, the coating is formed with an even smaller thickness - less than 1-2 mm. Not every base can be immediately coated with such putty in order to properly prepare the ceiling.
An example of a finished finishing putty with an allowable thickness of 3 mm Source wilisbel.by
The third point to consider is the nature of the working foundation. Initially, the ceiling may be previously leveled and only an update of the decorative coating is required. This option is the simplest. But there are also more complex ones that require dismantling or repair. In any case, a full analysis of the situation is required in order to correctly determine the method of preparing a rough, level base before puttingty on the ceiling for painting.
Leveling the ceiling with plaster
Plaster is used if the difference in ceiling level does not exceed 5 cm. Plastering is carried out along the beacons. In rooms with normal temperature and humidity conditions, gypsum mixtures are more often used. They have less weight per unit area, so they are well suited for ceilings.
Cement mixtures are heavier, so they are used only in rooms with high humidity, where gypsum compositions cannot be used. Plaster is applied between the beacons. The first stage is “covering”, when the solution is applied to the ceiling without leveling. The second layer is applied to those places where the thickness of the layer is insufficient.
The process of applying plaster to the ceiling is much more complicated than puttying.
When the entire ceiling space is covered with mortar, they begin to trim it using the rule. The tool is pulled along the beacons, removing excess solution. After the plaster has hardened, the beacons must be removed from the ceiling. At the last stage, the surface of the ceiling must be rubbed with a liquid solution.
Dry ceiling leveling
Dry leveling does not involve the use of binders adhesively bonded to the base. With this leveling method, some steps of preparing the base can be omitted. For example, you don’t have to embroider the rustics, as they are hidden by drywall.
For dry leveling, you need to make a frame, which is sheathed with sheet material (gypsum plasterboard, gypsum board, aquapanel, chipboard, plywood, etc.). In most cases, drywall is used, since it is the most common and affordable.
Preparatory stage
Before leveling a crooked ceiling, it is important to clean the manipulation area. The method is determined by the type of coating:
- Removal of water-based paint will be easier by pre-treating it with water and removing it with a metal spatula.
- It is possible to speed up the washing of whitewash by applying special compounds, soda ash or whitewash.
- Layers of persistent paint or enamel coatings are removed with an angle grinder with an abrasive attachment.
- Wallpaper is removed by moistening and then scraping with a spatula.
- To remove greasy stains, you should use soda ash or laundry soap.
- To remove rust, it is good to use hydrochloric, sulfuric or phosphoric acid. It is permissible to use anti-corrosion agents produced for the car.
- White or yellow stains caused by salt deposits can be removed with organic acids.
- To eliminate mold and mildew, you can purchase an antiseptic for concrete.
- Removal of dirt and soot is done with laundry soap or bleach.
The final stage of preparation is washing and priming the surface. These works are required when filling joints and sealing holes.
Frame marking
Marking the frame is no different in principle from marking lighthouses, but you need to immediately take into account the thickness of the frame, so we set aside 5 - 12 cm from the protruding point. If there is recessed lighting, the thickness of the ceiling will be at least 9 cm. Along the perimeter of the room on the walls we mark the location of the guide profile .
The frame for a plasterboard suspended ceiling consists of a ceiling guide profile (UD) and a ceiling profile (CD). CD profiles form a sheathing on which the drywall is fixed. The entire structure is attached to the base with hangers. Direct suspension allows you to make the ceiling thickness up to 10 - 12 cm. An anchor suspension has moving parts and is used for more complex ceiling structures. Read more about frame elements for drywall in the article “” on the website.
Frame installation
The guide profile is attached with dowel nails to the wall. It is recommended to install hardware every 50 cm or every 25 cm if fastening is to loose foundations.
After installing the guides, you need to set and mark the placement of the ceiling profiles (CD). This will help you find the mounting points for the hangers. Each suspension must be attached with dowel wedges to the base.
Long ceiling profiles are supported on opposite guides; they are called main profiles. If their length is insufficient, then connect the two profiles using an extension.
When installing the frame, do not install the profiles close to the walls; this will prevent the base from moving due to temperature deformations of the drywall.
The main ceiling profiles (CDs) must be spaced at 1200 mm intervals, which corresponds to a sheet of plasterboard. Cut ceiling profiles, called load-bearing ones, are installed perpendicular to the main profile. They should go in increments of 500 mm. Two perpendicular ceiling profiles are connected with single-level connectors (“crabs”) and fastened with self-tapping screws.
Read more about installing a suspended ceiling in the article on our website.
Drywall installation
After installing the frame, it is sheathed with sheets of plasterboard. It is recommended to first make a layout on paper in order to understand how many sheets will need to be cut.
Each subsequent row should be offset by half a sheet. It is recommended to use 12 mm thick plasterboard for the ceiling. When cutting sheets, it is important to properly process the joints; to do this, you need to chamfer them. This operation is performed before installation on the frame using a construction knife or an edge plane. If the joints are processed when the drywall is already fixed to the ceiling, then a construction knife is used.
Drywall is secured to the frame using black self-tapping screws. The junction of the two sheets must fall on the frame profile. You must follow the rules when tightening screws. The head of the hardware should not stick out, nor should it go deep into the gypsum core, breaking through the cardboard layer. After fixing all the sheets, the joints are primed and treated with putty.
Read more about processing joints of drywall sheets in the article “” on the website.
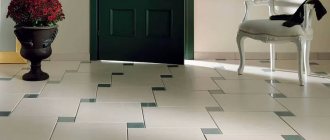
Leveling the ceiling with tiles
Tiles can be a good ceiling option depending on the material they are made from.
- Ceramic tiles are used as ceiling finishing quite rarely due to their high weight. Of course, if installed correctly, there should be no problems - the tiles will be firmly fixed to the base. If there is a mistake or external factors (leakage from neighbors), the tile may lose contact with the base, and this is already dangerous, given that the tile has considerable weight.
- Acrylic tiles are a finishing material that imitates regular tiles well, while being lightweight, making them well suited for ceilings. Acrylic tiles are glued using regular glue.
- Foam tiles are not only lightweight, but also cheap finishing materials. Such tiles are glued with an adhesive composition. There should be no solvent in the glue, as this substance corrodes the foam.
All of the tiles listed can be laid on the ceiling, but they will not help level the surface in all cases. They will be able to hide small irregularities, and if distortions in the ceiling level are combined with deviations of the walls, then the square modular structure of the tiles will only emphasize the curvature of the geometry.
Before laying tiles, it would be more correct to first level the surface with plaster, and only then glue the tiles to it. You should definitely not glue heavy tiles onto uneven surfaces, increasing the thickness of the tile adhesive.
A number of nuances that everyone should know
As we mentioned earlier, if you decide to line the ceiling with plasterboard or any other material, then in this case there is no need to think about how to putty the seams on the ceiling. However, this method of getting rid of ceiling unevenness is not highly reliable, so it is better to choose materials that are best suited for this type of work. Expanding cement, for example, is suitable.
Before sealing ceiling joints with cement, you will need to acquire the following materials:
- NTs grade cement is used for sealing deep joints. This material is capable of expanding during the process of its hardening, which leads to filling the entire space of the gap between the plates.
- To eliminate fairly wide seams, insulating materials with satisfactory density will be required. Quite often, polyurethane foam is used as such a material.
- Elastic, starting and finishing putty.
- Polyurethane foam will be necessary to eliminate wide cracks. This material adheres well to the primed base and, after expansion, can completely fill the gap.
If, after cleaning the surface, you find a very narrow and, at the same time, deep joint, then you will need to carry out a number of such actions. Having chosen a sealing material of suitable thickness, take the sealant and apply one layer of this composition to one of the sides of the seal. Next, such material is pushed into the gap between the plates with a spatula, and care is taken to ensure that there is room left for further filling with any mixture.
This is one of the methods for deciding how to seal the seam on the ceiling between the slabs. It is similar to the technology by which tiles are laid on an adhesive mortar, only in our case, expanding concrete is used. The cracks are closed with such a solution, with the obligatory leaving of small recesses, since the material we use has the property of expansion. In addition, decorative plaster will be applied at the end.
Coating the joint with elastic putty begins after the solution has completely hardened and the groove is prepared for the next finishing step. To carry out the above work, it is best to use not one spatula, but several, having a working surface of different widths. This will make the workflow easier to some extent.
A large spatula is needed for scooping up putty from the container, and a narrow one is used to remove the putty little by little from the large spatula and apply it to the seam being restored. Thanks to this process, it is possible to completely align all the cracks with our ceiling.
At the same time, do not forget about the timely removal of excess putty. Next, it is necessary to reinforce the working areas. At the final stage, after all the seams have been restored, it is strongly recommended to putty the entire ceiling to achieve maximum evenness of the entire surface.
Now we can assume that the question of how to seal the seam in the ceiling has been resolved. If all the work is carried out according to the technology specified by us, the ceiling will delight you for a very long time.
Alternative types of suspended ceilings
Suspended ceilings are represented not only by plasterboard ceilings, but by some other structures.
The cassette ceiling consists of modular panels that are assembled on a suspended frame. This suspended ceiling option completely eliminates “wet” finishing methods, because it does not need to be painted or further processed - it is immediately ready for use. Such designs are more often found in offices and public buildings.
A slatted ceiling is another type of prefabricated modular structure that does not require additional finishing. This ceiling is available and often used in bathrooms in private apartments. The structure is formed by longitudinal slats, which are installed on hangers.
Sealant
With this material everything is much simpler. You just need to choose an acrylic sealant, which, after application, can be painted along with the glued coating tiles. Of course, you need to choose the shade of sealant that will match the main tone of the ceiling, but usually it is white, so there will be no problems.
Before you putty the ceiling made of foam squares in this way, you need to stock up on hand rags and a damp sponge, as in the previous finishing option. In addition, you will need a special gun into which a tube of sealant is inserted and which helps squeeze it into the desired place. The spout of the tube with gap filler must be cut to the size of the thinnest joint to be sealed.
The nose of the cylinder is brought to the joint and the seam is slowly filled with material. You should not treat a large area at once - a joint length of one meter is enough. After this, you need to put the gun aside and use a damp sponge to evenly smooth out the layer of applied material.
The sealant hardens quite quickly, but it is still worth waiting a few hours until it completely hardens. This way you can process not only the seams between the tiles, but also fill the gaps between the baseboard and the ceiling covering.