Icer
1664 0 0
Icer February 14, 2019Specialization: master in the construction of plasterboard structures, finishing work and laying floor coverings. Installation of door and window units, finishing of facades, installation of electrical, plumbing and heating - I can give detailed advice on all types of work.
This summer I decided to put together a table for children to play and create. I looked at different materials and settled on chipboard as the simplest and most affordable. I’ll tell you about all the main stages of work and tell you what to look for when choosing a chipboard.
Laminated chipboard allows you to assemble a stylish and modern table at minimal cost
Main features of laminated chipboard
Laminated particle board has a number of features that you need to know when choosing a specific option:
- Slab thickness . The size range is wide; for the manufacture of tables, options from 16 mm and larger are used. I recommend using a slab of 18 mm or more when making. For the countertop, you can choose a thicker option - 30 mm, if this improves the appearance of the structure. You should not use material that is too thick (more than 20 mm), as this will make the table too heavy.
- Type of coverage . To protect the material from adverse influences, a special lamination layer is used. There are two varieties - paper-based coating, it is not reliable, but it is very cheap, I do not recommend using it. A special film is a strong and durable solution that protects the surface well from moisture.
- Coloring . There are a lot of options, so finding a suitable solution will not be difficult. There are thousands of varieties on sale, you need to find a solution that matches the color of the rest of the furniture in the room.
There are a lot of colors, this is one of the main advantages of the material, because finding a suitable solution is not difficult
- Slab density . The reliability of the elements and their resistance to deformation directly depends on this indicator. I advise you to use options with a density of 650 kg/m3. and more. Only these options have sufficient resistance to cracking and hold fasteners well. It is important to look at the end when purchasing; the material must be uniform, without voids or loose areas.
- Degree of toxicity . Any chipboard board uses formaldehyde during production; these are substances that are very dangerous to human health. Their content is regulated by regulatory documents; depending on the degree of concentration, LDS is divided into three groups A1, A2 and A3. For the table, choose only the safest option A1. Ask the seller for a certificate confirming the quality of the product.
Properties of laminated chipboard
Laminated chipboard is widely used in furniture production because it has a number of advantages over wood, plastic and other materials. Thus, it is characterized by its low cost, ease of processing, resistance to moisture and mechanical damage, durability, and heat resistance (you can place coffee pots and hot frying pans on it).
This material does not delaminate or disintegrate during processing, so dowels and screws can be screwed into it. Laminated chipboard has a pleasant appearance - it looks like natural wood. Now on the market the material is presented in a wide range of colors and patterns, which allows you to choose an option that suits any interior.
But laminated chipboard also has disadvantages. Thus, it contains formaldehyde resins, which have a negative effect on the human body. In addition, it cannot be subjected to deep milling (it will begin to crack), so it will not be possible to cut a beautiful design on it.
When choosing laminated chipboard for tables (especially for a child’s room), you need to pay attention to the following parameters:
- Degree of toxicity. Chipboard comes in 3 classes: E1, E2 and E3. Each class allows the content of a certain amount of formaldehyde; only class E1 can be used for furniture assembly. In order not to make a mistake with your choice, it is better to purchase material from trusted manufacturers. If the buyer buys laminated chipboard from little-known suppliers, then he needs to analyze the material himself. To do this, just get close to the product in the store. If the formaldehyde content is increased, an unpleasant odor will be felt at a distance of one meter from the bag. You should also be suspicious if the product emits a pleasant aroma. This may be evidence that manufacturers are trying to hide the smell of formaldehyde.
- Strength indicators. The main indicator is the density of the material - the denser it is, the stronger it is. In the picture you can see a product with a high density (left) and a lower density (right). Optimal density is 650-660 kg/m3. Before purchasing the tile, you need to inspect it on both sides; you can try to press a screwdriver or other object into its end. It will not be possible to press an object into dense material.
It should also be remembered that some manufacturers cover chipboard not with laminate, but with paper. Such a fake can be identified by stroking the surface of the slab with your hand (the buyer will be able to feel with his fingers that it is paper and not laminate).
Table shape and dimensions
First, you should decide what kind of table you will assemble. The list of materials and their quantity depend on this. Consider a few simple tips:
- Make a sketch of the future design . There is no need for perfect accuracy and precision. The main thing is to understand what shape and size the structure will have. All parameters are plotted on the drawing, this will significantly simplify further work and help you imagine the final result before assembly begins.
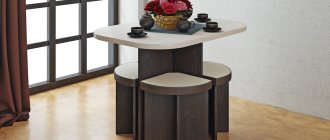
I will tell you how to assemble a simple and reliable kitchen table; using his example, you will understand the assembly technology and will be able to make other models
- Add all dimensions to the drawing . In our case, the total height is 760 mm, the depth of the tabletop is 750 mm and the width is 1120 mm. This table can accommodate up to 6 people; these are standard parameters for a kitchen in a city apartment. You can use any other sizes, it all depends on your needs and free space in the room.
- Calculate the number of elements and their parameters . If the drawing is made in detail, this will not be difficult to do. If you are in doubt, you can show the calculations to specialists when purchasing the material. They will quickly check the correctness and suggest errors if there are any in your case.
When making calculations, take into account the thickness of the plate used. This aspect is missed by many inexperienced craftsmen and then many problems arise.
- I recommend using a rectangular or square shape . Working with such models is much easier, especially if you still have little experience. For convenience, the corners can be rounded, but not very much.
Simple desk
The easiest way for a novice craftsman to assemble a simple table from chipboard for a study or children's room.
To work, you will need a drawing of the future product with all dimensions, as well as materials and tools:
- Four sheets of laminated chipboard: 1300x60 mm for the lid, 1170x400 for the inner wall, 2 sheets 450x740 for the end walls.
- Confirmations for connecting parts, caps for nail heads, end edges. To twist confirmations, you will need a drill of suitable length and diameter.
- Hand tools: ruler, square, tape measure, hammer, knife, screwdriver, furniture stapler, pliers, clamps, hex key for confirmations.
- Circular electric saw.
- Electric drill with reverse or screwdriver.
- An electric jigsaw that allows you to adjust parts to size.
- Sanding machine or sandpaper.
- Workbench for installing removable vices.
First you need to purchase a laminated board from a hardware store. It is advisable to go to the hypermarket with a drawing of the future product; the dimensions of all parts should be indicated on the diagram. You can cut out the necessary elements from a sheet of laminated chipboard yourself using a jigsaw, but this requires appropriate skills and time. You can order a cut to size directly from the material supplier; to do this, you just need to provide him with a drawing of the future design.
You need to glue a decorative edge to the ends of the prepared table parts; to do this, you need to attach the edge to the end of the sheet and run a heated iron along it. The heat-sensitive adhesive on the back of the decorative strip will melt and ensure its secure attachment to the end. Edgebanding of parts can also be ordered from material suppliers.
At the next stage, using a drill, you need to drill holes in the future table legs. The top hole should be 50mm from the top edge of the leg and the second hole should be drilled 300mm below. The distance from the long edge of the slab to the hole should be equal to half the thickness of the inner wall. So, if its thickness is 26, then the hole must be drilled at a distance of approximately 13 mm from the edge.
Then you need to take a slightly larger drill and use it to make a shallow groove over the hole for the confirmations. The head of the fastener will be recessed into this groove.
The transverse partition is attached to the legs with holes and attached to them with furniture screws. The tabletop is placed on top of the base and screwed with confirmations, for which holes are pre-drilled. The screw heads recessed into the chipboard are closed with special plugs. A simple desk is completely ready.
What to remember
- Choose the right chipboard . Consider the thickness of the slab, its density, safety class and color.
- Order sawing from the seller . Then all the elements will be perfectly even.
- Assemble the table carefully . Excessive force spoils the material and the fasteners turn.
Did you like the article? Subscribe to our Yandex.Zen channel
February 14, 2022
Furniture
If you want to express gratitude, add a clarification or objection, or ask the author something, add a comment or say thank you!
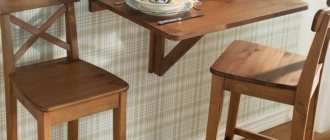
Corner table
This model is distinguished by its functionality and large size, while the corner table occupies unused space in the room, freeing up space for other furniture. Making this item is not difficult at all. You need to buy sheets of laminated chipboard or MDF and ask the store employees to cut them according to the pattern.
The work begins with all visible sections of the future product being sanded with sandpaper and then covered with a decorative edge. If desired, pasting can also be ordered at a hardware store. The side walls are connected to the back wall with nails or self-tapping screws. You need to pre-drill holes for the fasteners; their diameter should be slightly less than the thickness of the fasteners themselves.
Then you need to turn the tabletop upside down and mark the places where the dowels are attached. After this, deep, but not through holes are drilled in appropriate places. The dowels should be lubricated with glue and used to attach the top cover to the base. After complete drying, the product can be used for its intended purpose.
Furniture for kitchen
A do-it-yourself chipboard tabletop can be used not only in the office, but also in the kitchen. The technical characteristics of particle board allow it to be used in conditions of high humidity and temperature changes.
To work you will need:
- table top sheet with plastic coating, length 3000, width 600 and thickness 36 or 26 mm;
- end and connecting strips;
- end edges and ties;
- supports.
The legs can be made from timber yourself or purchased ready-made. The most popular option is round chrome-plated legs with a diameter of 60 and a height of 71 mm. They can be shiny, matte or painted, and even height-adjustable legs are sold.
First of all, markings must be applied to the future tabletop; roundings with a radius of at least 60 mm should be made at the corners. Then the tabletop is given the required shape using an electric jigsaw.
It is advisable to use a saw with reverse teeth, otherwise chips may appear on the plastic coating. First, the corners must be cut with a jigsaw with a margin of 2 mm, and then rounded with a grinder.
After this, you need to process the ends of the table cover. This operation allows not only to improve the appearance of the product, but also to protect the base from moisture. To work, you will need edge tape or furniture edging made of polyvinyl chloride. The best option is a plastic mortise T-shaped edging with girths.
At the next stage, the groove for the furniture edging is milled. Depending on the thickness of the edge, milling is performed either in the center of the end or with a slight offset. The exact milling parameters are calculated after determining the edge geometry using a caliper. Then the ends of the table top and the inside of the edge are coated with silicone sealant. After this, the edging is stuffed using a rubber mallet. Excess sealant is removed.
Now all that remains is to attach the legs. To do this, markings are made on the back side of the tabletop; it is recommended to place the legs at a distance of 100 mm from the edges. Self-tapping screws with countersunk heads about 20 mm long are used as fastening elements. The legs are put on the holders and secured with a hex key. The furniture is ready.