Hello, dear friends! Now they pay great attention to the interior of each room. Most strive for comfort, practicality, and aesthetics. And in many situations, a refrigerator in a niche in the kitchen can be a successful and rational solution.
We've probably seen how refrigerators clearly stood out against the general background in the kitchens of friends and acquaintances. And the situation at your home may also be similar.
Do not worry. Even in a Khrushchev-era, panel house, a niche will not take up too much space. Sometimes it is simply necessary. But it’s still better when the room is more spacious.
I propose to understand the situation and see what a refrigerator in a niche in the kitchen will do, how to implement it and what are the nuances of choosing the equipment itself.
General principles for installing a built-in refrigerator
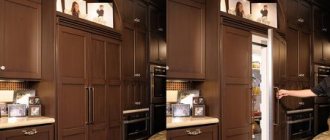
There are two types of built-in refrigerators - fully built-in and partially built-in. When fully built-in, the device is located entirely in the cabinet, with a front door attached to it. During partial installation, there is no need to hang the door - the refrigerator itself is already equipped with an aesthetic and functional front panel.
When installing equipment, you need to adhere to the following principles:
- strictly follow the instructions supplied with the refrigerator;
- choose or design a cabinet with indentations on all sides of the device of at least 2-3 cm for ventilation;
- make sure there are ventilation holes at the bottom and on the back wall of the cabinet;
- follow the rules for the location of the refrigerator in the kitchen;
- Make sure there are no slopes - the refrigerator should stand level.
It is important to remember: you cannot install the refrigerator next to radiators and heaters. The location should be such that the door can easily open to at least 110 degrees for ease of use.
Choosing a mounting method
The installation is carried out using two mechanisms:
- guides;
- hinges
The guides are attached to the facade and door of the refrigerator, thereby synchronizing the opening. The method ensures structural strength, but due to its complexity it can break more often, and the opening angle is usually small.
Hinges are attached to the refrigerator door, and the facade is hung on them. This makes opening as simple as possible, and the design is reliable. The disadvantage is the need to accurately calculate the weight, exceeding it is dangerous due to breakage, and the cost of such hinges.
TIP: it is better to purchase a built-in refrigerator with a suitable set - this will eliminate compatibility problems. An alternative is to individually order furniture for built-in appliances from professionals who will take into account all the nuances.
It is recommended to make kitchen furniture yourself only if you are confident in your abilities or have sufficient experience, since installation errors often lead to damage to the equipment, and this voids the warranty.
General procedure
The algorithm by which refrigerators are built depends on the specific model. In general it looks like this:
- the unit is unpacked, transport fasteners and films are removed;
- the device is inspected and tested for functionality;
- if necessary, change the location of the cabinet door hinges;
- the device is inserted into the cabinet, but not all the way - about 10 cm is left for ease of fastening the facade;
- the evenness of the device, the position and strength of the hinges, brackets, legs are checked, and if necessary, the bolts responsible for the level are adjusted;
- after installing all the fasteners, the refrigerator is completely pushed into the cabinet;
- all mechanisms and gaps are covered with plastic linings, often included in the kit, and decorative panels;
- door opening is checked;
- The operation of the refrigerator in the installed state is checked again.
If you purchase a semi-built-in device, the complexity of the work is halved. It is enough just to install it in the closet, secure it with corners or bolts, as required by the instructions, and cover the gaps with decorative panels, not forgetting about ventilation.
Can also be installed in a wall cabinet. The main thing is to strengthen the fastening. This is done by vertical metal rods, horizontal guides and the use of additional sheets of material from which the cabinet is made.
How to make a niche from plasterboard: tips and tricks
Quite often, during construction or renovation, the need arises to create a special niche or cabinet that would serve as a place to install equipment or store various things.
However, erecting such structures from brick, which subsequently needs to be plastered and puttied, is quite unprofitable and time-consuming. That is why the question of how to make niches from plasterboard is very popular among new residents and even some builders.
Decorative plasterboard niche with lighting
Integration into a conventional refrigerator set
A free-standing large refrigerator can also be built into a closet or pencil case. This can increase the attractiveness of the interior and create a unified style in the kitchen, but this requires additional space, since the cabinet will take up a lot of space.
There are two possible ways to install a conventional refrigerator:
- creating a pencil case;
- imitation of embedding with decorative means.
Both options can be done independently.
Preparatory stage - dimensions, materials, tools
You can make a cabinet from MDF or chipboard. It is also possible to use drywall, but the niche made from it will be heavy; this material requires special working skills. MDF is more beautiful, but more expensive, so if you have little experience, it is better to choose laminated chipboard - it is cheaper, the cost of a mistake will not be so high. It is better to choose slabs with a thickness of 16 mm.
You will need a 2mm thick melamine edge. Its shade must match the base material.
You will also need:
- furniture hinges - 5-7 pieces;
- two furniture handles;
- self-tapping screws, bolts and nuts;
- metal corners - 4 pieces;
- confirmations;
- minifixes;
- level and ruler;
- pencil;
- drill with drills;
- jigsaw;
- ball-type guides - 2 pieces.
It is important to take the measurements correctly. The cabinet under the refrigerator should have space for air circulation so that the furniture and appliance do not overheat. Overheating is dangerous not only due to increased energy consumption, but also due to fire.
The optimal dimensions of the pencil case for a standard refrigerator width of 600 mm, such as, for example, the familiar Atlant household model:
| External cabinet width | Must have a margin of 28 mm for loops. Considering the thickness of the material, with a refrigerator width of 600 mm, the cabinet width is about 660 mm (28+16+16+600). |
| Height | This is at the discretion of the craftsman, the main thing is to take into account the ventilation gap at the top (at least 50 mm after the height of the refrigerator). You can make a cabinet flush with the set, for example, 216 mm high. |
| Depth | A minimum of 50mm must be added to the depth of the refrigerator for ventilation. The standard option is 650 mm. |
| Shelf or cabinet lid on top | The length is taken equal to the width of the cabinet minus the thickness of the sides (660-16-16=628), and it is better to take the width 100 mm less to form a ventilation hole. You can make the lid/shelf blank, but then you will have to provide ventilation in the back wall of the cabinet. |
| Rear strut | The width is taken equal to the internal width of the cabinet; it is better to choose a height of 150-160 mm, which will ensure the best ventilation. If you make the back wall blank, you will have to drill holes in it. Sometimes they do without a back wall at all, but then the cabinet becomes less stable. |
| Two bottom struts | The height is taken to be 50 mm, the width is equal to the internal width of the cabinet. |
| Base | The length is equal to the width of the cabinet, the height is slightly less than the distance from the floor to the door. For example, if this gap is 80 mm, the base is taken to be 68 mm. |
| Facades | The width of the facades is calculated taking into account 2 mm edges on both sides, and the length is calculated taking into account the 5 mm gap between the doors, required in case of subsidence. |
Having decided on the dimensions, you can send the diagram and materials for cutting, edging, or cut out the parts yourself.
TIP: when cutting with your own hands, it is better to use a jigsaw - it provides the smoothest edges.
Pencil case assembly stage
The installation of the box is similar to the assembly of the construction set.
The side parts and the top panel are connected with minifixes. The back wall is attached to the sides with corners. If the cabinet included a shelf above the refrigerator, it is secured with confirmations. If spacers are used instead of a solid back wall, they are also attached with corners: the upper one (10-15 cm high) is in the middle of the height of the cabinet, the lower one (5 cm) is at the bottom of the frame.
Now the cabinet is placed in its intended place. It is leveled and secured with corners to other cabinets and drawers of the kitchen unit and to the wall for stability.
Next, the front lower strut is mounted, it is attached behind the plinth. Corners are used again, one side of which is connected to the side of the frame, the other to the floor.
The last stage of creating a pencil case is the installation of facade hinges to one of the side parts. For the freezer, two hinges are enough, for the main chamber of the refrigerator - four.
Stage of installing a refrigerator and hanging facades
To ensure that the refrigerator inserted into the cabinet stands level and the side parts of the pencil case do not sag, corners are attached to the body of the device. One of their edges is screwed to the side, the other - to the part of the refrigerator body between the doors. Do not be afraid to drill the device body, this will not affect its operation.
In order for the doors of the facade and the refrigerator to open simultaneously, they are connected by a slider fastening - ball guides. It is better to install the guides at the same level as the façade handles. Usually they are located at the edges of the facade: below for the upper chamber and above for the lower.
Mounting order:
- at a distance of about 3 cm from the edge of the facade, a straight line is drawn equal to the length of the guide;
- The first part of the guide is installed closer to the hinges by screwing screws into the mounting holes;
- the second guide is inserted into the first part;
- one side of the angle is installed on the outer part of the movable guide with bolts and nuts;
- the second side of the corner is attached to the end of the refrigerator door with a self-tapping screw and a press washer according to preliminary markings;
- The correctness of fastening is checked and, if necessary, adjusted by moving the corner.
Instead of one angle to attach the guide to the refrigerator door, you can use two: one is attached to the guide, the second to the door, and then both are connected to each other.
The second door is fastened to the facade in a similar way.
Advantages and disadvantages
Before installing a refrigerator in a niche in the kitchen, you need to look at what the pros and cons of this solution are.
Having studied the photos in the interior, such a kitchen design will not seem rational or practical to everyone. Let me disagree.
For objectivity, let's take a look at the strengths and weaknesses.
First, as I like, about the benefits. They are like this here:
- External attractiveness
. In terms of appearance, the kitchen benefits from the presence of a niche; - Practicality
. You can make shelves and drawers on the sides, as well as above the refrigerator. This increases the capacity of the kitchen; - Reducing noise levels
. In practice, it has been proven that the niche reduces the noise emanating from the refrigerator compressor; - Protection from external influences
. Since only the front side is open, the refrigerator gets less dust, dirt, and sunlight; - Rational use of space
. Especially relevant for small kitchens.
But this is one side of the coin.
Before you hide the refrigerator in a niche in the kitchen, consider the existing disadvantages.
The disadvantages include the following points:
- Additional financial costs
. A niche costs money. Even if you do it yourself. Therefore, the total cost of repairs will increase; - Higher energy consumption
. Devices that have improved thermal insulation and an additional cooling element are usually chosen for a niche. And they need more electricity to work; - Loss of space
. Partitions must have certain dimensions that exceed the dimensions of the equipment. Therefore, in miniature kitchens of about 5-6 square meters, such a solution will have to be abandoned.
If the kitchen area is 8 square meters or more, then placing a refrigerator in a niche in the kitchen will be more than realistic. The usable space will not suffer much.
Imitation of embedding with decorative means
If it is not possible to make a cabinet yourself, you can resort to decorative means and create an imitation of the fact that the refrigerator is built-in.
Suitable methods:
- painting with enamel paint to match the color of walls or furniture;
- acrylic painting;
- pasting with PVC film;
- fastening the chalk board.
Instead of enamel or acrylic paint, you can use spray cans for painting cars. The main thing is to apply a primer or wipe the surface of the device with white alcohol to degrease.
You can stylize the refrigerator compartment to suit any design using the decoupage technique. Using glue and varnish, the body of the device can be decorated with patterns and designs. Thanks to the vinyl film, you can visually “merge” the unit with the walls or furniture.
An interesting decorative option is to close the doors with a magnetic chalk board. This will turn the surface of the refrigerator into a wall for chalk notes or chalk drawings.
Option four: fireplace
Many people dream of having a real fireplace in their home, and the opening under the windows in a Khrushchev-era building allows them to fulfill their dream. The outer wall of the opening will also have to be insulated and finished with materials with low electrical conductivity and moisture resistance - and you can put an electric fireplace there that imitates a real fire.
Refrigerator under the window with sliding doors
But if what is more important is not the appearance of the electric heater, but its power, then you can build an oil heater or a stone quartz heating panel into the opening. But it is not recommended to use reflectors and fan heaters in the opening - they require free air exchange, which will not be available in such a small space.
This kitchen design will require the creation of proper electrical wiring and grounding.
Radiator grill under the kitchen window
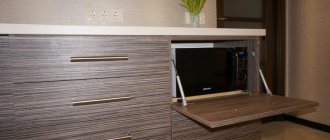
Refrigerator under the cabinet
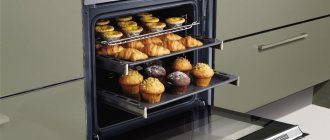
There are several types of refrigeration equipment that can be built into a kitchen set. The placement location must be selected based on not only the size parameters, but also the type of refrigerator. So, when there is a desire to build a unit into a cabinet and thus save the greatest possible space, it is advisable to give preference to built-in models without a freezer. This refrigerated cabinet will “fit” well into a small-sized kitchen, and its average volume is 90-170 liters. Some models have a freezer, which also does not add difficulties with integrating the unit into furniture. Such refrigerators can also be placed under the countertop - this allows you to leave even more space free.
Such units are not suitable for a family of 4-5 people or more, since its capacity is insufficient. With a large number of users and large volumes of stored products, preference is given to two-chamber models, whose main distinguishing feature from the previous type is the presence of two separate chambers - a refrigerator and a freezer. The freezer can be top or bottom mounted.
Similar models are available from virtually every manufacturer and are widely distributed in household appliance stores. Taking into account the choice presented, it is not difficult to purchase a suitable model in terms of functionality and capacity. To integrate appliances, nothing complicated is required - often a separate, specially fitted cabinet is assembled, in which the unit is “hidden” and it becomes a component of the kitchen unit.
Start of work with a built-in unit
Before installing the unit, get acquainted with the intricacies of the upcoming event. In the vast majority of cases, built-in refrigeration cabinets are equipped with a custom door canopy option. With some effort, it is possible to select a model that will be installed without using a hinge system. Such a unit is easier to build into a cabinet than a standard fully built-in one.
There are models whose doors are equipped with a hinge system, the so-called “mounted on runners”. In fact, doors of this design open in such a way that one gets the impression of the doors sliding. When deciding whether to install a unit, the weight of the sashes is also taken into account. It must be evenly distributed between furniture hinges and built-in appliances. The furniture itself can be assembled from various materials. The main condition is that the texture and color of the material must match the interior design of the kitchen.
Advice! When there is no experience working with wood, it is possible to use chipboard as a substitute.
What to do if the refrigerator is a classic freestanding
Quite often people are interested in the possibility of integrating a classic free-standing unit into a cabinet. This can be done, but many problems await you during the work:
- According to the rules, a classic refrigerator is installed on the floor and because of this, the cabinet in which the unit will be placed must have no bottom, which makes the entire structure unreliable and fragile.
- The cabinet into which the standard unit will be built must have a large depth, which will exceed in parameters not only other cabinets, but even the countertop. The width of such a cabinet will also be decent, since it is necessary to completely hide the refrigerator.
- The cabinet must have 4, and more often 6 doors. Each of them must swing open freely, and together with them, the unit flap must also open easily and unhindered.
- To ensure the necessary ventilation, the cabinet in which they plan to build an ordinary unit must not have a back wall. This has an even more negative impact on the stability of the furniture - such a structure will sway with every careless movement.
Due to the above difficulties, it is not practical to build a classic free-standing refrigerator into a cabinet. “Packaging” such a unit is a pointless waste of effort and money. If you want to beautifully design and build in a refrigerator, hiding it from view, it is better to buy specialized equipment designed for such actions.
Making a refrigerator cabinet
The first thing to do is choose what material the refrigerator cabinet will be made from. It can be assembled from the following:
- laminated chipboard;
- drywall;
- wood and more.
They focus on their own skills and budget. Working with drywall and chipboard is easy, but wood requires some experience. Prepare the following materials and tools:
- furniture canopies and handles;
- drill;
- materials for cabinet assembly;
- nails and screws;
- hammer;
- self-adhesive film, paint or wallpaper;
- construction tape;
- saw;
- building level;
- jigsaw (if present);
- furniture screws;
- sledgehammer;
- pencil.
The built-in unit does not have a decorative body, so it is possible to assemble a unique product with your own hands, making it so that it fits harmoniously into the kitchen interior, and the pantograph system connects the doors of the cabinet and refrigerator. This eliminates the problem of paired doors.
First, measurements of the built-in equipment are taken. They free up space for the cabinet and begin to mark out the parts of the future box and cut them. To cut chipboard, you can use an ordinary jigsaw. The cut components are fastened with furniture screws.
Attention! When installing the unit in a niche, you must be careful, since it is necessary to provide ventilation around the device, due to which the heat from the device will be removed outside. For free air circulation, openings are cut in the upper and lower shelves and in the tray of the box. Sometimes it is necessary to install an auxiliary fan to increase circulation.
The closet itself must be supplemented with a small podium. The back wall does not need to be attached. But, when putting the cabinet in place, it is necessary to check the evenness of the assembly using a building level. A hole is made in the side wall of the box for the cord of the built-in refrigerator. The cabinet is placed in its final location and the unit is inserted into the box. The cabinet door is pantographed and adjusted. Correct adjustment is the key to the absence of noise when the sash swings open. Visually noticeable cuts are hidden behind a specialized edge.
Some of the built-in units are equipped with a system for hanging facades on skids. The cabinet door in this version must have its own hinges, and when the built-in refrigerator is opened, both doors will slide relative to each other. This system is recommended to be used when the box is made of solid wood. Such a solution subsequently reduces the load on the doors of the built-in refrigeration equipment.
Option three: heating radiator
If apartment owners are most concerned about the temperature in the kitchen, they should avoid using the opening for storing food or kitchen utensils. Instead, the opening can be completely or partially sealed and a second heating radiator can be built in or a larger one can be installed. To fill the opening, you will have to carefully lay the brick, then plaster and putty well. It may be necessary to replace the window sill.
Radiator instead of refrigerator under the window