Storing rarely used items in small apartments often becomes a problem for the residents living there. An empty or cluttered balcony becomes an excellent source of free cubic meters to solve the problem. The best option for thoughtful organization and proper use of the side sections of the balcony is the installation of cabinets in these places. Corner cabinets are increasingly becoming a universal replacement for balcony shelves that are open and gathering dust or hidden behind faded curtains.
A corner wardrobe for an apartment (in the hallway, office, dressing room, kitchen, bedroom) is a product that is usually made to order according to individual sizes. There’s no need to talk about the balcony option. Therefore, after sketching the main sketch of the future interior element, you need to invite specialists to discuss all the nuances of the upcoming work. Or, rolling up your sleeves, you will have to get to work yourself. The second option can amuse the self-esteem of the home craftsman in case of success and add a lot of positive things when putting into operation new mastered squares of the balcony room.
Why do you need a corner cabinet on a balcony or loggia?
Corner cabinets for the balcony have the following advantages:
- Thoughtful and rational storage of things. The compact corner cabinet has a practical design, which is important for small spaces.
- Capacity. On shelves with different depths and heights you can conveniently place different types of items.
- A light weight.
- Varied design.
- Availability. Corner cabinets are sold in any furniture store.
- Wide selection of designs and materials.
- Multifunctional and good appearance.
Posting rules
The main reason why a closet is installed on a balcony is the need for additional storage space. A product that is too large will perform this function, but will block the balcony. Before installing the cabinet, read the following recommendations:
- First, decide whether you have free space on the loggia that is not being used.
- Low cabinets fit well under the wide window sill.
- The cabinet should not interfere with the passage.
- Placing a mirror on the facade will visually enlarge the room.
- If you have a balcony with panoramic glazing, choose triangular products. They look neater and do not cover the window.
- For non-standard semicircular balconies, it is better to order an individual product design.
- Examine in detail the surfaces at the location of the future cabinet. Installing it in a room with curved walls will cause difficulties.
The nuances of proper placement of a corner cabinet should be thought through to the smallest detail. Otherwise it will become a hindrance.
Types of corner cabinets for balconies
Corner cabinets for loggias and balconies, similar to room furniture, can be built-in or cabinet-mounted:
- Cabinet - the classic version, which has walls, doors, as well as top and bottom panels. They are installed on large and spacious balconies. Such furniture is easy to disassemble, carry and transport.
- Built-in cabinets have compact designs and are therefore in demand in small loggias. They are lighter in weight, as they are made without a bottom, lid and back panels. The furniture consists of shelves attached to the wall and doors. Corner cabinets are difficult to install, so you need to choose them taking into account the quality of materials and reliability of the design.
Cabinet in a trapezoidal niche.
If a hinged window is installed in a niche, then a cabinet is the best option.
P44
P-44T (“balcony/loggia boot”)
Popular shapes and configurations
There are the following design options for balcony corner cabinets:
- In the shape of a triangle, where the door connects two balcony walls to each other, forming a triangular figure. Typically, built-in cabinets are made in this form, but sometimes cabinet cabinets are also found.
- L-shaped. There are only cabinet models of cabinets like this, with clear rectangular or square shapes. Installed on long balconies and loggias.
- Trapezoidal in shape with two side panels that connect to the door and back wall at an angle. The trapezoidal design is typical for cabinet cabinets.
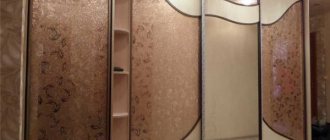
Corner wardrobes for the balcony are open, sliding and hinged.
Open structures resemble bookcases, free-standing or built-in. They consist only of side walls and shelves. They are not equipped with doors; blinds or regular curtains can be installed instead.
Hinged cabinets have classic doors that open outward. At the same time, several shelves in the structure can remain open.
Corner wardrobe for balcony
The most compact and lightweight version of a balcony wardrobe is a compartment with sliding doors that move smoothly along rails.
When choosing it, you need to take into account the following criteria:
- easy cleanability and moisture resistance of the material;
- removable shelves;
- light weight;
- Easy sliding of doors that does not require effort.
To produce such structures, several materials are used, each of which has its own advantages.
Natural wood
Expensive material, aesthetically attractive and environmentally friendly. A wooden wardrobe or wardrobe has the following advantages:
- noble appearance;
- durability;
- strength;
- Beautiful design.
The material also has a drawback - it is prone to damage by harmful insects and mold.
Metal-plastic
Cases for balcony cabinets are often made from metal-plastic.
Material is:
- practical;
- resistant to moisture and mechanical damage;
- durable and able to withstand heavy loads.
Chipboards
Shelves, walls and doors are made from double-stranded particle boards.
The advantages of the material are as follows:
- strength, resistance to cracking and deflection;
- protection from sunlight and moisture;
- service life more than 15 years;
- easy sawing;
- variety of finishing options - imitation of any wood species thanks to the lamination technique.
Drywall
Drywall is an easy to process and cheap material. A screwdriver is used to fasten the parts. The advantage is light weight, and the disadvantage is the inability to withstand increased loads.
Another popular material is MDF. It is convenient to use, but is not without such disadvantages as the likelihood of chipping and insufficient safety margin.
When buying a sliding wardrobe for a balcony, you also need to pay attention to the door opening mechanism.
The best option is a monorail, in which the rollers move smoothly along the monorail, which is reliably protected from the ingress of small foreign objects. The second type of mechanism - rail - is less reliable, since foreign objects can easily get into the rails, causing the rollers to pop out.
The advantages of a wardrobe with sliding doors are:
- Depending on the model, there are two installation options - from floor to ceiling or to window sill level.
- Visually invisible due to blending into the wall surface.
- Durability - ten years or more.
Varnishing rules
Buy only high-quality varnish; low-quality varnish raises lint as it dries. You will have to grind it, but doing this on lining is long and difficult, it has an uneven surface. Every groove and protrusion must be carefully sanded. Some profile turns have a small radius, which requires the manufacture of special grinding devices. Before applying varnish, surfaces should be thoroughly cleaned of dust and, if necessary, dried. You can varnish on both sides or only on the front.
Apply a protective compound
Apply varnish or protective impregnation to the wood of the frame
Work with a brush, making sure that no drips appear on vertical surfaces. If traces remain from the brush, the varnish should be diluted a little. You need to cover it at least twice. If there is no practical experience in applying varnish compositions to wooden surfaces, then it would not be superfluous to apply three layers. Each subsequent one is applied only after the previous one has completely dried. If desired, the lining can be impregnated with stain before varnishing.
Can be applied with a brush or soft roller
It is recommended to place the doors on a horizontal surface before varnishing; this will greatly simplify the work and make it possible to cover with a thicker layer of varnish. Just don’t get too carried away, the varnish can accumulate in the recesses of the lining. If the balcony is cold, then you should purchase varnish for external work; it can withstand sub-zero temperatures and does not react to condensation.
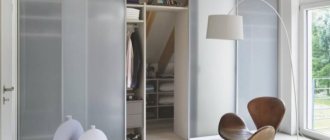
Corner wardrobe for the loggia
Depending on the size of the loggia and the tastes of the owners, you can install both a standard and a floor-standing model of a corner cabinet. Each of them has its own characteristics and purpose.
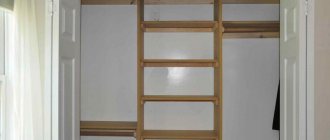
Standard designs have a height from floor to ceiling. They are characterized by a clear delineation of internal space. There are many shelves, niches and sections for this.
Depending on the purpose, they may contain:
- clothes rails;
- drawers;
- wide and narrow shelves;
- vertical ski storage compartment;
- mezzanine;
- trouser;
- shoe rack;
- cells for storing small items.
Compact floor designs combine the features of a corner table and cabinet. It can be used to store food or any items. In the first case, such a cabinet needs to be insulated.
The advantages of floor cabinets include:
- Multifunctionality. They serve as cabinets and tables at the same time.
- Spaciousness thanks to the presence of shelves and drawers of different sizes. There is a place to store building materials or tools.
- The presence of additional small drawers for storing small items.
DIY making
You can make a corner cabinet for a loggia or balcony yourself.
To work you need the following tools:
- drill and hammer;
- hacksaw;
- hammer;
- building level;
- screwdriver;
- self-tapping screws;
- electric jigsaw;
- screwdrivers;
- roulette.
You need to choose the type of construction, door opening options and materials. And then perform the following steps:
- Create a sketch indicating all the dimensions of the cabinet and its individual elements. The width and thickness of the materials must be specified.
- Based on the drawing, make markings on the wall, ceiling and floor.
- Assemble the frame strictly according to the markings.
- Finish the frame with any material of your choice - plywood, plasterboard, laminate, wood or plastic panels. When working with drywall, plaster its surface, reinforce joints and corners, putty, prime and apply a layer of topcoat.
- Make doors and install them. For sliding doors, you need to cut a solid sash from a laminated sheet of plywood or chipboard. Next, you need to determine which rollers will bear the load - the upper or lower ones. Install roller mechanisms and rail guides. If you are planning classic swing doors, you should first make a strong frame from timber or boards. To strengthen the frame, it is recommended to install a transverse or diagonal jumper inside. After this, you need to firmly fix the slats and strips of panels to the frame. The next step will be installing locks, handles, hinges and trim. Having secured the hinges securely, you can install the door on them.
- Secure crossbars, shelves and other storage devices.
- Niches in the corner cabinet can be decorated with liquid wallpaper.
- For finishing you can use several methods. The mirrors look impressive. If the loggia is spacious and can serve as a small lounge or office, sandblasting or photo printing will do.
Shelf mounting options
To make shelves with your own hands, it is most convenient to use sheet material (plywood of sufficient thickness, OSB, chipboard - laminated or regular). If a heavy load on the structure is expected, it is safer to make them from wood.
There are a lot of mounting options. You can secure the shelves using self-tapping screws, install them on bars, or use special corners for this purpose.
Fastening shelves using corners is quite convenient and reliable. However, there is an even simpler way. Using brackets and metal guides that can be fixed at the desired angle, we get a design in which the height is easily adjusted due to the ability to reposition the fastening elements. The holes in the guides are located in small increments, which allows you to optimally place things of any size on the shelves.
If you wish, you can make a similar storage system with your own hands from wooden blocks. To prepare recesses for shelves, cuts are made with a saw according to pre-applied markings, after which unnecessary wood is removed with a chisel. The figure shows an example of a rectangular shelf. Corner structures are made according to the same principle. To do this, you will need 3 racks, and the shape of the frame will be triangular.
Basically, the balcony has a small width. Therefore, you can make shelves with your own hands from the remains of boards. Any wooden products on the balcony must be coated with a special compound to protect them from moisture and maintain their original appearance. Despite the fact that a glazed balcony block is often classified as an interior space, protective impregnations and paints and varnishes should be chosen for exterior use. To avoid the inconvenience associated with the smell of varnish, you can opt for water-based products. They do not create a film, but they do a good job of preventing dirt from penetrating the surface.