Compliance with the rules of personal and household hygiene reduces a person’s exposure to various diseases several times. After all, many pathogenic bacteria that cause infectious diseases, various parasites (for example, helminths) enter the human body if the norms and rules of hygiene are not observed.
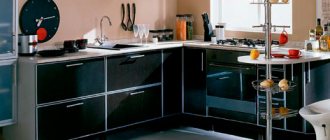
A dish dryer in a cabinet is an integral element of the kitchen, which should be present in any room intended for preparing dishes and eating.
An important attribute of human life is dishes, the cleanliness of which largely determines the quality of health of an individual family. Owners of a dishwasher, of course, do not notice any problems in constantly washing it, but for other housewives, keeping dishes clean means constantly washing, rinsing and drying dishes by hand.
Given the variety of models, types and configurations, for the right choice it is necessary to take into account quite a lot of nuances.
You can dry cutlery in different ways: rubbing it with a towel, placing it upside down on the sink or table, or putting it in a special dryer. The drying rack is a structure consisting of many special compartments for plates, mugs and cutlery.
They are made from both metal (stainless steel) and plastic.
Requirements for dryers
For washed dishes, it is necessary to provide adequate conditions for removing residual moisture from the surface. Wiped dry plates do not require any special equipment for drying, but the process is time-consuming. If, after washing, you place the accessories on a special lattice shelf, they will dry without outside intervention. The time saved in this way can be spent on activities that are not feasible without human participation.
Drying devices must meet the following conditions:
- Resistant to moisture, eliminating rust or areas of oxidation.
- Sufficient level of air circulation in the compartment with installed grille.
- Most drying accessories are equipped with a bottom tray, the cleanliness of which must be regularly monitored (the tray is usually made removable, and the surface is coated with a special composition to protect against microorganisms).
- Fits harmoniously into the design of the kitchen set.
The structure must be strong enough to withstand possible loads.
Idea 2. Jute coasters
If your kitchen (or, for example, a country or summer kitchen) is decorated in a rustic, Mediterranean, rustic or nautical style, then you will probably love this kitchen craft idea. In just a couple of hours you can make coasters for plates for the whole family and guests with your own hands.
To make one substrate with a diameter of 33 cm you will need:
- 10 meters of jute rope 1 cm thick (sold in construction and hardware stores);
- Hot glue gun;
- Scissors.
Just start rolling the rope in a circle, applying glue to small sections one by one and fixing them for a while. Once the mat is formed, cut the end of the rope and glue it down.
Dish dryer materials for cabinets
In most cases, the main material is steel. The metal grill is coated with anti-corrosion paint or a layer of special rubber is applied. The coating prevents the appearance of rust, mechanical damage and putrefactive formations.
It is also possible to manufacture from stainless steel grades that do not require additional processing. Stainless steel gratings are more visually attractive, more practical and durable than coated products, but more expensive.
Expert opinion
Bashir Rabadanov
Technologist at the furniture company Woodband
The cheapest material for dish dryers is plastic. Plastic models are completely protected from the harmful effects of moisture, do not rot or rust. The design possibilities are wide, since plastic is easy to shape and color. However, the disadvantages of polymers used to make dryers make this material the least popular among others. Plastic is cheap, low-strength, fades very quickly, and a lot of scratches form on it, in which dirt accumulates.
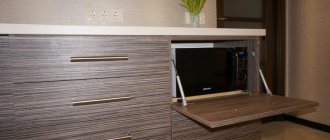
For certain types of kitchen set design, the use of metal and especially plastic is undesirable. Furniture made in country style will look better with wooden dish drainers. These are not full-fledged built-in modules hidden by the facade, but small external elements installed in open cabinets or on the countertop.
Idea 1. Tablet stand made from a cutting board
Watching your favorite TV series on your tablet or peeking at a recipe book while cooking will become easier if you make a special stand for this from... an ordinary cutting board. Making this kitchen craft with your own hands will take no more than two hours, and it will be used every day.
To make a holder for a recipe book or tablet you will need:
- You can use an old cutting board or buy a new one (wood is best, but bamboo will work). Its size should not be much larger or smaller than the tablet.
- A small wooden plank, or better yet, a piece of molding (this is what will hold the tablet/book).
- Another block of wood or plywood from which you can cut a sharp triangle;
- Paint or stain in the desired color, for example, to match the countertop, facades or kitchen backsplash;
- Paint brush or staining rag;
- Jigsaw or saw;
- Wood glue or any other strong adhesive.
- Using a saw or jigsaw, cut your strip or molding to the desired size (the width of the board), sand the edges with sandpaper, then simply glue it to the bottom of the board.
- Cut a support for the stand from a piece of wood in the shape of an acute triangle with a right angle as in the photo below and glue it too.
The angle of inclination of the holder will depend on the inclination of the hypotenuse of the triangular bar
- Paint the entire piece following the paint manufacturer's instructions and leave to dry.
- If desired, the handle of the resulting stand can be decorated with jute rope or ribbon. This way, when the stand is not needed, you can hang it on a hook.
Also, the craft can be further decorated - for example, by artificially aging it as in this master class, by drawing inscriptions, by burning a design, or by covering it with slate paint. In the following selection of photos you can get ideas for decorating original cutting boards.
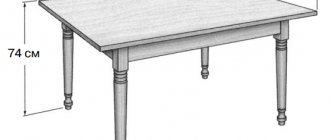
Sizes of dish drainers
The dimensions of the dryer primarily affect its capacity. On average, every 100 mm of the lattice base can accommodate 3 plates, and a certain amount must be added to the total value for the depth of a particular type of dish. That is, to place 12 plates in one tier, you will need a compartment with an internal width of 500 mm.
Standard sizes of common models range from 400 to 800 mm in increments of 100 mm. The depth of a conventional plate stand does not exceed 250 mm, which makes it preferable to install it in the top row. Bottom dryers occupy the entire space under the table (500 - 600 mm) and are divided into sections.
A module width of 600 mm is the best option, since the load with such dimensions will not be critical even when using roller guides. For multi-level built-in solutions, it is important to remember that the height between tiers should not be less than 30 cm. This height will leave enough space for storing relatively large dishes on the lower level.
Varieties
If we talk about the design features of built-in products, then we can distinguish 2 main types.
Let's start with the classic or standard solution.
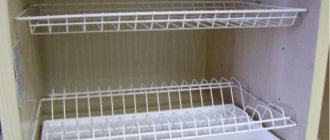
Built into base cabinets
. These are ordinary straight designs, which are presented in the form of a box. It is built into the base cabinet using guides. Such dryers are equipped with several compartments for various dishes. At the very bottom there is a tray for collecting excess water, which must be removed and washed periodically. Such designs are convenient to use for children and small people. You can install a Tip On pull-out system with a closer so that the dryer rolls out after lightly pressing the façade. That is, it is not necessary to use pens here.
If you have a dishwasher installed, such a dryer will be the optimal solution when placed next door. It is enough to open the dishwasher, pull out the drying compartment, and then, without changing your body position, move the dishes from one container to another.
Really very convenient and practical.
I can say that lower placement has more advantages than disadvantages. Much depends on the overall organization of the kitchen.
There is another type.
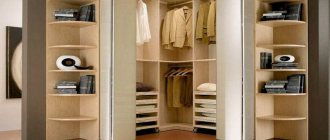
Roll-out bottom dryers
. Mainly used on corner cabinets. Due to the difficult access to them, it is quite correct to use a withdrawable system. It optimizes interior space. Basically, these are dryers with a mesh structure, which are attached to the counters or to the facades of the kitchen unit. There are usually no divisions into sectors for different dishes. Basically, it is recommended to use such dryers specifically for storage, and not for placing wet dishes there. This is due to the lack of pallets in most models.
So it is the first option that can rightly be considered a full-fledged and most practical dryer installed in the lower cabinet.
Instructions for installing a dryer in a closet
There are a lot of ways to assemble drying cabinets, and they differ in components, design and installation location. Next, we will consider common types of assembly for each location option.
Upper
The internal dimensions of the hanging cabinet must correspond to the width of the module (600 mm). The lower part (bottom) is missing; its function is performed by the frame of the dish dryer.
Sequencing:
- Attach the outer frame of the lower shelf, the ceiling panel and the supports of the upper shelf to the pre-prepared side panels. To fix the frame, complete self-tapping screws are used, the top is secured with furniture Euroscrews.
- Mount the rear part of the crossbar in such a way that the back wall made of fiberboard can be inserted into the groove.
- All that remains is to fix the metal bars in the seats and hang the finished cabinet on the wall.
I also recommend watching 2 videos with instructions on assembling and installing different types of dryers in a closet.
Angular
Installing the upper corner module into a finished (already hung) cabinet includes the following steps:
- Before proceeding with installation, make markings inside the compartment in accordance with the external dimensions of the shelves.
- Connect the side supports (G) to the square profile with the supplied screws.
- Using the markings, try on each of the assembled shelves. Adjust the depth and check that the doors operate correctly.
- If everything is in order, secure the assembled frame to the base, then place the metal grille into the mounting slots until it clicks.
- Place the pallets in special slots.
The process is quite simple. The main thing is that the internal dimensions of the base box correspond to the dimensions of the shelves.
Lower
Retractable lattice modules are usually installed at the bottom of the kitchen unit. The installation process is as follows:
- We mount the lower guides at a distance of 2 cm from the front edge of the base frame.
- We screw on the decorative trims.
- We attach it to the guide holders of the lattice frame.
- We place the mesh frame on the holders and secure it with latches, having first turned them with the open part outward.
- In accordance with the complete fittings, we mark the facade.
- We fasten the fittings according to the markings.
- We fix the façade to the dryer frame.
Main types
Modern manufacturers of kitchen accessories have provided customers with many types of dish dryers. It is worth noting that all designs, regardless of type, have several compartments. Each of them has an individual purpose: for storing plates, saucers or cups. High-quality and durable materials are used to manufacture the elements.
The surfaces of the structures are covered with special enamel, which greatly simplifies the process of cleaning this fittings. Some models are decorated with paint. One of the modern options is drying, the design of which uses special rubber coatings. This element allows you to put the dishes in place without noise.
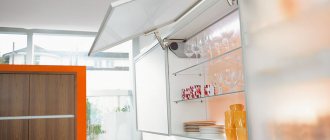
Manufacturers also produce wall-mounted models. Basically, such dryers are installed above or next to the sink, which is very convenient. The fact is: drops of water remaining on the surface of the dishes flow straight into the sink. Often a special tray is installed along with the dryer. This part needs to be cleaned of water regularly.
Built-in dryers are the most common today, and they can be safely classified as traditional types. The advantage of the models is that they are located inside the cabinet and do not take up space on the free surface. Installing such a system does not require much time and effort. For fixation, special plastic fasteners are used. You can place the dryer in both the lower and upper tier.
Wall systems are not inferior in popularity to the previous type. This group of models is based on two subtypes: stand-alone and built-in options. It is worth noting that when using the second type, you need to take care of the presence of normal ventilation of the furniture. This is due to the fact that the moisture that accumulates inside can deform the cabinet material. Basically, such options are presented in the form of a grid.
The latest functional innovations include retractable systems. Their advantage is their ease of use. The systems are mounted inside the cabinet, which saves space.
On sale you can find another interesting type of dryer called troflex. The peculiarity of these models is their unusual design. They are made in original and non-standard forms.
8 photos
The best models of cabinet dryers
The following models of built-in dryers are popular now:
| Dish dryer with tray and grid made of chrome-plated steel wire. Permanently mounted in the top row compartment with an internal width of 600 mm. The minimum depth of the cabinet is 350 mm. Price 790 rub. | |
| The most affordable option is 195 rubles. For drying small cutlery, cups and plates. Pallet included | |
| Two-tier option, designed for installation in a corner base. Supplied with a pallet and fasteners for fixing. Each shelf can withstand up to 10 kg of load. The price of the set is 3500 rub. | |
| Stationary shelves for drying plates and cutlery. The mesh is made of chrome steel. The set is equipped with a pallet. Price for 2 shelves - 1320 rub. | |
| The metal part is made of stainless steel; at the bottom of each shelf there is a plastic tray for collecting liquid. The price of a model with a width of 60 cm is 2540 rubles. |
Idea 3. Organizer for cutlery and kitchen utensils made from cans
Tin cans cost nothing, but they are durable, easy to clean, and their shape is just right for storing all kinds of spatulas, ladle, forks, spoons and other utensils. If you put in a little effort and creativity, you can make a convenient and cute organizer out of them, which, even if it doesn’t fit into the interior of a city kitchen, will definitely fit in at the dacha. You can also use an organizer made with your own hands from cans to store tools, brushes, felt-tip pens and other small items.
Stand for spoons and forks made from cans
To make such a stand for spoons and forks, you will need:
- 4 or 6 clean and dried cans, without lids or burrs;
- Acrylic paint for metal or enamel paint (it will protect the cans from rust);
- Several wood screws and a screwdriver;
- Thick nail and hammer;
- Furniture handle or leather strap with fittings;
- A small wooden plank.
- Paint the jars inside and out and let them dry for one day.
- If necessary, saw the wood to the desired size, sand it, clean it and finally paint it (not necessarily to match the cans).
- Take a nail and a hammer and make a hole for the screw in all the cans.
Tip: To make this process easier and not damage the paint layer, place a small block on the table using a clamp, then wrap the block in felt and only then put a jar on the block (see the picture in the lower left corner in the next photo collage)
- Place the cans against the board and align them the way they will be mounted later. Mark the location of the holes on the board with a pencil.
- Make small holes in the board where the marks were marked, using a hammer and nail.
Expert advice on selection and installation
First you need to choose a place of purchase. In branded furniture stores, the products are usually of higher quality. Some may find it more convenient to order online, but this method deprives the buyer of opportunities available only by directly inspecting the product.
The material from which the grille is made is also important. It determines the service life and the condition in which the dryer will be used most of the time. Stainless steel (stainless steel) has proven itself best. Coated versions are cheaper and often comparable in practicality. Plastic is even cheaper, but you should choose it only if you have a very limited budget.
Before ordering or purchasing, it is important to find out what sizes will be needed in a particular case. If you plan to install it in a ready-made cabinet, measure all the internal dimensions of the compartment for the future dish dryer. If the dimensions are not tied to the finished bedside table, you should start from the actual needs. As a rule, a module with a width of 600 mm will be sufficient - it can accommodate 12 plates, and with the same depth it is possible to divide it into additional compartments within one tier.
The quality of components is another important point. All parts, even those invisible after installation, must be free of obvious defects, damage to the coating, and especially corrosion. Ball retractable guides are better than roller ones, although they are more expensive. But it is not advisable to save on them, since the load on the dryer is relatively large (the dishes weigh a lot), and plastic rollers will not work for long under such conditions.
Main types
Modern manufacturers of kitchen accessories have provided customers with many types of dish dryers. It is worth noting that all designs, regardless of type, have several compartments. Each of them has an individual purpose: for storing plates, saucers or cups. High-quality and durable materials are used to manufacture the elements.
The surfaces of the structures are covered with special enamel, which greatly simplifies the process of cleaning this fittings. Some models are decorated with paint. One of the modern options is drying, the design of which uses special rubber coatings. This element allows you to put the dishes in place without noise.
There are two main groups of products: separate dryers and structures that are built inside a furniture set.
Manufacturers also produce wall-mounted models. Basically, such dryers are installed above or next to the sink, which is very convenient. The fact is: drops of water remaining on the surface of the dishes flow straight into the sink. Often a special tray is installed along with the dryer. This part needs to be cleaned of water regularly.
Built-in dryers are the most common today, and they can be safely classified as traditional types. The advantage of the models is that they are located inside the cabinet and do not take up space on the free surface.
Installing such a system does not require much time and effort. For fixation, special plastic fasteners are used.
You can place the dryer in both the lower and upper tier.
Thanks to the use of these systems, the kitchen interior looks more harmonious, and the presence of unnecessary details does not catch the eye.
Wall systems are not inferior in popularity to the previous type. This group of models is based on two subtypes: stand-alone and built-in options.
It is worth noting that when using the second type, you need to take care of the presence of normal ventilation of the furniture. This is due to the fact that the moisture that accumulates inside can deform the cabinet material.
Basically, such options are presented in the form of a grid.
Expert opinion Ekaterina Anatolyevna Smirnova has been engaged in interior design for 7 years, a professional architect
The latest functional innovations include retractable systems. Their advantage is their ease of use. The systems are mounted inside the cabinet, which saves space.
On sale you can find another interesting type of dryer called troflex. The peculiarity of these models is their unusual design. They are made in original and non-standard forms.
Idea 7. Wall panel
Another craft idea for the home and kitchen that you can make with your own hands from wine corks is a wall panel for decorating the interior and storing notes, memorable photos and postcards.
Framed cork panel from Ikea
To work, you will only need a beautiful frame (from a picture or a mirror), paint of the desired color, hot glue and a large pile of corks. Corks can be laid out in a herringbone pattern, in a checkerboard pattern, in even rows, and in other ways that you like. If necessary, for example, if there are not enough corks, they can be cut lengthwise or crosswise. To make the corks easier to cut, you need to soak them in hot water for 10 minutes.
Find other interesting ideas for making wall panels with your own hands here.
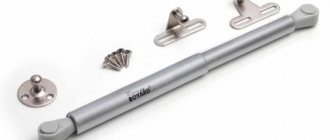
How to connect
There are certain features of connecting a dryer that need to be dealt with in advance.
Ventilation
Some people think that connecting a dryer to the vent is difficult, but this is not true. On one side of the dryer there is a special hole through which it is connected to the ventilation system. To secure the connecting corrugation, special clamps are used, which are supplied with the device.
The second side of the corrugation can be brought out into a vent in a window or into an opening in the central ventilation system
You must connect such a tube very carefully so that it does not bend by 80-90 degrees, as this will make it work worse
Sewerage
Condenser dryer models must be connected to a sewer system into which excess liquid will drain. Most of these devices have holes through which they are connected to the sewer. To connect the dryer and the sewer system, a regular hose is used, which can be led into the toilet, sink or separate drain.
Electricity
The last communication to which you need to connect the dryer is the electrical network. To connect it to a power source, you need to select a separate line on the distribution box. You can also use a free outlet. However, to connect such powerful equipment, you must use sockets that are equipped with separate grounding. However, experts do not recommend connecting a washer and dryer to the same double outlet at the same time.
How to make a clothes dryer with your own hands: features of the manufacturing process
Creating a product for drying clothes in the bathroom with your own hands is not a difficult job and, undoubtedly, economically profitable. Branded high-quality designs are quite expensive, and, unfortunately, there is no guarantee that this device will last a long time. You don’t need expensive materials to make a homemade product for drying things. To build a high-quality and reliable dryer, you only need desire and a little effort, and you will also have to sacrifice a few evenings.
You don’t need expensive materials to make a homemade product for drying things.
What a homemade dryer should be like: design requirements
It is quite possible to create a structure for drying clothes of any type with your own hands: wall-mounted, ceiling-mounted, outdoor, for installation on the floor or hung on a radiator. If desired, you can also make any dryer of an original design. Regardless of the model, the technical requirements for a homemade product are almost identical:
- the device should not rust or leave any marks on the laundry;
- it is necessary that the dryer can withstand wet laundry weighing 30-35 kg - this is approximately a large full basin of poorly wrung out clothes or two wet rugs;
- the capacity of the device must meet the needs of the family - the structure should not fall apart under the weight of things washed at once;
- it is required that the fastenings of the dryer be both simple and reliable, while minimally damaging the finish of the room;
- folding and retractable structures should be easy to unfold and firmly fixed in working position;
- it is preferable that the device allows you to dry bed linen in an unfolded position; for this, rods and cords for clothes should be located as high as possible above the floor;
- it is very convenient when you don’t need to climb on a stool or stand to hang or remove things;
The dryer fastenings had to be simple and reliable at the same time, while causing minimal damage to the finishing of the room
- It is desirable that the laundry can be hung on the dryer without clothespins.
Idea 5. Serving board-tray
But the idea of an unusual serving board-tray, which, although not a cutting board (intended for displaying food only in dishes), can nevertheless be very functional. For example, it can be used to beautifully serve snacks, drinks (olives, pistachios, nuts, chips, etc.), sauces, honey, sour cream, jam. Thanks to the slate part, while the board is not being used for its intended purpose, it can simply be hung on the wall and used for writing.
To make this DIY kitchen craft you will need:
- Wooden board 5 cm thick;
- Stain of the desired color (for example, to match the countertop);
- Sponge, rag or brush;
- Chalkboard paint;
- Two furniture handles and wood screws for fastening them;
- Jigsaw or saw;
- Screwdriver or screwdriver;
- Masking tape;
- Ruler, pencil.
- Cut your board to the desired size using a hand/power saw or jigsaw. In this master class, the board is 60 cm long, but you can make it shorter or longer.
- Stain your board according to the manufacturer's instructions and let dry.
- It's time to paint the inside. To do this, first apply masking tape along the edges of the board to limit the painting area. Next, apply slate paint (in this case, you use paint in a can) and let it dry.
- Screw the handles to the edges of the board.
You can replace furniture handles with leather straps, paint the board a bright color, burn a design onto it, or attach two “legs” to the back of it.
TOP 5 best products with reviews and prices
Among the many positive reviews about mats for drying dishes, there are five most popular models :
Umbra UDRY MINI
The Umbra UDRY MINI dish drying mat is a stylish accessory that simplifies the care of kitchen utensils. The product consists of two parts: a fleecy backing intended for drying dishes and a plastic stand with divisions for plates (this part is autonomous and can be removed if necessary).
The upper part of the drying substrate is microfiber, the bottom is membrane . The average cost is 1200 rubles. Read reviews here and here.
Video review of the rug:
NYHOLID IKEA
The NYHOLID dish drying mat is a European quality product from IKEA. This practical kitchen accessory (made of polyester) protects kitchen surfaces from moisture and simplifies the process of caring for kitchen utensils as much as possible.
The average cost is 200 rubles. Read reviews here and here.
Video review of the rug:
MoulinVilla Home
The MoulinVilla Home drying mat protects not only kitchen surfaces from moisture, but also dishes from damage . Thanks to the ribbed surface, moisture does not linger on the surface. Dense silicone prevents glassware from falling. The stylish design will help fit the rugs into the modern kitchen interior.
The average cost is 330 rubles. Read reviews here.
Ginger cat
The red cat dish drying mat is made of dense microfiber. Can be used as a hotel accessory and as a liner in a dish dryer. Bright colors and original design make it a successful addition to the kitchen interior.
The average cost is 150 rubles. Read reviews here.
UpakGroup
UpakGroup LLC dish drying cloth is made of viscose, which perfectly absorbs moisture and protects table and cabinet surfaces from damage. The variety of patterns will make the drying mat a bright accessory to the kitchen interior. The average cost is 50 rubles. Read reviews here and here.
Since drying mats come into contact with dishes, you should buy them only in stores where the quality of the product can be confirmed with appropriate documents. Rugs made from low quality materials can pose a threat to human health.
An indispensable thing in the kitchen: a dish drainer and its modifications
Reading time: 7 minutes No time?
A dish dryer is an absolutely necessary item. Even if you have a super-modern dishwasher and a fashionable kitchen set, you can’t do without this utilitarian little thing. The range of such designs is quite large, and in this material the HouseChief editors have collected for you a lot of useful information on selecting a suitable model.
Read in the article
Idea 6. Stand for mugs and glasses
If you're the type of person who collects wine corks (either for fun or in the hopes of one day making something useful out of them), then you'll love this craft idea.
To make one mug stand you will need:
- 8 corks (accordingly, to make a set of 4 stands you will need 32 corks);
- A roll of cork board, mat or coaster (for cutting out the base of the coasters);
- Hot glue;
- Leg-split.
Step 1: Lay out your corks in pairs in a square format as shown in the photo below. Using hot glue, apply a bead of glue between the two corks and press them together for 30 seconds. Repeat the procedure with all other pairs.
Features of placement of machines from different companies
There is no big difference in the installation of machines of different brands. The requirements for installation reliability are the same in all cases. For paired installations, it is recommended to use models of the same brand. This choice has a number of advantages:
Manufacturers offer sets of two units with fasteners, which greatly facilitates installation and ensures the safety and reliability of the design; some brands, for example, Bosch, Siemens, Asko and Gorenie, produce machines designed to be placed in a column, where the body of the washing machine is reinforced specifically for the weight of the dryer; connecting strips of such structures are specially designed to dampen vibrations and maintain stability; models from Bosch and Siemens may have a pull-out shelf; Asco has such a shelf equipped with a special laundry basket; drying units from Asko are equipped with additional fastenings for the legs; the Slovak Goreniya has suction cup legs; the undoubted advantage of choosing models from the same brand is style uniformity and the same dimensions, the latter condition is especially important for maintaining sustainability; when choosing narrow options for a small area, it should be taken into account that devices from Asco have a minimum depth, taking into account the mandatory free space at the back, it is 65.6 cm.
In cases where placement in a column is not allowed, the instructions indicate the minimum distance from above, which is necessary for the operation of the devices.
Myth 9. Drying spoils items made from delicate fabrics.
In the new Candy models, drying is implemented using a heat pump, that is, a lower temperature is used than in condensing machines. This in turn does not wear things out, as already stated. Also, let's not forget about special drying modes, for example, the mode for wool - they are designed specifically for delicate fabrics.
In addition, modern washer-dryers are equipped with a steam mode, which not only saves electricity, but also helps to carefully wash delicate fabrics: steam treatment resembles boiling in its effect, but colored fibers retain their color. By the way, steam also disinfects clothes quite well, which is very important for children's clothes or things for people with allergies.
Idea 8. Universal knife holder
A knife holder is a very useful kitchen gadget that helps keep your workspace tidy and keeps your knife blades sharp for longer.
Making a knife holder with your own hands is very easy - just pick up a small vase and fill it tightly with bamboo/wooden skewers, colored beans or... colored spaghetti, as in our master class.
To make a knife stand, prepare:
- A container or vase is the height of the blade of your largest knife. The shape of the container can be any, but without any bends;
- Spaghetti, lots and lots of spaghetti;
- Several large ziplock bags (or just large bags that can be tightly tied in a knot);
- Alcohol (for example, vodka);
- Liquid food coloring in the desired color (or several colors if you want to make a multi-color filling);
- Baking trays;
- Aluminum foil or old oilcloth tablecloth;
- Paper towels;
- Kitchen scissors.
- Make sure your container is clean and dry, then fill it tightly with spaghetti. When the container is full, remove the spaghetti and add a couple more bunches of pasta to the pile as a reserve (in case you make up for broken sticks).
- Divide the spaghetti evenly between the bags and pour enough alcohol into the bags to wet all the sticks. Next, add 10-40 drops of food coloring to each bag.
- Seal or tie your bags, then place them in additional bags to avoid leaks. Slowly shake and turn the bags to mix the coloring into the alcohol and pasta. Next, place the bag on one side and leave for 30 minutes, then turn the bag over again and leave it for another half hour. Continue soaking the spaghetti in this manner (no more than 3 hours) until it reaches the desired shade.
- Cover your baking sheet with aluminum foil, then a layer of paper towels (or oilcloth). To protect your hands from staining, it is advisable to wear gloves. Remove the spaghetti from the bags, after draining all the liquid, place them on a baking sheet in a single layer and leave to dry. From time to time, the spaghetti needs to be sorted to dry evenly.
- Once your spaghetti is COMPLETELY dry, start placing it in the container.
- Shake the filled container and smooth out the spaghetti. Insert your knives to determine the optimal filling density, adding pasta or removing excess if necessary.
- Now, using kitchen scissors or other very sharp scissors, trim the spaghetti to the desired length without removing it from the container (it's best to do this over the sink). It is important that the spaghetti does not exceed the height of the container by more than 2-3 cm, otherwise it will break quickly.
Topiary
You can decorate your kitchen by making a topiary - a kind of imitation of the tree of happiness. Today, such crafts have become very popular, because it is believed that topiary brings good luck to homes. Making such souvenirs yourself is extremely simple and does not require any special skills. The master class can be viewed on the Internet.
Completely different and sometimes unexpected accessories can be used as details of the tree - its leaves and flowers - ribbons, bows, artificial flowers, artificial and live fruits, candies.
In order to make topiary, you need to make a base. It will form the shape of the tree and any interesting components will be inserted into it. The base is made from:
- old ball;
- polystyrene foam;
- ready-made polystyrene balls, which are sold in hobby stores;
- papier-mâché in the shape of a ball.
Coffee beans are most often used to make the “tree of happiness”
Topiary in the form of a fruit still life will perfectly decorate the kitchen or dining room
To make a stylish topiary in the kitchen, you need to think about the trunk. The trunk of the tree can be made from a real tree branch, wire, or a stick wrapped in twine. If the topiary is tiny, then a pencil is used as a trunk.
A base is placed on the trunk. Wires are stuck into the base, on which are attached those trinkets that represent the crown - bows, shells, candies. The main thing is to plant the entire surface of the base tightly so that there are no gaps, trying to follow the rules of symmetry. The tree is planted in a pot, in which you can place synthetic polyester as a filler. On top it is masked with expanded clay or decorative stones. The topiary is ready.
Today topiary is a very popular decorative element that decorates almost every home.
Idea 10. Storage basket
There can never be too many baskets in the house, because they are so cute and help organize the storage system more rationally. Fortunately, you can make baskets with your own hands from newspaper tubes or just sheets of paper. Moreover, paper baskets can be very strong and practically no different from baskets woven from rattan. Perhaps this is one of the best ideas for crafts for the home and kitchen using scrap materials.
Read how to make such a basket for storing household items with your own hands in our step-by-step master class.
Today we will talk about an express technique for making a paper basket, which can be used to store small items (keys, stationery), yarn, as well as for an unusual presentation of fruits, Easter eggs, bread or pastries for a holiday table or as a gift.
Even a child can weave such baskets quickly and easily
- About 15 sheets of thin A3 paper, cut in half lengthwise (this can be printer paper, a full sheet of newspaper, or even baking paper);
- A container of suitable size with straight sides (for example, a jam jar);
- Glue in stick;
- One skewer;
- Spray paint (optional).
- Starting at one corner, begin to roll the sheet of paper tightly around the skewer to the diagonally opposite corner to create an even and long tube. Once the tube is ready, add a few dabs of glue to the corner of the paper to hold it in place and remove the skewer. Do the same with all the remaining sheets. In this master class, 30 tubes were required to weave 2 baskets.
- If necessary (for example, if you used newspaper sheets) or if desired, paint the tubes with acrylic paint.
- Take an even number of tubes and connect them together as shown in the photo in the upper left corner. In this master class, for a basket the size of a jam jar, 6 tubes were required, for a larger basket - 8 tubes.
- Start braiding: Take one of the outer tubes (which is under the grate) and lay it over the adjacent tube, then pass it under the next tube, then run the tube again over the next tube, etc. Continue weaving by lifting the already entwined tubes vertically (from now on we will call these tubes stands).
- When 2-3 cm remains from the first working tube, increase its length. To do this, apply glue to the new tube and insert it into the remaining “tail”. Continue weaving over and over again, adding paper tubes as needed.
- Once you have weaved a base of the desired diameter (the same size as the container), place the container on it and begin weaving around it, pulling the stand tubes close to the walls.
- Having weaved the basket to the end, remove the jar and carefully wrap the end of the working tube into the weave.
- Tuck the ends of the posts inside the weave and trim if necessary. Next, you can spray paint from a can as in our master class.