Creating a refrigerator cabinet
The project development procedure includes several stages:
- Freeze.
- Sawing and edging.
- Assembly.
- Installing an appliance such as a refrigerator built into a cabinet.
Important! The best option is when you can take care of a suitable cabinet at the design stage of the kitchen itself. Then later there are fewer problems with finding materials that can fit into the environment.
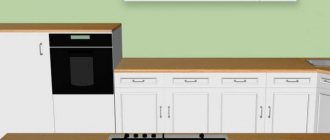
The size of the cabinet should be larger than the refrigerator, but not by much. It is necessary to leave space for free air circulation throughout the space. The load on the structure will be too severe if the box is placed too close to the hob or oven. Therefore, this type of built-in equipment and furniture is prohibited.
What to consider before starting installation
A regular refrigerator is designed to stand alone. It cannot be “covered” with sheathing, otherwise there will be poor air circulation. It will overheat and break. It also has no place near the washing machine and stove.
The vibration of the machine and the heat from the burners are not conducive to normal heat transfer. Therefore, you need to consider the design of the box and installation options.
Interesting article: Tips on how to store food in the refrigerator - features of each of the 5 zones, rules and terms
Required tools and materials
The list of necessary additions and fittings includes:
- Level.
- Pencil.
- Metal corners.
- Confirmats or Euroscrews.
- Self-tapping screws.
- High-quality hinges with a swing of at least 110 degrees.
- Furniture edge 2 mm.
- Facades and other parts made of laminated chipboard into which equipment is built.
Self-tapping screws for metal help to fix metal corners, but varieties for wood would also be useful so that the refrigerator built into the cabinet works properly.
Control system
Control of freezer functions can be mechanical or electronic. If the control system is mechanical, you will change the camera settings using mechanical switches. If the control system is electronic, control is carried out using regular or touch buttons. Electronically controlled chambers also have a convenient display where you can see the current operating parameters of the freezer. Freezers with an electronic control system have wider functionality and higher accuracy of settings. But the mechanical control system is considered more reliable and very rarely fails.
Measurements
First you need to study all the dimensions that exactly correspond to reality. Many manufacturers indicate data in technical documentation, but without taking into account, for example, strictly decorative elements. You can move on, relying on the previously obtained figures. Only then is the device itself built in.
- Width of the box from the outside. The dimensions must include an additional 30 mm for the hinges. For example, with laminated chipboard sheets of 16 mm and equipment with a width of 600, the final size will be 662 mm.
- Height indicator for the cabinet. The box and hanging cases must be at the same level with each other, then the overall style is not disturbed. It's okay if there is some empty space at the top of the refrigerator. The main thing is that there is a gap of at least 50 mm, then the cabinet for the built-in refrigerator will not cause any trouble.
- Vertical racks. Here they lay at least 50 mm. For example, with a unit depth of 600 mm, a total of 650 will be needed.
- A shelf that is located above it. You need to decide on the external width of the refrigerator, and then subtract the vertical dimensions of the racks. In the above examples, it will be 550 mm, it is better to subtract 100 mm.
- Spacers. One of them is behind, and the other is below. The length corresponds to the same indicator for a pencil case, only the width of the chipboard is subtracted from the result.
- Base. With a size that also corresponds to the indicators of other parts of the headset. The width is calculated based on the box.
- Doors. Cameras determine what the facades and heights will be. Each model requires an individual calculation, regardless of which cabinet for the built-in refrigerator is purchased.
The refrigerator compressor requires high-quality cooling, so you can do without the back wall. Spacers will make the structure more stable.
Aspects of freezing
The freezing power or the amount of goods that the model is capable of freezing during the day can be from 7 to 25 kg. Naturally, this indicator significantly affects the cost of the product. But in practice, the average family does not immediately freeze 25 kg of goods; 8 to 11 kg is enough.
The safety properties of frozen goods are determined by the number of stars on the door:
- one star indicates -6 0 C and the ability to preserve goods for up to a week;
- two stars correspond to -12 0 C, which allows you to store food for a month;
- three stars corresponds to a temperature of -18 0 C, which implies storage for up to 3 months;
- four stars indicate a temperature lower than – 18 0 C, which allows food to be stored for a whole year.
Sawing and edging
Sometimes it is not possible to do all the operations yourself and manually. Then you can contact any furniture manufacturing company. Purchasing suitable items and placing an order are issues that can be easily resolved in just a few minutes. If necessary, craftsmen help glue the edges. It is important not to forget about the holes where the door hinges are inserted. The large diameter makes it difficult to manufacture parts yourself. It is always better to find a ready-made built-in refrigerator in the kitchen set.
Freezing power
This aspect is determined by the time that the products will remain frozen when the power is turned off. This time interval can be from 12 hours to 32.
Energy saving. To reduce energy consumption, when choosing equipment, preference is given to classes A and A+. Models marked B, C and D obviously lose in this regard.
Climate class. Ambient temperature is of great importance for equipment used to cool goods. The climate class describes the temperature of the room in which the equipment can operate. Our area is asking for equipment manufactured in class N and SN.
Box assembly
There shouldn't be any major problems doing this part of the job.
The order is as follows:
- Connection of spacers with vertical posts.
- Adding a cover.
- Mounting the base.
- The pencil case is tried on on the spot, with the built-in device at the same time.
Sometimes an additional groove or hole is required to accommodate additional parts.
If the box and the wall are fixed to each other with corners, the structure will become more reliable. Two or three parts are placed on top, one on the middle spacer. The general level is leveled, then the pencil case is connected to other pieces of furniture. Lastly, they move on to the facades, because the hinges rotate on the vertical posts at the very beginning of work. The refrigerator cabinet is ready.
Configuration selection
Freezers are divided into semi- and fully built-in. The difference between them is small, but it exists. It is believed that a semi-integrated undercounter freezer can be installed or remain a free-standing appliance. At the same time, the front wall of the model is not covered by the kitchen facade.
100% built-in appliances are installed under the countertop. Depending on the installation location of the freezer, the placement of ventilation holes is provided. For models that will be located under the countertop, the ventilation mesh is located at the bottom of the equipment. Freezers built into columns have ventilation holes in the upper part.
Refrigerator installation
First, the installation is carefully installed in its intended place. Then they look to see if the furniture and the device itself are in the way. The location is centered and the corners are finally attached. Mounting it in place of the door gap will be the best option for integrating a regular refrigerator into the kitchen.
Metal self-tapping screws of 20-25 mm help secure the corners to the device. In this part, the body of the device will be complete, so there is no need to be afraid during drilling. All important elements will be located at the rear of the equipment. On top there are various sensors along with an indication. 16-18 mm wood screws secure the corners to the laminate so that the cabinet under the refrigerator is secured correctly.
You can also install corners at the bottom of the refrigerator to make the fastening and mechanism more reliable. It is better when there are more fixing parts, but it is not recommended to get carried away with this process. Otherwise, there is a high probability of simply damaging important parts of the structure with wiring. The handles are screwed onto the facades, the latter are fixed in place. It is not so difficult to integrate an ordinary refrigerator into a kitchen set.
Embedding Methods
When deciding to build in an ordinary refrigerator, decide on the option:
- custom-made furniture with space for a refrigerator;
- purchasing a special cabinet;
- place the refrigerator between cabinet furniture;
- leave it as it was, and decorate the visible elements to match the style of the kitchen.
Furniture made to order has a high cost, but all your ideas will be fulfilled. To create an opening between other furniture, the overall style may be disrupted. Masking the refrigerator will not solve the main problem and the only option is to make a cabinet to:
- it fit harmoniously into the design of the room;
- so that the cabinet doors do not interfere with opening the refrigerator;
- the absence of a rear wall without loss of rigidity is important (it is set using jumpers);
- had sufficient ventilation.
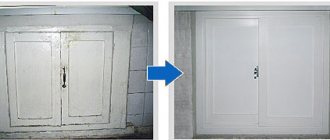
Refrigerator disguise
The option of simulating various effects is great for those who do not want to get carried away with the details and all the details of carpentry. This disguise helps to find optimal combinations with any interior when you need to build an ordinary refrigerator into a closet.
Vinyl stickers
They are easy to glue and detach if necessary, there are no problems. Various design options are available for sale. There are also individual elements of small dimensions and products that cover the entire refrigerator.
Film with photo printing
Such films create amazing decorative effects and can literally transport owners and guests to other places. There are no fewer design options here than in the previous case. The film will additionally protect the structure from the formation of scratches and dirt in large quantities. One option is easy to remove and replace with another when they are no longer needed. In this case, building an ordinary refrigerator into a closet will also not be difficult.
Painting
Full painting also helps make the structure less noticeable. It also adds free space. It is enough to choose high-quality enamel, the color of which matches the existing interior. It is acceptable to use acrylic paints together with stencils. Then colorless varnish is used to finally fix the design on the surface so that the cabinet under the refrigerator looks correct.
Interesting. Before starting work, the surface of the equipment is treated with white spirit and a primer is added. Then the material does not dry out or crack during further use.
Magnetic board
An option that can be called universal for all devices. Black magnetic boards are used, which are adjusted to the size of the equipment itself. A particularly useful purchase for homes with children and other forgetful family members. A practical decoration option for those who need to integrate a regular refrigerator into their kitchen.
Super freeze mode
A very useful feature that many modern freezers are equipped with is the blast freezing or super freezing mode. In super freezing mode, the engine operates at increased power. The essence of blast freezing is the accelerated cooling of products to a temperature of -26°C- -32°C. With this method of freezing, they retain the maximum of nutrients. Important! The freezer should operate in blast freezing mode for no more than a day. Otherwise the load on the compressor will be too high. It would be good if, in addition to the super-freeze mode itself, your freezer has a function to automatically turn it off. Otherwise, you need to independently monitor the operating time of the freezer in this mode and turn it off in time.
Source: greenloft.ru
Disadvantages of a built-in wardrobe with a refrigerator inside
Most often, such equipment quickly becomes unusable due to an imbalance and the influx of hot and cold air. You can get rid of the bottom and back panel to make the device work longer, but often this is not enough. In this case, the stability of the equipment is reduced, which can be dangerous for others.
Many people prefer to create their own designs from a regular factory-assembled refrigerator.
Defrosting system
The defrosting system in freezers can be manual or automatic. If your freezer has a conventional manual defrost system, you will need to defrost it once or twice a year. That is, turn off the device, take out all the products, open the chamber and defrost it completely.
If this does not suit you, it is better to buy a freezer with a No Frost automatic defrosting system. Freezing equipment with a No Frost system has a special evaporator that removes excess moisture from the chamber, thereby preventing the formation of ice and frost. With such a system, the walls of the chamber do not freeze and the products do not freeze over. The only drawback of this modern system is that due to dry air and constant circulation of cold air currents, the products dry out faster. In a chamber with a No Frost system, it is recommended to store products in bags or plastic containers.
Tips for installation and operation
The main rule is to first choose a refrigerator, and then move on to the cabinet. If furniture was purchased without measurements, no professional will undertake installation. He won’t even tell you how to install a non-built-in refrigerator without measurements.
Some people try to build regular refrigerators into cabinets.
There are several dangers in this case:
- An ordinary refrigerator is placed on the floor, so the cabinet will have to be made without a bottom.
There are other important parts at the back, so there will be no back wall either. The result is a structure made of three boards, which cannot boast of stability.
- You will need a refrigerator cabinet that is too large for even the smallest refrigerator.
The design will stand out compared to other parts.
- An ordinary refrigerator can only be properly hidden in wardrobes.
But even in this case, the top cover must be missing so that there is free access for air. The door must be made so that everything opens instantly.
- The ergonomics of the future device are also taken into account.
When they decide on a model, a suitable place is selected for it. The main thing is that the equipment is mounted far from the stove and other devices that can heat up to high temperatures. A perfectly flat place is selected under the cabinet. The door should also open easily and completely. This is important for those who are interested in how to integrate a refrigerator into a kitchen set.
Typically, such a design is placed at the edge of a headset, straight or corner. This is the highest point, the rest is at waist level. But there are plans for other solutions, no less interesting.
For example, when the refrigerator is hidden in a cabinet under the work surface. In such cases, two small units are purchased and then placed close to each other. You can use them to store different foods in each. Then there is no difference in height in the interior, and the solution itself looks unusual and original. But there will be little space for storing food. And you have to squat to get something when using the refrigerator cabinet.
Note! Under the windowsill you can equip an additional place where food will be stored. You need a fairly wide recess in the wall where the shelves will be placed. Technological holes will make it easier to maintain the required temperature level. Is it possible to create more complex designs in the kitchen? The answer will be yes.
Upright freezer.
The most popular among Ukrainian buyers is the vertical freezer, as it is most suitable in terms of convenience and dimensions for use in modern apartments. A vertical freezer is more suitable for storing fruits, vegetables, berries and herbs as its design makes it easy to find and get the desired product. The volume of the vertical freezer varies from 50 to 350 liters. A vertical freezer with a transparent door is called a display freezer. In a small kitchen, a mini freezer with a capacity of up to 80 liters can be used as a stand for a refrigerator. Kitchen appliances (microwave, etc.) can be installed on top of the freezer. Do not allow water to get on the top cover of the freezer compartment, as this may damage the electronic module.
About other features and benefits
A refrigerator cabinet along with the equipment itself usually has the following advantages:
- Much more economical due to thermal insulation due to the cabinet walls.
- Silent.
- Remains almost invisible.
But this is an expensive technique, even if it is inferior in capacity to conventional analogues. Especially when there are additional functions. If you have a large family for whom you constantly cook, this option cannot be called suitable. Installing a regular refrigerator in a kitchen unit is also not so easy.
Built-in refrigerators include office types of equipment and minibars, small car refrigerators.
Interesting. The sizes of equipment vary; the choice is made depending on the specific operating conditions. The freezer may be absent altogether, but most often it is 1-2 structures. Internal structure and safety remain the main requirements, but almost no attention is paid to appearance.
Such designs will not be practical if you always need to store a large number of products. 170 centimeters including the freezer compartment is the average size for modern models.
MDF and laminated chipboard are the most suitable materials for those who make their own boxes or make a refrigerator cabinet. Both options have good technical performance; the choice is based on the buyer’s personal preferences. The facade is covered with varnish or film to give the structure a certain appearance. It is not difficult to make a suitable size for a regular refrigerator.
If possible, the legs of the refrigerator are removed completely, or the bottom of the cabinet itself is discarded. But usually the pressure on its bottom increases due to the fact that the legs of modern designs are non-removable. Only with the right choice of location will the operation be stable and not cause any trouble.
It is recommended to regularly check the back wall for debris and other similar components. Due to such pollution, fires often occur and the normal process of air exchange is disrupted. The freezing compressor breaks down faster, and the refrigerator cabinet also deteriorates.
It is important to solve the problem with the electrical network in advance so that the wiring is always freely accessible. If changes are likely in the future, it is better to buy an extension cord with the necessary characteristics.
Construction belts help to calculate and place equipment more accurately. During installation, you are allowed to remove the doors, then it will be easier. Then they return to their place. So we managed to hide the refrigerator in the kitchen unit ourselves.
How to turn off the freezer
The control panel in two-compartment refrigerators comes in different types, and it is this that determines how to turn off the freezer. To turn off a mechanical freezer, turn the temperature control lever to position 1 and then turn it off completely without much effort.
To turn off a freezer that has an electrical panel, press the last button that shows the door open. After this, the Atlant freezer power indicator will go out, indicating that the compartment is ready. If you press the button again, the appliance compartment will restart after 5 minutes.
Step-by-step instruction
Anyone can install their own regular refrigerator with their own hands. There is nothing complicated, the main thing is to do everything step by step.
- Measurements and design. It is better to design the facade for the refrigerator when planning the kitchen. Otherwise, finding and selecting materials for an existing headset will be a problem. We take measurements of the width, depth and height of the equipment, its distance between the floor and the space between the refrigerator and freezer compartments (if available). To determine the size of the frame, one should take into account the technological reserve for normal air circulation, which means that the box should be slightly larger than the refrigerator itself.
- Preparation. The materials from which the cabinet will be made must be cut based on the required dimensions, and then sent to specialists for edging (or, if you have the skills and abilities, do it yourself).
- Frame assembly. We assemble the prepared parts together. The top panel and the panel above the refrigerator are connected to the risers using minifixes. The shelf and the back wall are fastened with confirmations. The back wall is attached with corners to the racks. Then we attach a spacer (the width of which is 100-150 mm) to the middle of the rear part of the box. We place the product vertically and place a spacer on the corners that is smaller in size on the lower part. We install it in the right place and align it, connecting it with the adjacent set. We make a connector for the wire in the rack. To ensure the strength of the structures, we attach them to the corners of the wall at the top and bottom and place another spacer behind the base. For the refrigerator compartment it is better to install four loops; for the freezer, 2 are suitable, but if it is about the same size, we use it too.
- We install the refrigerator into the structure. We attach one side to the rack itself, the other to the original fastening of the unit door. We install the second corner on the other side. Important! The walls of the refrigerator can be drilled, this will not affect the operation.
- We install the front on the door. We define a guide (it should be the same level as the handle). We retreat 30 millimeters from the edge and draw a straight line (you can use a building level). We install the first guide, securing it with screws. Then install the second guide. If the facade opens incorrectly, we adjust its position by moving the corners. We repeat the steps for the refrigerator and freezer compartments.
- We match the facade to the interior of the room using varnish, paint and special coatings.