Built-in household appliances are no longer considered something extravagant and exotic. On the contrary, the choice of certain built-in kitchen appliances is much preferable for many, since it brings with it many advantages. A small kitchen, equipped to standard standards, often looks cluttered due to the large number of appliances. Hidden household appliances can make the interior harmonious and stylish.
Working conditions
In an apartment, the installation location of the gas panel is determined by the location of the gas pipe. A shut-off valve must be installed on the gas pipe. It is worth noting that moving a gas pipe over any distance should only be done by gas company specialists. At the same time, no one forbids installing a gas panel at a certain distance from the pipe, using a flexible gas supply (gas hose).
bellows hose, flexible gas connection
Connecting a gas stove to the countertop
Let's look at how to build a gas stove into a countertop (photos of some stages in the article).
When installing the stove, you need to remember that all work related to gas is very dangerous and requires compliance with all established safety rules and instructions.
One of the important points is the correct choice of a special hose for connecting the stove. They come in metal, self-phone and rubber. The hose must be certified and should only be purchased in a special store.
So, how to integrate a gas stove into a countertop?
Before you begin installing the stove, you need to carefully inspect it. It is very important that it does not have any mechanical damage. If none are found, you can start working.
Installing a gas stove is easy. To do this you need:
- Insert the device into the hole prepared for it.
- Using adjustable wrenches, connect the gas hose to the gas tap. To avoid gas leakage, the connection point must be wrapped with gas tape.
3. Connect the other end of the hose to the hob. Please note that there are two output options, one of which is for a balloon device.
5. After the device is connected to the gas main, you need to open the gas tap. Coat the connection points with a soap solution, which will help you understand whether there is a gas leak or not. If the soap suds don't move, then everything is fine.
6. Check all burners.
Safety precautions
Compliance with safety precautions will help you avoid irreparable mistakes. We offer some tips:
- It is better to choose a gas hose with a length of no more than 3 m. It is prohibited to connect the hoses with each other.
- If you want to move the gas stove to another room, this must be agreed upon with the relevant authorities.
- To check the tightness of the hose that comes from the gas main, do not use open fire. This mistake can be fatal!
So, we looked at how to integrate a gas stove into a kitchen unit yourself. Before performing work, it is advisable to evaluate your abilities and skills. If you have doubts that you can do this, it is better to turn to professionals. However, it is worth noting that the installation process itself is not at all complicated and almost anyone can cope with such a task. The most important thing is to try to carefully read the instructions and purchase all the necessary tools and materials.
But remember that in order to install gas equipment, permission must be obtained from special regulatory authorities, who, after installing the stove, must check the quality of the work performed.
How to integrate a gas stove into a kitchen set?
Photos of the surface itself and some stages of work are presented to your attention in the article. Before installing the stove, it is important to choose its location correctly. You should focus not only on how this item will fit into the interior of the kitchen, but also on the fact that:
- A prerequisite for installation is free access to the cooking surface of fresh air.
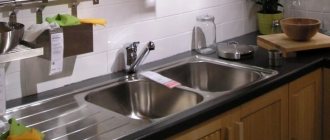
- It must be remembered that you cannot install a gas stove next to the sink, since splashes of water should not fall on the heated surface when washing dishes.
- It is also not advisable to place a gas hob next to a refrigerator, as its wall will heat up.
- The hob must be located in the kitchen at a safe distance from other elements of furniture.
Useful advice from experienced craftsmen
The distance from the front edge of the tabletop to the cutout must be at least 50 mm. Otherwise, this part of the tabletop may break during operation.
To reduce the formation of chips when cutting a hole in a chipboard tabletop, you need to turn on the pendulum stroke on the jigsaw.
It is recommended to install the hob after assembling the kitchen unit, so as not to deform the countertop.
In this article, we looked at the step-by-step process of installing a hob - from marking to connecting to communications, and also talked in detail about all the important nuances that a beginner needs to know. We hope that the information will be useful to you.
Advantages of built-in gas stoves
Before considering the question: “How to integrate a gas stove into a cabinet or countertop?”, you need to find out all its pros and cons. Let's first consider all the advantages of this technique.
- First of all, it is an opportunity to arrange kitchen equipment comfortably, compactly, without overloading the room with large appliances. This is especially true in small kitchens.
- The hob and work surface combined by a common countertop look very aesthetically pleasing. The oven door is flush with the doors and drawers of the kitchen unit, which is very harmonious. The kitchen becomes more spacious. In this case, a free-standing gas stove in the kitchen will clearly be a loser.
- In a solid tabletop without cuts, debris and grease do not get clogged in the cracks that always exist around individual slabs. With built-in appliances, all you need to do to clean is to wipe the surface. Isn’t this what every housewife dreams of?
Buy with a guarantee
Elica provides a long-term official warranty on all NikolaTesla hobs. The user manual contains detailed instructions regarding the operation of the hood, so at any time you can see how to get to the carbon filter and learn the intricacies of controlling the modes of the induction zones.
To select a suitable hob model with a built-in hood, use the filter and model descriptions in the catalog. And if any details are unclear, seek an online consultation. As soon as you choose a model and make an advance payment, the managers will arrange the delivery of the hob. Delivery is made to all regions of Russia.
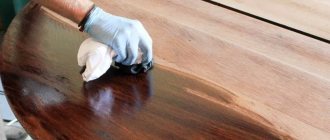
Sealing and sealing
Before installing a gas stove, you need to treat all cuts with nitro varnish or silicone sealant, which will protect the countertop from premature damage, getting wet, dirty, and swelling. You can also use a self-adhesive seal that performs the same functions. It is glued on top so that the edges of the hob rest on it.
To seal the edges, you can also use aluminum tape, which will also protect the tabletop from temperature changes. Remember that a high-quality seal can extend the life of the countertop, and it will not need repair or replacement.
Sawing a hole
Before you build a gas stove into the countertop, you need to make a hole. This process is not particularly difficult.
- In order to install a surface into a tabletop with your own hands, you should first of all know its dimensions. As a rule, they are indicated in the instructions, so there is no need to invent anything. You can also take measurements yourself. To do this, you need to turn the panel over and use a tape measure to determine its length and width along the inner edges.
- When working, pay attention to the fact that the instructions give the values of the minimum indentations from the edge of the tabletop. They can only be changed upward, since an edge that is too narrow may break off after a while.
- Now, according to the dimensions of the gas stove, you need to make markings on the countertop using a tape measure, a pencil and a square. It is imperative to ensure that all lines are parallel and the angles are right. The panel will be built into this location.
- Drill a hole where the cutout will begin. It is done using an electric jigsaw. To obtain an even cut, it is recommended to use a file with small sharp teeth. Otherwise, the edge of the cut may crumble. If you don’t have a file, you can use a hand router for the job, round the corners with a radius cutter, and grind the cuts.
- Sawdust generated during work can be easily collected with a vacuum cleaner.
After the hole is ready, you need to try on the hob to make sure that everything was done accurately and correctly.
Features of accommodation
A kitchen stove to be built in can be inextricably linked with the oven (the latter occupies a place strictly under the panel) or can be arranged separately, independently of the oven (the controls belong to it personally and are not combined with the oven units). The location possibilities directly depend on what type you have to deal with - devices of combined models, with rare exceptions, have a single power source, plus, they are connected by a network of wires. First of all, the oven is installed as the main carrier of the control elements (the unit is leveled using a building level).
Freestanding hobs, which actively crowd out built-in sets, usually fit into or are embedded in the countertop set.
The minimum thickness of the countertop for installing a stove is 38 millimeters. The material must wick away moisture well and withstand temperature increases of at least 100 degrees.
If the device supports automatic ignition, there should be a socket next to it. Installation rules prohibit placing any stove near the sink so that drops of water do not end up on the hot surface. Close proximity to a refrigerator is also an unspoken taboo: the walls of the unit will be subject to thermal attacks every now and then.
Dimensions assessment
Before integrating a stove into a kitchen unit, it is important to determine the dimensions, as well as prepare the necessary materials and tools. As for the sizes, the most common hobs on sale now are those with 4 burners.
The slab needs to be measured, but there are averages:
- panel height – 3-10 cm;
- length – 50-60 cm;
- width – 45-50 cm.
The sizes of the slabs from different manufacturers are approximately the same. Gas “built-ins” are characterized by a width of 50-52 cm, electric ones appear in a slightly expanded format - 60 cm. The height of both types is common - 85 cm for dependent models and 3-10 cm for individual panels. In the case of a hob, the depth is also subject to strict consideration: it ranges from 45-55 cm, determined by the number of burners.
Stove-oven sets must be aligned with the plane of the countertop. It is recommended to equip the side surfaces of the table with metal slats - this measure will significantly extend the life of the kitchen furniture.
Measurements are carried out in the usual way, by measuring the length and width of the equipment. Many companies help simplify the process by providing a convenient template, cut out in full accordance with the parameters of the unit: all that is required of the installer is to trace the contours of the stencil.
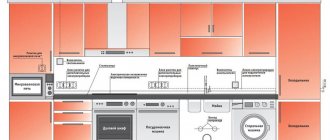
When marking a set, it is important to provide for such a factor as thermal insulation - otherwise there is a high risk of damaging the furniture from constant overheating. To organize high-quality ventilation, it is necessary to retreat approximately 10-15 centimeters from the walls and all edges of the tabletop. The minimum distance from the edge of the table is always specified in the instructions for the stove; it is permissible to increase it slightly, but in no case reduce it.
If you are unable to properly protect the set from overheating, or the distance to the wall is less than the standard value, a heat-insulating material like foil-coated plasterboard will come to the rescue.
Installation of Gefest CH 1210 hob
When installing the table, of course, it is necessary to take into account the presence and size of the supply gas and electrical communications.
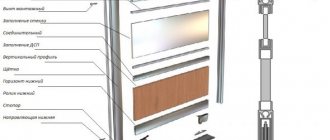
| Rice. 4. Bottom view of the hob with an electrical cord and an outlet for connecting a gas hose |
Marking the countertop for the hob
We start again with markings, using a pencil to outline the outline of the opening on the tabletop in accordance with Figure 5.
Article on the topic: How to set the time on an electrolux gas stove
What you need to consider when marking the contour for the Gefest CH 1210 hob
When marking, you need to take into account (Figure 5):
When installing the hob, it is necessary to ensure minimum air gaps according to Figure 7.
| Rice. 7. Minimum air gaps |
Cut out the outline for installing the hob
During the cutting process, we hold the part of the tabletop to be removed from below to avoid its premature fall and chipping of the decorative coating. No additional ventilation holes are required.
| Rice. 8. The cutout for the hob is ready |
Installing mounting brackets
We place and secure the mounting brackets so that the top edge of the bracket is flush with the surface of the tabletop.
To avoid cracking the countertop, do not tighten the screws without first drilling holes with a diameter of 2.5 to 3-4 mm.
| Rice. 9. Installation of fasteners |
By the way, this is a very simple and convenient way to install a hob; before this we encountered a more “hemorrhoids” method.
| Rice. 10. Fastening the hob using staples to the sides of the chipboard oven body |
Along the edge of the inside of the table we glue the table seal for a tight and airtight fit; the seal is similar to that used for installing the sink.
Next, carefully insert the hob into the opening and secure it with four screws and washers.
Why an induction hob is better than others
Advantages and disadvantages of an induction hob compared to gas and electric panels. Economics of using an induction panel. Did you know that there are hobs combined with hoods?
Gas hose connection
The gas hose must be connected by specialists, do not forget about this!
For installation, we bought a bellows hose, a dielectric coupling and an installation kit.
| Rice. 11. Everything we originally bought to connect the gas hob |
| Rice. 12. Contents of the installation kit |
Gas hose connection requirements
When connecting, the following requirements must be met:
Check the tightness of the connections in accordance with the technological instructions of the gas supply organization.
Bellows gas hose
Bellows gas hose is safer and more durable than rubber gas hoses, with references to lifespans of up to 25 years.
Bellows hoses are produced from stainless steel, at the ends of the hose there are threaded fittings with paronite gaskets. The hose bends easily, withstands pressure up to 6 atmospheres and temperatures from -50 to +200 degrees C.
But bad luck, it turned out that the bellows hose cannot be immediately connected to the gas pipe and a dielectric coupling cannot be installed; again, I had to go to a hardware store and buy a connecting coupling. Gas workers checked - everything is secure and there is no gas leak.
| Rice. 13. It turned out to be impossible to immediately connect the bellows hose to the gas pipe using a fitting; a coupling is needed |
| Rice. 14. The bellows hose is connected using a coupling |
| Rice. 15. Connect the bellows gas hose through a fitting to the gas supply to the hob. A little further down the view is a plate with which the hob is fixed to the cutout in the countertop |
| Rice. 16. Hob installed |
| Rice. 17. The gas pipe and bellows hose are hidden behind the box |
Watch a video about the results of installing a gas hob
Preparing tools
To install built-in equipment yourself, you will need the following tools:
- Construction level - needed in order to fix the hob perfectly evenly;
- a measuring device and a pencil - useful for marking the tabletop;
- electric jigsaw for “cutting” the hole;
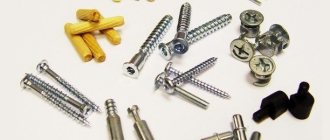
- fastening elements - selected based on the model of equipment;
- a certified steel hose (up to 3 meters long) is an indispensable element when supplying gas;
- gas winding - will prevent fuel leakage at the junction of the hose and the gas pipeline;
- silicone sealant - will protect furniture from destruction by moisture and fungi.
Article on the topic: Where to put an old gas stove in St. Petersburg