Spring is coming, which means it's time to plant seedlings. As you know, in order for seedlings to grow and bear fruit, they need care and light. To grow good seedlings you need to take care of all the nuances. We have all heard that the plant requires light, moderate watering and mineral-enriched soil. Well, of course you need a place to put all the seedlings. The rack will help solve the issue of plant placement. You can make a rack for seedlings with lighting yourself or buy a ready-made rack, saving yourself the extra hassle. By spending a little time and effort, you will create your own, original shelving unit that can become a decoration for your home. So, how to make a rack with lighting for seedlings with your own hands?
Why use shelving
Before arranging a window sill, you need to understand for what purpose the rack or shelf is used to place pots and other containers with seedlings on it.
If you are an avid gardener or summer resident, then you know how and where to grow seedlings.
The main condition for good growth is the optimal amount of light, humidity and temperature.
It is not for nothing that window sills turn out to be the most practical and functional place for such tasks.
Basic requirements for racking
A rack for seedlings can be made from various materials, but in any case it should be:
- durable;
- suitable for repeated use;
- convenient, i.e. provide comfortable conditions for caring for plants (it is important to have quick access to seedlings for watering, inspection and loosening);
- having an aesthetically attractive appearance.
The dimensions of the structure can be completely different, but racks with the following parameters are considered universal:
- number of shelves – from 3 to 6;
- the length of the shelves is sufficient to accommodate standard fluorescent lamps (i.e., from 50 cm);
- height between shelves – from 40 to 50 cm;
- the distance from the floor to the bottom shelf is from 10 cm.
Often the bottom shelf is used to store various garden tools or household items.
If you do not plan to keep seedlings on the last shelf, the top of the rack can be left open by installing front and rear horizontal supports instead of the top shelf. They will not only support the entire structure, but will also be an excellent place for attaching lighting elements.
Wooden frame with height-adjustable shelf
A do-it-yourself wooden shelf for seedlings on a windowsill is the most common option. The material is light, inexpensive and easy to process. To make a rack with one shelf adjustable in height, you will need 4 racks made of boards 40–50 mm thick. On one side, grooves are sawn in increments of 50–100 mm. The width of the cut is a couple of millimeters greater than the thickness of the material for the shelf.
The frame is assembled so that the slots are inside the structure. The boards form corner posts, and they are connected at the top and bottom with timber strapping with a cross-section of 40x40 mm. The resulting rectangular stretchers will become the basis for the stationary lower and upper shelves. The intermediate third shelf is freely inserted into the grooves of the desired height.
Advice! Due to the lack of intermediate supports and a stretcher, many heavy boxes with seedlings cannot be placed on the middle removable shelf.
Types of racks for seedlings
Based on location, racks are divided into:
- window, installed on the window sill;
- floor
The first type is used for installation on windows facing south. The downside is that such stands do not allow for growing tall seedlings on them. But for small specimens it will be possible to arrange 3 or 4 floors.
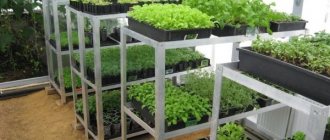
Rack for seedlings on the windowsill
Floor options are universal; they can be placed in front of a window, against a wall, on a loggia, and even, if desired, in the middle of the room. Equipped with a lighting source, they will solve the problem of providing the required duration of daylight for seedlings.
Floor rack for seedlings
Their height is presented in stores in different sizes.
The advantage is that in most designs you can remove some of the shelves if they interfere with the placement of tall plants.
Suitable materials
Particular attention should be paid to the materials from which the structure will be made. Traditionally they use:
- tree;
- metal;
- plastic.
The choice depends on your desire and financial capabilities, but you should keep in mind that the rack should serve you as long as possible, while being reliable and practical. For load-bearing racks, take wooden beams, plastic pipes or metal tubes with perforations, and for shelves - metal sheets, wooden lining, plastic panels or plexiglass.
Please note that shelves made of metal and wood (plywood, chipboard) can be seriously damaged by moisture. Therefore, in the first case they will have to be painted, and in the second case they will have to be covered with polyethylene.
Recently, racks made of metal corners with perforations are increasingly appearing. They are stable, reliable, and very easy to use due to the fact that you can change the location of the shelves at any time without much difficulty.
Deciding on design and construction
The rack consists of several shelves connected by longitudinal and transverse frame slats. If the space of the room allows, it is better to choose a stationary option in the form of a cabinet. Dimensions should be calculated based on the dimensions of the free wall where the structure is planned to be installed.
Wood products tend to deteriorate, especially in a humid environment. To do this, they need to be painted and the coating periodically renewed. Plastic models are strong and durable. Metal shelving is easy to use. Frames are often equipped with hooks or other fasteners, with which the height of the shelves can be easily adjusted. If necessary, shelves are removed or added.
In a spacious room you can install round or oval racks. This model looks aesthetically pleasing and original. There is access to plants from all sides.
Additionally, the structures are equipped with lighting. Lamps are selected depending on the needs of the crops being grown. Lamps are:
- sodium;
- luminescent;
- LED;
- incandescent lamps.
Phytolamps with LEDs are suitable for any crops. They contribute to the harmonious development of plants. To optimize the temperature in greenhouses, incandescent lamps are often chosen.
Having decided on a suitable option, you should study the models offered by manufacturers. If there is no suitable one among them or its cost is too high, there is always the opportunity to make the rack yourself.
Material selection
The material is selected so as to create a reliable and durable rack for seedlings. Let's look at some of them and find out the advantages and disadvantages.
- Metal: durable, reliable. Profiles or pipes are suitable for racks, and shelves are made of mesh or sheet metal. Disadvantages: high cost, special skills, devices and tools for manufacturing will be required. Corrosion may occur, so stainless steel is recommended.
- Wood: environmental friendliness, beauty, strength. To improve the latter quality and protect it from moisture, the rack is coated with impregnation, which protects the wood from getting wet. Hardwood materials absorb liquid the least: maple, oak, ash.
- Plastic: affordability, durability, easy to clean, resistance to external influences (light, water). To assemble the racks, plastic sheets and pipes are taken.
- Plexiglas: strength. An original stylish shelving unit is made from this material. The transparent design will fit into any interior. In addition, you can use plexiglass of different colors.
- Plywood: easy to work with. But not the most suitable material. The shelves swell quickly when exposed to water. To prevent this from happening, you will have to additionally use film.
Plywood seedling rack
Of the listed materials, plastic and plexiglass are considered the most suitable. Racks made from them are immediately ready for use. And there is no need to impregnate them with protective agents against pests, moisture, and corrosion.
If you decide to make a rack for seedlings with your own hands, in addition to the material you will need the following tools:
- saw,
- drill,
- screwdriver,
- screwdriver and others.
Types of structures
Racks according to their design are divided into stationary, collapsible and window.
- Stationary racks are installed in a permanent place and fixed in several places for reliability. They are distinguished by their strength and durability. They are installed in rooms where plants are supposed to be grown for more than one season.
- Collapsible racks for seedlings are convenient for limited space spaces. This rack can be easily and quickly disassembled and moved to another location. When the seedlings are planted, the stand is dismantled and put away.
Window racks are installed on the windowsill. They are suitable for planting a small number of seedlings. These devices allow you to grow greens all year round
The advantages of using each type of structure are confirmed by many years of experience of gardeners and gardeners.
DIY drawings of racks for seedlings
The simplest version of the design with shelves can be assembled with your own hands from ready-made parts used in arranging storage areas in warehouses. For example, you can make a rack from profiled steel racks, in which the shelves are assembled from ready-made metal cassettes.
Since the frame is assembled from standardized parts, it is possible to make shelves of unlimited sizes and number of places for arranging seedlings. The second advantage of using ready-made cassettes and racks is the ease and speed of assembly.
Designs made from ready-made parts are convenient and easy to assemble. Important! As the shelves with trays and pots with seedlings are filled, the rigidity of the frame can be increased using cable braces stretched from the back.
If you plan to make a stationary rack of maximum strength, then the best option would be a project from a 25x25 mm profile pipe, with a wall thickness of 2 mm.
Shelves measuring 50x150 cm can be made of waterproof plywood or metal if the seedlings are planned to be grown not on the ground, but in hydroponics.
If you make the shelves not from a pipe, but from a corner, then the supporting plane can be made of glass or thick monolithic polycarbonate.
Glass shelf cover improves illumination
One of the options for making a rack for seedlings with your own hands is shown in the video:
It is clear that wood remains the most affordable material for shelves. To make a window version, you can use the design of a U-shaped shelf installed on the window sill.
A more spacious rack for three full-fledged shelves from lining can be made according to the universal scheme given below.
In general, the design turns out to be quite reliable and convenient, but transporting it in an apartment or even a country house is not very convenient.
Cost of finished racks
Now in the retail chain you can purchase ready-made metal racks for growing seedlings. The cost of such products depends on the size and materials of production. The table shows the approximate price range for the most popular shelving models:
| № | Rack size | Price |
| 1 | 1500 x 750 x 300 (with phytolamps) | 9280 rub. |
| 2 | 2500x1000x600 (without backlight) | Z600r. |
| 3 | 1000x 700x300 (without backlight) | 1630 rub. |
| 4 | 2500x1000x600 (with backlight) | 8800 rub. |
| 5 | 1000x 700x300 (with backlight) | 6630 rub. |
| 6 | 1500Х1000Х500 (with backlight) | 6955 rub. |
| 7 | 350Х230Х150 (with backlight) | 9760 rub. |
As for custom-made racks, their cost will depend on the complexity of the design and the size of the structure. The minimum cost starts from 5,000 rubles.
Making a shelving unit for the windowsill
Having initially calculated the number of floors of the rack (in our case there will be 4) and its parameters, we proceed to construction. For simplicity and convenience, we take ready-made furniture panels in the size of the window sill, 1200 mm by 200 mm long. For the side racks we install furniture panels 1500 by 200 mm long. We fix it using the format. The height of the shelf in our case is 350 mm. If desired, for greater stability, the structure can be additionally secured to the slope or frame. You can make a rack for seedlings with lighting by attaching lighting to a ready-made structure.
Why do seedlings need lighting?
In winter, plants especially lack natural light. As a result, photosynthesis proceeds sluggishly, normal development and biomass growth slows down. The lack of light is compensated by installing artificial lighting. In stores you can buy lamps of various designs and powers. But how many lamps and what power is suitable for growing plants? First, let's decide which lamps are suitable for lighting.
Choosing the right lamp for seedlings
Suitable for illuminating seedlings:
- Incandescent lamps (17 Lm/W) are a simple, affordable, but not the most effective way of lighting. They provide little light and heat up a lot.
- Fluorescent lamps (70 - 100 Lm/W) type LBT or LB daylight with low power. Provide cold light. Have a low proportion of red light.
- LED (80 – 110 Lm/W) – durable, economical lamps. With them it is easy to select the required spectrum and intensity.
- Sodium metal halide lamps (up to 100 Lm/W) are easy to use, economical, efficient, but they lack the blue spectrum.
- Domestic sodium gas-discharge lamps (200 lumens per watt) emit a yellow-orange glow that does not cause eye irritation. Requires additional installation of a control device.
- Mercury . They have the largest “cross section” in the area of daylight.
- Phytolamps are economical, environmentally friendly, efficient, compact and durable. The most popular for lighting seedlings. Even close proximity of such lighting will not lead to leaf burns.
- Others : halogen (25 Lm/W), linear (47 – 93 Lm/W), xenon gas-discharge lamps (100 Lm/W), neodymium.
In order to illuminate a shelf 50 cm wide and 140 cm long, it will be enough to install a “warm” lamp and a “cold” spectrum lamp with a power of 36 W. And it is best to make up for the lack of sunlight with fluorescent lamps or special phytolamps. Reliable and efficient sodium gas-discharge lamps will also help illuminate racks for growing seedlings.
When choosing a lamp with throttles, take into account the strong heating of the throttle and the shelf above it. To reduce heating, the gap between the shelf and the lamp is 4–6 cm. If you use a lamp with electronic ballast, there will be no problems with heating.
Recommendations for organizing lighting
Regardless of the type of lighting chosen, try to place the seedlings on a south-facing window. For greater effect, you can install additional reflective screens on the sides and back of the seedlings. The lighting intensity is selected individually for each plant. Depending on the requirements of the plant, the intensity can be adjusted by increasing or decreasing the distance from the lamps to the plant.
Let's take stock
Having selected the necessary material and calculated the parameters of the shelves, you can easily make a rack for seedlings with your own hands. Do not forget about the need for additional lighting for plants.
Having decided on the choice of lamp (phytolamps, fluorescent, sodium lamps are considered optimal), you can make a rack for seedlings with lighting.
Varieties
It’s easier to buy a rack for seedlings in a store. However, the cost of the product is high, and the quality is not always good. The shaky structure can collapse at any moment. It’s easier to make a rack yourself according to individual dimensions, but first you need to decide on the design.
Stationary
A stationary rack for seedlings usually holds 5 shelves and is installed on the floor. The design is not collapsible. For reliability, the rack is fixed to the wall and floor. The model is suitable for people who are constantly growing planting material in large quantities. Due to the impossibility of disassembling the structure, it will be necessary to find an empty room for installation. Dimensions are calculated individually. The optimal material for manufacturing is wood.
Collapsible
The most convenient to use is considered to be a collapsible rack. The design can consist of 3, 4 or 5 removable shelves, installed as needed. The manufacturing material is a thin-walled metal profile with a galvanized coating. The collapsible model is installed while growing seedlings, and then it is stored in a shed.
Window
The window rack for seedlings accommodates 3 shelves due to the height limitation of the opening. The width of the windows is also different, so it is better to make such structures yourself with individual sizes. The height distance between the shelves is maintained at a maximum of 50 cm. The rack can be made folding or non-collapsible, but the first option is better. After growing the planting material, the structure is dismantled for storage until the next season.
With case
On sale you can find a rack for seedlings with a cover, consisting of 4-5 shelves. A similar design can be made at home. The manufacturing material is a thin-walled pipe with a diameter of 15 mm, an angle or a profile. The cover is sewn from transparent film or agrofibre. The purpose of the shelter is to create a microclimate for seedlings. The cover forms a mini-greenhouse, which allows you to install the rack in a cool room.
Important! Lighting for a shelving unit with a cover is a must.
Firstly, the lamps will become a source of heating for plants in a cool room. Secondly, the shelter partially reduces the intensity of daylight coming from the window and without artificial lighting the seedlings will be dark.
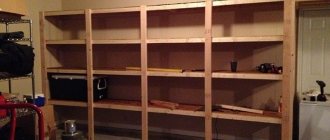
Wooden rack for seedlings
If you are planning to make a shelving unit from wood, you will first need to draw a sketch of it so that you do not forget what dimensions to adhere to. Here is an example of a suitable diagram:
It is better to make shelves from timber in the form of a longitudinal lattice. They will be stronger than plywood shelves, although the structure will be more bulky and heavy.
After preparing the sketch, you need to collect the following materials and tools:
- wooden beams for racks with a section of 45x60 mm (2 pieces of 3 m each, you can immediately ask to cut them into 1.5 m sections);
- wooden beams for crossbars with a cross-section of 20x60 mm (2 pieces, 2 m each, you can immediately ask to cut them into 50 cm pieces);
- wooden board for shelves with a section of 22x100 mm (one shelf takes 5 pieces 75 cm long, then for all 4 shelves you need 4-5 boards of 3 m each);
You can save on boards for shelves if you lay them not end-to-end, but at a short distance from each other. There will be a shelf in the form of a wooden lattice.
- saw;
- screws, nails;
- chisel;
- hammer;
- wood glue;
- roulette;
- pencil.
After preparing all the necessary materials and tools, you can proceed directly to the construction of the rack. This process essentially consists of two main stages - cutting parts and assembling them. We will consider each stage separately.
Cutting parts
The timber purchased from a hardware store must be cut taking into account the following parameters:
- the length of the bars for the manufacture of supporting parts of the rack (racks) is 1.5 m each;
- the length of the bar for the crossbars is 50 cm;
- the length of the shelf boards is 75 cm.
On each beam you will need to measure the required length, draw a line and cut along it using a miter saw or a regular saw. To save overall time, it is advisable to use a circular saw or jigsaw. Based on the cutting results, you need to obtain the following elements of the future design:
- 4 supports 1.5 m long;
- 8 short timber crossbars;
- 15-20 boards for shelves.
To further strengthen the rack, you can prepare bars that will need to be screwed to the finished structure diagonally at the back wall.
Assembly
The prepared boards need to be connected like a construction set to get the finished product. You must act in this order:
- Mark with a pencil where the groove for the crossbar will be located, attaching it to the support block:
The first crossbar should be located at a distance of 23-24 cm from the edge of the support beam, and the subsequent ones - 40 cm from each other. Measurements should be taken from the end of the support beam, which is in contact with the floor. This will ensure that the shelves are at the same height. - At the marking sites, first make cuts taking into account the thickness of the crossbar, and then cut out the grooves using a hammer and chisel.
Please note that the crossbar must be recessed into the groove. - Secure the first cross member between the two support bars by driving it into the groove with a hammer (dimensions in mm in the photo).
It is recommended to pre-treat the fastening points with wood glue and additionally secure them with self-tapping screws.
- After 40 cm, fix another crossbar, and behind it two more (the last crossbar will be at the very top edge). The result should be a kind of staircase.
- Prepare the second side of the structure as described above.
- Lay the boards that will make up the shelves between the two support posts. Secure them to the crossbars using self-tapping screws or nails.
- Cut corners in the end boards so that the support beams fit into them.
- Create the two top shelves in the same way.
- The top shelf can be made longer.
The finished structure will look like this:
If the joints were not treated with glue during assembly, such a rack can be easily disassembled by simply unscrewing the screws. In order not to waste time on disassembly, after growing seedlings, the rack can be moved to another place and used to store books, tools, jars with preparations, etc.
Shelves on a frame made of PVC pipes
A beautiful shelf for seedlings on the window with your own hands will be made from PVC pipes. Assembling the frame resembles a construction set. In addition to pipes, you will need fittings: tees, crosses and elbows. The connection method depends on the type of material used. PVC water pipes are joined by soldering, glue or detachable fittings. The last option is more convenient. After growing the seedlings, the shelves with the frame can be disassembled for storage into small parts.
Assembly of the frame similarly begins with two side posts in the shape of a rectangle. They are connected to each other by a bypass line of pipes and crosses at the height of each future shelf. Basically, you get two vertical rectangles connected by three horizontal rectangles. If the pipe is too thin, it is better to strengthen the frame with additional bypass lines under the bottom and above the top shelf. You will get five horizontal rectangles.
Shelves require rigid lintels. When assembling horizontal rectangles, tees are installed. They are mounted on opposite pipes so that the central holes are located opposite each other. Jumpers are cut from pieces of pipe and inserted into the holes of the tees.
The shelves for the rack are cut from the same plywood or chipboard. The frame made of PVC pipes turned out beautiful. For aesthetics, you can lay sheets of tempered glass. This shelf for seedlings will fit effectively on a plastic window, and due to its light weight it will not create much pressure on the window sill.
Homemade pallet rack
If the seedlings will be grown in a small apartment, the problem of placing containers with plants can be solved using a narrow vertical pallet structure mounted on one of the walls. To make it you will need:
- pallet (cargo box);
- wooden beams (4 pieces, 3 m each);
- wooden slats;
- hammer;
- nails;
- pencil;
- roulette.
You can assemble the rack according to the following instructions:
- We are making a three-bay rack. Cut the timber 1.5 m long. You will get 8 parts.
- Cut 18 slats as long as the width of the pallet.
- Take two bars and place them parallel to each other. Step back from the top as much as the thickness of the pallet (about 10 cm). Fasten the slats to the bars with nails so that you get a structure similar to a ladder. Pallets will be installed on these slats as shelves. The distance between the shelves should be about 40 cm.
- Place the pallets on the slats. You can secure them with nails or put them on wood glue.
Backlight
Seedlings are grown in February-March, and this is not the sunniest time of the year. Plants may absolutely lack the light necessary for photosynthesis and mass growth. To solve this problem, additional lighting is installed on the racks. There are several types of lamps suitable specifically for growing seedlings.
- The most affordable and simplest option is incandescent lamps (17 Lm/W). They are ineffective because they provide little light and at the same time generate a lot of heat, which can harm the seedlings.
- Low-power fluorescent lamps, such as LB or LBT daylight (70–100 Lm/W). They produce cool light with a low proportion of red radiation.
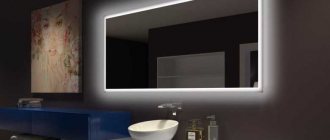
Shelving illuminated with fluorescent lamps
- Long-lasting and economical LED lamps (80–110 Lm/W). Their advantage is the ability to select the desired intensity and suitable spectrum.
LED lamps are easy to use and efficient
- Metal halide sodium lamps (up to 100 Lm/W) are efficient and economical, and are also easy to use. The downside is that they do not contain a portion of the blue spectrum.
- Gas-discharge sodium lamps (200 Lm/W). Their yellow-orange glow is not irritating to the eyes, but they will require a regulating device.
- The glow of mercury lamps is as close as possible to the level of daylight.
- Phytolamps are very popular among gardeners, including for lighting seedlings. They are compact, environmentally friendly, economical and durable. Even if the seedlings are located close to such a lamp, burns will not form on the leaves.
Phytolamps for lighting seedlings
- Also used are xenon gas-discharge lamps (100 Lm/W), halogen (25 Lm/W), linear (47 - 93 Lm/W), and neodymium.
When choosing a lighting device, pay attention to the presence of a choke. It gets very hot and heats up the shelf on top. Therefore, leave a gap of 4–6 mm between the shelf and the device. Lamps with electronic ballast do not have heating problems.
Whatever type of lighting you choose, keep in mind that seedlings will do better on the south side. To improve lighting efficiency, install reflective foil screens on the sides and back of the rack. Do not forget that each plant has its own level of illumination. You can adjust the intensity by changing the height of the lamps above the plants.
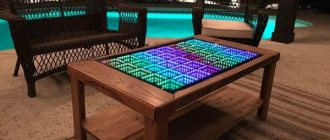
Installation of LED lighting
Due to their ease of installation and operation, LED lamps have become the most common among gardeners growing seedlings. You will need:
- red and blue LEDs;
- hot glue or thermal paste;
- a base for placing strips of LEDs (can be made of any material);
- a power supply that will provide the required voltage and current stability;
- electrical wire and plug.
To provide the required number of rays of a certain spectrum, alternate the LEDs on the strip: 1 blue, 2 red, and so on until the end of the strip.
Alternate red and blue LEDs to provide plants with the right spectrum of light
- Solder the diodes together using paste and lead them to the driver.
- Connect the driver to the switch and plug.
- Attach the LED strips to the prepared base.
- Collect everything into a single chain.
You can also use an automatic timer and set it to 14 hours of lighting. This is very convenient if you do not have the ability to control the illumination of seedlings in the evening and at night.
Illumination from fluorescent lamps
If you plan to install fluorescent lamps on the rack, then take into account their length when calculating the size of the rack. In order to pass the electrical wiring, you will need to drill additional holes in the metal corner. Or you can carefully distribute the wire along the metal elements.
- Attach 2 lamps under each shelf - at the front and rear crossbars. Leave a gap of at least 1.5 cm between the shelf and the lamp.
- For fastening, it is recommended to use cut tin tape or metal wire.
Install two lamps above each shelf
Remember to follow safety precautions when working with electricity. Exposed wires should not be in the public domain. All work must be done with the power off.
Selecting a lighting fixture and installing backlighting
If you plan to place the rack in a fairly well-lit place, then you do not need to install additional lamps, otherwise they will still need to be installed to guarantee the seedlings the necessary daylight hours.
The lamps must provide bright light, but at the same time emit a minimum of heat, otherwise the seedlings can get seriously burned. In this regard, any lighting fixtures except incandescent lamps can be used for lighting. Here are the best options:
- High pressure sodium lamps . These lamps emit an orange-yellow glow that promotes seedling growth. In addition, it does not irritate human eyes, so such lamps can be used in residential areas. Their disadvantage is their high cost and the need to use a power regulator when installing them.
- Phytolamps . Although the spectrum of such lamps is good for plants, it is dangerous for human eyes. When installing, they need to be adjusted so that the light hits the seedlings from above and from the sides. The distance from the lamp to the tops of the plants should be at least 10 cm.
- Fluorescent lamps . Such lamps produce cold light, which lacks the red component of the spectrum. They need to be installed at a distance of 30-60 cm from the seedlings. In addition, to ensure uniform heating of the plant, the lamps should protrude 5 cm from the edge of the shelves.
- LED bulbs . Plants that are illuminated by such lamps produce a larger harvest, so they are used more often than other options. In addition, such lamps consume little electricity and also combine the spectra most needed for plants - blue and red.
Since LED lamps are in greatest demand, let’s look at installing the backlight using them as an example. In an electrical goods store, you need to purchase lamps whose length corresponds to the size of the rack (or rather, the length of the shelves).
At the same time, it is extremely important to follow safety precautions - do not leave exposed electrical wires in the public domain, and even turn off the electricity during preparatory work.
Required materials and tools:
- red and blue diodes on the tape;
- glue “Moment” (transparent);
- plastic base or plinth with cable channel;
- screwdriver and screws;
- switch;
- plug and electrical cord;
- insulating tape;
- reflectors.
Instructions for installing the backlight are as follows:
- Attach a chain of LEDs to a plastic base.
- Connect the tape to the switch, and from it stretch a wire with a plug to the socket. If you plan to pass electrical wiring through metal corners, then you need to drill holes in them. Of course, you can take a simpler route - carefully distribute the wire along each metal element.
- Secure the base with tape to the bottom of the shelf. To do this, you can use transparent Moment glue.
- Attach mirrors or sheets of foil to the sides of the rack to reflect light.
If the shelves are made of plexiglass, then through them the light will fall unhindered on the seedlings, which is an additional advantage of this design.
In the following video you can clearly see how LED strip lighting is installed in a finished plant rack:
To grow healthy and strong seedlings, it is imperative to provide the seedlings with sufficient heat and light. A favorable microclimate for them can be created using racks for seedlings, which will also help solve the problem of lack of free space. You can make similar designs yourself using the above ideas, diagrams and instructions.
0
0
Copy link
Useful tips
LED lamps are not suitable for illuminating seedlings; they do not provide the range of luminescence necessary for plants. Fluorescent lamps are suitable for already mature seedlings. They are less safe to use due to the long glass body. Therefore, the lighting on the housekeeper should be done on flexible hangers and under no circumstances should it be rigidly attached to the surface of the shelf. Otherwise, under load due to the weight of the seedlings, the surface may bend and break the glass.
Halogen lights work well, they give a full spectrum, but they are installed above the seedlings in reflectors and at a distance of at least a meter from the seedlings
What kind of light do seedlings need?
before picking seedlings. You need to use blue and red light, in the proportion of two red and one blue. Blue light will perfectly stimulate the growth of roots, but it will slow down the development of the stem - it will grow wider, not higher. The stem will be thick, and there will be a large distance between the leaves.
after the pick. You need to reduce the lighting for two or three days. The plant is stressed and needs rest. Over the course of a month, you need to highlight the seedlings one to one, blue, red.