Rules for dismantling and installing new interior doors
Author of the article: Alexandra Ivanova December 29, 2020
- Preparing for work
- How to dismantle - step by step instructions
- Differences in working with different types of structures
- Differences between dismantling without a box and with a box
- How to remove the handle?
- Installing new doors - instructions
- Cost of dismantling and installation
Dismantling of old interior doors is carried out in several cases: if they plan to install a new product, and if they plan a major renovation. In the latter case, careful dismantling is carried out so that the interior doors can be reinstalled. The specifics of dismantling also depend on the final goals.
The simplest paper template for foam baguettes
In today’s step-by-step instructions, everything will be explained using the example of foam ceiling moldings, however, similar tactics can also be used to file corners on wooden or plastic trims.
Preparing for work
Before dismantling, the condition of the interior door is assessed and it is determined whether it can be reinstalled. In any case, the work will have to be carried out carefully so as not to damage the walls.
Dismantling is a dusty and dirty job, so all fragile objects, such as mirrors, are removed from the room, and the floor and remaining furniture are covered with thick plastic film.
The distance near the opening is cleared of furniture. Dismantling involves the use of power tools, and additional pieces of furniture will simply get in the way. It is better to carry out the work not alone, but with an assistant: the box or canvas can be heavy, and removing it alone will be problematic.
How to dismantle - step by step instructions
There are universal step-by-step instructions for dismantling an interior door:
- The door is opened and removed from its hinges. The canvas is placed on the floor, having previously spread rags. This will prevent damage to the floor covering and make it easier to transport the product itself.
- The principle of removal depends on the type of loops. If they are open, just lift the canvas. If the product itself is heavy, place a crowbar under it and use it instead of a lever. If the hinges are closed, they will have to be twisted off the door frame first.
- Next they move on to dismantling the door frame. The performance of the work depends on the method of its fastening. If the box was fastened with anchors, you can simply unscrew them from the wall. The mounting plates are usually hidden behind the slopes, so to dismantle them you will have to break the layer of plaster.
Much less often, the box is welded to pins embedded in the wall. In this case, you will have to knock down a large layer of plaster and cut off the pins with a grinder.
Differences in working with different types of structures
Certain differences in dismantling exist for a specific type of door:
- Sliding . Such doors operate on the principle of a compartment system. First, additional equipment is removed: automatic drive, closer or synchronizer. Then the stoppers located at the edges of the rail are removed. To do this, simply unscrew the bolts holding it. After removing the retaining elements, the canvas can be freely removed. All that remains is to remove the fasteners to remove the rail and dismantle the wooden beam, if it was installed.
- Swing . These are standard interior doors that can be dismantled in the usual way. First, the canvas is removed from the hinges, then the fittings or other elements holding the box are unscrewed. In some cases, you will have to knock down the plaster or use a grinder.
- Folding . A folding door is also called an accordion door or a book door. Dismantling such a structure is similar to working with a sliding structure. Therefore, first remove the fittings holding the canvas, and only after that remove the box.
If the door begins to sway, it means that the hardware holding the door leaf has become loose. Both dismantling and replacement must be carried out as soon as possible. During dismantling work, care must be taken to ensure that the swinging door does not accidentally fall on a worker.
Recommendations
There are two ways to remove doors from their hinges. The first time, you do not need to save the platbands. The process goes quickly. There is no need to install the structure in a new location.
Many homeowners use a more gentle method. With it, the structure is subsequently installed in a new location, maintaining an attractive appearance.
To dismantle the door frame without damaging the trim, do this:
- Take a crowbar and slide it into the gap located between the floor and the door structure.
- Close the doors slightly and lift them by pressing on the pry bar.
If there is no movement of the blade, it is necessary to lubricate the hinges to get rid of blockages or rust. After a few minutes, you need to try the process again from the beginning, opening the structure completely. Failure to comply with this will cause it to rest against the horizontal crossbar.
- At a further stage, the old frame is eliminated. To save them, insert an ax blade into the hole using a hammer. Detach the trim from the wall. The process must be carried out carefully so as not to damage the special structure.
- You can see nails inside the crack. At the next stage, you need to place an ax under them and push the casing to the limit. You need to repeat the process in other locations of the fasteners.
- The platbands on the sides are removed.
If it was not possible to save the structure, you can use a new frame when installing the doors in a new location.
Continuing dismantling, it is necessary to step back 25 cm from the lower attachment point. Insert the ax inside so as to drive it into the gap located between the door and the wooden stand. Press firmly on the special structure and move the stand away from the wall. Next, remove it and pull the nail out of the surface.
Differences between dismantling without a box and with a box
The difficulty of dismantling an old door directly depends on whether the frame will also be removed.
If you only need to remove the canvas, there will be no serious difficulties: you just need to lift it and remove it from its hinges. If they are closed, you will first have to unscrew the screws securing the hinges to the box.
If you plan to dismantle not only the door leaf itself, but also the frame, the procedure will be more complicated. The canvas itself will first have to be removed from its hinges. Then they unscrew the screws or other fittings holding the box. In some cases, you will have to remove a layer of plaster or use a grinder to cut off the pin holding the box.
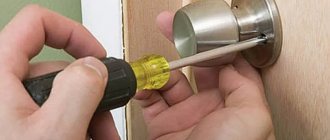
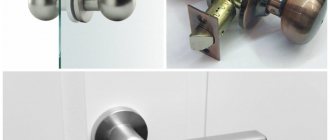
How to remove the handle?
It often happens that the leaf itself or its frame is no longer suitable for use, but the door handle still works perfectly. In this case, it makes sense to dismantle only the frame and door leaf, and remove the handle (with or without a lock) and move it to the new door.
With a lock
Round handles with a lock are usually installed on interior doors. They can be dismantled quite easily, and after dismantling, the fittings can be installed on a new canvas.
Before starting work, you need to prepare the tools: a Phillips and slotted screwdriver, an awl, a knife and a screwdriver with a set of bits.
Step-by-step instructions for dismantling a door handle with a lock:
- Use a screwdriver to pry up and remove the cover.
- Press on the opened stopper with an awl or knife to remove the knob.
- From the side where the handle was removed, unscrew the screws holding the fittings.
- After this, the remaining parts of the structure are dismantled. These include the lock and the reverse side of the mechanism.
At the end of dismantling, unscrew the working latch and remove its contents from the canvas.
Without lock
Dismantling a simple locking handle without a lock is not particularly difficult, because there is no locking mechanism inside the blade.
As a rule, all handles without a lock for interior doors have a similar design, so dismantling them is not particularly difficult. However, the installation diagram may differ depending on the type of structure.
The easiest way to remove standard round handles is to simply unscrew the two screws that secure the handle to the blade, after which the handle can be removed. Handles of other shapes are also unscrewed in a similar way.
Some designs include decorative overlays. In this case, first remove the decorative element, and then unscrew the screws holding the handle.
Tooling
The key point in installing platbands on an interior door yourself is to trim the corners evenly and accurately. The ideal equipment for this is a miter saw. With this tool you can easily process even laminated or veneered products, ensuring an even, clean and precise cut without chipping. But if you don’t have a miter saw, you can replace it with another tool:
- Miter box. This is a primitively designed device with poor precision in the form of a template with slots that set the cutting angle. During operation, the cutter breaks the slots and cutting accuracy decreases. Therefore, the miter box is considered a disposable tool.
- Rotary hand hacksaw. It has a long service life, precision and clean cutting. When working with this tool, you need to turn it at the desired angle and cut it in the traditional way.
Pro tip: It’s best to apply tape along the cut line. This will prevent chipping.
Installing new doors - instructions
Interior doors are dismantled for the subsequent installation of new ones. You can do this yourself if you have the necessary tools and work skills.
If dismantling was carried out for the purpose of subsequently installing a new product in the same place, all work is carried out extremely carefully. The platbands are removed with a sharp chisel and pliers. The chisel is inserted into the gap between the platband and the wall in the place where the nail holds the structure. It is carefully pushed out and removed with pliers. A similar procedure is carried out with all the nails that hold the box.
Next, the box is removed from the opening and the walls are cleaned of foam residues. After this, the opening will be ready for installing a new interior door.
After this, they proceed to the direct installation of the new door:
- Assemble a wooden box. After this, they try it on the opening, determine the places of its attachment and mark them with a pencil or marker.
- The most reliable way to secure the box is with anchors. To do this, drill holes in the wall, insert anchors into them, and attach the box to them. It is better to drill holes with a screwdriver, and they should be located not only on the sides, but also on top of the opening.
- The box is attached to the fittings. After this, try on the canvas and mark the location of the loops.
- After attaching the hinges, the door leaf is hung on them. It is first tried on: it is possible that the length of the canvas does not fit the height of the floor, and it will have to be slightly filed from below.
Methods for carefully removing platbands glued to liquid nails
Things are much more complicated if the platband was glued with liquid nails. By itself, such construction adhesive takes a long time to set. But you can defeat him. This will require a hair dryer, a knife and patience. Using a knife, you slowly move the trim away from the box, and use a hairdryer to warm up the adhesive layer. When it softens, you can push the platband further until it completely moves away from the wall.
You can also remove the casing using “brute force”:
- It is necessary to insert a metal blade into the gap between the box and the platband;
- Gradually moving the casing aside, saw through the glue.
The process is short, but requires some accuracy. A couple of millimeters are sawed off from the removed casing. This allows it to be reused. Any remaining adhesive on the wall should also be removed carefully. It’s better to just cover them with a new casing so as not to damage the wall finish.
Cost of dismantling and installation
Not everyone has the necessary tools and practical skills to independently dismantle old doors and install new ones. In this case, it would be logical to resort to the help of professionals.
Dismantling, as a separate service, will be inexpensive. On average prices start from:
- 2000-2500 rub. installation of one turnkey door.
- 2500-3000 rub. dismantling the door and then installing a new one.
In most cases, owners of houses and apartments prefer to order a comprehensive service, which includes dismantling and installing a new door leaf.
The cost of services depends on several factors:
- the degree of wear of the old door frame, because the complexity and duration of dismantling depends on this;
- method of attaching the box: if it is attached to anchors, dismantling will not take much time, but if the box is attached to pins that need to be cut with a grinder, the services will cost more;
- type of product: swing interior doors are easier to dismantle than sliding or folding ones;
- if immediately after dismantling they plan to install a new structure, the service will cost less;
- the cost of services is also largely determined by the region: in large cities the service will cost much more than in small towns.
Also, the cost of dismantling and reinstallation depends on the type of interior door chosen, the density of the walls and locking hardware.
You can easily dismantle the interior door yourself. The main thing is to carry out all work carefully and with minimal damage to the walls. The complexity of installing a new door leaf directly depends on this.
How to install trim on doors with your own hands
How to install trim on doors with your own hands
Platbands are an additional element of the door structure that closes the resulting gaps between the walls and the frame. They help make a smooth transition from the door to the wall, giving the overall structure a more attractive appearance. Installation of platbands is the final stage of installing a door structure. But this decorative element is installed only after the wall surfaces have been finished.
Expert advice
There are situations when platbands of the same size cannot be used, since cashing cannot be installed in width. Here the platbands can be cut to a width of no more than ¾. Every master should know this rule. The upper casing should be installed only after the two vertical ones have been secured.
How to properly install platbands on interior doors
When installing interior doors, the following fastening elements are often used to secure the trims:
- self-tapping screws;
- finishing nails;
- liquid Nails;
- “beak” fastenings.
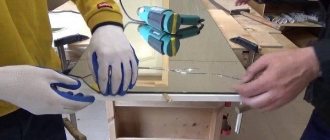
Step-by-step instructions on how to install trim on a door with your own hands:
- The platband is first applied to the frame in height in order to measure its required length (length of the doorway + width of the upper platband).
- Next, place the workpiece on a flat horizontal surface, apply a square, and cut an angle along the marked line (at 45 or 90 degrees).
- The strip cut on one side is again applied to the door, aligned along the edges, the bottom line. Next, height marks are made corresponding to the frame of the door structure.
- Taking into account the marks made, a 45º angle is marked on the bar with a special goniometer, and the excess parts are cut off. The bar is put aside for a while.
- Similar actions are performed with the strip for the opposite side of the door. Important: the top strip is adjusted at the very end, after installing the side trims. This will prevent the formation of gaps between individual structural elements after their installation is completed.
- After preparing the side strips, you can begin to attach them. Nails are driven into the door frame in 0.5 m increments. Next, the caps are cut off using wire cutters. Important: for reliable fastening of the casing, the length of the nail that is not completely driven in should be 5 mm or more.
- For optimal adhesion of the plank to the frame, an additional adhesive composition can be applied to its surface, but in such an amount that the excess is not subsequently squeezed out, otherwise the structure will lose its aesthetics.
- Next, the glue-coated casing is applied to the nails and carefully nailed through a wooden block wrapped in fabric.
- The side strips are nailed, now you need to fit the top strip under them. It is applied on top of the side planks, the corners are marked, and the excess parts are cut off. Fastening is carried out in the same way.
Manufacturing
When the material for the manufacture of door trims has been selected and the necessary tools are at hand, then you can move on to the active phase of work on the manufacture of door trims. First, the workpieces are cut to size , which must be determined in advance. Their dimensions are selected individually for each door product. Note that a high-quality result is possible only if there are cutting knives on the machines used for work.
When the door trim is ready, it is sanded. This work is carried out in two stages:
- the first is performing rough grinding using an electric machine;
- the second is manual processing, during which they resort to the use of fine-grained sandpaper.
It should be noted that at the second stage it is necessary to remove circular scratches that occurred when working with an electric machine. When the platband is ready, it is covered with a layer of protective composition.
How to install platbands on metal entrance doors
Installation of door frames can be carried out at an angle of 45º (separate elements are cut) or at an angle of 90º. Preliminary accurate measurements are taken and markings are applied. It must be remembered that the installation of platbands begins from the side where the hinges of the door structure are located.
How to install trim on the front door: main installation steps:
- Trimming side trims. Initially, measure the distance from the floor base to the top crossbar of the door structure. An additional 1 cm is added to this value. Appropriate marks are made on the platband, after which its edges are sawed off at an angle of 45º. A miter box is used for this. To prevent mismatches between the planks at the joining points, measurements are taken individually for each workpiece. This can be explained by possible distortions of the doorway.
- Fixation of platbands. The side strips are fixed initially from the bottom and in the center. They are fixed in the upper part after installing the lintel over the door structure (this stage of installing the trim is controversial - some people prefer to attach the top strip first, and then the side ones).
- Trimming the top lintel. This structural element is first placed under the allocated side strips, leveled, marked, and excess parts are sawed off. Only after this are all the planks secured.
Material selection
For the manufacture of telescopic platbands, only well-dried boards are selected. If you do not comply with this requirement, then the products installed on the doorway during operation will fail. The degree of listening to the material is determined by the sound . To do this, you just need to tap the board with your finger. A dull sound indicates that the board is not dry. If it is sonorous, then such material is optimal for the manufacture of these decorative elements.
When choosing a material for a door trim, you need to pay attention to the color. It should be uniform. If there are blue spots, it means that the technology for drying the boards was broken. This can be hidden only by painting the trim with opaque paint.
Please note that the board intended for making door frames must not have knots. If they exist, this will worsen the aesthetics of the platbands, and in addition, the risk of fracture of the product at the location of the knot will increase.
Types of fastening platbands on doors:
- Using adhesives. Sometimes liquid nails are used to secure the slats to the door frame. This option is good in terms of attractiveness, but in terms of reliability it is not very effective. Liquid nails can be used for MDF planks and absolutely flat wall surfaces. If platbands are made of polyvinyl chloride or wood, this technology will not work, since their surfaces will not have sufficient adhesion to the wall surface.
- Self-tapping screws (external fastening). The ease of fastening the planks makes this method advantageous. After fastening, the screw caps are covered with specialized rivets made to match the color of the planks. The main disadvantage of the technology is the low degree of safety; the products are quite easily dismantled, opening up the installation space.
- Self-tapping screws (internal fastening). The platbands are fastened with self-tapping screws from the inside of the door frame (a special fastening is installed). This is a more reliable fastening technology. At the same time, the design has an attractive appearance, the effect of its integrity is preserved due to the fact that the structure of the product is not disturbed.
- Combined method. To fix the platbands, self-tapping screws and liquid nails are used at the same time. Installation work, of course, becomes a little more complicated, but the level of safety is much higher. Some manufacturing companies produce platbands as a set, which can be purchased separately without doors. Products can be painted, covered with a protective film, or veneer. Therefore, by purchasing such a kit, you can also add attractiveness to old door structures.
IMPORTANT POINTS
- If the planks at the joints do not adhere tightly to the surface, this situation can be corrected with the help of finishing nails.
- To make self-tapping screws and nails almost invisible, it is recommended to use a wax corrector.
- To eliminate small gaps formed during the installation of the planks, it is worth using an acrylic-based sealant. For this purpose, you can also use a wax corrector, but first select the required color.
The nuances of using telescopic platbands
Various decorative elements can be used to decorate the door opening. Currently, many owners use door frames. Their main purpose is to mask the gap present between the door frame and the opening. Their selection is carried out according to the required texture of the opening. Along with this, its width is taken into account. The color chosen is the same as that of the door structure. A variety of materials are used in their manufacture:
- tree;
- plastic;
- laminated panels made of MDF and veneer.
During door installation, their installation is the final stage of work. They begin only after most of the repair work has been completed, with the exception of the installation of floor skirting boards. Many owners have difficulty installing door frames. How to install them correctly - we will talk about this in this article.
How to carefully remove trim from a door?
Interior doors play a big role in the apartment. They are able to create comfort in the home and provide reliable sound insulation in the room. Sometimes, a previously installed interior door falls into disrepair. The reason for this is improper operation or long service life.
It is not necessary to wait until repairs to replace the door, since a faulty design can cause a lot of inconvenience to apartment residents. Therefore, it is worth speeding up the process of replacing an interior door.
REPLACING DOORS IN AN APARTMENT: WHAT IS WORTH CONSIDERING
To install a new interior door, you need to remove the old structure. Replacement may take a little time if everything is done correctly and step by step. In the process of selection and work, it is worth considering some factors. Initially, you should decide on the choice of door design. It may be the same as the previously installed one, or it may be different.
Now there is a large selection of interior doors. They differ in material and design, opening method, service life and price. It is necessary to decide on the material from which the door will be made, based on the budget. Doors made of MDF are high-quality and inexpensive. They come in different designs and designs.
It is very important at this stage that you need to take into account the distance between the door frame and the door itself, this distance is about 4 mm
In order to choose the right interior door, you need to take measurements.
The decisive point is taking measurements. The dimensions must be accurate. To take measurements, you should use a construction tape.
The following distances must be measured:
- Width of the door block;
- Distance from the top point to the threshold;
- Thickness of the canvas.
If the door will be installed independently, then it is worth purchasing it together with the frame. The finished disassembled structure will save time and effort during installation.
It is worth determining in advance the direction of opening the door. Depending on the direction in which the door will open, the location for hanging the hinges is determined.
When replacing the door, you need to ensure sound insulation and thermal insulation. To do this, it is worth foaming the empty space and installing platbands. If the old door frame was not insulated, then this is another reason to change the door.
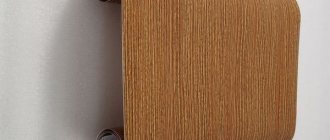
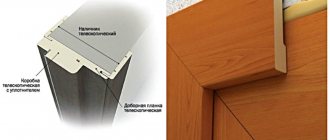
What is a telescopic casing?
In appearance it is similar to a standard door frame. However, there is one feature - a protrusion that is used to connect this element with the extensions and door frame. The use of telescopic platbands is the best solution in cases where the thickness of the box is several centimeters greater than the wall. The special protrusion that these elements have ensures their tight fastening in the longitudinal grooves of the end of the door frame.
By properly installing these fasteners on the door, you can ensure that they become invisible, and the structure itself acquires a monolithic appearance, durability and strength. But if the calculation of the distance was made incorrectly, then the telescopic trim will not fit tightly into the door frame . As a result, a gap will remain. In this case, the structure will take on an untidy appearance and will look ugly.
HOW TO REMOVE DOOR FITTINGS: TOOLS AND OPERATION STEPS
To remove the door, you need to start by dismantling the trim. This will require tools. If the old platbands are no longer useful, then you should not think about their safety. But, some people reinstall decorative trims.
They may have decorative value, so it is necessary to carefully dismantle them. Remove trims carefully so as not to damage the walls and doorway. You can do this with your own hands quickly and efficiently.
If there is no goal to preserve the trim, you should still remove them carefully so as not to damage the wall, door or window opening
To work you will need tools:
- Screwdriver;
- Chisel;
- Nail puller;
- Axe;
- Hammer.
First you need to remove everything from the room or cover the furniture with film so that dust does not settle on objects while dismantling the door. First of all, you need to remove the door leaf from its hinges. And then remove the trim. When removing platbands, you should use tools carefully.
If the platbands are secured with nails, you need to remove them with a nail puller. Then drive the ax with a hammer under the trim (or find another object instead of the ax to pry it off) and carefully move it away from the wall and remove it.
If the platbands are attached with liquid nails, then it will be more difficult to disassemble them. But this can be done without damaging the walls. In this case, the platbands may be damaged.
You can change the trims separately if they do not fit the new interior, but you are satisfied with the door itself.
Preparing the hallway
This simple process will help minimize or completely eliminate the risks of damage to the room or the objects in it.
What should be done?
· First of all, remove all furniture that may interfere with the removal of the door;
· Cover the floor with thick film;
· The remaining furniture in the hallway should also be covered with film to prevent small debris and dust from getting on it;
· It is mandatory to remove all clothing and shoes from the premises if the iron door is dismantled using a hammer drill.
After this, you can proceed directly to dismantling work.
How to replace platbands around the perimeter of interior doors – Blog Stroyremontiruy
When using interior doors, it is often necessary to replace the platbands, as they are damaged from mechanical stress, fade and lose their appearance over time. It would seem that everything is simple, to replace the platbands, they remove the old strips, buy new ones and fix them around the perimeter of the door frame. In reality, the matter is more complicated, because you need to avoid damaging the box, choose the right size/color of the planks and correctly install them in place.
Why preserve the integrity of the platbands?
Platbands are a decorative design for doors. But in addition to their decorative function, they increase the door’s protection from noise, heat loss and drafts. The door uses a set of platbands consisting of four strips, which are installed around the perimeter. Wooden trims are made from dried solid wood using the profile milling method. This allows you to give them a textured pattern. Platbands can be overhead and telescopic. The material used for their manufacture is different types of wood, coated with paints and varnishes. Therefore, when replacing an interior door, the platbands themselves can still retain their qualities and be reused. In addition, old doors can be installed in a country house or in a utility room, and damage to the trim will lead to the need to purchase new ones.
Size, material and color
Platbands differ in:
- Sizes,
- Blossom,
- Material.
Decorative strips are sold by linear meters, having dimensions 16×65, 16×70, 16×80, 16×95 mm, with a standard length of 2200 mm. The first number is the thickness of the product, there are no problems with the choice, the second value is the width of the strip. Before going to the store to make a purchase, remove one trim and measure its width from the back side.
The slats also differ in color. We do not recommend making a purchase by eye, since the color scheme of the planks must match the tone of the doors and frames. The colors available are beech, alder, beech, etc.
The best option for accurately choosing a color is to remove one old trim, cut off a piece from it and go to the store with it. It is important that if the color of the sun falls on the doors, the slats may fade and become lighter over the years of use. Keep this in mind and you won’t go wrong with the color.
According to the material, the trims can be MDF or wooden, made from solid pine, oak or other wood. Of course, solid wood is better, but MDF (pressed remains of woodworking, covered with laminated film) is also suitable for framing interior doors, because the slats perform exclusively decorative functions.
Removing old trims
The second stage of replacement is the removal of the old casing. Despite the simplicity of the process, difficulties can arise here. Rule No. 1 when dismantling is not to damage the box, because changing it just once or twice will not work.
The planks are attached with nails every 40-50 cm; to remove them, use a knife or other strong and sharp object. The knife is inserted between the casing and the box, 1-2 cm away from the nail, and the bar is slowly pressed away from the place of fixation. As a rule, it is enough to press the rail in 1-2 fastening points, then it comes off the box by hand.
If you want to purchase doors once and for all, then think about metal doors in Novosibirsk, since you will no longer have to think about protecting your home. The door-nso.rf company offers minimal prices, and there are no problems with choice, that is, assortment at all.
Using nails
The most traditional way to install platbands is to use nails. In order to hide the attachment points as much as possible, special miniature nails are used; their peculiarity is the almost complete absence of a head.
In order to properly nail the trims onto the door, you need to align them level. Since when installing on a wall, distortions or gaps may occur that were not present on a flat surface, it is recommended to leave a small excess of material when cutting.
Since nails without heads are used for interior door frames, try not to damage the coating of the cladding itself. It is most convenient to work with a small hammer. You can mark the joint location in advance using an awl.
In order to cover the nails on the platbands, they usually use a special mastic or grout to match the coating. Minor damage can be masked with paint, a felt-tip pen or pencil.
Using nails is a traditional way of attaching platbands
We attach new ones
The most difficult thing in attaching the platband is cutting it. How to cut planks at 45 degrees has already been written on the blog, so we will only give a few important tips. To work, you will need a wood saw or grinder with a disc, as well as a pencil, nails, a hammer and a tape measure.
Here are tips that will help you get the job done quickly and without defects:
- First, the side trims are attached,
- Cut the planks from the front side,
- The interval between carnations is 45-55 cm,
- The platband is moved away from the inner edge of the box by 3-5 mm.
As a rule, the side slats are first cut to 45 mm, then they are secured with several nails in the center and bottom, after which they measure the length and cut of the upper trim, insert it into place and completely secure all the slats.
What if there is a difference in installing platbands made of different materials?
Experienced craftsmen prefer door products made of laminated and veneered MDF or PVC. They are practically not exposed to external influences, serve for a long time and are highly reliable. At the same time, depending on the material of manufacture, the installation of door frames will vary. Wooden structures can be installed with liquid nails or mounted using thin nails without heads.
If nails with heads are used for installation, then the fasteners must be recessed a little, and their locations must be sealed with acrylic sealants to match.
Liquid nails for fastening are used only if the walls are level. Otherwise, gaps will appear. Plastic panels are usually attached using adhesive. It is advisable to glue flexible door moldings to walls with minor irregularities. As for MDF products, which are practically indistinguishable from wood in appearance, they are more difficult to install. Holes for nails are drilled in them in advance to avoid damage. Moreover, the holes are not made through, but with a diameter of approximately 1 mm.
Installation of platbands at 45 degrees - principle
This joining with cutting the ends is the simplest and most common. It involves trimming the joints of individual parts of the door set at an angle of 45 degrees. This way you can install platbands of any configuration. Finishing doorways with platband allows you to completely hide the places where cuts are made, as a result of which the design looks beautiful and harmonious.
Installing door trims at an angle of 45
Installing platbands at 90 degrees - principle
This cut is used in cases where the shape of the door cashing is flat and looks like a rectangle when cut. In this case, the location of the joining seams does not matter. The connection of the planks is made at right angles to each other, and the upper casing should be inserted between the two side ones. Thanks to this manipulation, it is much easier to trim and adjust the joints.
Installation of the structure at right angles
Installation of telescopic casing - principle
In cases where the walls are uneven, telescopic platbands will be the best solution. Such strips have a protrusion located perpendicular to the front surface. It fits snugly into the groove of the door frame or door frame. Finishing with a telescopic element consists of installing a workpiece of the required length into the groove.
Design option with telescopic panels
How to Remove Trims From a Door
What to consider when choosing plinths for interior doors: types of moldings
When making a doorway, the width of the cabinet for interior doors is of great importance. It is selected individually, depending on the design and other interior conditions. However, there are some GOST parameters regarding their size. The visual quality of the product should also be considered. So let's see how to choose the best option.
Fabrics mask technological gaps and give the door a finished, attractive look.
Purpose and types of skirting boards
Door panels. What is this? In fact, this is an important design component for the design of the hole, which allows you to hide technological gaps and at the same time perform a decorative function. To make the most of the positive qualities of these products, GOST sets some requirements for the location and size of the door frame.
The platforms perform the following functions:
- hide defects, fastenings and gaps between the wall and the door frame;
- give the hole a neat, finished look;
- focus on passing;
- connect the door with the rest of the interior.
Without a door frame, the doorway is lost against the wall; the frame allows you to focus on it or, conversely, fit into the overall design.
A set of canvases is used for installing conventional swing doors with frames, as well as for installing sliding systems or arranging portals and arches. It is very important to choose the right type of product. To make the selection process easier, you need to consider what types of platforms are available. Today, depending on the materials used, we can distinguish the following types:
- metal;
- wood;
- MDF and other wood derivatives;
- PVC
- from pressed paper.
Types of door leaves depending on the material of manufacture
There are restrictions according to GOST for each category. However, there are no particularly strict criteria, so product design and configuration may vary significantly.
The door leaves also look different in the method of fastening:
- Just. They are independent and are attached with glue or nails.
- Telescopic. They have an interlocking connection and are connected to the box or add-ons.
Nail wraps are easy.
Welt door installation method
using self-clamping foam scrubs.
Dismantling interior doors
Disassembling the door
. How to do it yourself. Careful dismantling.
As for the shape, they can be rectangular, curved, carved, rounded, etc. This is especially true for wood products.
The fastening method distinguishes between simple and telescopic skirting boards
What to consider when choosing
In order for the opening of your interior door to look perfect and fit naturally into the overall interior, it is important to choose the right treatment. To make the selection process easier, you can break down all the important nuances into several categories:
- Dimensions . The door leaf should completely cover all imperfections in the opening and at the same time look natural. The length of the elements directly depends on the size of the opening and plinths, and the width of the door leaves is selected individually in accordance with GOST standards.
- material . The pieces should blend seamlessly with the box and fabric. It is best to choose them from the same material. There are also our own GOST standards for skirting boards made of wood, metal, MDF and much more.
- form . It's more a matter of decoration, but to a certain extent shape plays a role in terms of serving other functions, such as masking white space.
- color . The final result depends on the color of the finish. They can match the tone of the door, base, walls, or be completely contrasting. The most popular are products that imitate the texture and shade of wood of different species.
- Mounting type . Fastening method means: nails, glue or lock on the box. It is also important to consider the method of connecting the structure: at a right angle or with a 45-degree cut.
- Additional elements . These are various decorative elements, for example, capital ones. It's a matter of individual preference and design ideas.
Shape and color are the main characteristics to consider when choosing skirting boards.
What is a door casing: materials of manufacture
Decorative elements, the main purpose of which is to hide defects formed after installation of the door, are called platbands. Such overlay panels create a beautiful frame for the door leaf, covering the gaps and nuances between the wall and the frame. They must be selected according to texture, width and color, but always in accordance with the door leaf. Materials for making platbands can be wood, plastic and MDF.
An opening without a door can be designed without platbands. But in other cases, this is a necessary element.
Facing the door structure with additional panels and platbands