Without exaggeration, we can say that the most exciting event in life is a wedding. Much of the decor, on which an unforgettable festive atmosphere depends, can be created with your own hands, including the original design of bottles for a wedding. Everyone wants every banquet decoration to be creative and delightful. And each element was decorated extremely carefully, starting with the arch for the wedding ceremony and ending with the glasses of the bride and groom.
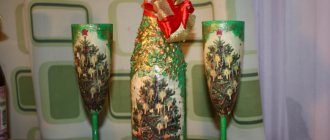
From ordinary bottles of champagne you can make a real exclusive that will be the center of attention at your wedding
A young couple will have to devote part of the personal time that they could devote to each other to choosing wedding paraphernalia, but this is a pleasant chore. However, their loved ones can take on the responsibility for decorating the attributes, including what will stand in the most prominent place - two bottles of champagne in the image of the wedding couple.
- 1 How and why wedding champagne bottles are decorated
- 2 What materials are traditionally used to decorate a wedding bottle?
- 3 Choosing the design of bottles according to the type of bride and groom
- 4 Wrapping champagne with ribbons
- 5 Painting a champagne bottle and decorating with rhinestones
- 6 Photos: examples of wedding bottle decorations 6.1 See also
Wedding decoration with champagne “Bride and Groom” - master class
Let's start decorating the wedding champagne.
Let's start with the groom. Let's tie a beautiful tie for the groom, but before that we need to make the shirt collar. Take a white satin ribbon 2 cm or more wide. We bend it in half lengthwise and iron it. We measure how much ribbon is needed to braid the neck
Please note that we are already beginning the process of braiding the bottle with ribbons, so place the ribbon at the back a little higher than at the front. You will understand how it should be done correctly, since the tape should lie perfectly flat and fit tightly. Burn the edges of the tape with a match or lighter
Apply glue to the surface of the bottle and glue one end first, then the other
We burn the edges of the tape with a match or lighter. Apply glue to the surface of the bottle and glue one end first, then the other
It is important that the upper corners of the collar touch and do not intertwine
Next, we raise the collar (just like in a shirt), take a white ribbon of the same thickness and weave it around the bottle close to the fold, repeating exactly the slope of the collar. First we glue one end, then we glue the second overlapping. Next, each layer of tape must be overlapped with the previous one by 1-2 mm upward.
We glue another tape. The collar and shirt are finished.
Let's tie a fashionable tie with an "Eldridge knot" from a blue ribbon, which we will braid around the entire bottle. Below is a detailed diagram of tying such a knot. You may not like it and you can tie a different type. The only advice: the end of the ribbon in the right hand should be long (about 30 cm) so that it is convenient to weave, and the end in the left hand will remain unchanged (it will make up the tie).
We put the tie on close to the fold of the collar and tighten it.
We lower the collar down and glue the end of the tie to the bottle.
Next, we begin to braid the bottle with a blue ribbon (width 1.3 cm or at your discretion).
We braid this until the shape of the bottle begins to change dramatically and we have to glue several rows of tape in one place.
When the smooth surface of the bottle begins, glue the end of the tape in front in the center. The tape should be level and overlap slightly, where the oblique rows end on the reverse side.
We wrap the bottle very tightly with tape, securing each row at the front with a small drop of hot-melt glue.
We cut the ribbon and fasten it in the front in the middle. We cover the cut with beads and decorate them further, imitating buttons. Glue on the boutonniere and the groom is ready!
Take a white ribbon of the same width as for the groom's suit. You need to start braiding the bride from the level where the groom's blue ribbon (jacket) begins. First, in the back center, you need to secure a bottle-length tape with the front side to the surface using hot glue. It will cover the joints. We braid the bride in the same way as the groom, only part of the shirt and tie is missing.
The only difference is that when the flat surface of the bottle begins, we fasten the edge of the tape in the middle at the back and fasten the end there too. Everything ahead must be perfect.
The base of the dress is done. Now we will wrap the flat part with lace. The joint should also be at the back. Apply glue to the joint and a couple of drops on top so that the lace does not slip.
Let's prepare a bow for the top of the dress. For it you will need a blue ribbon 2.5 cm wide, a ribbon 0.7 cm wide. Place the blue ribbon in the center, and cut two pieces of the white one and place it along the edges of the blue one. We tie a bow with a white ribbon into two knots, hide them at the back, and cut off the ends.
Apply glue to the knots and glue the bow in the front center above the lace. First, we braid the bottle with blue tape on one side and the other, sealing it at the back at the junction, and then with white tape, slightly covering the edges with blue. The basic rule: the ribbon should lie flat and cover the edge of the lace. Hot melt glue can be applied pointwise when we braid it with tape.
We lower the tape at the back and glue it, covering all the joints. Glue the end of the tape to the bottom of the bottle and decorate it with beads.
We glue a regular bow from a thinner white ribbon on the front and decorate it further with beads (at your discretion).
The bride's dress is ready!
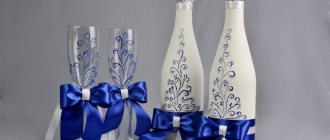
Now you know how to decorate wedding champagne with your own hands. You can decorate glasses in the same colors. We will tie a regular bow from white organza (2 cm or more wide) and the blue ribbon from which the groom’s suit was woven. First we tie it with a white thin ribbon, placing the knots on the back side. The ends should be the same - we will use them to tie the bow to the leg.
Then we tie it in the same place with a blue ribbon, but we cut off the ends end to end. Glue a bead in the middle.
We tie it to the leg with a white ribbon, tying a knot in the front. Leave the ends free. We burn the ends of all the ribbons.
Wedding champagne in the shape of the bride and groom is ready to decorate the festive table!
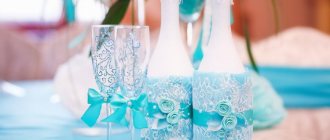
Decor with rhinestones and bows
This option can be used either as a single design or in addition to the methods described above. Rhinestones are useful when decorating with ribbons or painting; bows are used in the design of the neck and complement outfits for bottles made of ribbons or fabric.
When decorating bottles only with rhinestones, it is recommended to clean the surface of labels and degrease.
For more comfortable work, contours for gluing are outlined with paint. It is recommended to prepare in advance sketches of the drawings that will decorate the festive champagne.
Master class: bride and groom made from champagne bottles
The bride and groom made of satin ribbons on champagne bottles is a common attribute of a wedding celebration. Previously, this craft was ordered from decorators, but now anyone with minimal handicraft skills can make such a decoration.
You can decorate champagne in the form of newlyweds using different techniques: entwining bottles with ribbons in the simplest way or using the more complex kanzashi technique.
Champagne wedding couple decorated with ribbons
Groom made of ribbons on a bottle of champagne
To make a groom, you need to prepare materials:
- white and blue ribbons;
- white half beads of different sizes;
- heat gun;
- lace;
- organza;
- small artificial flower;
- champagne
Step by step execution:
Cut a white satin ribbon 2 cm wide so that it is enough to wrap the neck of the drink. Fold along and carefully iron the fold line. Lightly scorch the edges with fire. Apply adhesives to the bottle and glue the tape, first one edge, then the other
Please note that on the back side the tape should be positioned slightly higher than on the front side so that it fits tightly to the surface of the glass. Raise the ribbon along the fold, like raising a collar, before putting on the tie. Glue the same white piece from below, close to the fold line of the first tape.
Popular articles Pincushion “Mushroom”
Repeat the steps one more time. From a blue ribbon - it should already be white, tie a tie in any convenient way. The tie can be replaced with a bow tie from the same ribbon. Place a tie under the white decorative “collar” and tighten. Lower the collar and attach the free end of the tie to the bottle with glue. Below the shirt, braid the bottle with a blue ribbon until the shape of the champagne begins to change dramatically. At this point you will need to glue several tapes on top of each other to level the surface. Continue covering the drink with tape all the way to the bottom. The joint should be located on the front side. It will need to be covered with half beads, similar to buttons.
Under the shirt, a little to the side on a drop of glue, plant a boutonniere flower, and the bottle groom is ready!
Champagne bottle groom with bow tie
Bride made of satin ribbons on a wedding bottle
You need to make a bottle with ribbons in the shape of a bride from the same materials that were used to make the groom’s craft.
The bottle of champagne representing the bride may be a little shorter, then the couple will look very beautiful and gentle
Step by step execution:
- Wrap a white ribbon around the bottle from the level where the “groom’s” jacket begins (made of blue ribbon). The technique is the same as when making a shirt.
- Then wrap the bottle crosswise with the same ribbon, overlapping the ribbon slightly, going down to the very bottom.
- Wrap the flat part of the bottle with lace, the edges should meet on the back side.
- Make a bow from satin ribbons. How to tie a ribbon: prepare a blue or white ribbon (2.5 cm wide) and a white ribbon (0.7 mm wide). Glue the blue ribbon in the center of the bottle above the lace. Wrap a thin white ribbon on top and tie a bow with 2 knots. Trim the ends.
- On the reverse side, cover the joints with white tape.
- The front part can be randomly decorated with beads or seed beads.
Decoration of the bride and groom with ribbons in classic colors
You can decorate champagne with your own hands in an original and simple way and observe the traditions of the holiday. You just need to use your imagination a little and have some free time. You can also decorate the newlyweds’ glasses in the same style - you’ll get a beautiful set that also acts as an additional wedding decor.
To make everything clearer, watch the video of making clothes for champagne for a wedding with your own hands from ribbons:
Decoration with kanzashi flowers
Kanzashi is a technique that uses pieces of fabric folded in a special way. Most often, holiday flowers are made this way. Creating such decor is relatively simple if you use ready-made flowers. It is better if they are silver or pastel shades with a pearlescent tint. To decoupage wedding champagne you need to prepare the following:
- 7−9 flowers of different sizes;
- silver satin ribbon 2.5 cm wide;
- 1 cm thick ribbon to match the kanzashi elements;
- glue;
- multi-colored beads or rhinestones.
Cut a piece from a wide satin ribbon and glue it to the very top of the bottle, where the cork is located. The ends of the tape should extend slightly onto the sides of the cork. The following actions:
- Wrap the neck with tape to a height of 5 cm, starting from the edges of the first segment.
- Starting from the end of the upper winding and extending slightly onto it, wrap the neck with another tape (1 cm wide) until it widens.
- The process should result in a pattern resembling a “Christmas tree”.
- The corners of the herringbone should be directed downwards.
- The places where the tape intersects are coated with a thin layer of glue; there should be just enough of it to fix the satin.
- Take a thick silver ribbon and make one herringbone circle, starting from the edge of the previous winding.
- The entire bend is wrapped using the same technique using thin tape.
- The straight part of the bottle is also wrapped with colored satin ribbon, but without the “Christmas tree”.
- Kanzashi flowers are glued onto the wrapped surface, placing them diagonally.
- The upper flower is placed opposite the second thick winding, and the lower one should not reach the bottom by several centimeters.
- Rhinestones and multi-colored beads are attached to the second thick winding.
The second bottle is decorated in the same way. If the region has a tradition of placing “bulls” on the table, they should also be decorated in this way. By the way, this decoration option is suitable not only for a wedding.
How to decorate bottles with your own hands?
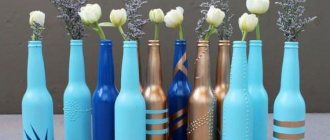
Bottles of wine, decorated by hand, should fit into the overall tone of the holiday and its style. There are simply an incredible number of options for decorating a drink; choose the one you like and follow the instructions step by step. For those who have a penchant for handicrafts, a great option is to decorate a bottle with polymer clay. Minimum costs and your masterpiece will delight all guests!
You will need:
- a couple of bottles of sparkling wine;
- white spray paint;
- ready-made polymer flowers;
- glass pencil;
- rhinestones, beads for decoration;
- glue, ribbons, lace, scissors.
The work itself will not take much effort and time. First, paint the bottles with white spray paint, then draw the outline of the desired decor option. Place polymer flowers, beads, ribbons, rhinestones, bows along the finished contour and secure them with glue. This type of champagne decoration is very simple, and the effect is amazing.
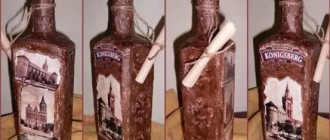
An equally interesting, but much rarer option is decorating champagne with photographs of a married couple. Photos can be placed on bottles instead of labels. In a similar way, you can decorate the bottle with a sticker with the date of the celebration or wedding, with the names of the bride and groom. Decorating with photographs is a simple process. First, print the necessary photographs on thin paper, and then apply them to the bottles using the decoupage technique. The contours and the rest of the bottle can be decorated with ribbons and rhinestones.
You can contact your nearest photo studio, where they will help you select special wedding pictures and logos and print them on paper of the required format and quality. Champagne with images of newlyweds in reality look magical and intriguing. Be sure to consider this option for decorating the drink and you definitely won’t go wrong.
Champagne looks rich and elegant in bottles decorated with gold or silver. In this design, the drink can retain its original appearance for many years. The choice of patterns and inscriptions suitable for decoration, of course, is a purely personal matter, but it is better to entrust this kind of work itself to professionals who know a lot about this matter.
You can create another champagne decoration option on your own - decorating bottles with satin ribbons. To work you will need:
- bias tape;
- glue;
- rhinestones, beads, feathers for additional decor;
- two bottles of champagne.
The point of the process is to attach pieces of bias tape to the bottle according to the pattern. The pattern depends on the selected pattern. These can be bottles in the suit of the bride and groom, vest bottles for a wedding in a nautical style, etc.
It is better to start designing from the neck of the bottle. The top can be decorated with a black hat or mustache, or a veil. Add beads and rhinestones as desired. Do not cut the ribbon into pieces at once, as the length will change as you work, depending on the shape of the drink bottle.
As you move from top to bottom, the edges of the attached tape are hidden under the top edge of the next row. The widest bottom part of the bottle is also decorated with ribbons, but the tails are secured from the bottom. It is not at all necessary to attach the tapes at an angle, it all depends on your imagination. If somewhere you get a sloppy stripe or the ribbon is crooked, you can fix everything by attaching a decorative element over the satin. This decor option looks good with the addition of feathers of different colors and sizes.
As you can see, there are really many options for decorating champagne. This is only a small part of what you can do with your own hands. It’s up to you to decide – use ready-made ideas and master classes or come up with your own unique design.
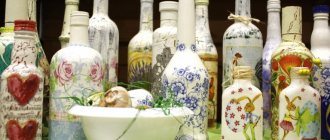
Decor using decoupage technique
The decoupage technique is widely used in the design of various household items and decor. You can also use this decoration method when decorating champagne.
If both the bride and groom have experience in making things with their own hands, you can prepare a surprise for each other.
Tools:
- napkins with themed patterns;
- degreaser;
- soft sponge;
- brushes;
- primer;
- sandpaper;
- acrylic lacquer;
- paints.
Advice. Photos of the newlyweds are also used instead of napkins.
The initial stage is preparation. Bottles must be cleaned of paper labels and wiped thoroughly. Degrease the surface with alcohol. It is recommended to remove the foil from the cork itself.
Primer treatment will help create a suitable background and prepare the surface for further work.
A soft sponge will be useful when processing. The primer must be applied evenly, using patting movements. After the first layer has dried, a second layer is applied. The component must dry thoroughly. After drying, the surface is carefully sanded with fine-grain sandpaper to obtain an even coating.
The required design is cut out from the napkins.
When cutting, you should step back a few centimeters from the ornament. The picture is applied to the selected area and treated with glue. When working with glue, all folds and irregularities are carefully smoothed out. After drying, the edges can be lightly sanded to eliminate any defects and smooth out the contour. Finally – varnish treatment.
Decoration with photographs and engraving
Decorating a bottle of champagne with photographs of the bride and groom has long been used by newlyweds. To do this, the photo laboratory orders photographs of the newlyweds of a certain size in heart-shaped frames, equipped with original wedding drawings. These images are applied to special adhesive paper, which is then easily pasted onto the bottle.
Engraving a wedding bottle is a rather rare and expensive way of decoration, but it allows you to make the bottle original and memorable. The creation of drawings and inscriptions is entrusted to specialist engravers, who, at your request, apply all the necessary symbols to the bottle.
Wedding bottle decoration is an interesting creative process that gives you the opportunity to show your imagination and talent as a decorator. By putting your soul into this activity, you can get a magical result that will be remembered by all the guests of your celebration and will make the ceremony and subsequent banquet original. You will remember the wonderful moments of your wedding for a long time and will be proud that you approached its preparation seriously and responsibly, without missing a single small detail.
Popular articles Pincushion – half an apple
What shape of container should I choose?
Champagne bottles are distinguished by the fact that they practically follow the shape of the human body. Therefore, they are convenient to use for decorating figurines of the bride and groom.
From ordinary bottles of champagne you can make a real exclusive that will be the center of attention at your wedding.
Some people use containers with other drinks. For example, cognac can be selected in accordance with the image of the figure of the bride and groom. Elongated bottles with a narrow neck are suitable for decorating a lady. A rectangular or pyramidal vessel is useful when decorating a man. Containers with vodka, martini, and vermouth are selected using similar criteria.
Advice. When choosing an alcoholic drink, it is recommended to select bottles that resemble the outline of the young person’s body. Wide, voluminous containers are suitable for the groom, and narrow ones with an elongated neck are suitable for the bride.
Wedding champagne bottle: trim with ribbons
Using satin ribbons is a simple and optimal budget option. This method of decoration is characterized by fairly simple steps and helps to create a bright and unique decoration for the holiday table.
There are many interesting wedding traditions, including two untouched bottles of sparkling drink.
- ribbons of several shades;
- glue;
- scissors;
- lace;
- elements of additional decor (flowers, rhinestones, beads).
Attention! Bottles must be thoroughly cleaned of contaminants - dust, greasy marks, stains. Pasting begins from the neck where the foil ends
The required piece of tape is glued to the bottle, the excess is cut off. The second layer is glued slightly overlapping the first. This way you can make 3-4 layers. It is recommended to use a white ribbon, then you will get an imitation of the groom's shirt. For subsequent decoration, it is better to take a ribbon of a different shade - black, blue, gold. The entire surface is covered in a similar way. You can place a piece of ribbon in the center to act as a tie. The bottle for the groom is ready. Lace is useful as an additional decor
Pasting begins from the neck where the foil ends. The required piece of tape is glued to the bottle, the excess is cut off. The second layer is glued slightly overlapping the first. This way you can make 3-4 layers. It is recommended to use a white ribbon, then you will get an imitation of the groom's shirt. For subsequent decoration, it is better to take a ribbon of a different shade - black, blue, gold. The entire surface is covered in a similar way. You can place a piece of ribbon in the center to act as a tie. The bottle for the groom is ready. Lace is useful as an additional decor.
Just to the left of the neck there is a small flower made of white ribbon - a boutonniere.
The bottle for the bride is made of white ribbons. The registration process is carried out according to the steps described above. The lid is covered with a small piece of lace, which is a veil. In the belt area you can add a bow or ribbon flowers. Decorate the neck itself with beads or rhinestones.
Photos of young people
Many newlyweds use personal photographs to decorate their bottles. This decor option has gained wide popularity recently. Photos are used instead of labels. In order to place the desired photo on the surface, it is recommended to print it on thin paper. The design is carried out with special care. You will need to think about the photo format, its location, and additional decorations.
Inscriptions with wishes (if the bottle is presented from guests), indicating the names of the spouses, the date and time of registration are suitable as decoration.
The vessel itself needs to be prepared for the technological process. The label is removed with warm water and the surface is degreased. The surface can be painted and a photo can be placed in the center. Small rhinestones will come in handy when creating a frame. The neck can be decorated with a ribbon bow, flowers, and a veil and a man’s hat (for example, a paper top hat) can be placed on the lid.
There are a lot of options for how to decorate this table souvenir.
Attention! Many specialized salons provide services for printing labels with the required image. This sticker will be a smart alternative to the real one.
Master class on decorating wedding bottles with your own hands
You don't have to have any special skills or talent to create a real work of art. The main thing is to have desire, imagination and free time. Select decorative elements taking into account the theme of the celebration, as well as color design and your own imagination. But first, we recommend that you carefully study video master classes online or attend real courses on creating unique jewelry. Specialists will help you decorate the containers on the festive table with your own hands, making it as solemn and unique as possible.
Satin ribbons
The shiny satin ribbon on the bottle looks especially bright. It is beautiful both as a canvas and as a detail. In addition, it is perfect for decorating wedding containers. Moreover, such decor does not have to be black and white. It is quite possible to use ribbons of other delicate shades. To do this you will need:
- satin ribbon;
- decor;
- lace;
- rhinestones;
- scissors.
To begin, measure and cut the required amount of tape. Apply only a small amount of glue. Then cover the surface, starting from the neck, and gradually go down. Do this as carefully as possible; we recommend gluing the tape in several layers. Mask the joints with another tape. As soon as the champagne is ready, you can safely put it on the gala table.
Bows, contrasting fabrics, brocade and lace also look great in such a situation.
Velvet suits
Velvet looks especially luxurious. This material has excellent stretch, which makes it possible to create mini bottle outfits from it. Velvet can be any color, but it is best to use white fabric for the bride's suit and black for the groom. If you choose a themed, not quite standard wedding, then try to demonstrate this in the decor.
Classic black and white
If you decide to have a classic wedding, we recommend creating black and white bottle decor. This way you will complement the decoration of the celebration. To do this, you can use any type of fabric, just try to stick to a certain style. Choose materials only in black and white. At the same time, you can complement the decor with white artificial pearls or black beads.
Champagne Bride
A wedding is the brightest and most unforgettable celebration. The majority of ceremonial decorations can be made independently. This does not require any talent or skill. Even if you want to decorate bottles at an event in a special way, you don’t have to worry that you won’t succeed. We recommend using bottle decor in the form of a married couple’s outfits.
Regarding the bride, we recommend using a white tulle skirt, a lace corset and velvet elements, also in white. From classic champagne containers you can create a real masterpiece. This exclusive item will become the center of attention at your event. We recommend that the young couple devote the maximum amount of free time to creating a festive atmosphere.
Champagne Groom
Table decor is only gaining popularity every year. Therefore, we advise you not only to decorate the bottle in the form of a groom’s suit, you can make a whole set from a bottle and a couple of glasses.
Regarding the design of the container in the form of a groom, we recommend using black and white fabric and complement the decor with several pearls. This way you can imitate the buttons on the groom's suit. If you want to make the bottle as festive as possible, complement the costume with a boutonniere made of fresh or artificial flowers.
Engraving
This method is durable. Engraved inscriptions and images will not lose their attractiveness even several years after the celebration. It is recommended to entrust the decoration to a glass specialist in order not to damage the bottles and to obtain high-quality images.
For decoration, you can use drawings or inscriptions.
The image itself can be either glossy or matte. When choosing a suitable shade for engraving, you should pay special attention to color combinations. For example, on dark bottles images of a golden or silver palette will look especially impressive and attractive.
Engraving on bottles has many advantages compared to the decoration methods described above.
This design is almost impossible to damage or spoil. If minor dirt or buildup occurs, the bottles can be gently rinsed in cool water. The liquid does not have a negative effect on the drawing. In addition, it is worth highlighting its versatility: champagne decorated with engraving will be appropriate at any wedding, regardless of the style.
Decor of bottles using original techniques.
Clothes for champagne made of organza and velvet
Following the master class below, you can decorate champagne for your wedding in an original way with your own hands.
The magnificent clothes of the bride and groom, made with velvet and organza, will certainly attract the attention of all guests to the bottles. This kind of work can be done by any girl who can hold a needle in her hands.
Decorating champagne with your own hands will not take up much of your time.
Necessary materials
To create your own champagne clothes you will need the following materials:
- organza for a skirt 30x80 cm;
- white satin;
- velvet black paper;
- black velvet fabric 30x40 cm;
- lace 1.8 m;
- adhesive tape for finishing edges;
- instant glue;
- organza for veil;
- flesh-colored ribbon 40 cm;
- white satin ribbon 2 cm wide, 0.5 m long;
- white narrow ribbon 1m long;
- rhinestones, beads, artificial flowers for decoration;
- wide organza ribbon for bow.
Pattern and creation stages
- In those places of the wedding champagne where there will be light fabric, we wrap it with white mounting tape, paper, cardboard, or cover it with paint, and tear off the label. On the bottle symbolizing the groom, we lay a mounting tape along the bottom of the shirt and the collar.
- For the bride's corset, we wrap the front of the wedding champagne with a piece of white satin 3-5 cm wide.
- We put a body braid around the neck, cross the ends and hide them.
- To secure the corset to the champagne for the wedding, we apply adhesive double-sided tape along the edges of the corset on the inside.
- Fold the fabric for the skirt so that the bottom part is one third larger than the top.
- We sew lace 2.5 cm wide onto the top flounce.
- We sew narrow lace onto the hem.
- We place a ribbon between the flounces and tighten the skirt at the place of the bottle where the waist is supposed to be.
- We distribute the pleats beautifully and sew the skirt to the corset. We sew the edges at the back.
- We decorate the corset with lace and sew a bow on the back.
- For the cape, cut a piece of fabric 5x28 cm, bend the edges.
- We intercept with a narrow braid in the middle and connect with a ring.
- We put it around the neck and secure it at the back with glue.
- We cut a piece of organza for the veil 30 cm long, 25 cm wide. We assemble it by stepping back from the edge by 10 cm with a thread and tighten it.
- We tie a braid or a string of beads to the head, and attach a veil. The bride's clothes are ready.
- To make champagne clothes for the groom with your own hands, we wrap the bottle with paper, then you need to draw the outlines of the suit.
- To make trousers, sew black velvet 8 cm wide, 27 cm long, add a seam allowance.
- We hem the bottom edge, turn it inside out, and put the trousers on the champagne. We lay a white braid along the top edge and sew it to the trousers.
- We lay a small piece of white fabric along the front of the neck and secure it with adhesive tape.
- We attach a body tape to the neck. Below we wrap the neck of the champagne with a satin white ribbon, hiding the ends at the back. For the collar, we throw a 20 cm white ribbon, cross it on the chest, and secure the ends with glue.
- We cut out a frock coat from velvet according to the pattern, connect its parts, and sew a white ribbon on the front.
- At the top of the coat, on the wrong side, we make four small darts so that the garment fits well.
- Let's try on a tailcoat.
- We cut out a velvet collar and glue a white ribbon along its edges. Glue the collar to the champagne.
- We make a bow tie from ribbon, a black top hat from velvet paper and two buttons. We dress champagne in ready-to-wear clothes.
Popular articles Folding postcard with love
Design ideas and examples
Here are some more interesting options for decorating champagne for the newlyweds’ table. Decoupage decoration technique is interesting and easy to perform. It is gaining popularity not only in the wedding theme, but also, in general, among needlewomen. The result will exceed all expectations.
Decoupage technique is the process of transferring a paper image onto any surface that has been pre-treated with acrylic-based varnish or glue. The paper with the picture must be very thin. Napkins are well suited for such work; there are a great variety of colors (flowers, floral patterns, angels, hearts). You can choose any design you like.
First you need to thoroughly wash the bottle, removing the label and any remaining glue. Then you should degrease the surface for better adhesion and dry it. The next layer is primer. There are special primers for glass, but you can make the impregnation yourself by mixing PVA glue with water and acrylic.
The primer is applied in a thin layer to the entire surface of the bottle. The most convenient way to do this is with a foam sponge or sponge. It is better to apply two layers of primer.
After the soil has dried thoroughly, begin applying the design. Special glue for decoupage, regular PVA, and a glue stick are suitable here. Carefully straighten any wrinkles that appear during the process of attaching the paper, otherwise the bottle will end up looking sloppy. Apply the drawing gradually, preferably from top to bottom. When all the images are in place, secure everything on top with a layer of acrylic varnish (apply several layers, after drying the previous ones).
See below for a master class on decoupage of a wedding bottle.
Decorated bottles in the form of a “couple” in velvet suits look no less solemn. This is a very aristocratic decor option that is perfect for a classic celebration. Choose the color of velvet to your taste.
To complete the decoration you will need the following materials:
- velvet with stretch effect;
- threads in color;
- graph paper;
- pencil, scissors;
- beads, rhinestones, sequins for additional decor.
Prepare a pattern of the appropriate size and transfer it to the velvet. Apply markings from the wrong side. Cut out the resulting blank along the contours and sew it. Put the costume on the bottle.
Decorate the outfit as you wish. You can add lace for the “bride” bottle in the form of a veil or wedding skirt. A lady's neck can be decorated with a string of pearls. For the “groom” you can add a satin tie or bow tie. Rhinestones can replace suit buttons.
See below for a master class on making a wedding dress for a bottle.
So, the wedding day and its mood are a concern not only for professionals in the field of wedding celebrations, but also for the newlyweds themselves. Everyone can make this holiday unforgettable. You just have to show a little imagination and tune in to the right mood. It is the little things and details that create the atmosphere of love, celebration and help to remember the happiest day in all its details.
How to make champagne “bride and groom”
Many couples who are going to celebrate their wedding order its decoration from professional agencies, since it is not always possible to find time for preparation. Therefore, they do not think about what decorative elements will be on the table. But those couples who are serious about their special day and want to choose all the items and decorations for their wedding themselves also make their own decorative items.
Girls especially love preparing their wedding, because it’s such a pleasant chore, and it’s a pleasure to do it. It is for such girls that there are various lessons on making small beautiful decorative elements. These are champagne bottles made in the style of the bride and groom. Before you start decorating the bottles, you need to decide which champagne will be decorated, choose the bottle shape you like and only then start decorating. Also, if a couple decides to get married, but they already have a child, you can take a small bottle and decorate it in the style of a little boy or girl.
Necessary materials for decoration
After all the necessary bottles have been purchased, tools and decorations are purchased. Typically, champagne clothes are made from bias tape, a material that resembles ribbons. They are easy to envelop champagne, and it is very easy to find colors in the style of the bride and groom. Of course, according to custom, the main colors at a wedding are black and white, but if young people wish, they can change this tradition and make the clothes brighter.
To decorate the bottles, you will also need lace, which will decorate the bride bottle, glue and additional decorations (bows, rhinestones or decorative flowers). You can use satin ribbon instead of binding, but it is worth noting that the binding stretches, and this will help to decorate the bottle beautifully, while satin does not stretch, so it will be harder to decorate with it. Many craftsmen advise decorating clothes for bottles using a glue stick, because it is this that does not leave obvious marks and sticks the fabric to the bottle well.
Bottle preparation
So, first you need to decide what outfit the bottles will have, its color and approximate execution. After this, two bottles should be left in water for an hour so that the labels can be easily removed. When the bottles are clean, you need to glue a small piece of lace on top, it will act as the beginning of the dress.
Decorating bottles of champagne “bride and groom”
Next, you need to take bias tape (white or beige) and glue it to the base of the lace, then weave the tape in parallel oblique lines, so you need to cover the entire bottle, starting from the base of the lace and ending with the wide bottom of the bottle. Don’t forget to lubricate each strip of tape with glue so that they don’t eventually come off. Each strip of binding needs to be joined at the end, and the excess fabric can be cut off.
At the moment when the entire bottle has already been pasted over, and a few centimeters of the wide bottom remain, the tape can be glued on in exactly one continuous piece. At the very bottom of the bottle you need to put a lace bow with an elastic band. The elastic must be strong so that the hem of the dress does not fly off. You can either make this hem yourself, or simply put on a beautiful lace elastic band and decorate it with a gold frill. But in order for the hem not to fall off, it needs to be attached to the binding with a thread, it can be a transparent thread or of such a color that it will not be noticeable.
You can also glue a golden ribbon onto the lace on top of the bottle, and glue rhinestones or other decorative elements onto it using a glue gun. This makes it look like there is a necklace on the bottle. Well, at the very end you need to make a veil, for this you need to take a wide lid from some kind of drink and glue white transparent material to it in the shape that you like best.
The groom bottle is no different from the bride and is made in exactly the same way, the only thing is that the first few turns of the tape are made white, and all the rest are black. This will give the impression that the bottle is in a white shirt. For the groom's hat, you can use an oblong cork, but it needs to be cylindrical and wrapped with black tape. If desired, the groom can wear a tie, stick rhinestones in the form of jacket buttons, and attach a small flower to his hat.
Now the bride and groom are ready, you can add or change something to your taste, this will only make the appearance of the bottles better. A small bottle must be done exactly like the large ones, depending on whether the wife and husband have a daughter or a son. You can change colors and add other decoration elements. To choose a suitable option for the bride and groom, you can look at photos of completed work and, focusing on them, create your masterpiece.
How to choose a decor style?
Champagne is the most traditional drink for wedding celebrations; any festive table is abundant with it. Many wedding competitions and games also use bottles of this drink. This is a good reason to make champagne a small highlight of the holiday.
You can turn bottles into real exclusives by showing a little imagination and ingenuity. You can do the decoration yourself, which will save money.
There are a lot of design options for champagne bottles. The most common option is to decorate the sparkling wine in the “bride + groom” style. Such a “couple” is usually placed on the newlyweds’ table. The classic color scheme in this case is black and white.
But if the celebration involves the use of some bright color (this is fashionable now), then the bottles can also have colorful elements.
It is popular to celebrate weddings using bright colors in addition to classic colors (white, ivory, champagne, milk). It can be turquoise, blue, orange, purple and even red.
The holiday will clearly become bright and unforgettable, but then it’s worth thinking about color accents in everything. Including in the decoration of wedding attributes.
There are a lot of design options - decoration with three-dimensional elements, fabrics and lace, pearls, scrapbooking, modeling. The drink looks good in bottles hand-painted with acrylic paints.
The most important thing is not to overdo it and create such decor that the bottle of champagne does not stand out from the overall style of the holiday.
Two beautifully decorated bottles are usually made and it is not customary to open them during the celebration. They remain for the couple for the future: one for their wedding anniversary, the second for the birth of their first child. Here is another reason to make a bottle of champagne beautiful and unusual.
The main rules of decoration are compliance with the given level of solemnity, combination with the furnishings, dishes, and outfits of the newlyweds
. For example, gold and silver engraved bottles would be completely out of place at a boho or Provence style wedding. But delicate floral motifs and lace are an excellent decorative option for a classic wedding with aristocratic notes.
If the wedding takes place under the auspices of a specific theme, for example, maritime, then the decor may include appropriate details. Bottles of champagne can be painted to resemble a sailor’s vest or decorated with anchors and chains, painted with sea waves, etc.
An autumn wedding in the Russian style presupposes the presence of autumn fruits and vegetables in the paraphernalia and the use of a red-red color scheme. Here bottles can be decorated with stylized painting, autumn apples or leaves.
The main thing in decorating is to show your imagination.
You can find many master classes on the Internet, which detail the sequence of actions and the necessary materials for the work. It’s these little things that make up the overall atmosphere of the holiday, so pay due attention to decorating not only the newlyweds, the cortege and the banquet hall, but also small accessories.
Bottle decor with tights
For such an option as decorating bottles with nylon tights, you may need more than just napkins. This time we use nylon stocking instead of fabric. We saturate it with glue and put it on the bottle. We also create chaotic folds, while the cork can be covered with nylon, or you can stretch the stocking only to the neck of the bottle - after completing all stages of the work, it will seem that the bottle is in a kind of bag. We dry the glue, cover the product with acrylic paint and dry it again. Glue on a fragment of a napkin, let it dry, and paint the bottle in the main color.
We complete the decor with a ribbon, bow, braid, and sparkles. Decorating bottles with tights is a great option not to throw away a damaged item, but to use it in a new quality.
Delicate drawing with Japanese motifs using acrylic paints
Incredible bottles with luxurious finishes by Michelle Butler
Glass bottle decorated using mosaic technique
An original design option for bottles using buttons
Yes, yes, it is from toilet paper that you can create incredible textured patterns and finishing elements
Bottle decor with leather
Decorating bottles with leather can be considered one of the most labor-intensive decoupage processes, which requires the greatest material costs, although if you have pieces of leather in your arsenal, the option will be economical. To work you will need a bottle, glue, scissors and leather. It is better to take thick but soft leather, then it will be convenient to work with it, and the effect will be the most luxurious. It is better to apply glue directly to the skin and place a piece against the bottle. You can make patterns from leather, make roses or other flowers, complement the design with beads, coffee beans or other elements to your taste. You can decorate bottles with paints.
Decorating bottles with your own hands is a fascinating process with a unique result. Give yourself productive leisure time, and give your loved ones amazing accessories that will become a chic addition to any interior. Finally, take a look at another way to decorate a glass bottle (video).