What types of drawer guides are there?
Drawer guides in ascending order of cost can be arranged as follows:
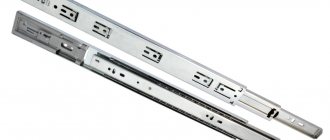
- Roller guides (slides)
- Ball guides (Kulkova, telescopic guides)
- Metaboxes (metalboxes, Metabox guides)
- Tandems (Tandem guides)
- Tandemboxes (Tandembox guides)
- Legrabox
Interesting materials:
Why do pancakes turn out dry? Why is Oleg the Prophet nicknamed? Why do deer and elk shed their antlers? Why couldn't Olga get Oblomov out? Why didn’t Olga Ilyinskaya manage to awaken Oblomov to life? Why are the Olympic rings this color? Why does the top of the bread fall off during baking in a bread machine? Why does it rain most often in autumn? Why do hookahs make you dizzy and nauseous? Why is there a lot of dust from the humidifier?
Kitchen fittings Blum
Furniture fittings Blum (Blum) is a well-known brand on the Russian market.
In modern furniture showrooms, a high-quality kitchen set will definitely be equipped with fittings from the Austrian manufacturer Blum. Thanks to the high requirements for fittings, which are set by the manufacturer himself, focusing on the speed of development of modern technologies, furniture fittings from Austria have taken leading positions in Europe and Russia in just a couple of years.
Why should furniture fittings be from Blum?
- Bloom mechanisms open silently, close smoothly, can be invisible or in noble colors that will ideally complement the image of the furniture.
- Bloom loops are the absolute champion in terms of the number of openings. Hinges from an Austrian manufacturer can withstand 200 thousand cycles , while according to GOST, ordinary hinges only reach 80 thousand cycles (open-close). Translating this indicator into a temporary resource, we get approximately 22 years of continuous use.
- Furniture with Bloom fittings made of exceptional stainless steel is guaranteed by the manufacturer for each component for at least 5 years.
- Blum fittings are so convenient and functional that they will definitely become a housewife’s assistant in the kitchen. It will also not cause any trouble in caring for the furniture, since the main facades and fittings can be removable, which will make it easy to carry out hygienic cleaning in the kitchen or even wash the blum hinges and lifts in the dishwasher .
Austrian Blum fittings are a guarantee of peace of mind and complete satisfaction with your furniture. You will forget about the unpleasant creaks of hinges, extraneous noise from cabinets, the heaviness of facades, opening drawers with force and other problems associated with kitchen components.
How do blum kitchen fittings work?
Speaking about the operating principles of bloom mechanisms, we can distinguish several categories that differ in the type of opening and functionality.
AVENTOS BLUM lifting mechanisms easily open and lock at any level, providing plenty of room for handling kitchen utensils.
Bloom lifts come in the following types:
- BLUM AVENTOS HF - opening upwards, in two folds.
- AVENTOS HS - opening upwards, in one fold.
- AVENTOS HL - vertical opening.
- AVENTOS HK - rotary opening.
- AVENTOS HK-S - rotary opening for small facades.
- AVENTOS HK-XS - upward opening for fronts less than 460 mm.
BLUM drawers come in three types of extension:
- METABOX - partial extension, normal closing.
- TANDEMBOX - full extension, soft closing, with built-in closers.
- LEGRABOX - non-standard fittings in shape, size and color with an additional function - CABLOXX locking.
Installation and adjustment of Tandembox Blum drawers
In our store you can buy not only complete sets of TANDEMBOX boxes The contents of each kit are indicated in the description on the product page. To order any item from the set, send a request indicating the name of the item and the required quantity. After receiving your request, our managers will contact you, clarify the order and inform you of its cost.
Example of a standard TANDEMBOX BLUM :
- guides with BLUMOTION - 2 pcs.
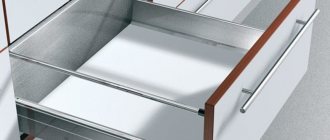
- double-walled drawers - 2 pcs.
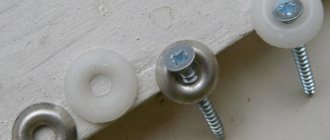
- back wall holders - 2 pcs.
- INSERTA fastenings for the facade - 2 pcs.
decorative plugs - 2 pcs.
Open the bottom and back wall.
Bottom, back wall and front are not included. They can be purchased separately.
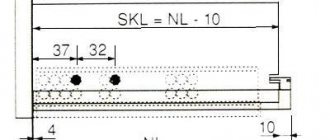
Cutting for 16 mm chipboards. indicated in the description on each product page.
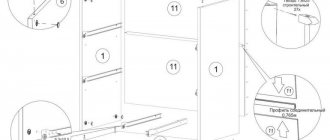
On the left is an example of such cutting for a standard TANDEMBOX M box (TANDEMBOX BLUM).
In our online store you can purchase a steel back wall for standard case sizes (right).
Fastening the facade and rear wall.
The dimensions for installing the back wall and front are also indicated in the pictures in the description on the page of each product.
On the right is an example for marking the back wall and front for a standard TANDEMBOX drawer. (FA - front overlay on the drawer body.)
Attaching the guides to the body.
Attaching the guides to the inner wall of the housing must be done in accordance with the table on the left.
Height dimensions are also indicated in the pictures in the description of each product.
On the right is an example of the height arrangement of Tandembox guides for a standard drawer.
Pull-out fittings for drawers from Hettich: how to install
Today we will look at the installation of such a type of retractable fittings as the InnoTech system from Hettich. This is very good fittings, the quality is quite comparable to the well-known Blum. Personally, I don’t really like their characteristic movement dynamics (before sliding, the box almost stops, after which it seems to be quickly sucked into the box), but this is purely my personal opinion.
This system is a representative of full extension drawers with a double steel wall. The height of the boxes can be of three types: 70 mm, 144 mm and 176 mm. We will analyze the installation using the example of a high 176 mm box.
I’ll start my story with an additive scheme specifically for a 176 mm box. The rest can be viewed in the official file of the manufacturer attached at the end.
Now let's go over the calculations of the components (bottom and back wall) - for all varieties.
| Height 7 cm | Height 14.4 cm | Height 17.6 cm | |
| Bottom depth | NL - 1 cm | ||
| Bottom width | LB - 2 x 12.5 - 51.5 | ||
| Rear width | LB - 2 x 12.5 - 63 | ||
| Rear wall height | 65.5 mm | 144 mm | 176 mm |
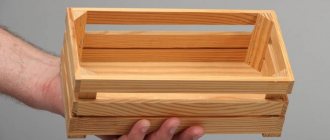
So, we calculated and sawed the dimensions of the components. So we can get to work. The following photo shows all the system components that we have to assemble and install.
These include:
- Pair of double side walls.
- A pair of Quadro full extension guides (there are also partial extensions, but that’s not about us today).
- A pair of rear wall connectors.
- A pair of front panel (facade) fastenings.
- Set of longitudinal rails (2 pcs.).
- Pair of end caps with Hettich logos.
The facade is calculated according to general principles for all drawers. In terms of width, I make them 3 millimeters narrower than the width of the box. In general, I make the interfacade gaps equal to 3 mm.
Let's start the work by assembling the box itself. First of all, the back walls are assembled. Why do you need to attach the rear wall connectors to it? First, the connectors are attached to the rear wall from the rear surface with a self-tapping screw, aligning the bracket along the bottom edge.
The second self-tapping screw in the upper part is screwed in from the end. For this purpose, there are wide holes on the sides of the connectors.
After this, the side walls are attached to the connectors of the rear wall, clicking on the sides. The bottom is inserted into the grooves of the side walls.
The bottom is wound in all the way, aligning along the front edge with the sides. The drawer is turned upside down and the bottom is secured with self-tapping screws (I usually put three on each side).
This completes the main part of the box.
All we have to do is attach the façade and the rails attached to it to it.
To do this, it is necessary to secure fasteners to the facade. They should be installed in 10 mm holes, which can be conveniently drilled with a Forstner cutter of the appropriate diameter.
For correct marking, we return to the first diagram. Considering that we have a bottom drawer, then to the size of 40.5 mm we add the thickness of the lower horizon of 16 mm, which gives a total of 56 mm. The remaining values correspond to the diagram. On the sides you need to set aside size A, which is 23 mm. That is, we retreat 23+15 mm from the edge of the facade (the thickness of the vertical pillar minus the inter-facade gap, which I usually make 1.5 mm - on each side. The lost millimeter is easily compensated by the adjustment capabilities of the system, but if you are a perfectionist, then on one side you need to add to size A 16 mm, and on the other 14 mm, or make 4 mm gaps between the facades).
Using a Forstner cutter, we drill these holes to a depth of 1.2 cm. We do this carefully so as not to drill through the facade. It is advisable to use a drilling machine or at least a stand with a drill depth limiter for this, but a simple hand drill can do the job.
We press fasteners into the holes, which, after pressing, are fixed with screws (they spread the jaws of the futor, tightly securing the fasteners in the holes).
Now we install the roof rails. First, we attach them to the rear wall connectors, snapping them into place.
We repeat this manipulation on the second side. It turns out something like this.
We snap the facade onto the side walls.
The front part of the railing is mounted on the fastening elements of the facades. They are inserted into the groove from above, after which they are closed with decorative bushings.
In the next photo I showed the position control panel.
Now we mark the guide. Let's focus on the first diagram again. To do this, we set aside 3.6 s from the bottom of the facade (remember that the lower facade will be lowered by another 1.6 cm). We draw a perpendicular and mark the traditional 3.7 cm on it.
We lay the guide on the perpendicular so that the line passes through the centers of the top row of holes. The attachment points of the self-tapping screws (at least three pieces) are pricked with an awl.
We assemble a furniture box. In my case, this is a box with lower drawers.
We place the box on the guides and push it until it clicks. It is not necessary to remove the façade.
But I dismantled the facade so that it would not be scratched during transportation and therefore put them in place.
Tilt in the frontal plane is produced by rotating the roof rails. At the same time, as they lengthen, they tilt the façade forward, or when rotating back, they tilt it backward.
The façade is shifted left and right by rotating the screw (which is located on the right side). You can move it up and down by rotating the wheels (they are on both sides of the box). To dismantle the facade, you need to press the blue button in front of the window.
All that remains is to close the technical window with a plastic plug with the Hettich logo.