Vadim
6727 0 0
Vadim June 26, 2018
The decor of furniture and other interior items, called “Carriage screed”, has existed for more than a hundred years. According to legend, this is how the carriages of the highest nobility were treated. A bed with a quilted headboard looks luxurious and can transform even the bedroom of an ordinary Khrushchev-era apartment. Let's look in detail at the entire process of creating such beauty at home, and go through everything from choosing a style to important details in installation.
“Carriage screed” is considered a universal finishing method and is widely used in interior design in many styles.
Materials and tools
What you will need to make capitone
First, you should purchase all the necessary material and prepare the tool. Materials for production:
- The plywood will act as a base, it all depends on what it will be - the sides or head of the bed, the wall.
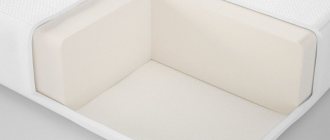
- Foam rubber corresponding to the shape and size of plywood and having a thickness of 5 cm.
- Fabric/leather/eco leather is 0.5 m wider and longer than plywood, add 30 cm for buttons if you have to cover them. The amount of material depends on the pattern report; the smaller it is, the greater the consumption, and vice versa.
- Metal buttons.
- Glue for foam rubber.
- A piece of padding polyester that follows the shape of foam rubber and plywood. They need to be covered with foam rubber.
Tools you will need:
- furniture stapler, preferably pneumatic;
- cord for fastening buttons;
- crochet hook;
- sharp knife;
- drill for drilling holes in plywood;
- drill with Ziefendorf attachment.
Screed manufacturing processes are completed in a matter of minutes if you have a special tool. You can learn about the principle of its operation and features from the video we offer.
Making a finishing drawing
In order to buy the required amount of fabric and fasteners and correctly distribute the arrangement of the ornament, you will need to draw up a preliminary drawing.
Example of a panel design scheme
Using the above drawing, calculations must be made. Initially, you should measure the structure that is supposed to be finished. After which it is better to display these values on the drawing in the appropriate sequence.
This figure shows a panel with a diamond-shaped pattern, the dimensions of which are 200x95 centimeters. At the same time, in order to know the exact locations for installing the fasteners, you need to take a square as a basis (it is shown in the figure on the left). In this case, its dimensions are 20x20 centimeters. It is these values that will help determine the size of the diamonds.
It should be noted that in our case, only the upper part of the panel is decorated with the capito technique. And at the bottom there are uniform stripes (their width will be the same as that of rhombuses).
It is more convenient to mark foam rubber with a bright marker
There is a distance of 10 centimeters on both sides for installing fasteners. The result is nine stripes arranged vertically. Their total height to the place of fixation will be 40 centimeters. There is a distance of 5 centimeters at the top of the panel (before the start of the buttons). Using the same principle, you should calculate the location of the ornament on the base in any other case.
The material will also need to be marked, but in accordance with some features. So, the size of the squares in this case will be 4 centimeters larger. This is necessary in order to form a relief.
After all the calculations have been made, it is necessary to transfer this entire drawing onto a cardboard canvas, which should be exactly the same size as the base itself. Here you should also mark the places where all fasteners are fixed and make holes. It is better to double-check the correct location of the markings several times, because the quality of the screed will depend on this.
Video - Marking the carriage screed
Instructions for action
Drill holes using a drill.
It is very important to note that the panel on which it is planned to create the carriage screed is created separately from the wall. As a basis, you can use a wide variety of materials, which are sheets
It can be plywood, chipboard and MDF. The panel must be adjusted to the required dimensions, after which a sheet of foam rubber is glued to it. The use of nitro glue for these purposes is absolutely unacceptable, since it has the property of corroding the entire material. In this regard, it is best to use rubber glue, which is based on rubber. The glue must be applied to the panel and to the foam in 2 layers. It must be taken into account that the next layer of glue must be applied only after the first layer is completely dry. After applying the second layer, the foam is securely attached to the panel (this may require 6 hours); design templates, which are made using thick paper, must be applied to the materials. Holes are cut out on the template, they need to be drawn with a pencil on the foam rubber surface. Then you need to mark places on the material, drill holes with an appropriate tool (the tool should have one or two cutting blades). When all the holes are prepared, the foam rubber must be covered with padding polyester. Where there are holes in the foam rubber, you need to make holes in the padding polyester. After this, the resulting structure should be covered with a pre-selected material, which also needs to be secured to the inside of the panel with a stapler. The material must be stretched with maximum evenness, there should be no folds, but compression should also not be allowed.
We stretch the fabric and use a drill to drill holes in it.
Share on
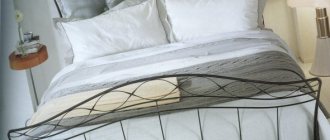
Beautiful furniture can decorate any interior and create a cozy atmosphere even with simple wall decoration. In the bedroom, a bed with a carriage frame looks chic and emphasizes the sophistication of the chosen style. Considering the rather high cost of the finished product, a volumetric headboard can be made independently at home. The bed will become a real highlight of the room; it will look cozy, rich and elegant.
The carriage screed has been known for quite some time. Back in the mid-19th century, expensive carriages were decorated in this way. The screed symbolized prosperity and luxury. This decoration method was used mainly for royal luxury items. Capiton (as carriage screed is also called) has also found application in the design of walls and upholstered furniture. The most famous example made using this technique is the classic Chesterfield sofa or Karelia bed 160x200.
After some time, capitone lost its popularity. However, recently such decor has come back into fashion. Modern apartments are decorated using this technique. These can be walls, chairs, headboards, and many other interior items. Furniture with a carriage frame looks elegant and cozy. Some people believe that such beds can only be suitable for classic style. But products made using this technique will fit perfectly into modern, pop art, kitsch and modern room design.
You can choose a bed with a carriage frame in a furniture showroom, or you can decorate the headboard of the bed yourself. This does not require special knowledge; a novice master can do it. A little effort and patience will do the trick. The bed will be transformed and will look elegant. Before starting work, you need to decide which type of capitonné decor is suitable.
There are several types of carriage screed:
- Diamond-shaped;
- Square;
- Complex, with changing geometry.
Expensive, beautiful material, as well as buttons, rhinestones, crystals, and LEDs give the furniture a special chic and elegance.
Origin of decor
The history of rhinestones dates back to the 18th century, when an enterprising jeweler named Strass discovered that properly cutting potassium glass could turn it into an elegant imitation diamond. After this discovery, Strass pulled off several deceptions and was exposed. A return to history begins in the 19th century, when Daniel Swarovski studied the methods and techniques of crystal polishing, thanks to which he began producing original rhinestones.
Since that time, the original sparkling stones have been given various designs many times, and also began to be used in different areas of life. One of these segments was the production of upholstered furniture. Italian and French designers could not ignore this opportunity to significantly transform the appearance of beds and began producing exclusive models. A bed with rhinestones is still of particular value in any bedroom today, attracting with its grace and beauty.
Modern beds using this decor are produced by manufacturers from different countries:
- Russia;
- England;
- Italy;
- France;
- United Arab Emirates.
It is worth noting that models from Europe have a cost that is an order of magnitude higher than domestic options, but Russian products are in no way inferior to them in terms of quality of materials. When framing models, both natural versions of Swarovski, made of crystal, and artificial analogues are used. Based on the material used, the final price of the bed will vary. Most models contain decor on the headboard of the bed: this way you can fully emphasize the style of the product and add originality to it.
Elegant models suitably fit into luxurious baroque, rococo, classicism, empire and gothic interiors. Glamorous interior trends do not exclude the use of such beds for rooms of similar styles.
What is a carriage screed and what types are there?
Carriage screed is a finishing technique that is also commonly called “capitone”. It appeared back in the 18th century; it was used in France to decorate carriages, and such design was considered a sign of luxury. In those days, not only vehicles, but also interior items in the homes of aristocrats were decorated with such equipment.
Despite the fact that the carriage screed has lost its former popularity for some time, the technique is now actively used by designers in their projects. That is why it can be found in many modern apartments. Furniture decorated in this way looks very elegant.
Interior with elements of carriage screed
It is worth noting that over several centuries, “capitone” has undergone significant changes - new unusual ways of using this technique began to appear.
Table No. 1. Types of carriage screed
| View, illustration | Description |
| Diamond-shaped | The pattern is a repetition of diamonds of the same size. Beginners in this business are recommended to opt for the standard version of rhombuses, because creating figures with sharp ends requires some experience from the master. |
| Square | In this case, the design looks like a square. It should be noted that this form is most optimal for beginners in this business, because working with straight lines is much easier. |
| Unusual geometric shapes | Professional craftsmen make screeds of various shapes, create curly headboards and rounded patterns. You should not immediately choose such a design; it is better to start learning the craft with a simpler ornament. |
To fix the material in this technique, buttons of various diameters and nails with voluminous heads are used. They will first need to be covered with the same material or purchased to match the main material.
Decorating furniture with a carriage screed has the same principle, but there are still some differences in the execution technology
It is necessary to choose the most convenient option, because here it is the outcome that is important
Finishing using carriage screed technology is carried out in two directions:
- the workpiece is covered with material exactly according to its size, and only then an ornament is formed on the surface;
- The upholstery of the base is done using small pieces of textile or leather of the required size.
Advantages of carriage screed
The popularity of "capiton" for several centuries is due to the following advantages:
- A headboard or chair designed using this technique will be very soft and therefore comfortable.
- Such a surface does not require any special care, even if textiles rather than smooth leather are used for upholstery. You only need to periodically use a vacuum cleaner to remove dirt from the product.
- Even after many years of use, a high-quality carriage screed does not lose its original appearance.
- If over time there is a desire to replace the coating (the fabric is outdated, greasy marks have appeared), then this can be done while maintaining the integrity of the soft base. In addition, if necessary, you can restore the panel by adding only a piece of material in a certain place.
- This technique can be used to decorate almost any surface, giving it an unusual decorative look.
- Pieces of furniture with such upholstery are suitable for decorating both respectable interiors and small apartments, that is, they are completely universal.
- This is an excellent opportunity to insulate the wall and improve the level of sound insulation.
- The walls that are supposed to be decorated with a carriage screed can be leveled strictly to the level.
Capitonné decor and its types
If you believe historians, quilted decoration appeared in Europe in the first half of the 19th century; initially it was used for the interior decoration of carriages, but over time it “migrated” to the interior of bedrooms, living rooms and children’s rooms. In the West, this type of soft cladding is known as “Capitone”; in our country it is called “Carriage screed”.
The soft finish “Capitone” is universal; any furniture, walls, doors and even ceilings can be draped in this way. There is an opinion that a bed with a quilted headrest fits only into classical styles, however, a carriage headrest harmonizes perfectly with loft, modern, pop art and other modern styles.
Quilted “Capitone” trim fits perfectly into modern design styles.
Quilted furniture is now available in a wide range, but the price is respectable. A crib, a small ottoman or a kitchen corner can cost the same as a full-fledged double bed in a budget finish, this paradox is caused by the large amount of manual work.
I am glad that you can actually make a carriage tie with your own hands, and for this you do not need to have sky-high professionalism and expensive tools; if desired, even a novice craftsman can do such work. But first you need to decide on the type of finish; there are 3 options:
| Illustrations | Recommendations |
| Diamond or wedge screed. The pattern consists of a number of identical rhombuses.
| |
| Square screed . As the name suggests, the ornament here has the shape of a square. It is easier to work with figures of the correct shape, so a square is considered the best option for an amateur. | |
| Ornament with diverse geometry . This section includes the arrangement of furniture with complex, rounded geometry and beds with a figured headboard. Not every master undertakes such work and there is nothing for an amateur to do here. |
Making a template
The success of the event as a whole will largely depend on the correctness of the pattern, so care and accuracy are important when making it.
For the template, take a sheet of cardboard that matches the dimensions of the finished product. The easiest way is to draw a square marking of standard sizes 10x10 cm.
To obtain such markings, you need to apply marks along the length and width every 10 cm using a marker and tape measure, then draw horizontal and vertical lines
When choosing the geometry and size of figures, it is important to maintain proportional compliance
To obtain a geometric pattern in the form of a rhombus, you can use a surface marked into squares. In each square you need to draw its diagonals.
The intersections of the diagonals of the squares and the vertices are marked with a felt-tip pen so that the required geometric figure is obtained. Trace the resulting diamonds with a marker or felt-tip pen.
Holes are cut out at the tops of the diamonds through which buttons or furniture nails will be attached in the future.
Carriage screed technology
At first glance, the carriage screed technology is elementary. But like any labor process, it hides a lot of nuances, and the advice of furniture makers can be very useful:
Start work with a plan-drawing. The dimensions of the product provide information about the need for material, and it is better to take it with a reserve. If the screed is being made for the first time, then it would not be amiss to make a small banquette, upholstery of a chair or bench, and even a sofa cushion - experience will reveal all the mistakes. The size of the first item should not be chosen on a grand scale - 0.5 * 1.0 m is enough.
The screed is performed with considerable mechanical effort, and the base (plywood, less often thick cardboard) must be strong. The lining layer must also be durable, but at the same time elastic and soft. It is difficult to select the thickness of the required base by eye; everything is revealed in the work. A sample will always help you determine the stitching interval and the thickness of the lining layers.
In order for the marking on the foam sheet to be accurate, you must first mark a sheet of cardboard similar in size to the panel being lined.
A foam pad is glued to the rigid base using a special composition. Glue in aerosol cans is much more convenient. Holes should be drilled in a glued piece of plywood and foam rubber only after the glue has completely dried.
Fabric for carriage screed
Covering fabrics are selected according to the criteria of strength and density. Thin materials and plain weave can present an unpleasant surprise - at local points of puncture of the fabric and future fastening with furniture nails, tears and tracks are possible, the fabric “creeps”. For the same reason, knitwear is not suitable. The overall impression and reliability of the product depends on the quality of the finishing cladding. Plain fabrics are a classic for carriage ties, but small patterns, stripes and textured fabrics are also interesting. The main thing is that the fastening step matches the drawing. But choosing printed upholstery is a rarity when it comes to making carriage ties.
Buttons for carriage ties
The button for the tie can be figured, not necessarily plain with upholstery; there are options with rhinestones and flower decor, with precious stones and coins. Screed fastening details are chosen in harmony with the idea of the interior. Carriage ties are available in various styles, and with a skillful approach they can decorate even a strict or high-tech style.
Lining for carriage screed
Often, thermal insulation made of foamed polyethylene is placed under the foam rubber sheet for strength and deep relief of the product. Furniture padding polyester is also suitable; such upholstery turns out to be exceptionally delicate and soft, and at the same time with a clearly defined high relief.
Completion of work on carriage screed
Before fixing the upholstery to the base, the materials are carefully smoothed, each fold is formed separately. The work is painstaking and requires accuracy, but otherwise a beautiful and high-quality screed cannot be completed. The slightest misalignment will be difficult to eliminate, and deformations, barely noticeable at first, usually appear during the use of the upholstery. During operation, each button is recessed into the base to the same height, with control. The geometry of the puff pattern must not be violated, otherwise the finishing will cause a feeling of sloppiness.
What kind of fabric is used for the carriage tie?
The choice of material for the carriage tie is key. It is worth considering that not every type of textile is suitable for such a design.
Therefore, when choosing a particular fabric, take into account the following features:
- the material should be quite dense, because during work the master pulls it tightly, and due to constant pressure the thin fabric will quickly become unusable;
- it is advisable to choose only one-color fabric or with a large ornament, because any small pattern will be hidden in the folds, and this, in turn, does not look very aesthetically pleasing;
- It is not recommended to save on material, because decorating the carriage cloth requires a lot of effort from the master and it will be a shame if it breaks after a few weeks.
Table No. 2. The most suitable materials for creating a carriage screed
| View, illustration | Description |
| Chenille | This is a natural fabric with good wear resistance. |
| Flock | An artificial material that has a velvety texture. Its main advantage is the presence of a huge variety of shades. |
| Jacquard | Typically, such fabric has large patterns that will look best in a screed. The material itself looks luxurious. As many craftsmen note, you can work with it only if you have the appropriate skills, because you will need to correctly calculate the locations of the ties so as not to spoil the design. |
| Velours | This material, like folk, has a texture reminiscent of velvet. It has a higher cost, but is also soft, making it easier to pull. |
| Leather | Both natural and artificial leather are used for carriage screeds. The second option has a budget cost, but is less wear-resistant. This is an ideal option for this technique, because leather is the easiest way to form an even pattern. Beginners are advised to pay attention to eco-leather; it has a low cost but is of good quality. |
Work order
A sheet of foam rubber is glued onto the prepared base panel. The glue is applied in several layers both to the base and to the elastic lining. Typically, foam rubber sticks together quickly enough, but for the glue to dry completely, it is better to leave it for 5-6 hours. If several layers of lining are provided, each subsequent layer is glued only after the previous one has completely dried. After the foam sheet is completely glued, a cardboard template with a geometric pattern and holes is placed on the structure, and the holes on the template are drawn with a felt-tip pen or marker. Holes are cut in the marked places using a drill with a special Zifenbor attachment. On the plywood sheet, mark the points for the holes that coincide with those on the lining. This can be done using the same cardboard template. Holes are also made in the plywood sheet using a drill, but of a smaller diameter. It should allow you to insert a crochet hook. The diameter of such holes is comparable to the thickness of a match. After cutting the holes, a padding polyester lining is glued onto the foam sheet. Holes are also cut in it, coinciding with the previous layer. The resulting structure is covered with upholstery. It is attached to the plywood with a stapler along the outer edges on all sides. The upholstery is pulled smoothly and evenly so that it does not compress the foam-sintepon layer
It is important not to overtighten the fabric to avoid tearing it later. Hooks are inserted into all holes and their edges are brought out through small holes in the plywood sheet. After removing the hooks, cords (threads) of the required thickness are attached to them. On the front side of the structure, buttons are attached to each hook. The cords or threads are pulled from the wrong side, pressing in the upholstery fabric. It is necessary to ensure that the buttons are installed at the same depth, and the upholstery is dented evenly
The folds are formed by hand. On the reverse side of the structure, the cords are secured with a stapler. For stable fastening, it is better to choose a zigzag option.
When using it, time and labor costs are reduced several times. The order of work, in this case, is as follows:
- A base is prepared from sheet material, given the desired shape and sanded.
- Foam rubber and padding polyester are glued to the base using high-quality glue.
- Holes are made in the foam-sintepon layer.
- Upholstery material is attached on one side.
- The attachment points are marked on it.
- Using a gun, holes are punched and buttons are inserted along with a holder securing them on the back side.
When working with an air gun, it is enough to choose the right consumables and follow the instructions for use.
Capitone with the use of special carnations provides additional opportunities for decoration. Carnations with brass and bronze caps decorated with rhinestones will add originality and sophistication.
To finish capitonné using nails, you can choose the following work option:
- Prepare the base, glue foam rubber and padding polyester.
- Mark the nail locations using a template.
- To ensure durability of the fastening and to avoid tears in the fabric, stretchers are used between the nails of the same material as the upholstery.
- Mark the attachment points on the upholstery.
- Attach the upholstery cover.
- Carefully drive in the nails along with the stretch marks between them.
Where is this type of screed used?
Today, carriage screed has conquered interiors all over the world; it is used to decorate walls, armchairs, headboards, all kinds of poufs and couches. Its classic look will complement any modern design style.
It is not difficult to make, but it requires enough strength and dexterity to tighten the buttons or hammer in special nails, which, when pressing the foam rubber, create an interesting geometric pattern, most often square, triangular or diamond-shaped.
If you want to decorate a wall or piece of furniture in this way, practice first. If you ruin a small piece of plywood, there won’t be much harm, but you will understand the principle of such a craft and gain practical experience.
Carriage screed - stages of work
First of all, the base is made to the required dimensions. This is done with a jigsaw or circular saw.
Then the plywood is marked using a strip and a marker. Depending on the width of the diamonds, dots are drawn along the long edges every 10 or 15 cm.
Opposite marks are connected by lines indented by one division so that they take a running start. Holes are drilled at their intersections.
At the same time, a full-size stencil is made from cardboard. You will need it later. Next, glue is applied to the entire surface using a roller and foam rubber is applied. Do not press it too hard so that it does not become saturated with the fixing compound - this will put an end to your work.
After drying, dots are also made on it with a pencil (the ink of the marker sometimes appears on the fabric). Using a Zifendorf nozzle, they drill holes the size of your buttons into the filler.
On top, stretching it very carefully (invite someone from your family to help), glue the padding polyester.
The most crucial moment is marking the material. On the cut, an indentation is made from the place of the first tightening to the edge of the base and another plus of 75 millimeters.
Expert opinion Maria Vasilievna Mikhailova Manager of a furniture store. Knows everything about comfort and interior design
A stencil is placed on the back of the fabric and dots are made with it. A piece of thread is threaded into each (through two punctures so that the material can be pulled to the plywood).
Work very carefully at this stage, especially if you have chosen thin, delicate textiles. The first row is crocheted through the plywood and each loop is nailed from the inside with a stapler.
By the way, take only stainless steel brackets for it. Upon completion of the first row, proceed to the next and so on.
The first row is crocheted through the plywood and each loop is nailed from the inside with a stapler. By the way, take only stainless steel brackets for it. Upon completion of the first row, proceed to the next and so on.
If you carried out all the manipulations correctly, then in the end you will get a beautiful surface with neat folds
It is important to work slowly and meticulously, otherwise it is difficult to avoid distortion and defects
Work always begins from the middle of the future composition - this approach will ensure uniform stretching of the material and eliminate excessive constriction. Only then will the entire product look as elegant as possible.
Diamond-shaped folds are best smoothed out with a stick or knitting needle after a whole row has been formed. Later this will no longer be possible. After this comes the turn of buttons. They are installed before the formation of end folds occurs. Next, the edge of the material is nailed to the plywood with a stapler. The corners are fixed last.
The described option is quite simple to implement, but looks extremely attractive from an aesthetic point of view. You can see from your own experience that the most time and effort is spent on the preparatory stage. Completing work is an easy task, not without its pleasure.
A good master class on carriage screed is shown in this video:
Step-by-step instructions for carriage screed
After studying some of the intricacies of the carriage screed, you can begin work on surface cladding. Today we will look at the steps of finishing a panel with a solid canvas, because this is the most popular and convenient method.
Cladding using the capitonné technique using a single piece of fabric
Step one: first you need to attach the foam rubber to the plywood base. For this purpose, we use glue, but the use of other techniques is also permitted.
We fix the soft part on the base
Step two: on top of the foam rubber you need to put a pattern with markings where all the holes are marked, as in the preliminary diagram. The cardboard sheet should be held well, so this activity will require the help of another person. Then you need to circle the round holes using a textile marker.
We apply the pattern to the foam rubber
Step three: then you need to make holes in the foam rubber exactly according to the markings using a screwdriver and a special nozzle. Next, you need to make holes in the wood through the same recesses. They will be needed to tighten the fasteners.
Making indentations in the soft part
You can do it another way; to do this, mark the plywood before gluing the foam rubber. It is necessary to mark the points for fixing the buttons on it. Then holes for fasteners should be made at these points.
We make markings on the plywood. On top of this base you can attach foam rubber
Step four: then you will need to pierce the foam through the base using sharp nails. In these places it is necessary to leave marks for attaching buttons. After which the nails should be removed and holes should be made in the foam rubber using the same nozzle.
We pierce the foam right through
Step five: the next step is to apply diamond markings to the surface. In this case, their size will be 18x12 centimeters. In order not to make a mistake with the markings, it is advisable to prepare a diamond model from cardboard.
Diamond model for marking foam rubber
Step six: Next, you need to mark the upholstery fabric from the inside out. In this case, you should take a larger diamond model, taking into account the formation of the relief.
Diamond layout
Step seven: you need to once again check the accuracy of the markings. After all, any mistake will lead to a crooked screed.
It is necessary to check the correctness of the markings
Step eight: Next, you need to make punctures along the marked points (use an awl for this). Dense threads will pass through them to secure the buttons.
It is necessary to make punctures in the material
Step nine: when all the holes for fastenings are ready, you need to carefully lay out the material on a soft base. For ease of operation, it is necessary to install the panel in such a way as not to block access to it from the inside. The best solution would be to place it on several chairs.
Placing the panel on a flat surface
Step ten: then you should prepare the threads for fixing the fasteners. In our case, for the purpose of tensioning the material, buttons covered with eco-leather will be used. It is necessary to cut the threads into several parts, exactly according to the number of buttons. The ends of these dense threads must be processed using matches or a lighter. Then the cut parts are bent and tied with a tight knot (it should not fit into the hole).
Threads for fastenings
Step eleven: place the pieces in the holes from the extreme part of the panel from the second line. The thread is threaded into the skin using a needle so that one of its ends is on the wrong side. The other end of the thread should remain on the front side.
We thread the threads through the holes
Step twelve: the end of the thread from the wrong side must be fixed to the plywood base using a furniture stapler. You can make this task easier for yourself and do as shown in the picture - install several screws on the plywood, which are easy to hook threads onto. After which they can be attached with a stapler without any problems.
Securing the cord from the inside out
Step thirteen: other threads must be fixed in the same way, securing them to the previous ones that are in this line.
Alternately fastening threads
Step fourteen: the same actions should be done with all holes. It is important to remember that one edge of the thread should be on the outside.
Leave the edge of the thread on the front side
Step fifteen: the same manipulations must be done with the first line from the edge.
It is necessary to insert the needle into the holes one by one
Step sixteen: after pulling up the row, tensions are formed, from which folds are made.
Forming folds
Step seventeen: during the stretching process, part of the pattern begins to be visible.
The diamond becomes noticeable
Step eighteen: upon completion of the formation of diamonds of one line, you need to secure them with threads through buttons. After obtaining the desired tension depth, you should hook the edge of the thread with a stapler to the plywood.
It is necessary to pass the end of the thread into the button
Step nineteen: upon completion of work on the site, it is important to evaluate the quality of the screed.
Finished finishing area
Step twentieth: after forming the relief in the center, you need to move to the edges. In order to make even folds on the skin, you need to cut the edges.
Cutting the skin along the edges
Step twenty-one: then these cuts are folded to the wrong side, and a normal fold is obtained.
Folding the edges
Step twenty-two: at the end you need to bend all the corners and trim off unnecessary pieces of leather.
Ready screed
Video - Carriage screed on a wall panel
What should the screed be like?
Decorating with a carriage screed is used only if there are funds for it. Still, the fabric, which gives an unusually beautiful look to the interior or any kind of interior, is expensive due to its dense texture and high quality.
In addition, it is not easy to choose, because it needs to be in harmony with the general background of the room and have a pattern of medium brightness.
The color of the fabric for upholstery or any other item in the interior of the room can be absolutely anything.
But the design on it should be neutral, since immediately striking and contrasting images on the upholstery material spoil the appearance of the finished structure.
A carriage screed will look very elegant on furniture upholstered with a plain thick fabric, as proven by the capitonné making master class shown in the video.
Such upholstery material can tear and render the carriage screed unusable. Even the thickness of the elastic lining is of particular importance, because the geometry of the pattern on the fabric will be more embossed and luxurious if the elastic lining is dense.
When choosing carnations or buttons to decorate furniture or the interior with a carriage tie, you need to focus on the volume of the room and its design.
For example, it is best to attach furniture buttons to the upholstery material of a sofa in a large room.
But the most beautiful thing on furniture is decorative nails, which make the room feel luxurious and cozy.
The carriage screed is distinguished not only by its beautiful appearance, but also by its practicality. When decorating the walls with it, you can achieve additional sound insulation of the room.
Surfaces decorated with carriage screed are easy to care for. They acquire a finished look in terms of design and do not require the use of any accessories, which is proven by the presented photos.
Once you have the skill to tighten buttons or hammer in decorative nails, you can begin decorating the walls or headboard.
The finished creative work, which the master talks about in the video, will never cease to please the eye, as it is one of everyone’s favorite timeless classics.
So, carriage screed is used to decorate walls, armchairs, headboards, ottomans and couches. It's not that difficult to make if you practice on something first.
Still, attaching buttons or nails that press the foam layer requires skill.
France is considered the birthplace of the carriage screed. Thus, in a modern interior, walls and various furniture in recreation rooms or bedrooms are decorated. Thanks to this finishing, the ceiling height visually increases and the room acquires an extraordinary style. For this finishing, eco-leather or fabric for upholstery is used. Let's look at step-by-step instructions on how to make a carriage screed yourself.
DIY headboard decoration
A carriage bed is a great addition to any style bedroom. Creating a beautiful headboard yourself is quite possible; for this you need to prepare all some tools and materials. Upholstery fabric, fittings, and other elements are always available and can be easily found in hardware stores.
Material
The first step is to decide on the type of fabric and its shade. When choosing a material, it is recommended to pay attention to the following points:
- The fabric must be strong enough. Thin upholstery material may not withstand the load and after a while begin to tear;
- It is recommended to give preference to plain fabrics. The fact is that a floral print or any other ornament will be partially hidden in the folds characteristic of the capitonné technique. Plain material will look more harmonious and sophisticated;
- You cannot skimp on furniture upholstery material. To make the headboard of the bed truly reliable and last for many years, you will need high-quality fabric. Genuine leather or eco-leather, furniture velvet or other durable luxury material are used;
- To make a headboard using the capitonné technique, you can choose one of the following types of fabrics:
- Jacquard - looks rich, is perfect for folds, holds its shape, has a large pattern;
- Chenille is a natural material characterized by wear resistance;
- Flock - a huge selection of colors, fabric with a small pile;
- Genuine leather is durable and looks luxurious;
- Eco-leather – holds its shape perfectly in folds, is quite soft, wear-resistant;
- Sheet foam rubber with a thickness of at least 5 cm is used as a backing.
Genuine Leather
Eco leather Flock
Jacquard
Chenille
Buttons
Buttons for the carriage tie are selected depending on the design of the room and the style of the piece of furniture itself. A variety of carnations with colored rhinestones or hats decorated with carvings look beautiful. You can even install LEDs, it will be unusual and very impressive.
It is not always possible to match buttons to the color or style of furniture. In this case, you can make them yourself. As an option, cover the buttons with fabric that is similar in tone and texture to the headboard upholstery material.
Buttons come in different types and may differ in color, shape, and size. It is important that they have a metal loop. Such buttons can withstand loads and do not break. Plastic loops are less durable and are not suitable for carriage ties.
Carriage screed and its features
What is a carriage tie
The carriage screed or “capitonné” technique appeared several centuries ago in France. It was used to cover the seats and interior walls of aristocratic carriages, thanks to which they acquired not only comfort and an aesthetic appearance, but also certain insulation and sound insulation.
Later, this technique began to be used not only in vehicles, but also for upholstering furniture - ottomans, sofas, couches and armchairs, bed headboards, as well as simply for interior decoration.
Carriage screed is especially suitable for wall cladding in the bedroom, where it is important to create an atmosphere of peace for proper rest. And even today the carriage screed can be seen not only on upholstered furniture
A similar technology is often used when upholstering doors. And some homeowners decorate the walls of rooms with it, not only giving the room originality, but also protecting it from noise coming from neighbors
Even today, the carriage screed can be seen not only on upholstered furniture. A similar technology is often used when upholstering doors. And some homeowners decorate the walls of rooms with it, not only giving the room originality, but also protecting it from noise coming from neighbors.
An interesting fact is that over the centuries-old history of using such technology, it has not undergone significant changes, which, of course, once again speaks of its perfection and durability. The relief pattern created during its arrangement is particularly diverse - these are rhombuses, squares that have a three-dimensional shape, and triangles are somewhat less common.
Furniture buttons or decorative nails with wide heads act as parts that fix the material on the surface to be finished and give volume to the upholstery. Both buttons and nail heads must be covered with leather or fabric (most often the same as that used for upholstery).
Covering buttons with fabric by hand for a carriage tie.
Professional craftsmen make such metal buttons using a special press. But they can also be made manually by selecting the desired diameter and covering them with fabric or leather.
Any carriage screed is made according to the same principle, but in slightly different ways. Each master chooses from them the one that is more convenient for him to perform. Ultimately, what matters is the end result.
Methods for securing material to the base.
So, cladding using carriage screed technology allows two different approaches:
- The prepared surfaces are sheathed with a solid sheet of material, which is then given the intended relief.
- The lining is made with separate pieces of fabric or leather of certain sizes, cut according to a pattern.
Different materials are used for lining the carriage screed - natural or artificial leather, suede, velor or simply very dense fabric. However, when choosing suede or velor, you must remember that this type of coating will require special and frequent care, since a large amount of dust can accumulate in the fabric pile.
Advantages of carriage screed
The popularity of the carriage screed technique is easily explained by its many advantages. No wonder it hasn’t gone out of fashion for several centuries.
The headboard of the bed is decorated using the carriage screed technique - “capitonné”.
- The voluminous upholstery makes it very comfortable - it’s comfortable to sit or lie on a sofa with such finishing.
- The capitonné surface is easy to care for, even if fabric, rather than traditional leather, was used for covering. It is enough to regularly clean the surfaces with a vacuum cleaner.
- The upholstery is highly durable and durable in use.
- If the outer covering needs to be replaced (wear, stubborn stains, or just plain tired), the fabric or leather is easy to replace while maintaining the soft layer and base. It is possible to replace only individual accidentally damaged areas of the finish.
- The carriage screed technique is, in principle, suitable for decorating any surface.
- Furniture, as well as other surfaces covered in a similar way, give the interior respectability.
- The ability of the finishing to give the walls additional insulation and noise-absorbing qualities is important. This can also be safely attributed to the advantages of this technique.
- If carriage screed is chosen for wall finishing, then their surfaces do not require too careful leveling.
Style Features
Beds with a carriage frame in the interior have the following features:
- The characteristic folds are the most important difference between capitonnes. They are formed between the buttons, forming diamonds or squares of different depths and sizes, which depend on the thickness of the foam;
- Buttons, carnations - come in a wide variety of designs and are also a distinctive feature of the carriage tie;
- Sophistication and elegance - the capitonné technique transforms pieces of furniture due to spectacular folds, expensive material and original buttons. In one room, using a carriage tie, you can arrange several armchairs, chairs and sofas. You can independently choose the material and color of the upholstery that suits the overall design of the room;
- Durability, reliability - such furniture is not difficult to care for, it is durable. Dust can be swept away with a special brush or removed with a vacuum cleaner. If necessary, voluminous upholstery is replaced with new one.
Making buttons
How to make beautiful and reliable buttons? This is probably the most important question in a carriage tie. Despite the fact that ready-made options are now not difficult to buy, it is still often impossible to choose the exact shade.
In this case, you will need to purchase upholstery material with the necessary reserves. When purchasing a base for buttons, you should choose those that have an iron ear - plastic ones break very quickly.
Step-by-step instructions for tightening buttons yourself:
- cut the textile into strips twice as wide as the existing base;
- we cut squares out of them, and they, in turn, turn them into circles;
- after that, small stitches are made along the edges of the shred with a needle and a strong thread folded in half, gradually tightening the edge - eventually the material should wrap around the button;
- The smaller the step, the smoother the fabric will lie.
This process is very painstaking and also takes a lot of time, but undoubtedly the result is worth it. If there are no special problems with finances, then it makes sense to save time by purchasing factory-made universal buttons, the heads of which have a special rim that fastens the fabric.
Where do we start?
Before developing the shape of the frame and starting fastening, you need to decide on the type of upholstery material and the design of the buttons, because this determines how luxurious the furniture will look.
Choice of fabric and buttons
Not every material is suitable for arranging a carriage screed. When the master tightens the sectors, the fabric experiences heavy loads, plus subsequently the upholstery is under constant tension.
| Illustrations | Recommendations |
| Chenille . Wear-resistant fabric belonging to the line of natural fabrics. | |
| Jacquard. The fabric is distinguished by a deliberately large pattern with a claim to luxury. One of the features of jacquard is the easy arrangement of folds.
| |
| Folk . Artificial upholstery fabric with light hairiness. Features a wide range of colors. | |
| Velor . Another representative of the fuzzy fabric community. Velor is more expensive than folk, but the fabric here is softer and easier to work with. | |
| Leather. Previously, fine leather was used to make such furniture, but such material is expensive and now manufacturers have switched to eco-leather. In essence, eco-leather is a high-quality, elastic leatherette that is visually similar to natural leather.
|
Carriage buttons are traditionally considered a classic. The design of the products is very diverse, starting from the base covered with upholstery fabric and ending with rhinestones. A separate niche is occupied by so-called carnations; the latest hit is the use of LEDs.
People who are far from the technology of arranging “Capitone” believe that tightening is done with buttons, but this is a mistake, tightening is done with strong threads, and buttons or nails are inserted at the last stage and have an exclusively decorative function.
Buttons for the carriage tie are selected depending on the design of the furniture.
Plastic buttons are not suitable for these purposes; under constant load they quickly break, so products with a metal eye and base are used for carriage ties. There are plenty of similar products on the market, but it can be difficult to choose the color and texture, so it makes sense to sew the button yourself.
Making your own buttons
| Illustrations | Recommendations |
| Blanks. In a store that sells furniture fittings, you need to buy metal blanks for buttons; take them with a reserve. According to the rules, buttons are covered with the same material from which the furniture will be made. | |
| Cut out the canvas . A circle is cut out of upholstery fabric or leather, the diameter of which is 2 times the diameter of the metal blank. | |
| We sew the perimeter . Then we step back a couple of millimeters from the edge of the circle, take a needle and thread and stitch the workpiece around the perimeter. | |
| Making a button . After stitching the “nickel” around the perimeter, you will get some kind of basket. Insert the workpiece into this basket, then tighten and tie the missing thread. |
Plywood and tools
First you need to prepare all the necessary material and tools, there are many options, we will focus on the traditional one.
- To make a bed headrest, I recommend taking plywood of the “FK” brand with a thickness of 10 mm or more; by the way, for the manufacture of facing slabs with a carriage screed, plywood with a thickness of 6 – 8 mm is sufficient.
To make the headrest of the bed, plywood of the “FK” brand is used.
In order to reduce the cost, some manufacturers try to use chipboard for headrests, I do not advise you to do this, firstly, chipboard is dense, and secondly, furniture staples do not hold well in it. As an option, you can take MDF with a thickness of 12 mm.
- We will make a carriage tie from eco-leather. When purchasing, keep in mind that the canvas is taken at least half a meter larger than plywood, and on all sides around the perimeter. If you make the buttons yourself, then consider the fabric on them as well.
- For the bed, furniture foam rubber 50 mm thick is used.
- Batting or padding polyester.
- Glue for gluing foam rubber to plywood, preferably in an aerosol can.
- Furniture stapler; you can use a mechanical one, but it’s better to use a pneumatic one.
- Thick nylon cord.
- Knife.
- Scissors.
- Drill with 8 mm drill bit.
- Drill attachment "Ziefendorf"
To arrange quilted upholstery, a minimal set of tools is enough.