DIY Iron Throne from Game of Thrones! GAME OF THRONES!
Probably every fan of this fantasy drama imagined himself in the role of his favorite character. And I’m almost 100% sure that everyone thought about what they would look like on the iron throne! Well, admit it, you thought, didn’t you? By the way, what character do you see yourself playing? I'd be interested to know. Maybe it's just me, riding horses and flying dragons in my dreams? I decided to share an idea on how to make a budget “iron throne” with your own hands. Perhaps someone is as crazy a handmaker as I am! In fact, the idea was not spontaneous. I thought for a long time about how to prepare such an interesting, memorable and individual guy for his anniversary?! Actually, I didn’t have to think long about the theme, but how to put it all together and fit into my budget was a little puzzling at first?! First of all, I started looking for information on the Internet, where, by the way, I found a lot of suitable examples. But I’m not a blacksmith to work on metal, and I don’t have a garage to melt plastic. It's time to improvise! I decided to think associatively. What are the swords like? What is the easiest way to make them? The answer came naturally. Fillet! Ceiling plinth according to ours. I decided that this was the ideal option. Then it was up to the frame, although it was necessary to start with it. I took a regular chair. But the back of the chair made it very awkward to attach the swords, so if you have time, it's better to make a more comfortable frame, like just a square box or stool to which you attach the base. By the way, the base to which I attached the swords was made of polystyrene foam. You can, of course, choose polystyrene foam, but it is not strong enough and crumbles very much.
And so, after you have bought the basic materials, you can get to work.
*** List of materials***
2 sheets of polystyrene foam. Ceiling plinth. I had about 20-30 pieces. Each 2m. Tile adhesive. PVA glue. Black acrylic paint. 300ml. Gold paint. (spray paint works great) 1 fl. Oilcloth or newspapers. Old brush.
To your frame (chair, stool) you attach a backrest cut from polystyrene foam. This can be done using liquid nails or tape. It all depends on what material you have. I needed to secure the back to the frame, so I opted for tape.
The sides of the throne were also made of polystyrene foam. After that I started cutting swords from the ceiling plinth. When buying a plinth, you choose the width of your swords. All of mine were the same size except for the main two.
When I bought the paint, I was told that I could choose one defective baseboard as a gift, I chose the most beautiful one!
Making the Iron Throne
Today I will tell you how to use 9 bags of skewers and a piece of wood to make the best gift for a fan of A Song of Ice and Fire and/or Game of Thrones.
The components are simple; you can buy a small wooden chair (without chiseled peaks) at a store selling goods for non-handed creatives:
I had a whole toy bench next to me, so I had to saw off the extra half from it.
Next, after a big banquet, take with you not only unfinished alcohol, but also skewers for canapés. These, in the form of standard swords, are better suited:
We prepare the skewers, bite off the protective bracket from the handle.
The most crucial moment is coming. Using claws and snot from our hands and glue, we begin to create the back of the future iron throne:
We take the last living dragon and melt the Valerian plastic in the flames of its breath.
If you don't have a dragon, a regular candle will do, but be careful when working with fire! The heated skewer bends easily and takes the shape we need:
If the resulting color scheme does not suit you, then you are intolerant! Go to the sept and pray to the Seven. On the way back, buy paint at the store (the ashes of the dead were used here, acrylic dazzling metallics):
The throne is ready, you can begin to rule the Seven Kingdoms!
As I understand it, this is the first of two thrones made from sharpened swords? Looking forward to the next post, subscribed.
ahem, well, personally, the serial interpretation seemed so-so to me... this option is cooler, in my opinion)
Making an iron throne for a child under one year old?
Cool, at first I thought it was all made of nails.
Throne chairs
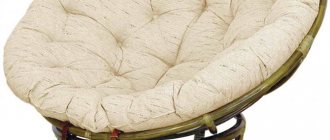
Living room armchairs
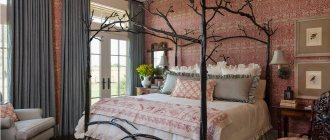
Armchairs are integral functional elements of modern interiors. In addition, such products perfectly complement the design of the room, bringing comfort and coziness to the environment. One of the most interesting and unusual options is the throne chair. Previously, such elements were often used to furnish spacious rooms in expensive houses.
The main feature of the throne chair is its incredibly luxurious design. In comparison with standard options, these products are used in the interior as decorative components. The design of such chairs is quite complex, since the base contains many details that are created by hand. Most often this concerns thread elements.
Working with small parts requires a certain approach, skills and knowledge. It is almost impossible to produce such elements under industrial conditions.
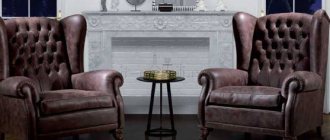
Many modern designers actively use armchairs to create harmonious interiors. Most often this applies to such directions as Rococo and Baroque. This is due to the fact that these styles are the embodiment of pretentiousness and luxury.
The throne chair will fit perfectly into an expensive setting thanks to its unusual design.
When considering the features of a throne chair, you should not lose sight of the advantages of this furniture. The main advantages include:
- the furniture has an expensive and stylish design;
- Expensive materials are used to make chairs;
- The chairs are durable and reliable.
Most often, wood is used as a base for a chair. This is due to the fact that the material lends itself well to processing; its surface can be decorated with carvings. Velvet and leather are used for upholstery. Each of these materials looks quite expensive.
Modern designers offer a modernized version of the throne. It resembles a bean bag chair, but unlike it, there is a frame at the base that allows the product to hold a shape similar to a throne.
In addition to the advantages, there are also disadvantages. The main disadvantage of the throne chair is that it is not suitable for modern interiors. For example, furniture with carvings and velvet upholstery does not fit in with the strict geometric lines of Minimalism.
You need to be very careful when using a throne chair in an interior. In this matter, you need to focus on the style of the room, since there is a risk of completely disrupting the balance in the environment
For example, if the living room is designed in the popular Provence style, a throne chair would not be a very appropriate addition.
As noted above, this furniture is suitable for interiors in Rococo and Baroque styles. Basically, they are used to decorate spacious rooms that can accommodate a large number of large items.
The throne chair will be the perfect complement to artsy and luxurious interior items.
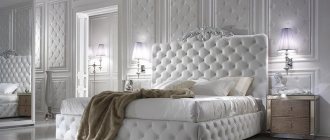
For example, the design of a room can be complemented with a model with white upholstery and gold inserts. A chair decorated with floral patterns would be a good choice. Models in dark shades are best used for a more restrained interior.
If you decide to complement the interior of the room with a throne chair, but did not find a suitable option in the stores, you can make such furniture yourself. Basically, it is created on the basis of a finished wooden chair and complemented with fabric elements. Therefore, first you need to decide on the design of the chair and select the necessary material.
If you have already prepared everything for decorating the chair, you can get to work. It is best to use models with a high back, so that the final version resembles a throne as much as possible in design.
Stages:
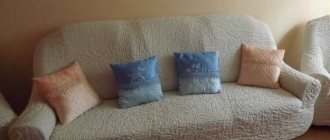
So, first you need to cut out a small rectangle from the filler. This can be standard foam rubber or padding polyester. The piece is fixed on the back of the product, which will provide additional comfort while sitting. Then you need to start creating the case. It is best to use high-quality and “noble” material for these purposes. Organza and velvet are often used to upholster a wooden throne.
Please note that the cover must completely cover the chair. You need to cut a wide strip of fabric and place it around the lower back. You need to tie a bow on the back of the chair
If you want to give the solid wood throne a more majestic look, then use large rhinestones for decoration.
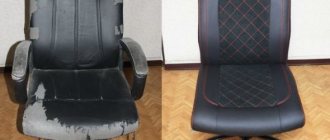
It is worth noting that not only a chair can be used as a frame. An old chair or an office chair with a high back is suitable for this purpose.
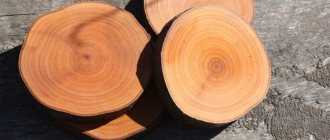
To learn how to make an unusual throne chair out of weirdly shaped wood, watch the following video.
How to do it yourself?
If you decide to complement the interior of the room with a throne chair, but did not find a suitable option in the stores, you can make such furniture yourself.
Basically, it is created on the basis of a finished wooden chair and complemented with fabric elements. Therefore, first you need to decide on the design of the chair and select the necessary material. Throne for the King and Queen
.
To make a throne you will need
:
1. Old children's chair
4. Glue stick or PVA
5. Furniture stapler
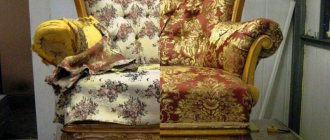
I took an old children's chair and cleaned it of dust and dirt. I covered it with wallpaper (I have vinyl wallpaper, you can use any other wallpaper)
.
I let the glue dry. For the back of the throne
I took a large cardboard (a large shoe
box
, cut out the shape I needed, and covered the same with wallpaper. I used a glue stick, it sticks well
(tested)
. I also cut out 3 parts from cardboard in order to cover the legs of the chair
(1 part in front and 2 on the sides)
. I pasted them with wallpaper. After all the parts had dried, all that remained was to assemble
the throne
a crown
cut out of gold cardboard to the back of the chair . The height of
the throne
turned out to be 1 meter 15 centimeters. I made two
throne
... Used for the fairy tale “Sleeping Beauty”.
Publications on the topic:
The performance based on the Hungarian folk tale “The King's Hares” was prepared as part of the educational and creative Project.
On the eve of the main holiday of all children and adults, our garden was preparing to meet the main character of this celebration, Santa Claus. For Grandfather.
Summary of entertainment for constructing “The Road to the Blue King’s Castle” for children 3–4 years old
The road to the Blue King's castle Objectives To clarify the idea of the road as a structure created for ease of movement in space, etc.
Summary of a music lesson in a preparatory group using the methods of O.P. Radynova) Listening to the music of E. Grieg “In the mountain cave.
Introductory part: children come to the music room to play a glass harmonica and discover that there is water with which they can play.
Summary of direct educational activities in the educational field “Artistic and Aesthetic Development” with children 5-6 years old.
Summary of the quest game “In the Kingdom of the Coal King” for children of the preparatory group
Goal: Early career guidance for older preschoolers to the professions of mining enterprises. Objectives: 1. To form cognitive interest.
Even from an ordinary chair you can make a real throne with your own hands. And its main feature is its chic and catchy design. Such chairs are used as interior decoration, for special events and holidays. Many details of these chairs are made by hand. It can be either bright fabric or carving. Styles with elaborate designs include Baroque and Rococo. Transforming an ordinary chair into an armchair in this style will not be difficult.
Design Features
Computer chairs in the IKEA catalog
A royal chair can be recognized even without knowing its features. In the interior it is used both functionally and as a decorative item. The distinctive features of this model include:
- Impressive dimensions. The seat is wide, buried in a frame of massive carved armrests. The back is quite high and has a complex geometry.
- Curved legs. As a rule, these elements have a small height, but in some cases it can reach 30–40 cm.
- Majestic performance. Lots of carved details and scrollwork, gilded plating, expensive quality fabrics draped to perfection. The ability to emphasize the status of the owner is limited only by the designer’s imagination.
- Expensive materials. Only high-quality, “status” raw materials are used for production.
- High price. Luxurious and unique furniture is an expensive pleasure. Often such models exceed the cost of designer products, especially since mass production of “thrones” is not practiced today.
This furniture can only be used in designs that are characterized by luxury and splendor. An important requirement is also the availability of free space. If these two conditions are not met, the throne chair will look ridiculous.
The throne chair is always made by hand. The demand for such furniture is not so great, besides, the carved parts are so small and elegant that only an experienced craftsman can handle the work.
Majestic performance
Expensive materials
Impressive dimensions
Peculiarities
The main feature of the throne chair is its incredibly luxurious design. In comparison with standard options, these products are used in the interior as decorative components. The design of such chairs is quite complex, since the base contains many details that are created by hand. Most often this concerns thread elements.
Many modern designers actively use armchairs to create harmonious interiors. Most often this applies to such directions as Rococo and Baroque. This is due to the fact that these styles are the embodiment of pretentiousness and luxury.
Historical reference
Options for making a chair with your own hands, diagrams and drawings
The chair as a piece of furniture appeared many centuries ago. At that time, the throne and the chair were essentially the same thing. It is believed that the first throne chairs were used by the Egyptian pharaohs. Such furniture was found in their tombs. At first these were thrones made of wood; they could hardly be called very comfortable.
Gradually, the fashion for thrones captured almost all countries. But initially such furniture could only be found in the homes of rulers; later, majestic chairs in the form of thrones began to appear in the homes of wealthy subjects. Upholstering thrones with fabrics was first invented in France. Royal seats were upholstered in silk, velvet, and tapestry. They also came up with the idea of making soft down pillows for the thrones for greater comfort. Later, the backs and armrests began to be turned into real objects of applied art: craftsmen carved elegant patterns on them.
The 20th century was famous for its practicality, so elaborate thrones disappeared into oblivion at that time. However, nowadays they are back in fashion.
Model selection
Making a chair from wood is a labor-intensive task, but anyone can do it. Having found the best option and some free time, you can get to work. The process itself consists of developing detailed drawings and preparing parts, which will then need to be combined into one whole. All instructions have a standard algorithm of actions, in which they first prepare the parts, make holes for fasteners, fasten the parts with screws and glue, and finally paint the product or varnish it.
The assembly of the chair must take place taking into account the established plan so as not to make a single mistake.
The work of making a wooden chair begins with determining its type. After all, not every type of chair can be made with your own hands; some of them require either mechanized actions or professional skills. After studying all the possible options, you need to choose the one that is right for you. It is unwise to take on a complex drawing right away, because in the end nothing will work out.
Chairs that you can actually make yourself:
- Soft – the main thing here is the frame and upholstery. A correctly assembled product and neat upholstery are the key to success. This product can be placed in any place convenient for you to create a cozy corner for relaxation.
- Folding ones are a more complex option, but more functional. The frame of the product is made in such a way that it can be expanded and folded with some pressure. This chair will be the perfect item for a country trip.
- Kentucky is a simple version of the product, but very original in appearance. To create it, you only need bars and wire.
- Sliding – their design is more complicated than a regular chair, but a beginner can easily handle it. A sliding product will help save space in a small room and can replace a full bed.
- On wheels - the main thing in their design is to install stable wheels that will be able to move both an empty chair and a chair with a person sitting in it. This is a pragmatic option for disabled or elderly people.
- With a high back - these products can be hard or soft, the main thing is that they have a comfortable high back. Making it is no more difficult than a regular chair.
- Rocking chair - these products are not suitable for beginners, but for experienced craftsmen this is a completely doable task. The main thing in the design of the chairs is the arched bases, due to which they will swing.
Step-by-step instructions for manufacturing
The manufacture of the throne will depend on where it will be used. You can consider the manufacturing process of the most common product for New Year's celebrations. For decoration you will need white wallpaper, fabric or cardboard, a ruler, a regular pencil, scissors, glue, foil (metallic or blue), and tinsel. You can also add ready-made New Year's rain to the decorations. The work process itself will not take much time:
- We take thick cardboard, measure the corners and cut them.
- Next, we assemble the “pattern” of the product.
- On the top side of the “pattern” we cut out the corners. The corners will resemble pointed ice floes, as in the fairy tale about the Snow Queen.
- Additionally, you can cut out patterns inside the top of the “pattern”.
- We glue all the pieces of cardboard together and put them on the chair.
- Next, we decorate the back using white wallpaper, cutting out the patterns prepared in advance.
- We glue the back of the product with tape to the chair.
- We decorate the product with tinsel, rain or colored paper. Additionally, you can glue snowflakes or sparkles.
REFERENCE! Glitter paints or acrylics also work well to decorate the back of the throne.
You can also consider another decoration option, a more complex one. It will take about three days to make it, but the result itself will exceed all expectations if you do everything according to the instructions. In this example, we use a regular wooden chair without upholstery. Follow the following sequence of actions:
- We sand the chair with medium-hard sandpaper.
- Fill the holes from the screws if they are visible.
- Prime the surface of the furniture. For simplicity, you can use a diluted solution of PVA glue.
- When the solution has dried, cover the chair with dark brown enamel.
- After the enamel has dried, rub it with wax.
- Next, we cover the surface with two more layers of white enamel.
- We decorate the chair using stencils. You can, for example, use roses or any other flowers. The paint color can also be chosen to suit every taste. Absolutely any color looks beautiful on a white background.
- The final touch is to varnish the chair. Now it looks like a real throne.
We hope that this article will be useful for creating new interior solutions. After all, with the help of the simplest and most inexpensive materials and tools, you can revive any furniture. Even an ordinary chair can easily turn into a throne.
Subscribe to our Social networks
How to make a throne for a princess, or Giving a second life to an old chair
My first job and first master class. Do not judge strictly