Epoxy has unique characteristics that allow you to create aesthetically pleasing and incredibly practical things, from small decorations to floors in an apartment or house. Epoxy resin is also used to fill the countertop.
This coating is not afraid of mechanical and chemical damage and looks really impressive, especially when using decoupage or similar techniques. The entire process will require personal protective equipment and accuracy, but no special tools or special skills are needed. Read more about the filling method in our article.
Advantages and disadvantages of epoxy resin kitchen countertops
Epoxy is unique; it is used to make both miniature jewelry and large objects. The filling does not change volume when it dries, and no bulges or cracks form on the surface. The configuration of the item doesn't matter either. The popularity of the resin is increased by its affordable price.
Advantages of epoxy countertops:
- any material can be poured;
- resistance to the formation of dents, cuts, cracks, chips;
- moisture resistance;
- resistance to cleaning agents;
- you can create an ornament from decorative elements;
- ease of care.
The finished product looks interesting, much like a 3D image.
Main disadvantages:
- the need to maintain proportions when mixing with the hardener, precautions during operation;
- if the temperature is too high, there is a risk of releasing toxins;
- low temperature promotes the formation of “white flakes” at the bottom of the fill;
- low quality of the finished product due to errors in calculating proportions.
The formation of “flakes” is prevented by heating the material to 50-70°C. Toxins are not released if the surface is varnished.
Features of the material
The epoxy countertop filler is two-component and includes a hardener and resin. After hardening, the substance does not decrease in volume and does not become covered with cracks; it perfectly fills small irregularities. The material is resistant to moisture, it cannot be scratched, but it melts when exposed to high temperatures.
Typically, epoxy is an expensive material, but it turns out to be cheap when compared with analogues for treating surfaces with increased stress on abrasion, moisture and mechanical damage. The price of epoxy fill as of 2018 varies between 200 and 800 rubles per kilogram, the wholesale price will be even lower, 180-190 rubles.
When filling the countertop with epoxy, the wood is stabilized: its pores are filled with resin. As a result, the tree becomes invulnerable to ultraviolet radiation, solvents, and organics.
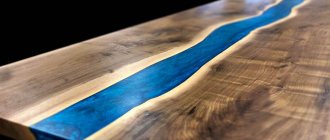
In addition to operational properties, epoxy resin also has decorative advantages. With its help, patterns, decorations, and imitations are created. For example, a table with a “flowing river” pattern. Epoxy resin paints beautifully and can be created in a variety of shapes (the thicker the consistency, the easier), although this is more of a glue than a pour.
Advantages of a countertop coated with epoxy resin:
- After drying, the substance does not shrink.
- After hardening, the surface becomes perfectly smooth, like glass.
- Resistant to damage caused by mechanical impact (dents, chips, cuts).
- It is immune to the effects of moisture and aggressive household cleaning products, therefore it does not require a special selection of care methods.
- Does not degrade under the influence of ultraviolet rays.
- Looks impressive.
Epoxy resin for pouring countertops also has its disadvantages:
- To make a high-quality fill, you will need to strictly adhere to the proportions of the components.
- It is necessary to work in compliance with safety rules as strictly as possible.
- A sharp drop in temperature will lead to the appearance of white flocculent inclusions in the deep layers.
- When heated strongly, the material will release substances that are toxic to the human body.
Advice! Dealing with the last two shortcomings is very simple. To remove white flakes that appear, heat the countertop to +50-60˚ C. To prevent the release of toxins during heating, coat the countertop with an additional protective transparent varnish.
There are several types of countertops made using epoxy:
- Made entirely of resin, without support. This type is most often found in the manufacture of coffee or coffee tables, for which significant loads are not planned.
- Made from boards and coated with epoxy as a protective layer. The role of the base can be played by a board made of any material: solid wood, multiplex, paneled surface, fibreboard, chipboard, OSB, etc. Before pouring, such tabletops are often decorated (with prints, stencil painting, paper elements, according to the decoupage principle, mosaics, flowers, coins, shells - whatever).
- Combined, when resin alternates with fragments of another material, most often wood.
The base can have any shape (square, round), it is important to make the sides of the required height so that after the pouring hardens, the side surfaces of the tabletop are smooth and even.
Advice! When choosing a material for decorating a tabletop, remember that the more embossed the decoration, the thicker the layer of fill will have to be made; it will take longer to dry.
Material properties: how to choose a resin
Epoxy resin is an artificial oligomeric compound that cannot be used in its pure form. To make any product, it is mixed with a hardener. The characteristics of the interior item depend on the type of epoxy and the type of hardener.
Resin selection criteria:
- degree of transparency (important if visual effects are created);
- ability to maintain volume;
- low viscosity level (minimizes the risk of bubble formation);
- a relatively long hardening period (important if patterns are created);
- type of hardening.
There are two types of epoxy compounds: cold-curing and hot-curing. For household use, only the first option is suitable.
How to make a tabletop with your own hands
It’s worth saying right away that this will take a lot of time and effort. Therefore, if you need a table ready for a certain day, you should start making it in advance - 2-3 weeks in advance, by which time the composition will have hardened. Moreover, the product may need to be adjusted.
https://www.youtube.com/zy0lR6aXs3w
Necessary tools and other components of the process:
- epoxy composition;
- boards for frames or temporary formwork;
- polyethylene sheet (also for formwork);
- glue;
- epoxy separator;
- container for preparing the solution;
- construction mixer or any clean stick;
- grinder with attachments from P320 to P2000;
- polishing paste;
- silicone sealant;
- screwdriver;
- drill with a flexible shaft for correction;
- decor as desired.
Additional epoxy and hardener may also be needed for correction.
Cleaning the base
The first thing to do is clean the wood base. If the board has already been used, then you need to carefully remove the layer of varnish and paint, and then degrease and polish it.
Reference . The less unevenness there is on the surface, the lower the risk of bubbles.
Fill boundaries
Now you need to mark the boundaries of the tabletop. To do this, you can make formwork or a frame. In the first case, the side walls of the cured epoxy will be visible, in the second - not.
For the formwork you will need four boards (if the table is square or rectangular), as well as four polyethylene sheets of the same format. Boards and sheets will need to be glued together. Polyethylene sheets are covered on top with a special separator. This is done so that after the tabletop has hardened, the formwork can be easily removed.
Reference . It is best to use polyethylene sheets. The epoxy will stick to the polycarbonate.
Now the boards need to be fastened together very tightly, trying not to leave any gaps. A screwdriver is suitable for this. There will still be microcracks, so all seams (lateral and horizontal) should be coated with silicone sealant.
Preparing the mixture and pouring
Mixing the two components will take 25-40 minutes. The hardener is poured into the resin and mixed smoothly. You can do this by hand or with a mixer.
Reference . At this time, the solution may become slightly cloudy, no need to be alarmed. Small air bubbles will come out during mixing.
Now you can start pouring directly. If the surface of the table is uneven, then you first need to prime it with a thin layer of the substance.
So that the boundaries of the layers are not visible, the second one is poured no later than after 16 hours, but not earlier than after 10. During this time, the lower layer will begin to gel and connect with the upper one at the molecular level. In this way, you can gradually fill the entire height of the countertop. But to save effort, you can pour out the entire composition at once. In this case, there will definitely be no visible boundaries, but there is a risk of air bubbles appearing in the thickness of the material.
You need to pour the epoxy slowly, smoothly filling the entire space. You can shake the tabletop a little to release bubbles.
After this, the liquid solution will have to be left for some time. Depending on the thickness, this could be 24 hours or even a week. Refer to the instructions for the resin.
It is better not to allow more than 7-10 days to harden. Otherwise, the epoxy will stick to the formwork and it will be very difficult to separate them.
Formwork removal and sanding
After the time has passed, the formwork is dismantled. All irregularities and leaks become immediately visible. Remove them with a sander. Both the side walls and the horizontal surface are sanded.
First you should take the P320 or P600 nozzle. You will also need polishing paste. A small amount of paste should be evenly distributed over the entire countertop and polished. If necessary, you can add regular water.
Important ! Make sure that no debris or grains of sand get under the nozzle while sanding. They can scratch the decorative layer.
Polishing
To achieve the best effect, it is worth polishing the surface with the same grinding machine. Only now take the P2000 nozzle. It is fine-grained and makes the epoxy countertop transparent, shiny and perfectly smooth.
Adjustment
If, after hardening, a lot of bubbles have accumulated in the top layer and you want to get rid of them, then you can carry out a correction procedure. For this you will need a drill. With its help, the bubbles are carefully drilled out.
Now you will need to repeat the filling procedure. This layer will be thin.
Important ! When pouring onto an already hardened composition, the boundary between the layers will be clearly visible. This option is suitable if you install a frame around the perimeter and thereby cover the ends of the tabletop.
Decor
A wooden tabletop filled with epoxy resin looks interesting in itself. But for a more original look, you can use additional decor in the form of wooden cuts, shells, beads, coins, dioramas, broken glass, etc.
Important ! When pouring light objects, it is worth placing them on glue, otherwise they will spread under the pressure of the resin.
You can also add dye or glitter to the substance itself. For example, by mixing resin with glitter and blue and pink dyes, you can get a “space” table. This is done when mixing the solution. And if you divide the surface of the base into several parts and fill them all with different colors, the result will be a modern block design.
Tips for use
Epoxy resin is not the most durable material. If such a countertop is intended to serve as a kitchen table, then you will need to take doubly care of it. Hot cookware can start to melt, and porcelain can cause scratches. Therefore, the use of stands in this case is mandatory.
Types of epoxy resin kitchen countertops
A kitchen countertop made of epoxy resin can be without a supporting surface, with a supporting surface, or combined. The first option is not suitable for the kitchen due to its heavy weight. In the second option, the base can be any material, but most often it is wood. The main advantage can be considered the ability to update outdated pieces of furniture.
When using the third option, sections with support alternate with sections without support. The shape of the surfaces does not matter if it is possible to create sides of the required height for pouring.
Advantages and disadvantages
No material can be called absolutely perfect. The user only chooses which advantages are decisive and which disadvantages he is willing to neglect. Epoxy resin is no exception in terms of material for making furniture, in particular countertops. Some of the properties described earlier can be considered advantages, but they may not be so obvious in context, so here is a more specific list of the pros and cons of the resin. They will help the master choose the right brand, because minimizing shortcomings is on the list of his priority tasks.
The polymer does not shrink. In this regard, everything is extremely simple. Whatever brand of resin the master chooses, he will be able to avoid shrinkage, since this unique quality is inherent in all types of epoxy resins, regardless of the hardener. After pouring the resin, due to its fluidity, it forms a smooth surface. Experienced craftsmen advise using more viscous compounds for the production of jewelry and souvenirs. As for filling countertops, preference should be given to material with low viscosity
The resin should penetrate into the corners of the mold, as well as fill all the cavities of the decorative fillers. It is recommended to handle the surface with care, however, it is quite durable. It is not susceptible to chips and cuts, and recommendations are given to reduce risk factors. Epoxy tables can be installed in any room
The resin is resistant to moisture, because in industry it is used as a material for waterproofing. This is a very important property, since furniture in the kitchen experiences temperature changes and high humidity. The transparency of the resin does not decrease even with prolonged exposure to sunlight. Here the compound looks more advantageous compared to plastic, which turns yellow, cloudy and cracks over time. Finally, it is necessary to note the variability of color design. The high degree of adhesion of the polymer allows you to create various design projects, both in terms of filling and color.
Now let's move on to the disadvantages. They also need to be taken into account when choosing a compound.
- One of the requirements is strict adherence to the proportions of the main component and hardener. This drawback will not in any way affect the procedure for selecting a brand of resin, since all manufacturers impose such a requirement on users.
- If modern jewelry resins are safe even in a liquid state, then when working with epoxy for countertops it is necessary to follow safety rules and use protective equipment. Cured resin does not emit toxins and does not harm health.
- When the resin is cooled sharply during its polymerization, suspensions in the form of flakes are formed, so it is necessary to strictly observe the temperature regime. Usually the resin is preheated to 50°C degrees, but if the flakes appear due to the low temperature in the room, then the finished tabletop needs to be heated and cooled in a less intense way.
Do-it-yourself kitchen countertop made of epoxy resin: step-by-step instructions
Before you start making a kitchen countertop from epoxy resin with your own hands, it won’t hurt to familiarize yourself with some important rules:
- You need to work with this material in a well-ventilated area with minimal humidity and a temperature of +22°C;
- It is advisable to cover the floor with film (it is difficult to remove the resin after hardening);
- special clothing and a hat are required (even hair can spoil the appearance of the finished product);
- Do not speed up the drying process with a hairdryer (there is a risk of boiling).
The step-by-step instructions below will make it easier to make your own kitchen countertops from epoxy resin.
Calculation of epoxy resin consumption
The amount of composition depends on the dimensions of the tabletop (length, width, height). The indicators need to be multiplied (this is the volume in liters). No stock required due to no shrinkage.
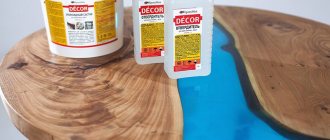
Resin and hardener are sold together, the volume ratio is determined by the manufacturers. You will need a container large enough to pour in the resin and hardener. The ratio of liquids is 10x4.
It is important to prepare epoxy resin correctly
According to professionals, the consumption of epoxy resin per 1 m2 of surface with a layer thickness of 1 mm will be 1.1 liters. Accordingly, if you need to fill 1 square meter with a thickness of 1 cm, then the epoxy consumption will be 11 liters.
Cleaning the base
The term “without basis” is relative. The epoxy compound needs to be poured into something. The base is left or removed.
When using a used table or old boards, they must be thoroughly cleaned (remove varnish, paint), degreased, and sanded (irregularities contribute to the formation of bubbles). New wood is dried, degreased and sanded.
A transparent tabletop is made on glass or without a base. In the first option, the glass must be cleaned and degreased, rubbed with mastic before pouring.
Tabletop boundaries
To create boundaries you need to make a frame or formwork. When using the first option, the epoxy side walls will not be visible (the frame is not removed).
The formwork is made from boards to which polyethylene is glued, covered with a separator. When attaching, it is important not to leave large gaps. Microscopic ones are treated with sealant.
For the glass base, the sides are made from aluminum corners attached to window putty.
Preparing the mixture and pouring
After pouring the hardener into the resin, thorough, smooth mixing is required. If you don't have a mixer, this can be done manually. Don't be alarmed if the solution becomes cloudy. Smoothness is important to ensure that all the bubbles come out.
First, a thin layer of epoxy is poured onto the uneven surface. You can continue pouring after 10-16 hours. If the period is changed, the boundary between layers will be visible.
At the second stage, you can pour out the entire composition. To prevent the formation of bubbles, this should be done slowly (the space should fill smoothly). If bubbles are detected, you can shake the tabletop a little. The hardening time depends on the thickness of the layer. However, you should not keep the finished product in the formwork for too long to avoid the epoxy sticking to the wood.
Formwork removal and sanding
After dismantling the formwork, all irregularities are visible. A grinder is used to remove them from the horizontal surface and sidewalls. During the process, it is important to prevent any debris from getting on the surface that could scratch it.
Polishing
Next, polishing paste is distributed over the surface, and polishing is carried out with the same machine with a P2000 attachment. The tabletop should be smooth, transparent, shiny.
Adjustment
This procedure is required if many bubbles are found in the top layer of the fill. The bubbles are carefully drilled out with a drill, a frame is placed, and the filling procedure is repeated. However, the layer should be minimal. It is important to understand that as a result the boundary between the fills will become clearly visible.
Decor
A wood tabletop after filling with epoxy looks interesting even without decoration. During the mixing process, you can add glitter or paint to change the color. A more original appearance is obtained using glass shards, coins, beads, and shells. All elements must be glued so that they do not move during the pouring process. By dividing the formwork into several parts and pouring a multi-colored mixture, a block design is obtained as in the photo below.
How to choose the right epoxy resin for pouring a countertop
The first thing you need to do is calculate the amount of epoxy to fill the countertop. To do this, we multiply the length and width of the table by the thickness of the fill, and then by the resin density coefficient, K = 1.1.
For example: table width - 45 cm, length - 80 cm, pouring thickness - 2 cm. Therefore, the calculation formula will be: (45 × 80 × 2) × 1.1 = 7.92 kg of resin.
Important! Slowness, attentiveness and adherence to technology are the most important things when working with epoxy resin.
Countertop resin must maintain transparency and density for a long time. Base resins are not suitable for such an operation; they are very thick - air bubbles do not have time to escape before they completely harden. In addition, these varieties are more fragile. The main requirements for epoxy for countertops are low viscosity, maximum transparency and strength . It is also necessary to take into account the fact that different types of resins are needed for one-time or layer-by-layer filling of the tabletop.
It is advisable to study the instructions for mixing the components in advance. It is also important to familiarize yourself with the guidelines for adhering to time limits. The curing time of the composition varies slightly for different types of resins. This is especially important for the technology of filling a form in several layers when creating a three-dimensional image on a tabletop. The next layer can be poured only after the previous one has completely hardened. On average, the process takes about a day. The thickness of the layer varies from 1.5 mm to 6 cm, occasionally a little higher.
A high life expectancy is considered an important parameter. This is the name given to the indicator of the activity of the reaction between a substance and a hardener. Resins with a long lifetime harden longer, but eliminate the appearance of such an effect as boiling (the interaction reaction occurs with the release of energy).
Additional materials also require close attention. It is necessary to think about what to use for the formwork sides in a particular project. The epoxy should not stick to the mold. Release agents, varnishes and polishes for the finished product must be selected carefully. The quality of the finished countertop depends on your responsibility; there are no unimportant details in this matter.
Some useful information for those who are planning to try their hand at working with epoxy resin. When using a construction mixer to mix resin and hardener, do not use high speed. This will lead to the appearance of air bubbles that do not have time to escape before curing and form voids in the layer of frozen compound. It is recommended to pour the mixture several times from one container to another, stirring gently.
If bubbles still form after pouring, the surface can be passed through with a torch. Do not hold the flame in one place for a long time. Thanks to gentle heating, the bubbles will come to the surface.
Interesting! The properties of epoxy make it possible to install luminescent elements and LED strips into the tabletop.
Temperature is important for epoxy. So in a warm room the mixture will become hard faster, and under the influence of extreme cold the hardened resin may delaminate. Epoxy will turn yellow if left near an open fire or in direct sunlight for a long time.
It is recommended to coat the finished frozen product with a protective safe varnish. This will make the tabletop stronger, eliminate the release of harmful toxins, and give the new table a finished look.
Tips for use
Epoxy kitchen countertops are not the most durable. When used as a kitchen worktop, special protection is required. The use of stands should never be forgotten. Porcelain dishes will scratch the surface, a hot pan will melt.
If the table on a wooden base is not large and is not used as a work surface;
- do not take it out of a heated room;
- place closer than 1 m from the fireplace or heating radiator;
- move to a room with humidity above 75%;
- leave in direct sunlight for a long time.
Temperature fluctuations and high humidity have a negative impact on wood. It changes volume (swells, dries), disrupting the structure of the frozen fill.
Maintenance involves regular wiping with a damp soft cloth and immediate wiping dry.
Rules for preparing for pouring
The preparation of the resin composition must be carried out in strict accordance with the instructions, which are always attached to each factory container. The lack of instructions in the kit calls into question the quality of the resin itself.
The proportions that must be observed when mixing play a huge role. The usual ratio of resin to hardener is 10 to 1. In special-purpose formulations, the proportion can vary from 5 to 1 to 20 to 1. Methods for preparing small and large volumes also differ. A large volume should first be warmed up thoroughly in order to reduce the viscosity. It is worth remembering that every 10 degrees Celsius increase in temperature speeds up the polymerization process by a couple of times.
When heating the mixture, you need to constantly monitor its temperature. If you bring the substance to a boil, it will begin to become cloudy and foam. This composition will become unsuitable for work. Using special thinners, the viscosity of the mass can be reduced. However, it should be remembered that even minimal doses of these additives (5-7%) can significantly reduce the adhesive qualities.
Particularly relevant is the problem of purifying a substance from visible impurities before application. Therefore, it is prudent to prevent stains from appearing at all. If this trouble occurs, then it is better to carry out cleaning using a banal mechanical method. But it is not applicable to all surfaces. The use of special solvents may also not ensure the safety of surfaces. Both freezing and heating can also be used. But none of the listed methods gives a 100% guarantee of complete cleaning.
Creative decor ideas
A popular option is a river with filling. Most often, the base is wooden slabs. A solution is poured between them, forming a river between the two banks. The maximum effect is achieved by adding blue dye to the solution.
The slabs can be replaced with saw cuts with unevenness, knots, and cracks. The disadvantages of wood after pouring turn into advantages. Products with a marine theme are also created. The filling is seaweed, pebbles, and shells. Even more original decor is made from photos or other color images. The pictures are glued, filling starts from the center.
The most spectacular luminous models, during the production of which a phosphor is added to the solution (in a ratio of 1x3). In the dark, the areas between the decorative elements create a magical effect.
DIY epoxy resin kitchen countertop: reviews
Reviews note the beauty and originality of epoxy countertops. The situation gets worse when making to order. Not all craftsmen are conscientious, so the tables crack and turn yellow.
The cost of such products is low; costs are required at the stage of purchasing materials. However, when making it yourself, the result is not always positive. Correcting errors requires additional costs. Therefore, this work should be carried out responsibly, follow the recommendations of the epoxy manufacturer, and follow the technology.
Criterias of choice
The wide range of epoxy resins available on the market today often makes it difficult to choose the right material. Experienced craftsmen recommend that when purchasing a synthetic mixture for making countertops, pay attention to the following qualities:
- Transparency of the material. This feature is necessary to create various visual effects.
- Volume conservation. During hardening, the resin should not shrink significantly.
- Low level of viscosity. Very viscous material may leave bubbles after mixing.
- Quite a long curing time. The slower the epoxy mixture hardens, the easier it is to create different patterns.
- Fill layer. When choosing a material, you should consider the size of the countertop. Some epoxy resins are designed for pouring thin products.
The epoxy resin should have a low viscosity level.
It is best to purchase a synthetic composition designed specifically for the manufacture of countertops. This resin has all the characteristics necessary for such a product. It is also necessary to take into account the cost of the material, since a fairly large amount of it will be required to cover the table.