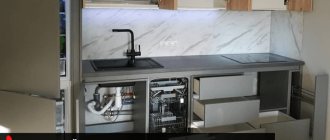
Installing a faucet in the kitchen is a procedure that every person faces when purchasing a new sink. But, even if the sink is not replaced, it is worth considering that the faucet is used dozens of times a day, and that is why it quickly wears out, fails and there is a need to replace it.
Of course, you can use the services of a professional plumber for this, but this entails additional costs. Therefore, it is better to try to handle the installation yourself - we will tell you today how to do it quickly and correctly.
Installing a faucet in the kitchen
How to choose a kitchen faucet?
On sale you can find a huge number of different options for mixers, which differ in design features and materials of manufacture.
Previously, most products were made of durable metal, and they were wear-resistant. Now cheaper and lighter alloys, such as silumin, are often used in production.
The silumin mixer looks nice, but is not reliable
Such designs will definitely not serve you for many years, but at the same time they have a minimal cost. Installing a cheap faucet is dangerous, because it can suddenly leak when the residents are not in the apartment, which is fraught with big problems.
This is why experts recommend purchasing high-quality products, despite the fact that they have a higher price. You can distinguish a reliable mixer by its weight - any brass structures are an order of magnitude heavier than silumin ones.
Table No. 1. The most popular faucet designs.
| View, illustration | Description |
| With one lever (cartridge) | The mixer is designed in such a way that there is a cartridge inside it. When the lever is lifted, the valve opens and tap water flows. The water temperature changes by manually turning the lever to one side. Such a mixer is unsuitable if a flow-through water heater with the ability to change the temperature regime is installed, since it is impossible to smoothly adjust this lever. Otherwise, this type of mixer is convenient for the kitchen, because it can be operated with one hand, which is extremely important during the cooking process. |
| With two valves | This design has been used for a long time, so of all the possible options it is the most practical. In this case, shut-off valves are attached to individual channels, and to supply water you will need to open one of the valves (from either side). It is worth noting that this design consumes much more water compared to the previous option. |
| Sensory | This is the most modern type of design. The sensor is triggered by hand movements, due to which the magnetic valve opens and water is supplied. This is very convenient for the housewife, because she doesn’t have to dirty the tap with dirty hands. However, such a product has two significant disadvantages. The first is high cost. Secondly, the mixer will not function without electricity, and if the lights go out, it will not be possible to turn on the water. |
| This type of faucet will be needed only if the housewife needs to wash a large amount of dishes every day (if she has a large sink). In other cases, its installation will be unprofitable. |
When purchasing a mixer, you should pay attention to the following nuances:
- Sink dimensions. Based on the size of the sink, you should choose the optimal length and height of the tap. So, according to the standard, the stream of water that comes out of the tap should fall into the middle of the sink. The height of the spout should be positioned in such a way that the mixer is comfortable to use. However, the jet cannot be too high, otherwise the water will only splash on the sides along with greasy drops from the dishes.
- The location of the recess for installation and its diameter. To avoid having to enlarge the hole in the sink, you should choose the appropriate flange size. If you have an atypical hole, you will need to purchase an adapter.
- Rotate the tap. The choice of the optimal option will depend on the number of sinks. So, if there is only one sink, then a 90-degree turn is sufficient. If you have two sinks, it is better to choose a mixer with a 180-degree rotation.
- Appearance of the product. For many, this nuance is of great importance, because the mixer must be combined with the sink. If desired, you can purchase chrome or matte products, or to match the color of the sink itself.
The modern market offers faucets to suit any kitchen design
Basic criteria for choosing a kitchen sink
Appearance
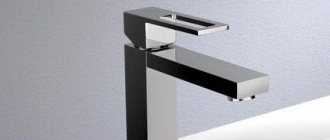
The appearance of the faucet is of great importance when looking for solutions for how to install a faucet in the kitchen, since the plumbing equipment must be selected in accordance with the design style of the kitchen. In specialized stores, mixers are presented in a wide variety. These can be models made in loft, hi-tech, classic and minimalist styles. The shape of the faucets can be chopped or streamlined; in addition, chrome, copper or black products are produced.
As for the cost, it is important to adhere to the rule: the higher the price, the better the quality of the plumbing equipment, including faucets.
What will be needed during the installation of the mixer?
In order to install the mixer, you will need to prepare some devices, materials and components.
If you have already purchased a mixer, then you need to pay attention to the components. After all, not in all cases the length of the hoses (pipes) included in the kit is sufficient. Most often, their standard length is 30 centimeters, but this is not enough. In addition, if this faucet is from a dubious manufacturer, then in most cases the quality of the flexible hoses included is unsatisfactory, so it is better to replace them immediately.
The length of the eyeliner in a metal braid is not always enough
When purchasing such flexible hoses, it is necessary to take into account that their fittings should have different lengths, which will make the structure easier to assemble - because the hexagons will not abut each other.
In addition, you should pay attention to the threaded connection to the water supply. This applies not only to the size of the threaded part, but also to its type (internal or external). Of course, in most cases, hoses with internal connections are used to connect to the pipe. However, another option is also possible if the ball valve already has an outlet with an internal connection.
When choosing liners, it is necessary to take into account the size and type of threaded part
It is important to achieve optimal hose tension. So, the eyeliners should not be under strong tension or, on the contrary, dangle excessively. Indeed, as a result of the constant opening and closing of the valves, the hoses will move, and this, in turn, will lead to wear of the rubber tube that is located inside it. A hole may form in it, causing the liner to leak.
External and internal structure of flexible braided liner
Video - Features of flexible eyeliners
In this case, it is better to purchase a flexible stainless steel corrugation. Of course, such hoses are more expensive and are not so easy to install. However, they will definitely last you for several years because they have good rigidity.
Stainless steel corrugation has good wear resistance
In some cases, it is possible to completely eliminate the installation of such connections, because you can supply water to the mixer using a metal-plastic pipe. To do this, you should buy a set of fittings with press fittings suitable for these pipes.
Fittings with press fittings look like this:
Of course, this method of eyeliner is a little more complicated. However, you won’t have to change the fittings for many years to come.
Option for supplying pipes
In addition, before installing the mixer, we will need to prepare the following tools:
- Wrenches for tightening nuts of different diameters. If it becomes necessary to secure the faucet to the sink with a nut that is too large, it is better to take a universal adjustable wrench.
- Set of different screwdrivers.
- Pliers.
- Pipe wrench (may only be required in some cases).
- If you are installing a faucet on a new sink that does not have a hole for the faucet, then you need to prepare an electric drill with special attachments with a diameter of at least 3.5 centimeters.
- It is important to clearly see all connections during installation, so it is recommended to have a portable flashlight with you.
It is better to change the faucet during daylight hours so that the space under the sink is illuminated
During the work you will need the following materials:
- Sealant for threaded connections or fum tape. Seals will be required only in cases where there is a need to install additional adapters on pipes. For such purposes, it is recommended to purchase a special plumbing tape or use a special sealing paste, so that the connection will definitely not leak.
- If you will be disconnecting the sink, you should purchase silicone sealant.
- If you are replacing an old faucet, some connections may be difficult to unscrew. You can cope with this problem using universal aerosol lubricant WD-40.
Installation of the mixer requires a minimum of tools
When all the devices are ready, you need to start working.
Theoretical knowledge
In most cases, bathrooms already have female end fittings for . If you do the wiring of highways with your own hands, consider the following important points:
- The axes of the hot and cold water supply inlet fittings should be installed at a distance of 15 cm from each other.
- Hot water is supplied from the left, and cold water is supplied from the right.
- It is most convenient to use a mixer installed at a height of 15-20 cm from the bathtub and 60-80 from the floor level. Therefore, it is best in this position.
- Recess the inlet fittings into the wall. This must be done in such a way that when laying the tiles on the wall, the ends of the fittings are located flush with the front side of the ceramic tiles. Thanks to this, you can hide the connection points of the plumbing fixture behind decorative cups.
It is best to use plastic pipes for plumbing. They are cheaper and more practical than steel and cast iron products, and even a person without experience can cope with welding such pipes.
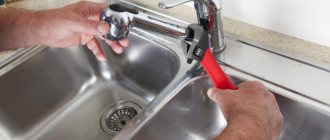
Dismantling the mixer
The dismantling process has the following sequence:
- Before starting work, you will have to stop the water supply. Usually they shut off the valves that are located at the entrance to the house, but in some cases it is possible to shut off only the wiring to this room. Sometimes these valves are located down under the sink and can be quickly turned off. However, it is not recommended to do this, because during the installation process you can accidentally catch the valves with your hand, so it is better to immediately turn off the water supply to the room.
- Now you need to leave the tap open to optimize the pressure in the pipe. All water should be drained from the pipes, so it is recommended to place any suitable container down.
- Next, you need to dismantle the non-working mixer, but, unfortunately, this is not always possible to do quickly.
When dismantling an old faucet, it is important not to damage the surface of the sink
During the work the following difficulties arise:
- the master has to carry out dismantling in a rather uncomfortable position, especially in cases where the sink crashes into the table;
- it is very difficult to unscrew the connections, because the wrench requires more space;
- connections are not always easy to unscrew due to rust.
In this case, the best solution would be to dismantle the sink. There is no need to complicate your work by saving money on purchasing sealant.
It is recommended to dismantle the sink to make it easier to change the faucet
In order to disconnect the sink, you will need to disconnect it from the sewer pipe. It is necessary to remove the flexible corrugation from the sewer pipe. After these steps it will be much easier to remove the old faucet.
You will need to disconnect the stud or lock nut (depending on the design features of the product). If the components are heavily rusted, they must be thoroughly sprayed with aerosol lubricant. However, even this is not always enough, so you can dismantle them using a grinder. The main thing is not to damage the integrity of the shell.
Corroded pipes will have to be cut off
It is necessary to carefully examine the condition of the water pipes, namely the threaded connections where it is planned to install new connections.
In order for the hose to be securely fixed to the pipe, it must be intact without any burrs or chips. Therefore, if the pipe is rusty, it is better to secure a special extension cord in this place. This method will make the connection as strong as possible.
It is recommended to install an extension on the old pipe
First, you need to wind the seal onto the pipe threads, and then strengthen the seal using a special paste. Now you can secure the extension cord itself with a key. You will need to tighten it very tightly.
If there is a need for this, it is recommended to install shut-off valves at this stage. This will greatly simplify further minor repairs, because you will not have to turn off the general water supply.
Plumbing shut off valve
Further actions will differ depending on the installation features:
- if you use metal-plastic, then it makes sense to attach adapters to the pipes;
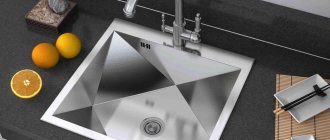
- if the faucet will be fixed to the sink after long-term use, it is recommended to first clean the hole from rust and other contaminants;
- If you purchase a new sink, it is recommended to choose a model with already prepared mounting holes (if they are missing, you will have to make them yourself).
Drill for making holes in the sink
You can quickly make holes in a metal structure using a special tool, which will allow you to prepare recesses of any diameter.
If the sink is made of stone, you will need a special diamond attachment.
Using this attachment you can quickly make a hole in the countertop.
Preparatory work
Before you begin to solve the problem of how to connect the kitchen faucet to the water supply, you must definitely turn off the water supply to your house or apartment. Otherwise, you may encounter serious troubles when installing the mixer. In addition, it is necessary to open the tap at the water collection point to drain the remaining liquid.
Then you can begin to prepare the necessary tools and materials. In most cases, the working set for solving the problem of how to install a faucet in the kitchen consists of the following:
- Screwdrivers of different types. Most often, the work requires a Phillips and flat-head screwdriver.
- A set of socket wrenches and an adjustable wrench.
- A self-contained lighting device, such as a flashlight.
- Sandpaper.
- Flexible hoses.
- Tow.
- A special composition WD-40, which is used to treat stuck compounds
Before assembling the faucet in the kitchen, you need to take care of the new connection to the mixer, this will ensure the tightness and durability of the connections.
Installing a new faucet
As we said earlier, faucets are installed directly to the sink or countertop.
Faucet option with studs
A good mixer always includes nuts, special brackets with recesses for studs, and rubber gaskets of the same shape.
The second version of the mixer is with a clamping nut
This type of faucet is best suited for stainless steel construction. The main thing is that the surface of the sink is not corrugated, otherwise it will be difficult to press the nut tightly.
Nut fastening: step-by-step instructions
Step 1. First of all, we need to fix the rubber gasket at the end of the mixer, where there is a corresponding recess for it.
We fix the seal
Step 2. Now you need to insert the thread of the mixer into the prepared hole in the sink itself.
It is important to ensure that the polymer gasket does not fall out
Step 3. Now you need to fix another gasket from below. It is usually included as standard.
We fix the seal at the bottom
Step 4. Next, tighten the nut. There is a wide part at its end, thanks to which it is pressed as tightly as possible.
The nut must be securely fastened
Step 5: Next we will need to use an adjustable wrench to tighten the nut. It should be secured so tightly that the mixer cannot be moved. At this stage, it is important to calculate the correct direction of the tap - now you can still adjust the position of the mixer.
Securely fasten the nut
Step 6. Now you need to install flexible connections.
First of all, fix the eyeliner with a shortened fitting
Here you no longer need to use any additional seals, because the fitting already has rubber gaskets, thanks to which the fastening will be airtight. In this case, it is necessary to tighten it tightly, but do not overdo it, otherwise the gasket will become unusable.
Using the same principle, we tighten the eyeliner with a long fitting.
Now you need to install the sink in place.
Stud fastening: step-by-step instructions
The main feature of this method is that all flexible hoses are fixed before the tap is installed, otherwise they will not be able to be properly secured.
Step 1. First, we need to unscrew the nuts, after which they should be fixed at the bottom of the mixer. You can quickly tighten them using a screwdriver - in this case, it is not recommended to tighten the studs too tightly.
This is what the mixer should look like after installing the studs
Step 2. Now you need to insert flexible hoses into the prepared hole so that the fittings are on top. As in the previous case, the short and long fittings should be secured. Next it’s time to start installing the mixer.
Installing the structure in the recess
Step 3. You need to attach a polymer gasket to the studs, and then a metal plate, which is included in the package. Now the nuts are fixed to the studs and screwed.
Now use a wrench to secure the nuts as tightly as possible.
This is what the bottom of the system should look like after installation is complete.
It is important to pay attention that there are no gaps left near the mixer. This usually happens if the hole is too wide.
Now all that remains is to return the sink to its place.
Video - Installing a faucet on a sink
Production of sanitary devices: requirements for materials
Water is a universal solvent and upon contact with almost any object, impurities are formed. This is especially true for liquids with high temperatures; it is widely known that this increases the intensity of chemical reactions.
Therefore, even at the product development stage, the use of exceptionally high quality materials is envisaged. The development of special alloys is carried out in accordance with regulatory documents.
The Federal Republic of Germany has developed the DIN 50930-6 standard, which implements the provisions of the EDWD (European Drinking Water Directive). This document sets out the requirements for metals used in the production of products such as Grohe kitchen faucets and other fittings. To produce products that come into contact with drinking water, the company's factories use bronze and brass.
Kitchen faucet from Grohe
In order to reduce the content of heavy metal impurities, the requirements for alloys in terms of nickel and lead content have been tightened. As for non-metallic materials in contact with liquid, their characteristics are regulated by no less stringent requirements of the relevant standards.
In addition to raw materials, production processes at the company’s enterprises are also certified.
Elegant high-tech faucet
Connecting communications and checking leaks
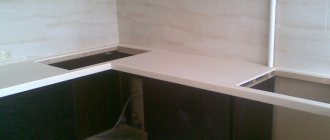
It should be noted that if you had to dismantle the sink to install a new faucet, it should be attached to the countertop or separate cabinet using silicone sealant.
Particular attention must be paid to attaching the sink to the countertop to avoid leaks. You can read more about sink installation methods in our special article.
Fixing the sink
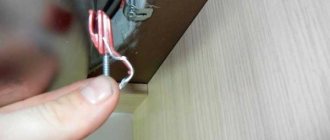
Now all the connections should be connected to the water supply. It is not recommended to do this too hard, because this can also damage the gaskets. It is enough to securely secure the fastenings with a key.
When connecting hoses, do not tighten the fasteners too much.
It will be much more difficult to do this work in the case of metal-plastic pipes. To begin with, you will need to prepare them, decide on the length and bend, and then secure them in the fittings.
In addition, it is necessary to connect the sink to the sewer pipe and reinstall the siphon with a corrugated pipe. Next, when connecting for the first time, you will need to carefully inspect all connections to eliminate the possibility of leakage. This happens when the installation sequence is violated.
Be sure to check the operation of the new faucet without putting the tools away
As you can see, even a novice master can cope with installing the mixer. It is only important to adhere to all points of the instructions and not to tighten the hose fastenings too tightly. In any case, upon completion of installation, it is necessary to check the functionality of the system.
Company's own technologies
In the manufacture of sanitary fittings for the kitchen, German engineers developed a number of interesting solutions. Thus, the Grohe Eurosmart faucet, in addition to its original appearance, has a proprietary StarLight® coating.
The surface of the product is not only resistant to moisture and detergents, but practically no deposits form on it. The faucet retains its appearance for a long time.
The cartridge used in the product is also unique; it is made from ceramics. The material has the highest degree of chemical inertness towards water. The technology was developed by the company’s specialists and patented by them under their own name SilkMove®.
Grohe Euroeco 32752000 tap – high quality
No less interesting is another product from the company labeled Grohe Euroeco 32752000. This mixer has a number of extremely useful properties. The tall water spout can be rotated in a full circle.
The cartridge allows for smooth adjustment of water flow and temperature by operating one single lever. The relatively low price makes the product accessible to many.
Schematic representation of the model in question
All products of this German company supplied to our country are manufactured in accordance with European quality standards. They are designed for long-term operation without significant changes in consumer properties.
The delivery set contains everything necessary for installation, which can be done with your own hands without the involvement of personnel from housing maintenance organizations.
As practice shows, the owner is always able to do this simple work better than hired specialists. Quality Grohe kitchen taps are recommended for their intended use.
Installation is simple, and further operation of such products will satisfy any consumer with its simplicity and practicality.
Did you like the article? Subscribe to our Yandex.Zen channel
Great article 0