A single-lever, or as it is also called a joystick, mixer confidently takes the place of obsolete valve devices. It is simple, easy to use and quite reliable. You can repair it yourself, without turning to a plumber for help.
After reading the article we presented, you will be able to repair a single-lever mixer with your own hands. We have listed all types of breakdowns typical for this type of plumbing fixtures. We describe in detail how to fix breakdowns. Taking into account our recommendations, you can easily repair a device with one lever.
Advantages of a single lever mixer
Like any mechanism, the mixer sometimes breaks down. The failure of a plumbing fixture in the bathroom or kitchen is the most common breakdown, which is impossible not to notice - puddles on the floor and the irritating sounds of falling drops that do not stop day or night will not leave anyone indifferent.
The above troubles can be eliminated quite simply and quickly on your own. Of course, for this you need to at least theoretically become familiar with the internal structure of the mixer, know the reason for its failure and how to eliminate it.
A single-lever mixer is a plumbing fixture that is characterized by its simplicity of design, excellent functionality, durability and, most importantly, ease of operation.
All these issues will be discussed in detail below.
However, first let’s look at the advantages of this plumbing fixture, to which it owes its popularity:
- Simplicity and maintainability. This has already been mentioned above - due to its simplicity, a single-lever mixer lasts a long time, and this period can be extended by timely repairing the product.
- Ease of use. There is no need to turn the valves; just lift the mixer joystick up in one motion to let the water flow. To adjust the temperature, the lever is turned left and right, and the pressure is adjusted by vertical movement of the lever.
- Durability. The simpler the design, the less often it breaks - a single-lever mixer consists of a small number of parts, and if you treat it with care and install a filter on the water, the product is guaranteed to last more than 10 years. Of course, this only applies to high-quality faucets.
On sale you can often find products made from fragile, short-lived, but very cheap silumin. In the best case, such a mixer will work for two years.
It is worth mentioning simple repairs. Simply put, any smart housewife can do a simple repair of a single-lever mixer with her own hands. Basically, it all comes down to a banal replacement of the disk cartridge or ball, depending on the design of the device. But let’s not get ahead of ourselves and consider the internal structure of the mixer.
Image gallery
Photo from
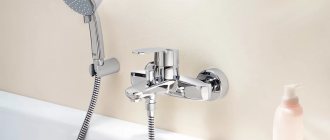
Single lever mixer for bathroom installation
Easy to use device
Originally designed mixer
Brass shut-off and control valves
Let's look at the reasons why it may drip from a kitchen faucet.
There can be several reasons for the formation of leaks:
- Incorrect use. Any equipment has certain operational characteristics. When providing a guarantee for their products, each manufacturer stipulates a number of restrictions, the violation of which leads to accelerated wear and tear. And often it is almost impossible to carry them out or control these parameters.
- Poor workmanship or poor quality materials. Often, when making a certain purchase, a person tries to choose an inexpensive product, trying to use financial resources economically. But often this turns into not just inconvenience, but a direct loss of money when forced to replace a defective product. Particularly unpleasant are cases when a breakdown occurs in the absence of people. When purchasing a faucet for your apartment, it is better to pay for the brand, because this concept also includes such an indicator as product quality. However, the low cost of a popular brand should alert you - most likely, this is a low-quality fake.
- Natural wear and tear associated with long-term use. The taps open and close many times during the day; its locking parts (gaskets, axle boxes, cartridges) work intensively and wear out quickly. Therefore, the best way to avoid leaks is timely forced replacement of quickly wearing components.
- One of the reasons for the breakdown may be poor build quality. The most common errors are misalignment of parts, destruction of seals due to too much tightening. Manufacturing defects cannot be ruled out, so a thorough inspection upon purchase is required.
Device design with one handle
Let us repeat once again: the design of a single-lever mixer is quite simple. There are no traces of constantly breaking crane boxes here.
If you do not take into account the presence of spouts, shower heads, and various types of switches, the device consists of only two main parts: a monolithic metal body and a cartridge with a locking device consisting of two disks or a ball. They are “responsible” for controlling the flow of water and regulating its temperature.
The design of a single-lever cartridge mixer is characterized by simplicity and a minimum of parts: the cartridge is a consumable material, the rest of the parts are permanent, but can be replaced
The cartridge is placed in a housing and securely secured inside with just one nut, which is neatly hidden under a decorative cap. The cartridge control joystick is installed directly on its lever. Everything is simple, no tricky elements, therefore no serious damage.
The internal structure of a single-lever mixer may differ - a disk cartridge and a ball can open/close the water and regulate its temperature. Let's consider the structure of both designs.
Disk version design
As the name implies, inside such a device there is a special cartridge bulb with a locking and adjustment mechanism. In expensive faucets, the cartridge is made of high-quality ceramics; in budget options, it is usually plastic.
An inexpensive cartridge model whose body is made of plastic. The valve of a disc mixer is a pair of discs with holes for cold, hot and mixed water in the cartridge. When the surfaces of both disks are aligned, the flow through the device stops
The cartridge mixer is very easy to use, but those people who are accustomed to a valve mixer will need to practice a little at first, since the joystick turns very easily.
But you get used to the good things quickly: the desired temperature and water pressure can be adjusted with one easy movement. When the disks are partially or completely combined, a stream with the characteristics required by the user is formed.
The cartridge mixer consists of:
- Spout, or, as it is also called, “gander”.
- Switch equipped with a fixing screw.
- Lock nut.
- Actually, the cartridge.
- Housings with a seat for a cartridge.
- Gaskets, studs, nuts - parts to ensure tightness.
The locking mechanism discs are most often made of ceramic, less often of a steel alloy. There are protrusions on the top and holes on the bottom, their shape is complementary to each other. When fully aligned, the projections overlap the holes, resulting in a sealed connection.
When partially blocked, water flows into the spout. The smaller the protrusions of the upper cartridge cover the holes of the lower part of the shutter, the stronger the jet.
A rod is attached to the upper disk, the position of which can be changed to move the plates relative to each other. This way the amount of water passing through the cartridge plates is adjusted.
It should be noted that the plates are ground together very tightly - this is a necessary condition for the normal operation of the mixer. For this reason, cartridge models really “dislike” dirty water with foreign mechanical suspensions, since miniature particles get between the plates and lead to their rapid wear, resulting in premature failure of the shutter.
To extend the life of the product, some manufacturers immediately install a filter for rough water purification in front of the inlet pipe of the mixer at the factory. It is recommended to follow their example: install a good filter on the water supply yourself and safely supply purified water to all plumbing fixtures.
What does a ball mixer consist of?
As in the case of the disk model, the name indicates the design features of the shutter mechanism of the device. In the ball model of the mixer, the water pressure and its temperature are regulated by a special ball.
The part is made of metal, the ball is hollow inside. The outer part is perfectly polished. The ball has three holes - two for cold and hot water, the third for mixed.
The rod is rigidly attached to the part, its other end is attached to the mixer control handle. Thus, when you press the handle, the rod rotates the ball, opens/blocks access to water and regulates the temperature of the stream.
Scheme of a ball mixer. The principle of operation is the same as that of the disk counterpart, but the design differs in some details
Operating a ball mixer is much easier and more convenient than a disk mixer, since the parts are smooth, perfectly adjusted, and the joystick moves very smoothly and softly. The ball is installed in a kind of sleeve cartridge, which can be easily removed from the device in case of repair or replacement.
By analogy with a disk device, a ball mixer is very demanding on water quality and reacts poorly to hard water and high iron content.
Most ball valve leaks occur due to debris getting into the gaps between the ball and the rubber seats that hold it. Installing a water filter in front of the mixer in this case is also considered a mandatory procedure.
What is needed for repair
Before you start repairing a kitchen faucet with your own hands, you need to prepare all the tools and necessary faucet components.
You will need:
- Hex wrench;
- Adjustment key;
- Cutter knife;
- Screwdriver and hammer.
Repairs also require additional materials - dry rags, lubricant. And if the faucet leaks, you will have to buy additional spare parts: a new cartridge or its parts (for a single-lever mixer), sealing rings, a faucet axle (for a two-valve design).
How to fix a ball mixer?
The ball mixer was invented almost half a century ago, and since then its design has essentially not changed. It is very simple and quite reliable - there is nothing to break here.
If any problems arise, most often they are associated either with low-quality materials from which the plumbing fixture is made, or with bad water. As in the case of a disk mixer, the gaskets must be removed, carefully examined for damage, and then either replaced or cleaned of dirt, washed, dried and reinstalled.
The most common problem with a ball valve faucet is poor flow. Occurs most often due to a clogged ball mechanism
For ball valve faucet models, the disassembly and repair process is similar to the one above. The only difference is the position of the ball, which rotates relative to the rubber seats tightly pressed to it. The contact density of the parts is ensured by the water bursting the mechanism.
The lever itself, which transmits movement to the control rod, is removed in the same way as in disk models: you need to uncork the decorative plug, unscrew the screw, remove it, and then remove the mixer lever.
Next, you need to unscrew the clamping nut and remove the washer that is located under it. This opens up access to the ball. The ball itself is easy to remove - you just need to pull the rod.
Internal view of a ball mixer. The ball valve mechanism is located inside a cartridge made in the form of a sleeve. The ball inside it is held by saddles, the strength of the position of the sleeve itself is ensured by a cuff and springs
At this point, disassembling the mixer can be considered complete and we can begin inspecting the parts, replacing them or cleaning them from contaminants.
As noted above, most often the problem consists of deposits of salt and grains of sand on rotating parts and the mixer elements in contact with them. All dirt must be carefully removed and the springs must be inspected - they can also be dirty. In addition, the springs may lose their elasticity and need to be replaced.
The cause of a faucet breakdown may also lie in the ball itself. Ideally, it should be made from high quality stainless steel. In this case, it only needs to be cleaned of dirt.
In fact, manufacturers, especially Chinese ones, skimp on expensive materials and produce parts from low-quality metal. Over time, the surface of such a ball begins to peel off and rust, the water holes become clogged with rust particles and the mixer fails.
In this case, cleaning the surface will not help; the ball will have to be replaced. The old part, as in the case of a disk cartridge, needs to be taken with you to the store for comparison.
You need to reassemble the ball mixer in exactly the reverse order, work very carefully and center the parts. An incorrectly installed element will wear out quickly and may cause another breakdown.
A separate item needs to be mentioned is the most common and, at the same time, insignificant problem - clogging of the mixer aerator. This small part is a regular mesh and is designed to prevent splashes. Over time, the mesh cells become clogged with salt deposits and miniature particles of debris.
Removing the aerator is very simple - you need to unscrew the washer at the end of the spout and pull out the part. If the mesh has not become completely unusable, but is simply clogged, it needs to be cleaned and replaced.
Image gallery
Photo from
Step 1: Unscrewing the aerator from the faucet body
Step 2: Using an adjustable wrench during disassembly
Step 3: Soak the aerator overnight in vinegar
Cleaning the aerator before reinstallation
The aerator can be replaced if you can find an analogue that is suitable in size, or, as a last resort, use a mixer without it.
Another problem is clogging of the flexible mixer connections.
Flexible connections - rather thin tubes - have a small diameter and can easily become clogged. Particularly prone to blockages are the connections between tubes and other parts.
Considering the state of modern water pipes and the quality of city water, there is nothing unusual here. In this case, you need to turn off the water, unscrew the inlets, clean them, inspect them for damage to the threads and install them back.
Tips and tricks
The water supply system in an apartment or private house is a source of increased danger. Therefore, when operating it, it is necessary to adhere to certain rules to avoid problems. Let's list them:
- Have the ability to quickly turn off water from the riser.
- A set of tools for performing repair work should always be at hand.
- It is necessary to keep in the house a set of replaceable components for faucets and mixers that are in use.
- Be prepared to urgently call emergency water services in the event of a serious accident.
- And, of course, you need to know the rules and procedures for independently eliminating an emergency situation.
Getting ready to do our own repairs
Set of tools
Before you learn how to fix a faucet in the kitchen, determine the inventory list:
- keys with six edges and a distributing one;
- knife with a pointed tip;
- various screwdrivers, hammer;
- new spare parts depending on what you will be fixing;
- technological spray for easy separation of components.
Stages of preparation and analysis
Before deciding how to disassemble the faucet in the kitchen, how to change the gasket in the faucet, or start repairing places where there is a leak, be sure to close the outlet to the water supply and drain the remaining moisture (simply open the valve).
The next stage is analysis. It is different for each type.
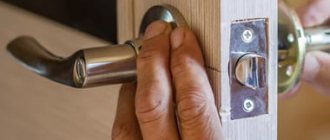
Let's figure out how to disassemble a single-lever kitchen faucet:
- After draining, place a rag in the sink (so that equipment or spare parts do not deform the surface).
- Lifting the plug with a thin screwdriver, look at the type of fastener (3mm hexagon or screwdriver).
- Using a selected tool, loosen the screw and turn it upward to remove the handle. If it doesn’t come out, you’ll have to slowly rock it.
- Lightly remove the decorative nut. If you can’t get it out easily, wet it with vinegar or technical liquid.
- Remove the clamp nut with the cartridge using 27mm, 30mm keys. If that fails, try a head or socket. It is also allowed to add table vinegar or a special solution.
- Remove the cartridge and the analysis is complete.
- If necessary, unscrew the aerator filter with a wrench when 2 beveled edges are found on the body.
- The spout is removed by pulling it towards itself after unscrewing the nut.
When reassembling, do everything in reverse order.
Analysis of two-valve:
- After draining the water and laying out a thick napkin, pick up the plugs on the handle and remove them (with a knife or a thin-tipped screwdriver). There are some designs with threads on these covers, in which case they are unscrewed according to the instructions.
- The mounting screws are turned out with a screwdriver and the valves are removed. If you can’t get it out easily, then insert the key and use pressure as a lever. In the worst case, moisten the thread with citric acid, table vinegar or technical composition. Even if this doesn’t help, break it and install new ones.
- Using a wrench, unscrew the axle boxes and take them out. If it gets stuck, pour in a special anti-scale solution and wait a little. It is important to hold the case with another key wrapped in a towel to avoid damage.
- The aerator is unscrewed according to the instructions using distributing wrenches.
- The spout can be removed by unscrewing the nut and pulling it towards you.
The mechanism is assembled in reverse steps.
Method No. 2. Replacing the stuffing box seal
If the cause of a leaking plumbing faucet is wear of the seal, then you can fix the problem in one of two ways:
- unscrew the stuffing box nut, and then replace the stuffing box itself;
- make the liner yourself from fluoroplastic tape.
Another solution to the issue is to change the oil seal or the entire faucet.
If you do everything correctly and in accordance with our recommendations, the faucet will stop dripping and the valve will turn smoothly.
Video - How to repair a faucet
Guaranteed success
As you can see, we can easily repair our leaky faucet. However, there is one universal condition: we must have the right tools that will not damage the sensitive components of the battery. It will also be important to use only high-quality new gaskets and rings. Remember that even an old, unused gasket can lose its properties, and replacing it will not help.
It will be much better to go to the store when you notice the error. A similar situation applies to replacing a faucet head. It is best to buy a completely new and high-quality product that was manufactured by a trusted manufacturer. Only such actions will give us confidence that the replacement will end in eliminating the fault.
Determining the exact cause of the leak
To find out what kind of kitchen faucet repair needs to be done, first determine the cause at different places of the leak source:
- liquid flows from the spout fastener with the body;
- flows below at the installation site to the water supply pipes or supply hose;
- water oozes from the valve or faucet body below, at the connection with the sink;
- when the handles are blocked, drops or a small stream flow from the gander;
- when the valves are open, there is insignificant pressure or complete absence;
- There are damages on the case that allow moisture to pass through.
You can fix almost all of these breakdowns without a complete replacement and on your own.
Leaking under the sink
Leaks under the sink are caused by a damaged hose or a worn gasket at the point where it is attached to the body. To repair, read how to disassemble a faucet in the kitchen and purchase a whole hose or rubberized sealing rings, and then replace it.
Leakage in spout mounting
It is not uncommon for a rotary tap to run in the fastening of the body and spout. This happens due to wear of the gasket. When correcting defects, you need to replace them, as well as install new rubberized rings for sealing.
Weak water flow
Poor flow in the faucet in kitchens occurs due to clogging of the filtration aerator, breakdown of the valve that functions as a lock, damage to the gaskets or cartridge. First you need to unscrew the aerator and clean it. If the pressure has not increased, then repairs will not be possible without replacing parts.
Seal for a refrigerator, replacing the rubber seal for refrigerator doors, how to change the rubberWhich waffle iron is better to buy: for Viennese, thin, Belgian and thick waffles, rating of the best models
Coffee machine for home: which one to choose, professional advice
Gander leak
A situation often arises when a two-valve type kitchen faucet drips. A gander leak is one of the main operating problems. This occurs due to damage to the gasket when turned on and clogging of the filter, leading to delamination in the metal pipe under strong water pressure. In single-lever mechanisms with a cast body and a non-disassembling ebb, the components completely replace everything, leaving the cartridge.
Other reasons
It happens that the mechanism leaks due to limescale deposits on the parts. To eliminate the leak, disassemble and clean the parts with special products to remove lime salts.
Troubleshooting
Let's consider the sequence of actions for diagnostics:
- First, you need to pinpoint the location of the faucet leak and find out whether the battery leaks when it is turned or unscrewed. If water comes through when the faucets are open, the gasket must be replaced, and if water comes out of the faucet spout when the lever is closed, the head gasket must be replaced.
- Squeaking, difficulty moving and leaking water where the handle meets the battery body, irregular flow or annoying dripping from the spout are signs of damage to the single lever faucet head.
- Uneven drainage from the spout, often causing water to splash around the sink, may indicate a dirty or damaged aerator.
Remember that all plumbing work must be performed with the tap closed. Otherwise, the entire kitchen or bathroom may be flooded with water.
What are the risks when purchasing and using the product?
We talked about repairing this kitchen product. But in addition to this, you need to understand what risks exist during the purchase of a faucet and use associated with the breakdown of the mixer:
- Don't buy cheap products. Often such faucets are made of unknown alloys, and not at all from steel, as they say on the packaging. Such products break down quickly. An important drawback is also the fact that you cannot repair this faucet; you will definitely have to go to a specialized store for a new one. The main thing is not to take the same faucet, hoping that it will work better. Therefore, an important rule: do not save on such things - you risk overpaying even more.
- Buy products only from brands that have been known in the market for a long time. You can ask your friends what kind of faucet they use and how well it works. Also, do not hesitate to ask the advice of a consultant in the store - they will help you choose a product. Often these cranes have an average cost. There is no point in buying an expensive product (solely for the sake of design), but there is also no point in buying a faucet for 700 rubles.
- Along with the tap, purchase and install a special filter that will thoroughly clean the water. This is usually required for those whose water contains grains of sand and other small components.
- Install a device that will help protect the faucet from salts and hardness. At the same time, the sink will become much more attractive in appearance, and the mixer will work much longer.
Buy only quality products
Table No. 2. Names of mixers and their prices.
| № | Mixer name | Price |
| 1 | Lemark Plus Strike | RUB 2,420 |
| 2 | IDDIS Alborg | RUB 2,730 |
| 3 | Rossinka Silvermix | RUB 2,190 |
| 4 | Grohe Concetto | RUB 9,990 |
| 5 | Kaiser Teka | RUB 4,950 |
| 6 | Jacob Delafon Caraf | RUB 27,200 |
| 7 | Omoikiri Tonami-C | RUB 11,790 |
Prices for different types of kitchen faucets
Kitchen faucets
Cleaning the aerator
Lime deposits are added to the water aerator sieve. When they almost completely clog the small mesh, you get nothing from the battery except a thin trickle of water. To avoid this, the aerator should be cleaned several times a month. Simply unscrew it from the spout (some manufacturers add special plastic keys to their batteries). Then clean the aerator by rinsing it under running water and, if the sieve is very rocky, we immerse it in vinegar diluted with water in a 1:1 ratio. Finally screw the aerator on, remembering to install the gasket.
If the lever goes down on its own
Spontaneous lowering of the mixer lever usually tells us that it is broken. When you press the flag, water may flow in a thin stream or not at all. Many people believe that the main reason for this lever behavior is a cartridge failure, but this is not always the case.
All residents of a city apartment or country house use plumbing differently. Some open the taps carefully, others, for example, children, jerk the flag sharply. In the latter case, damage to the inner part of the lever, which fits onto the head of the cartridge, may occur. If damaged, the walls of the square insert diverge to the sides, which leads to a certain amount of free movement of the part; when lifted up, the crane begins to fall.
Note! To determine the breakdown, you need to remove the round decorative insert, unscrew the screw and remove the lever. After this, they look at the inside of the flag: if it is damaged, then install a similar part from the old mixer
If you have high-quality plumbing, lowering of the lever may be caused by wear of the cartridge, which will need to be replaced.