Only those who have the necessary tools and skills to work with them can make a kitchen table from laminated chipboard with their own hands. The standard designs that can be found on sale are almost all of the same type; If you want to buy something original, it won't be cheap. The cost of material, fasteners and paintwork products is much less.
Deciding on the shape and size
During manufacturing, it is necessary to take into account that a kitchen table made of chipboard must accommodate all residents of the house. And you cannot neglect the size of the room in which the table will be installed. If guests come to the house, it is advisable to increase the number of seats. If there are 4 people living in a house, then it is recommended that there is a table in the kitchen that can accommodate 7-9 people (if the size of the room allows this).
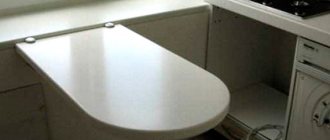
Tabletops can be rectangular, square or round. If you need to accommodate a large number of people, you can choose swing-type structures. If necessary, the design folds and takes up little space.
In order to make a kitchen table from chipboard with your own hands, you will need hand tools:
- Carpenter's pencils.
- Stationery knife.
- Square and rulers 50-100 cm.
- Roulette.
- Rubber and metal hammers.
- Corner and simple clamps.
- Screwdrivers.
- Pliers.
- Hex key.
- Furniture stapler.
The following tools must be used in production:
- Electric drill - it is recommended to use models that have a reverse function. If desired, you can use a screwdriver - it can operate at low speed.
- An electric jigsaw is an indispensable tool that allows you to create parts of original shapes.
- Sander – necessary for cleaning wooden surfaces.
- A hairdryer and iron are needed when gluing the edges of curved and straight ends of elements.
- It is advisable to have a hand-held circular saw available.
- Workbench with a vice.
You will need one of the materials to make a kitchen table:
- Chipboard or laminated chipboard (plain and laminated boards).
- Ordinary edged board.
- Glued board.
- Wooden beam.
When making tables, you can use a combination of 2-3 materials listed in the list.
Other restoration methods
A very popular method is craquelure, this is a special varnish that gives the table the texture of an antique canvas. As it dries, it becomes covered with cracks; craquelure should be used on a tabletop without a pattern.
Updating with mosaics is a great opportunity to make the table beautiful and durable. They resemble frescoes in ancient cathedrals; you can use mosaics with patterns or just broken tiles. Mosaic pieces are glued with glue or liquid nails.
One of the simplest options is to cover the table with self-adhesive film; it comes in a wide variety of designs and has a fairly low cost.
Using epoxy resin will also make the tabletop distinctive and very durable. You can add dried flowers, stones, herbs and other decorative elements to it.
Manufacturing of parts from chipboard
To make a simple chipboard table for the kitchen, you will need to prepare the material and apply markings in this order:
- The tabletop is the largest element of the table, so you need to start there. In the simplest version, it should be rectangular, the corners can be rounded.
- The table legs are made in the shape of a chess rook, with a round cutout located at the bottom. If you wish, you can come up with your own form. Do not forget about only one main condition - all racks should not protrude from under the tabletop. They must also be sustainable. Draw a leg template on thick cardboard.
- Mark the top and bottom rails that connect all the posts together. With the help of these crossbars, the strength of the tabletop and the stability of the entire structure are increased. During manufacturing, it is necessary to take into account that the lower crossbar has a width 2 times greater than the upper one. The lower one can be either straight or wavy.
When marking, keep in mind that all legs should be located approximately 15-20 cm from the edges of the tabletop.
After you have finished marking, you can start cutting out the elements. To do this, follow these steps:
- Place the laminated chipboard sheet on a level table.
- Using an electric jigsaw, you need to cut out the tabletop. To avoid chipping on the reverse side, you need to place a piece of plywood under the cut line.
- Similarly, cut out the remaining elements of the kitchen table. Please note that when working, you should not allow the sheet to sag - this can lead to the saw being jammed and the part being destroyed.
- All elements of the table must be processed with a grinding machine and sandpaper.
Having made all the elements, install the racks with clamps on the tabletop and evaluate the appearance, making adjustments if necessary.
- Press the tape with a heated iron to glue it to the end of the element.
- Compare the width of the tape and the end of the part. Remove excess with a knife.
The tape does not need to be applied to all elements, only to visible areas.
Number of legs
After determining the dimensions of the kitchen product, no less attention should be paid to the number of legs:
- One massive leg is usually equipped with small-sized wood products that fit in a small kitchen. To give the structure rigidity and stability, use a cross-shaped strapping that can withstand increased mechanical loads;
- two legs are used for rectangular or oval tables. They are installed at an equidistant distance from one another. Most often, such stands have an elongated shape from top to bottom. They are comfortable because people sitting at the table do not hit their feet on the wood;
- The most popular are square, rectangular dining tables with four legs . This is the best solution for folding structures. To attach them, you do not need to perform complex calculations, because they are placed around the perimeter of the product. This table is strong, reliable, and very stable. The main thing is to correctly calculate the length, width of the lid and size of the legs during manufacturing. They must be of the same shape so that the furniture stands level and does not wobble during use.
Reliable fastening of the supports is ensured by blind or detachable collets. The latter option is more complex in design and allows for convenient transportation and storage of the product.
Methods for fastening chipboard blanks to each other
Confirmats are used as fasteners. But they require a drill of a special design; select it according to its length and diameter. The hole for the confirmation has a different diameter for the cap and the top. To cover the hole, purchase plastic caps.
When making a kitchen table from chipboard (chipboard), you will also need to use the following types of fasteners:
- Self-tapping screws 4x16 and 4x50.
- Furniture corners 30x30.
- Dowels (wooden) 8x40. You need to drill holes for them in advance.
- The edges are laminated (choose to match the color of your laminated chipboard sheet).
Transformable table made of drawers
You can make a table based on wooden boxes in which fruits and vegetables are transported and stored.
Let's say you found new or vintage drawers, now we'll make a transformable coffee table:
1. Paint or varnish the boxes to your taste, let dry;
2. Lay the drawers on their sides and align them to form a square;
3. Secure the drawers with self-tapping screws.
The upper, flat part of the drawers will become a tabletop, and their side parts can be used to store magazines or teaware. Turn the table over and put it on its end - you get a shelving unit.
Do-it-yourself methods for covering chipboard
After assembling the table, the question arises of how to decorate it. The main condition for the countertop is that it should not absorb liquid. Otherwise, the board will swell and the entire surface will become wavy, which will affect not only its convenience, but also its appearance. If desired, you can laminate the kitchen table from chipboard. It's not difficult to do this with your own hands.
But it's easier to apply paint to the table. To do this you will need a primer, paint and varnish. The first layer must be applied with primer - it will allow the paint to adhere better to the surface. Paint should be applied only after the primer has completely dried.
To make the appearance as attractive as possible, you need to apply 2-3 layers of paint. How to paint a kitchen table made of chipboard - decide for yourself. Choose a color that is dominant in your kitchen. After the paint has dried, you need to apply 1-2 layers of varnish.
What do you do with old furniture?
You can make a table from chipboard yourself. To do this you will need a hammer, tape measure, screws, a screwdriver, a pipe with a diameter of 30 mm, flanges, jokers, a jigsaw, wheels and chipboards 16 mm thick, glue.
Kitchen table restoration
There are many methods that can be used to restore this piece of furniture. If you don't want to buy a new table, then try breathing new life into old furniture.
- Traditional coloring.
- Applying decorative tiles to the countertop. This will make it as wear-resistant as possible; you can place hot dishes on such a table.
- Updating the table using decoupage technique.
- Pasting with a special self-adhesive film.
Preparatory work
To make a table from chipboard with your own hands, you will need to create drawings of each piece of furniture. Part parameters are indicated on the corresponding product diagram. Cut out patterns are applied to the material. Their outline is outlined with a pencil and scratched out with a nail (to prevent the material from chipping when sawing).
At the bottom of the table and tabletop patterns, the outline of the legs is printed. The data is transferred to the details. A center line is drawn. Mark 3 holes 12 mm deep. To do this, use an 8 mm drill. You can control this parameter with regular electrical tape. On the inside of the legs, markings are made for the holes that are necessary to support the shelves.
The ends are finished with a flexible U-shaped profile, the texture of which should match the appearance of the slabs. Experts recommend making a table from chipboard with your own hands using an overlay profile that will wrap around each part on both sides. This does not require a groove for fastening.
Each end is treated with sandpaper. Then the profile is glued to the legs. The last elements are connected to the shelf using a dowel. The profile is placed on the shelf and cut off on the other side. If the glue has dried, its excess is removed.
Corner models
They have two working platforms: the main one - in front of the monitor, the auxiliary one - for papers and a printer. The advantage of using DIY corner computer desks is their compact arrangement. Such models can be used in conditions of shortage of square meters.
Note!
- Do-it-yourself wardrobe: a review of ways and methods on how to build a stylish and original wardrobe (video and 145 photos)
Do-it-yourself furniture restoration - removing chips and scratches, restoring surfaces. Instructions with photos and video tips
- DIY ottoman: how to make it at home. The best ideas, master classes. Photo + video review of beautiful ottomans
Step-by-step instruction
A tabletop and bottom shelf (size 100x50 cm) are cut out of chipboard. The flanges are screwed to the 1st part. An indent of 6-7 cm is made from the smaller side. A parallel line is drawn along the surface. Similar actions are repeated on both sides of the tabletop and shelf. This technique allows you to obtain 4 intersection points into which the flanges are screwed. Then rubber wheels are installed. The next step involves inserting the pipe into the flanges. They are secured with bolts.
To give the furniture stability, adjacent supports are connected to each other by a pipe and a joker. To make the table look attractive, designers recommend installing a shelf. In this case, standard pipes are replaced with special analogues with appropriate fastenings for the shelf. Then the glass of the required size is cut out and inserted into the mounts.
The varnish coating prevents the destruction of the structure, protecting it from moisture.
To apply the substance to furniture you will need sandpaper and remover. If the slabs from which the table was made were previously painted, then the material is cleaned of varnish/paint. To do this, experts recommend using mechanical, thermal or chemical methods. In the latter case, a special substance is applied to the treated coating with a rag. After 10 minutes, the table is wiped with the last material.
The thermal method for removing old paint or varnish involves the use of a hair dryer. The coating is heated, the paint is removed with a rag. The mechanical method is carried out using a grinding machine (low speed) and sandpaper.
Finishing work
The paint and varnish material is applied to the table with a roller or brush. Before using clear varnish, you will need to cover the furniture with several layers of primer or stain. To reduce the consumption of the substance and eliminate minor irregularities, experts advise priming the table.
For this purpose, a composition based on water is used. The surface dries for 12 hours. Then the furniture is varnished and left for 24 hours to dry completely. After the specified time, the product is re-treated with paint and varnish material. A coffee table can be decorated in a variety of ways. Designers recommend that owners of houses and apartments use mosaics. To do this you will need sandpaper, paint, a spatula, and a brush.
The product is first coated with paint. After it dries, glue is applied to those parts of the furniture where the pattern is intended. Mosaic tiles are laid and pressed to the surface. If it is dry, then the seams between the tiles are processed. To do this, use grout, which is subsequently washed off. Before applying it, you will need to cover that part of the table on which finishing work has not yet been completed. A similar technique is performed on the 2nd half of the tabletop. The furniture is ready for use.
When faced with choosing furniture for the kitchen and living room, many craftsmen do not run to the store, but decide to make a table from chipboard according to their own tastes. This method is both faster and relatively cheaper. Even with minimal DIY skills, you can make a homemade table. In addition to the obvious advantages, the table will stand out due to its exclusivity. Everything you need for work can be found in the house.
The process of making furniture with your own hands is filled with pleasant bonuses. The craftsman chooses the design himself, takes into account the layout of the apartment - and there is no need to go to furniture stores with a tape measure in hand! A person fully reveals his own creative potential, reaping a lot of benefits in terms of costs and acquiring new skills. Let's consider the process of making two tables: a large kitchen table and a small coffee table for the living room.
Useful tips
Look for upcycling materials at flea markets. In such places you can find antique doors, windows, and fittings that will form the basis of your craft. Moreover, they will cost mere pennies.
Pallets, boxes and scraps of boards and plywood can often be found on special stands in large hardware stores. The trimmings are subject to write-off, so they are given away free of charge.
You can even use waste material to create tables. For the countertop, you can use old tree stumps, metal or plastic barrels, even bottle caps or drink cans glued together.
Don't be afraid to show your imagination. Frequently visit flea markets and yard sales and let the materials tell you what you can make with them.
How to make a kitchen table from chipboard with your own hands
The kitchen table is the most used of all the furniture in the house. It is at this place that people eat and spend most of their time talking. The table should be visually attractive and durable. Chipboard is an ideal material for kitchen furniture, as its advantages lie in practicality and long service life. In addition, it is a lightweight material that is easy to process and create a full-fledged kitchen table.
Table drawing
You can make a drawing of the table yourself - absolutely according to your own preferences, or use the template we offer.
IMPORTANT! It is imperative to take into account the dimensions for the blanks, both in an independent diagram and using ready-made templates. Otherwise, an opportunity will arise - the finished table will be smaller or larger than the required size.
Let's consider the simplest table in design with a wide but small tabletop, four legs and reinforcing supports.
Necessary tools and supplies
The first step is preparing the necessary tools. For fruitful work you will need:
- drill or screwdriver - it’s better to take small models so that the mounting points look nice;
- circular saw, router and jigsaw;
- auxiliary tools: level, square, tape measure, drills, countersinks;
- set of hex keys;
- hand saw for wood;
- conductor.
IMPORTANT!
The main work on cutting and preparing workpieces is best done outdoors (for example, in a garage). This way the noise and pollution levels will not affect the house.
To assemble a chipboard dining table you will need the following parts:
- 4 side stands (74x46 cm);
- tabletop (95x56 cm);
- support frame for the tabletop (2 pcs. 3x5 cm: length 72 cm, 2 pcs. 30 cm);
- 10 furniture corners;
- bottom spacer (4x3.5 cm: length 74 cm).
All blanks are cut from chipboard sheets. In addition, you will need self-tapping screws to secure all the parts.
ADVICE! Before you start cutting out the parts, it is recommended to draw them out on a sheet of chipboard with a simple pencil. You will get a kind of wooden pattern.
We manufacture components
The tabletop is always cut out first - you need to round the corners, giving it the desired shape using a jigsaw. The second is to assemble the frame for the strength of the tabletop - 4 pieces are joined together, secured with corners or self-tapping screws. The support frame must be positioned exactly in the middle of the table top.
The third will be the side racks:
The second rack is made in the same way.
Assembling the table
Place all parts on a level surface. Assembly also begins from the countertop. You need to retreat 11 cm, drawing horizontal stripes - you will get a square right in the center of the slab. This is where the frame will be located - secure it. Next, you should make marks for the side posts, attaching them in the same way in the center, but to the thrust frame.
After assembly, all that remains is to insert the lower thrust beam to space the legs and secure it using corners. For strengthening, the side racks are screwed once again with self-tapping screws - from the outside of the table top.
It is important to remember that before assembly, all parts must be cleaned and processed - for example, with putty and varnish. Or you can cover it with a special film.
Making a Simple Computer Desk
Let's look at a specific example of how you can make a simple and convenient computer desk with your own hands. In this instruction, the master demonstrates how you can assemble furniture without a single screw, with the exception of fixing door hinges. The table will be made from furniture board.
Materials for production
This is what our table will look like
Step 1. First, you need to purchase all the necessary materials and make the necessary markings of parts on the furniture board according to the drawing, then cut the boards into elements of the required sizes.
Cutting furniture board
Step 2. Now let's see how to make connections between table elements without using self-tapping screws using the example of creating a table drawer. At the end of one of the side parts you need to make 4 holes with a diameter of 8 mm at an equal distance from each other. These holes will be needed to install wooden dowels. The depth of the holes is 3 cm.
Holes are drilled at the end of the part
Step 3. In the drilled holes you need to insert special metal markers for dowels, which have a small spike that can leave a mark on the tree in the right place.
Marker Markers are inserted into the holes
Step 4. Two parts that need to be aligned with each other at right angles must be installed in the way they will be connected later, aligned, and the end of the part into which the markers are inserted must be hit several times with a mallet. On the second part, in places where it comes into contact with the markers, there will be traces of the markers' spikes.
The end of the part must be hit with a mallet.
Step 5. Next, using the marks obtained, you need to drill holes also with a diameter of 8 mm, but of a smaller depth - 1 cm.
Holes are drilled
Step 6. Thus, you will need to make holes for dowels in all parts that require connection to each other.
Holes must be made for all dowels that require connection.
Step 7. Now you can see the process of connecting the parts using dowels. So, you need to pour a little glue into the holes, also lubricate the dowels themselves with glue, insert them into the holes and hammer them deeper with a mallet.
Glue is poured into the holes
The dowels are lubricated. The dowel is inserted into the hole.
Step 8. Next, you need to lubricate the end of the part from the dowel side with glue, align the dowels on one part with the holes on the other and hammer the part. The glue between the elements may come out - this is an indication that there is enough of it for gluing. The remaining glue needs to be removed, and then it is worth tightening the parts to be glued together with clamps, placing an unnecessary piece of wood under them so as not to damage the part itself. You need to leave the parts in this state until the glue dries. The clamps can be removed after 30 minutes.
The end of the part is lubricated
Dowels align with holes Clamps can be removed after 30 minutes
Step 9: The creation of the desk drawer continues. Next, you need to glue the bottom to the glued sides of the box. Using the same principle, you need to install the central shelf in the box and its other parts.
Creating a desk drawer The future drawer The process of making a drawer
Step 10. The box is ready, and you can use the same principle to make a stand for the system unit. This is a design of two side and one bottom part.
Making a stand for the system unit
Step 11. Now you can work on the countertop. It will have a small cutout in the middle. First you need to draw a line for this cutout with a pencil, and then cut it out using a jigsaw.
The cutout line is drawn The cutout is formed Another photo of the process The finished cutout
Step 12. Next, you can connect the tabletop with the drawers and make legs from two scraps of furniture board on the second side. To do this, you need to make exactly the same connections as described above - using dowels and glue, and combine the tabletop and cabinet with drawers and legs.
The same connections are created
The drawer connects to the tabletop
A piece of board is placed under the clamps. Result of the work
Step 13. Then, using the same scheme, you need to attach the shelf for the system unit to the table on the side where the legs are located.
Attaching a shelf for a system unit
The shelf is clamped with clamps
Step 14. Now you need to secure the wooden ties to the back of the table. They will ensure the strength and stability of the table and will not allow it to become loose over time.
Fixing wooden ties
The ties are fixed. Done!
Step 15. This is the design you should get after removing all the clamps and ties.
This is what the finished design looks like
Step 16 Now you can make the door for the drawer. Using a Forstner drill, you need to make recesses for the hinges on the workpiece.
Recesses are created for the hinges. What is a Forstner drill?
Step 17 Next you need to install the door hinges. They can be fastened with self-tapping screws included in the kit with a loop.
Next you need to install the door hinges. The hinges are screwed on with self-tapping screws.
Step 18. Now the door needs to be screwed into place. The main thing is to immediately install it evenly and correctly.
The door is being installed
Screwing the door
Step 19. All uneven edges in the area where the jigsaw work was carried out earlier need to be sanded.
Sanding the edges
Step 20. The table needs to be varnished so that it is more resistant to moisture and retains its original appearance for many years. The varnish can be applied with a brush. After it dries, the table can be used for its intended purpose.
The table is varnished. Ready computer desk.
Video - Making a corner table with your own hands
How to make a coffee table from chipboard
A coffee table is twice as easy to assemble because it is compact and doesn't require much work. Such a table is usually low - at the level of the sofa, or even lower. The simplest scheme is to place a round tabletop on 2 parallel bars. The most convenient, affordable and fast. But to make something more serious, you will need similar tools and components.
Making a drawing of the table
You should make your own measurements and calculations or use a ready-made diagram by simply copying it. The main thing to remember is that even they can be changed to suit you. Be sure to consider the dimensions.
Preparing the ingredients
The coffee table will consist of the following parts:
- tabletop (75 cm by 70 cm);
- 4 planks (46 cm by 10 cm);
- 2 flat shelves (70 cm by 50 cm);
- 4 legs or wheels;
- additionally: firmware, self-tapping screws, plastic corners and material for processing.
Depending on your wishes, there may be just legs or wheels. Or you can combine them by cutting out holes for wheels in the legs - this way the table will be mobile and easy to move.
Table assembly
The tabletop and lower shelves must be cut out yourself. Before work, be sure to sand the sheet, then make pencil markings and cut out the parts.
All end elements should be glued with a decorative edge, after which you can begin assembling the table top, shelves and side strips using corners and self-tapping screws. The next step is attaching the bottom. Further equipment with legs or wheels.
The table is ready, all that remains is to decorate it and check its strength.
Attaching the apron
Cut two more pieces of 5 by 20 cm board, 80 cm long, and two boards of narrower boards equal to the narrow side of the tabletop. The boards must be flush against each other. Apply wood glue to the wide part of the boards and attach them to the edges of the tabletop and screw them in place with self-tapping screws at a 45-degree angle.
The final stage is decoration
The only thing left to do is cover the prepared surface with transparent varnish or decorative film. Before painting, you should also treat the table with impregnation to neutralize the glue. In addition, the table will become moisture resistant. It is better to apply the varnish in two layers. You can also attach an LED strip inside the table as a decoration.
By spending some free time and a little money, you can get a comfortable and unique table. The main thing is not to be afraid of your own mistakes, but to turn failures into the unique charm of furniture. Friends, I decided to share my experience of independently designing and assembling furniture from chipboard. I hope it will be useful to novice furniture DIYers)) The desktop, at least for me, is the most important element of furniture in the house, so it should be as comfortable and functional as possible.
Well, let's go)).
Design.
As usual, the idea was stolen by me on the Internet; I was inspired by this project from a certain Mashstudios (https://iconsumption.ru/note/3725):
I liked the compactness of the design, the lack of legs and the space for placing drawers in the table, because I always don’t have enough of them)
But of course, all this needed to be creatively reworked taking into account your wishes:
1. The table should have a bunch of sockets built in, the more the better - a table lamp, a laptop, a phone - all this requires power. By the way, Mashstudios somehow didn’t take care of this - what does this Apple in the photo power from? 2. The table itself should have as many drawers as possible for all sorts of things that take up space on a regular wide table - papers, notebooks, tools, wires, etc. All this should be closed from the penetration of dust - I don’t know how things are with you, but for me dust settles on surfaces within a week. 3. The presence of a cork panel above the table to attach various things to it that should be in front of your eyes - reminders, work schedules, business cards, etc. Well, like in American thrillers, when detectives get to the maniac’s home, his entire wall is filled with various documents and photos of the victims, and then everything finally becomes clear to them). In short, something like this, only in a good way).
Construction.
We’ve decided on the project, let’s start designing. For design, I use Google SketchUp, I like it for its convenience and ease of use for a beginner - I don’t want to study any professional CAD or furniture editor to get a simple 3D model with dimensions. This is a paid program, but the trial period is usually enough for me)
I made a table from 16 mm thick chipboard, which was cut to my measurements. If you have never designed furniture from chipboard yourself, but want to, then don’t be afraid, do it, I just advise you to pay attention to a few points:
1. Always keep in mind that chipboard parts are edged (an edge is glued to the ends of the parts), which increases their size. The edge comes in 0.5 mm and 2 mm. 2. Cutting companies cut at least 1 sheet of chipboard, usually 2750x1830 mm in size. You don’t have to fill out the sheet completely, but no one will return the money for half the sheet - or they will simply give it to you in the form of scraps, or it will be used to heat them on long winter evenings) Therefore, try to fill the sheet by 90 percent - the cutting machine also requires some indentation from the edges of the sheet. By the way, the table in the end did not take up the entire sheet and I decided to supplement it with a shelf for dumbbells, which I had wanted for a long time. 3. Milling for fittings is relatively expensive, so where you can do without it, it’s better to do without it. For example, in this project it was possible to fasten the top tabletop using so-called “eccentrics” - but milling the grooves for them would increase the cost of cutting by a thousand rubles, so I decided to make do with furniture corners, the total cost of 70 rubles. 3. Sheets come in different thicknesses - 10, 16, 18, 22 mm. If you want to combine chipboards of different thicknesses and colors in a project, keep in mind that there will be separate full sheets for each thickness and color. That is why good factory-made furniture is usually richer in the variety of materials than home-made furniture - due to its mass production, a factory can use several types of them.
In SketchUp it turned out like this:
A table with drawers, a hanging drawer with doors, a shelf above the table for small items, and a shelf for dumbbells on the left.
Opened design for better understanding:
Placement of parts on a chipboard sheet 2750x1830 mm.
After designing, you should have a list of parts with their sizes, quantities and an indication of which ends of the parts need to be edged. Below is a scan of the sheet given to me by the cutting company with such a list. For those interested, it is located in Khabarovsk. Does it properly and on time. https://lamart.ru/
The sheet that is given to the cutters to complete the order (who can guess what the underlines under the dimensions of the parts mean?))):
I made the table 45 cm deep. This may not be enough, but I was always afraid that the fastening of the tabletop to the chipboard on the wall might not hold up and crack. Now, from the feeling of the rigidity of the resulting structure, I can say that it was quite possible to make 50 cm, but not more. Actually, for the same reason of lightening the design, I decided to make the table drawers from 7 mm thick plywood.
Order and pickup.
The order went smoothly, a competent employee quickly entered and calculated everything. They promised to complete the order in ten days and they did it. The only mistake made by the cutters, which I encountered for the first time in several years of cooperation with this company, was that both fronts of the hanging box were not cut correctly and I had to bring them back for correction. Therefore, I advise you to check at least the most important details upon acceptance. Firms, as a rule, never deny their mistakes and correct them, it just takes extra time. Since the largest part was 1200x500 mm, I managed to remove everything myself in my Honda Fit. By the way, the issue of order pickup should also be worked out in advance if the items are large or if you don’t have your own transport - Lamart, for example, does not provide its own delivery services, but they can give you the phone numbers of familiar truck drivers. The cost of cutting with material turned out to be 6,000 rubles. Another total of about 1000 rubles. spent on fittings - roller guides for drawers, sockets, furniture handles. Part of the fittings were purchased from Leroy Merlin (it opened a year ago right next to my house), on the lane. Sports 4, in Bayard. These are construction stores in Khabarovsk.
Assembly.
Assembly took place at home. If you have the opportunity to make all the holes and milling somewhere outside the house, it is better to do so, because no matter how hard you try, there will be a lot of sawdust and dust. A few photos of the most important stages of assembly:
An inverted top of the table top with ribs attached using furniture corners. Roller guides for drawers are also immediately installed:
The reverse side of a chipboard panel attached to the wall. The tabletop, in turn, is attached to the canvas. The fastening is made using metal washers to reduce the likelihood of the confirmat (a special screw for chipboard) “breaking out” under load:
Cables for electrical outlets are laid in channels made with a router. I bought a router a long time ago to carry out renovations in an apartment, but in fact it turned out to be needed very rarely. Now I would rent it from friends or rent it just for the time of work.
Attaching to the wall, installing sockets. The height from the floor of the upper surface of the tabletop was 73 cm, the bottom - 60 cm. For my height (167 cm), the opening for the legs under the tabletop is sufficient; taller people may have problems:
Final look.
Well, here's what happened in the end:
Some acquaintances of little faith had doubts whether this table could withstand more or less heavy weight. Well, of course, it’s still not worth standing on it and doing other things not foreseen on it)). The heaviest thing you can stand on it is a laptop. But just in case, I did a test - a total of 20 kg of weight on the table:
And this is how the shelf for dumbbells turned out:
Conclusion.
Thank you for reading the post to the end. I hope it will be useful to novice furniture makers.)
PS With this post I am opening a section for reviews of my projects in interior design and I will call it, oddly enough) -
Not so long ago, only a good carpenter could make good wooden furniture, and there were very few craftsmen who made interior items from expensive types of wood, cabinet makers.
Chipboard is a material made from wood chips. It is well suited for making a table.
The emergence of such materials as particle boards (chipboards), and especially their laminated version - chipboards, allows you to make a table or cabinet yourself, even without experience. Laminated surfaces can be smooth or have a texture that imitates precious wood.
Having made a table from chipboard or a cabinet with the texture of a valuable type of wood, you can be considered a cabinetmaker.
U-shaped models
Most often these are representatives of professional gaming tables. The side shelves and compartments are filled with equipment, game consoles, auxiliary accessories, and speakers. The disadvantage of using this option is that it takes up quite a lot of space.
There are also more original tables - in the form of a semicircle. However, they are less practical and do not always fit well into the overall interior of the room. The types and sizes of computer desks are selected individually, based on the needs of the owner.
Preparation for production
Laminated chipboard is a material manufactured under industrial conditions. You can try to laminate chipboard with your own hands, but experience shows that it is practically impossible to achieve good quality coating. The last stage of lamination - pressing the coating with a gradual decrease in temperature - turns out to be a difficult task. It is impractical to laminate yourself, especially if you are planning to make only a small chipboard table or coffee table.
In production, high-quality material is selected for the manufacture of laminated chipboards. Slab sizes may vary from manufacturer to manufacturer. A variety of sizes allows you to select the material so that there is less waste when sawing.
The main indicator of slabs for making furniture, especially for children's furniture, is their degree of toxicity.
When choosing chipboard, you need to pay attention to the density of the material.
According to this indicator, chipboard is divided into three classes: E1, E2 and E3. They correspond to the permissible amount of formaldehyde. Only class E1 is suitable for furniture. It is advisable to purchase material from manufacturing companies that are well known in the market for these products.
If the manufacturer is located in one of the Asian countries, then do a “chemical” analysis yourself. Formaldehyde has a very unpleasant odor, and you can smell it already at a distance of 1 m from the bag. A pleasant smell should also arouse suspicion. Perhaps this is an attempt to hide the smell of formaldehyde.
An indicator of strength is the density of the material - the denser, the stronger. In Figure 1 you can clearly see the difference between a dense (left) and not very dense slab. The optimal density is 650-660 kg/m3. It is necessary to inspect the slab from all sides. You can try to press into its end, for example, with a screwdriver. This cannot be done in dense material.
Paper can be used as a covering instead of laminate. Such a fake can be identified by touch: stroke the surface of the plate and feel that it is paper.
Coffee table-window
If you have replaced old wooden windows with plastic ones, do not rush to throw away what is left. An entire window along with a wooden frame will decorate a table in a vintage style.
To make the table more durable, secure a sheet of painted chipboard or several boards fastened together under the tabletop-window.
Screw the legs to the tabletop.
Tools and fasteners
To make furniture you will need the following tools:
To make a table from chipboard, you need a screwdriver, tape measure, building level, hacksaw, jigsaw, self-tapping screws, etc.
- hand tools: pencil, tape measure, ruler (50 and 100 cm), awl, knife, square, hammer (metal and rubber), clamps (regular and angled), screwdriver, pliers, furniture stapler, hex wrench for confirmations;
- an electric drill, preferably with reverse, or a screwdriver, which, unlike a drill, can operate at low speeds;
- a jigsaw will allow you to create an original shape of a part or adjust it to the location;
- belt sander, the constant companion of the jigsaw;
- an iron and a hairdryer will be required for gluing the edges of straight or shaped ends of the slabs;
- hand-held circular saw;
- a simple workbench on which you can install a removable vice.
The main fasteners are confirmations. They greatly simplify the process of assembling furniture. A special drill is required for confirmation. It must have the appropriate length and diameter. The hole prepared for the confirmation must have different diameters for its upper part and cap. Caps are commercially available to cover the fastener head.
Tabletop from the door
An old wooden door can also become a countertop.
File about half of the door.
Paint the tabletop and legs.
Attach the legs to the door using self-tapping screws and metal corners.
Work surfaces made from pallets
Building materials are excellent raw materials for creating home furniture. From pallets you can make benches, shelves for books and, in unusual shapes, tabletops.
A simple model of a pallet structure
An original solution to recycle unnecessary boxes and at the same time create something necessary for the home. The U-shape fits into limited space. You can place the system unit on the left side, and disks and documents on the right. The tabletop is covered with thick glass according to the size of the pallet.
Table with high top in corner
Very often the corner space is the only place where you can put a computer accessory. Knowing the dimensions, it is possible to make it yourself. Use galvanized or water pipes as supports. This table is made high so that it is possible to work, so to speak, “on the go.”
Selecting material for the table
Modern computer desks are made from a wide variety of materials. For independent work, wood and chipboard panels are the most optimal. For decoration and arrangement of auxiliary accessories, you can use plastic and glass inserts.
Second life for a tire
An unusual solution for creating a coffee table can be a base in the form of an old tire.
Firstly, it must be cleaned of dirt, then dried thoroughly; if desired, the tire can be coated with a special compound for additional blackening to refresh the rubber.
The second stage is preparing the base for stability and the table top on top; for this you need to cut two circles from plywood equal to the diameter of the tire, then treat them with varnish or paint.
We fix the resulting sheets of plywood on top and bottom of the tire, using glue or through self-tapping screws. The height of the coffee table can be adjusted by the number of bars fastened together.
You can leave this design in a loft style, without treating it with twine. But to finish, using a glue gun, from the middle of the tabletop, you need to wrap a rope around it, gradually going down to the base. Then treat the table with waterproof varnish.
Master class on making a table
When working on creating furniture, you must first measure the dimensions of the room, select a model, and prepare a drawing. Schemes and drawings for making a computer desk are now freely available. If you wish and have artistic skills, you can make the diagram yourself.