Do you want to decorate your interior with unusual furniture, but don’t yet have the skills for complex products? Then you should pay attention to tables made of epoxy resin. The result of the work in most cases exceeds all expectations.
This tabletop is quite wear-resistant. The coating is hard, not afraid of mechanical damage, and protects moisture-sensitive materials well from corrosion and rotting. The hardened resin can easily be washed with water, even with household chemicals.
Good in any interior
Epoxy resins are oligomers that, when mixed with hardeners, form cross-linked polymers. The material is resistant to halogens, some acids, and alkalis. It is used to prepare glue, plastics, varnishes, plastic cements and other materials. Recently, epoxy has been increasingly used in craft furniture production.
There are few disadvantages to using an epoxy countertop. For example, there is no need to subject the hardened resin to prolonged heating to avoid melting. Another drawback is the presence of toxic substances in the composition. Therefore, some craftsmen advise opening homemade furniture with varnish in order to bind toxic substances and prevent them from getting into the air.
Their epoxy resin tables come in several types:
- with a board (plywood) base - resin is used as a decorative layer and to protect the wood;
- entirely made of epoxy resin - such countertops can withstand minimal loads (for example, coffee tables);
- combined - resin inserts are combined with wood, metal, and other materials.
Furniture pieces with a partially or completely resin tabletop look especially impressive. Translucent material transmits light well. Therefore, LED lamps or strips are often built inside to create an additional light source. It will not replace a chandelier, but as a night light or decorative lighting it justifies itself and looks very impressive, especially in the evening.
The resin is used both in its pure form and with various fillers - shimmer, color, phosphor. Thanks to additional components, you can create the most unusual effects - a starry sky, a flowing stream, a stone or mineral surface.
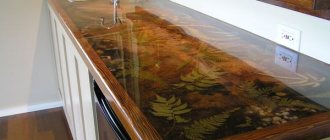
In addition, a wide variety of decor is used. These could be coins, photographs, or just beautiful images. Dry plants and insects are placed inside: the resin acts as a good preservative: the organic matter underneath does not deteriorate and retains its color for a long time.
Epoxy table goes with most popular styles. Furniture combined with wood will easily fit into country, loft, modern, fusion, boho, bauhas, grunge, kitsch, minimalism. Models with metal look organically in industrial, rustic, steampunk, futurism, techno, etc. spaces.
Types of Epoxy Resin Tables
According to their design solutions, tables with resin are divided into:
- Combined. A special feature is the alternation of epoxy elements with wooden parts.
- Options with support. Synthetic material is used exclusively to create a coating. The design is complemented by a variety of decor
- Structures without support. Created from resin without the use of wood or metal. They are distinguished by compact dimensions. Not intended for heavy loads.
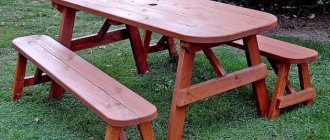
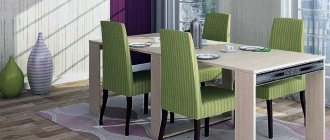
The first two options may have different designs and purposes. Dining structures with a rectangular-shaped tabletop look incredibly attractive. They will decorate any kitchen and fit into most interior styles.
In addition, round models are of interest to users. Most often they are placed in the dining room and living room. Products with futuristic configurations are no less in demand. However, it should be remembered that they are not suitable for every style direction.
Resin for countertops: how to choose?
There are certain requirements for resin for furniture:
- good fluidity and low viscosity for an even coating and good adhesion to other materials (thicker compositions are recommended for jewelry);
- high transparency.
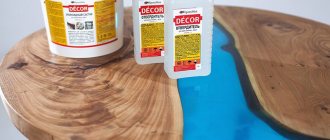
For countertops you can purchase the following products:
"Art-Eco"
Resin is also used for layering. The composition already includes a coloring pigment, the color palette is quite wide. The disadvantage of the product is possible yellowing during use.
EpoxyMaster
Epoxy is suitable for forming a layer up to 5 cm. The product has good fluidity and forms a smooth, even surface.
QTP-1130
The composition is designed for layer-by-layer pouring, which is ideal for a beginner. The maximum thickness of the product should not exceed 3 cm.
CHS Epoxy 520
It is used for making decor on wooden or metal tabletops, as well as for restoring wooden furniture.
Often craftsmen try to save on materials by buying budget brands of epoxy. But the savings are not justified. As a rule, cheap compounds turn yellow after drying, and the surface is not always perfectly smooth.
What is a slab
A slab is a wide longitudinal cut of elm, oak or poplar used in furniture production. A cross-section along the trunk reveals the texture of the tree.
In addition to beautiful shade transitions, defects of natural origin (wormholes, various knots, etc.) are also valuable. As a rule, there is no processing of the side surfaces of such slabs.
Other features of slabs:
- Irregular geometric shape;
- Impossibility of self-production (requires special tools).
How to calculate the amount of material
Before starting work, you need to calculate the amount of material. To do this, use the volume calculation formula. Prepare a drawing of the tabletop, determine the length and width. If you plan to make a tabletop in which the resin will form a sector over the entire height of the product, multiply the resulting area by the thickness of the boards, but if only the top layer will be formed, then multiply by its thickness.
Expert opinion
Korzhavin Daniil Dmitrievich
Designer of stylish home furniture
Resins harden when mixed with a hardener, which tends to expand. Therefore, the solution ready for pouring increases in volume by 10–50%. This must be taken into account when calculating the material. The expansion coefficient is indicated in the instructions for the drug.
- Calculation example. There are two boards 10 mm thick and 1000 mm long. According to the master’s idea, between them there will be a transparent sector made of epoxy resin 300 mm wide. To find out how much resin is needed for pouring, multiply 10x1000x300 mm, resulting in 300,000 mm3, or 300 cm3. This volume corresponds to 3 liters of epoxy resin diluted with hardener.
Wooden cuts
Previously, small tree cuts that were so useless to anyone went into the furnace. Now, various products from wooden saw cuts are at the peak of their “boom”. Not just like that.
Items made from wood cuts look very beautiful and very solid. Free material, in the form of dry branches in the forests, is another plus for various kinds of products from saw cuts.
- Garden paths are made from saw cuts
- Floors in the house are made from saw cuts
In today's article, we will tell you step by step how to make a table from wooden saw cuts
Preparing for work
The final result depends on the quality of the preparatory work. The surface with which the resin will come into contact is cleaned, washed, degreased, and dried.
Further actions:
- The resin is heated to 50 °C (unless otherwise specified in the instructions).
- Epoxy is poured into a clean, dry container that can then be thrown away.
- Decorative fillers are added - pigment, aerosil, microsphere, wood dust, plasticizer or other materials (as necessary).
- Pour in the hardener in a thin stream, constantly stirring the resin. If you add a component quickly, the base may boil and immediately harden.
- Stir the mixture thoroughly for 2–4 minutes.
It is necessary to strictly observe the proportions of the components. If there is an excess of hardener, the resin thickens too quickly, and if there is not enough, it does not set. Then sticky areas form, causing the quality of the finished product to deteriorate.
When exposed to ultraviolet light, the resin may turn yellow when dry. To prevent this from happening, a UV filter is additionally added to the mixture.
1-Surface preparation; 2-Pouring resin into a container; 3-Adding fillers; 4-Creating frames
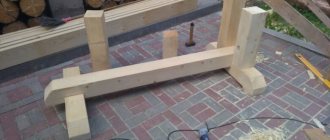
A frame for filling is pre-made from scraps of boards and slats. The joints of the box are sealed with sealant to prevent liquid from spilling out. The interior space is carefully lined with film.
Expert opinion
Korzhavin Daniil Dmitrievich
Designer of stylish home furniture
Countertops made of epoxy resin are quite heavy - 35 kg/m2 or more. Therefore, the base and legs should be quite strong.
Decoration options
Let's consider several options for using wood when pouring countertops. As we have already noted, there can be many variations, because elements can be placed at the same or at different levels. The tinting of the resin itself also adds variety. But the main ideas can still be described. They will be useful to those who plan to make their own countertops.
With whole slab
When cutting a tree, the lower part of the trunk is sawed along the grain, producing slabs up to 5 cm thick. Such a slab is called a slab. For the production of countertops, the edges of the slab are not always processed, leaving the bark and bast in their natural form.
Many connoisseurs of natural masterpieces prefer to choose slabs that have many knots and wormholes.
Under a layer of resin, the overall picture looks very beautiful.
The processed slab can serve as a base. The strength of wood when exposed across the grain is very high, so such tables can be universal and withstand heavy loads. It is very difficult to make a slab yourself. To do this you need to have a special machine. And it’s impossible to pick a tree with a diameter of about one meter. Therefore, we can say that a tabletop made of a solid slab is the easiest option to manufacture, but it is far from budget-friendly.
Before the main pouring, the slab undergoes thorough preparation. The surface is freed from dust and debris. All depressions, wormholes and irregularities are pre-filled with resin.
If this is not done, then after pouring, air bubbles and suspensions of tiny particles will form in the thickness of the layer.
To highlight the fiber pattern, the surface of the slab is treated with stain or other similar compounds. You can use inkjet printer toner. After the paint has filled all the smallest recesses, it is removed from the surface of the slab. The result is a fiber pattern made in black.
From several slabs
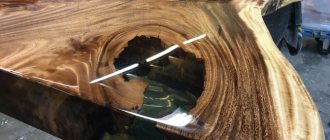
Not everyone can afford to buy a solid slab, but this is not a reason to abandon wood as a component for countertops. You can use slabs obtained from thinner trees, or slabs from the butt. In this case, several shapeless slabs are laid into the countertop.
First, let's consider an option in which two or three slabs are laid parallel to each other.
How does such a slab differ from an unedged board? Absolutely nothing. The term “edged board” or “unedged board” is used primarily in construction, while the concept of “slab” is used in decoration. The principle of obtaining an array is the same. The tree trunk is sawn lengthwise.
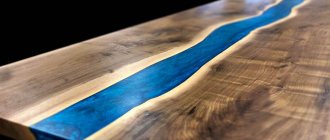
But for the production of countertops, the most interesting options will be those with “crooked” trunks. The remaining space between the slabs is filled with transparent epoxy resin. An example of resin tinting is a table-river, but since such works have become a masterpiece and are developing in their own direction, we will consider them in a separate paragraph.
Useful to know > Table made of plywood and epoxy resin, what options there are, how they are made
Butt slabs are interesting for their shapelessness, but at the same time the wood retains a unique pattern.
Such slabs can be laid out in any order. It is necessary to understand that the larger the gaps between the plates, the larger the volume of resin required to form the tabletop.
Pieces of slab laid over the countertop area cannot act as a base, so the resulting slab will not have high strength indicators. Ideas with processed tiles fall into this category. For example, each tile is a regular hexagon. As a result of their installation, a peculiar pattern is obtained.
Imitation of reservoirs
Tables with a river, islands or lake made of epoxy resin form a separate category, although in technology they are no different from the tabletops described above. The river table is made using two slabs located at a certain distance from each other. The space between them is filled with resin tinted turquoise.
Additional decorative elements are important. For example, in one of the options they make a tabletop with a base. Sand is poured onto the base (bottom of the reservoir), and the shores are decorated with sea pebbles and shell rock.
You can create paintings with stagnant bodies of water, but it is quite difficult to choose a suitable slab.
The world map is considered aerobatics. Tiles are cut from pieces of solid wood, resembling continents in shape. After pouring blue resin, you get something like a map.
Lamps are placed under the tabletop below. Illuminated tabletops look beautiful and can be used as night lights. An alternative is compositions with the addition of a phosphor to the resin composition. Solar energy is converted into light, causing areas of the resin to glow in the dark.
From slices
A cross cut of a tree trunk is usually called a cut. The cut is a “nickel”, up to 5 cm thick. Such nickels are very successfully used for decoration, since the growth rings also have a pattern. The slices are laid out according to the shape of the tabletop in rows or in a chaotic manner.
It is up to the master to decide whether to free the nickel from the bark or leave it in its original form. In any case, masterpiece paintings can turn out.
The saw cuts can be not only round. When processed, they can be converted into cubes, which are subsequently laid out over the area of the future slab.
The closer the wooden elements are to each other, the lower the resin consumption for this process.
Combination of wood and stone
The space between the sebs, as well as the cavity formed by the crevice, is filled with pebbles. As a result, you can save on the amount of resin and also get an interesting picture.
Liquid resin goes well with stone. There is no need to carry out any preparatory work. However, if there is another material instead of stone, there is a chance that it will begin to float in the resin. In this case, each decorative element is pre-glued to the slab or base.
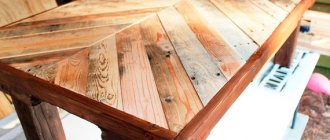
From edged boards
The processed daughters are laid in rows close to each other. The formed flooring occupies approximately half the area of the future countertop. The second half is laid out with decorative stone, which is very convenient, since the stone is made in the form of ready-made tiles.
All that remains is to adjust them to the desired size. Particular care must be taken here. Gypsum-containing mixtures are often used to make stone. It is advisable to first coat the tile with a layer of primer. The resin itself will cope perfectly with its tasks if it is applied in a thin layer to the tile and allowed to dry.
Volumetric compositions
In principle, any table that uses wood is included in this category. But I would like to dwell in more detail on two methods for creating three-dimensional images.
Abstraction of volume will be achieved by layer-by-layer filling. If you place thin planks in different layers, then after the finishing layer hardens you will get a three-dimensional picture. When creating the Cosmo style, experienced craftsmen use a special technology to introduce water into the liquid resin, which spreads in the form of small droplets throughout the entire mass.
Useful to know > Epoxy resin table - a modern solution for an excellent interior
The second version of three-dimensional images returns us to the imitation of reservoirs. When the edges of the slab are processed so that its width at the base is greater than at the surface, poured resin tinted blue can create the effect of the ocean depths.
It is not easy to create such a masterpiece. You need to have a special tool. A special cutter is used to remove the edge along the perimeter of the slab, and resin is poured into the remaining space layer by layer.
Instructions for making a table top
Inside the frame, the elements that will form the tabletop are laid out on the film - wood, chipboard, plywood, metal. If you plan to coat them with epoxy resin, then they should be lower than the sides of the formwork.
Next, the resin is poured, starting from the center. The composition spreads over the form under its own weight. If necessary, carefully level the surface with a clean, dry spatula.
1-Pouring the epoxy resin 2-Drying the resin 3-Sanding the product 4-Final finishing
Leave the first layer until completely dry. This may take up to several days. The top of the mold is covered with film to prevent dust or other debris from entering. When the layer has completely hardened, repeat pouring and drying until the desired thickness is formed.
Complete polymerization of epoxy resin occurs in approximately 24 hours. This depends on the thickness of the layer and the properties of the hardener. Therefore, gradual filling takes a lot of time.
Next, they move on to sanding to get rid of irregularities. Although some manufacturers produce products that do not need to be processed after hardening (this should be indicated in the manufacturer's instructions).
Coarse sandpaper
Fine sandpaper
Grind the hardened resin with waterproof sandpaper with a coarse grain, and finally with the finest dusting. Recommended skin numbers are from 80 to 2000. The stove is watered all the time. Then finishing is carried out with abrasive pastes.
The next stage is finishing. Standard coatings are applied to wood - protective impregnations, waxes, varnishes. The part of the tabletop formed with epoxy resin must be covered with film or mounting tape.
Removing material from the mold
For the future geode to completely harden, you should wait about 1–1.5 days. Once the time has expired, the product is carefully removed from the mold. First, remove the tape, and then carefully crawl under the film with your hand. Gently move the frozen silicone until the souvenir is completely free. If necessary, the finished mineral can be ground and polished. The finished silicone mold has been successfully used many times. Its shelf life will end when it begins to stick tightly to the vinyl film.
Features of working with resin
- When working with epoxy resin, you must strictly adhere to the proportions of components specified by the manufacturer.
- The room should be dry. Do not allow moisture to get into the resin so as not to spoil the product. The optimal temperature for work is +22 °C. When the temperature drops sharply, white flakes appear in the pour. Therefore, temperature changes must be avoided until the resin is completely dry. Do not work with the material at low temperatures, as the resin may delaminate.
- The colder the room, the thicker and more difficult the material to work with. The higher the room temperature, the faster the resin hardens.
Expert opinion
Korzhavin Daniil Dmitrievich
Designer of stylish home furniture
Do not speed up the drying process. If you heat the surface from above, the tabletop may become deformed.
- Mix the hardener with the resin slowly and carefully. Active stirring can lead to the formation of air bubbles in the mixture, which are difficult to get rid of.
- The components must be connected carefully. If the mass is not uniform, then poorly hardened areas and sticky spots will form on the countertop. To prevent this from happening, craftsmen recommend pouring the resin from one container to another several times. In this case, you need to mix the mass in the thickness, trying not to lift the tool to the surface.
- If bubbles do appear, you can get rid of them. While the resin has not hardened, the problem area is heated with a construction hairdryer.
- Cloudiness can also be eliminated. Thus, masters claim that the mass becomes transparent again, as soon as it is heated to a temperature of 60 °C.
- Experts recommend mixing no more than 1–5 kg of resin at a time (depending on the size of the table). A large volume of working solution can harden directly in the bucket in a matter of minutes. It is recommended to use only modern hardeners such as Etal-45M.
Another danger of unused epoxy resin is the possibility of it catching fire when stored in a thick layer. For this reason, it is recommended to pour the resin in thin layers. This technology has its advantage: you can create a stereo effect if you additionally decorate each layer.
Features of care
The finished product will last much longer if it is periodically wiped with a soft cloth to remove dust and dirt. It is forbidden to rub the surface of hardened epoxy resin with alcohol solutions and acetone. Do not allow hairspray to splash on it.
Final polishing of the product Source alexia.by
Safety rules when working with resin
When working with epoxy resin, adhere to the following safety rules:
- Use personal protective equipment - gloves, respirator, goggles. If the mixture gets on the skin, eyes or mucous membranes, chemical burns are possible. Prolonged inhalation of vapors can cause poisoning.
- Small children or animals should not be allowed into the workroom.
Do you like the look of epoxy resin tables?
Very! Not really
- Tools and dishes are cleaned with acetone - the liquid dissolves the product well, or thrown away.
- It is prohibited to carry out work near an open source of fire.
Even a beginner can handle making a table from epoxy resin. But there is a condition: you need to follow all the instructions of the material manufacturer and listen to the recommendations of the craftsmen. Otherwise the material will be damaged. And if safety rules are not followed, you can also harm your health.
Advantages
When purchasing ready-made furniture, the main guidelines are appearance and price. If these two parameters suit the buyer, then the deal will go through. The excessively high cost of epoxy tables, as well as the desire to be creative, force many, even inexperienced craftsmen, to fill the countertops themselves. They might just need information about the benefits of using wood.
- Wood is the most affordable material. It is impossible to say unequivocally about its cost, since the price depends on the type of wood and the method of finishing, but you can always choose options that are affordable.
- Every tree has its own unique texture. This pattern can make any piece of furniture unique. The characteristic highlight of the fibers on the wood cut fits perfectly into any interior.
- Wood is available for processing. In the absence of a special tool, you can even use unprocessed fragments (boards, slabs, cross cuts) as decoration.
- The wooden base of the tabletop will give it strength, which will allow the future table to be used under constant loads.