A homemade table can be made from a variety of materials: MDF or chipboard, furniture board. A solid, durable table is made from boards and timber. Usually, only the table legs or also the frame on which the lid rests are made from timber. For the table top itself, use an edged board or solid wood panel. But the entire product can be made entirely from timber, resulting in a massive structure that will last for many years, withstanding significant loads. Let's look at several options for making a table from timber with your own hands.
How to make a desk with your own hands
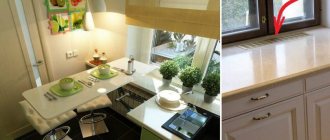
If you're looking for a simple desk that's quick and easy to make, here's a great option.
The author started designing at 4 pm, continued until 10 pm, and then worked another 4-5 hours on Monday. At this point the project was completely ready. So in total it took about 8-10 hours. In a sense, this is a one-day project. However, the finishing process could potentially take another 2-3 days, depending on the finish you use and the time you have. It is better to apply the top coat in the morning before going to work. Then in the evening you can sand, clean off any dust, and then apply another coat. So everything will be ready in three days. Given that this is a quick project, only simple techniques were used: plywood countertop, hardwood trim, and a quick and easy pocket design.
You can read the instructions or watch the assembly video on the website, link below under the gallery. In general, this project was developed with the SketchUp program. Here are a few features of this desk. First, this design has a plywood top. But the author didn't want it to look like that. So the idea came to add some "fake" layout ends to the top of the table to give the look of a solid wood tabletop. Then the idea of another modification came up: to narrow the legs so that they did not look like just square bars
Note that the taper starts below the side bars. Additionally, a sort of arched cutout at the front adds a nice decorative touch.
The photo on the right shows diagrams with dimensions in inches; multiply these figures by 2.54 to get values in centimeters.
Photo source: www.instructables.com/id/Quick-Writing-Desk-in-the-Shaker-Style/
Desk with drawer under the tabletop
Here is a simple example of how to make a desk with drawers with your own hands. The finished table is 76 cm high, 74 cm wide and 41 cm deep. The base and drawer are made from 2×2 pine bars and 1×4 boards, and the top is made from walnut. You will need (4) 74cm high 2×2 legs, (2) 62cm long 1×4 back stretchers and (4) 32cm long side stretchers. Drill pocket holes at the ends of the crossbars to connect the legs. Next, assemble one side of the desk. First, attach the top stretcher flush to the inside of the leg.
Attach the lower side frame 7 cm up from the floor with a centimeter offset on the sides. Fasten with screws. Repeat this process for the other side and you will have two sides of the desk completed. Then join the sides together using the back bars. The bottom rails are installed flush with the back of the legs so that they can be attached to the wall if necessary. Next you need to make a box. Slides were used here, so the drawer should be 60 cm wide and 30 cm deep. The size of your drawer may vary depending on the type of slide. From a 1x4 board, cut (2) 56cm fronts and (2) 30cm sides. Cut 7cm wide or you can use a 1x3 board to make a shallower box. Cut a groove on the sides and front for the drawer underneath. The groove has a depth of 6 mm, and the width is selected in accordance with the plywood (usually 5 mm). This can be done in 2 passes on the countertop.
For the back, instead of making a 6mm recess, lift the blade and cut all the way through. You will get a ~6cm wide piece that will allow it to slide into the bottom panel at the back. Drill pocket holes on the outside of the front and back pieces. Assemble the drawer using screws lining the slots where the side and front meet. Attach the back of the box upside down so that the top edges of the box are even. Cut a 57x31cm sheet of plywood to fit the bottom of the box. Push the bottom in and secure at the back with two screws. Before moving on to installing the slides, fill and paint the base and front of the drawer. When installing, use spacers for support points. Install the retractable device according to the manufacturer's instructions. The last step in assembling the desk is the 74 x 40 cm table top. Attach the top using S-shaped fasteners, but pocket holes can also be used. Finish the top with a walnut urethane finish.
Photo source fixthisbuildthat.com/diy-writing-desk-plans/
Table with 4 legs
For a table 1.1 m high, with table top dimensions 1.5x0.9, you will need the following materials:
- timber 100x100, 4 pcs. 105 cm each for legs, 2 x 75 cm and 2 x 135 cm for crossbars;
- edged board 50 mm thick, 150 mm wide for the lid, 6 parts 135 cm long and 1 – 90 cm;
- 10x40 slats for assembling the lid, 2 pcs. length 85 cm;
- screws, corners.
The table dimensions can be changed. To implement your project, just change the length of the blanks. To make the furniture wider, you can take boards of greater width or increase their number.
Having sanded and treated all the parts with an antiseptic, you can begin assembly:
- Saw a short board lengthwise into 2 halves 7.5 cm wide, lay 6 long boards on the work surface, and along the edges, perpendicular to them, these 2 halves.
- Place the slats at the junction of the longitudinal and transverse elements, mark and drill holes (1 in each long board and 5 in the short one, so that they are arranged in 2 rows in a checkerboard pattern). Fasten the lid parts together by screwing the slats to them.
- Connect 2 legs each with short crossbars. To do this, drill holes for dowels in the ends of the crossbars and the bottom of the legs, and assemble them dry. If there are no distortions, coat the holes and dowels with glue and connect the parts again.
- Connect the resulting side supports with long crossbars.
- Place the resulting structure of legs and legs on the lid lying upside down and secure with the corners.
All that remains is the finishing touches.
Another option is to connect the legs not with legs, which are located at a low height, but with drawers, which are located directly under the table cover and form a frame on which it rests. To increase rigidity, jibs are installed in the corners between the drawers. The drawer is attached to the lid with corners. The short edges of the table can be designed differently: screw 50x50 bars or thinner slats to the ends of the boards. They need to be placed with the wide edge towards the ends of the tabletop boards, and the narrow edge towards the ground.
Homemade table top made of laminated wood
DIY table: diagrams, drawings, sketches and options for the best tables.
instructions and 90 photos on how to make a table correctly Tables made of this material have an even and uniform structure, without joints or crevices. Another argument in favor of this technology will be its resistance to deformation and cracking. To make a table, you will need 4 boards with smoothly planed edges, having the following parameters - 1x1.5x0.5 m. The working algorithm is as follows:
- At the ends, at a distance of 10-12 cm, make holes measuring 8-12 mm. They are needed for attaching dowels and dowels. Holes in the two side boards are made on one side only.
- Fold the boards correctly before applying glue.
- Sand the boards and coat them with glue.
- Insert dowels and fasten the boards.
- Align the ends and make sure each board is in the correct position.
- Place the finished tabletop on a flat surface and press tightly with a clamp.
- Leave to dry.
Original feast
A small but very original table will not leave either the owners or their guests indifferent. During the day it will become a place for a cozy feast, and in the evening it will amaze you with its quaint glow. To make it, you will not need complex drawings, but only an original idea and desire.
What do you need?
- 3 boards with cracks of swamp cypress (or any other wood similar in texture);
- ready-made metal legs for the table;
- epoxy resin;
- photoluminescent paint or dry powder;
- polyurethane paint;
- adhesive tape;
- wood glue;
- knife;
- grinding machine;
- glazing beads;
- clamps;
- wood glue.
Finishing
Building a house from timber: types of building timber, design features, stages of building construction
As for the finishing, the assembled product must be given an aesthetic appearance:
- To do this, the timber is sanded with sandpaper to eliminate all irregularities and burrs.
- Next, we putty all the cracks in the surface of the structure. The putty should be selected to match the shade of the wood that will be used for the bed.
- After the putty has dried, the product is carefully sanded again.
- Next, the dust is wiped off. To do this, it is recommended to use a long-bristled brush.
- The next finishing stage will be staining. Its color is chosen depending on the overall interior of the room. To obtain a rich dark shade, the stain is applied in several layers.
- Next, the product is varnished. For these purposes, it is necessary to use non-toxic paints and varnishes that dry quickly.
A bed made of timber can also be painted. For painting, you should choose acrylic pigments. The designs on the product must match the overall style. For a classic interior, dark colors (brown, black) are chosen. It would also be appropriate to make a sandy or lemon shade.
Tip: any light shades, peach and orange, are suitable for country style.
You can also resort to the decoupage technique when decorating a bed. This method is used in the restoration of furniture items and to give them originality. Depending on the direction of the bedroom, a ready-made picture from napkins or wallpaper is selected and applied to the headboard and footboard.
You can use the stencil technique. Thanks to a well-chosen ornament, you can apply intricate patterns to the product. Simple curls are suitable for romantic styles; runes are suitable for Scandinavian styles.
You can upholster the backs of the product with textiles. But it is best to decorate with fabric only that part of the frame where the bedspread will not be covered.
Advice: if you are serious about furniture for the bedroom, try making a dressing table, bedside table or changing table. You might also be interested in a loft-style wardrobe or table.
Tools
To complete the work, you may need the following tools, which should be prepared in advance:
- hammer;
- chisel;
- hacksaw;
- drill;
- plane;
- nail puller;
- saw.
Advice . If further work with the tool is not planned, then you don’t have to buy it, but rent it.
How to design a path?
Comparison of timber and laminated timber - which is better to build a house from?
Forming a garden path from scraps is a very original and beautiful idea.
The saw cuts should be at least 0.1-0.15 m thick. Too thin ones are not reliable enough and can move involuntarily. Of course, all parts of the track should be the same in thickness, but the diameter may differ - this even allows you to create interesting design effects.
The necessary protection will be provided by:
- drying oil;
- bitumen;
- copper sulfate.
The depth of the trench for backfilling drainage is 0.05-0.1 m greater than the height of the beam. Crushed stone is scattered on a waterproofing film and leveled. Lay out the rest of the cushion, arrange the cuts in any way - imagination is limited only by the need to carefully embed the remains of the timber into the sand and level them.
General requirements for lumber
It has been proven by practice that any product made according to the principle of “molding from what was” will certainly be of appropriate quality. A frame house, a place where people will live all year round, must be made without a hitch, therefore the board for frame house construction should not be easily cut, but calibrated.
Why calibrated is better
It is distinguished from planed boards by its ideal geometry, because it is no secret that when ordering edged boards with the required parameters, the customer is not immune from the “creative” approach of the supplier. The width and thickness can go negative from the desired value to ten centimeters, not to mention areas of rot, warping or cracks, which are unacceptable according to GOST 8486-86.
After processing the usually crookedly cut ends, up to 10 cm are lost on each board, which amounts to a certain amount on the scale of the whole house. Crooked boards of the lower frame on the foundation threaten to distort the floor and the entire building.
You should not use a cheap, unplaned board. You will waste money on fire protection agents because they are difficult to apply to rough surfaces. And after finishing work, the interior space will be lost.
Unplaned boards are not the best material for a home
Dry board – healthy home
A high-quality construction mat should have a humidity of 12 to 15%, which can only be achieved by drying in a chamber by heating and blowing, so that the board does not warp. The process, which takes several days, adds up to 1,500 rubles to the cost of each cube of material.
For example, the price of 1 m3 of edged board with a moisture content of up to 20% and dimensions 15x150x6000 mm will be about 6 thousand rubles, a calibrated “prepared” board according to all the rules will cost twice as much.
If time does not push you, you can “make” boards of excellent quality yourself, following simple rules:
- wood cut down in winter contains a minimum of moisture;
store in stacks protected from bad weather and sun;
Place coniferous wooden blocks between the boards so that the lower surface also dries out; The storage area must be ventilated lengthwise and crosswise.
It is undesirable to build a house from boards of natural moisture for permanent residence, because even at the joints of several boards, cracks will inevitably form over time with all the ensuing consequences.
Although there is a technology for building from such material, it is suitable for summer cottages. First, a load-bearing frame and roof structure are erected, which are left to dry in this form until the end of summer, and only then the construction ends and the house is insulated.
Construction of a house from boards
Tools for work
For the process of installing a house from boards, you will need the following:
- screwdriver;
- wood screws, metal corners and galvanized nails;
- electric plane, jigsaw;
- polyurethane foam;
- waterproofing, insulation, vapor barrier;
- tape measure, corner, hammer, pencil.
Construction of the frame
The construction of the frame begins with the lower frame.
For tying, a beam measuring 15 cm by 5 cm is usually used. We lay the beam through a double layer of waterproofing (roofing material, waterproofing) and secure it with anchors or studs that were previously laid in concrete. The second layer is laid in the overlap of the joints of the first row. The wood must be dry and treated with special means. The boards are also nailed together with galvanized nails every 20-30 cm. We measure the surface level of the entire plane of the strapping using a building level.
Next we attach the trim boards; they have the same dimensions as the boards for the bottom trim.
Just install it on the edge and nail it every 40-50 cm.
Next, logs are installed at intervals of approximately 50 cm to better redistribute the load.
The size of the log is 15 cm by 5 cm.
2 nails are attached to each edge of the trim board.
Floor insulation is done using mineral wool, do not forget about waterproofing with a membrane or polyethylene film, you can also insulate with sawdust.
Leaving a gap of 2-3 cm for ventilation between the insulation and the subfloor.
Finish edged boards with offset or PVC boards are laid on top of the subfloor; plywood should only be left with a gap of 2-3 mm between the sheets.
You can also use floorboards for your home. We fasten with self-tapping screws.
Next we install vertical beams, they can be 15 cm by 15 cm or 10 cm by 10 cm in size. 10 cm by 10 cm are mainly installed when building one-story houses. And 15 cm by 15 cm is used for the construction of two-story houses. First, corner beams are installed, and then in increments of 50-60 cm. The increment is usually chosen according to the size of the insulation. They are usually secured using metal corners. But you can also use a notch halfway through the base, or hammer in wooden dowels.
We immediately mark the places for windows and doors; they should be reinforced with another row of boards. The walls are reinforced inside the frame with jibs. Then we make the top trim, install the ceilings, rafters, make the sheathing and install the roof. The roof should be light.
The ceiling is lined from below with an edged board, a layer of waterproofing, a layer of insulation, and a layer of vapor barrier are laid.
If you will use the space under the roof as an attic, then cover it with a subfloor and sheets of plywood. At your request, you can also insulate the roof.
Photos and work progress
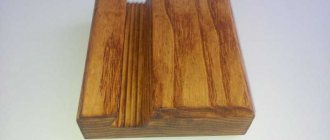
We put the metal disc on the grinder and begin to process each board of the tabletop, and the entire table as a whole. We give the effect of antique wood. I'm attaching a photo of what it looks like... The first one on the right is processed:
The knots become more expressive. And the cracks that exist are nothing to worry about... On the contrary, they can be emphasized with the help of an angle grinder, creating a greater effect of wear and antiquity...
…more photos:
As a result of all processing of the table, only with this disk, we have the following result:
It has already noticeably transformed; the edges and ends of the table were specially aged, using a grinder, holding it and burying it in the wood fibers. You see the results.
Step 5.
In fact, we could have stopped there and ended it. After all, you can go over it with sandpaper or a polishing machine, and then cover it with oil - and you’re done...
But I decided to go further and add more of an antique effect... Look what happened around the edges:
The same thing, repeated with other elements of the table...
Table with timber top
Timber is used quite rarely for countertops; a board with a thickness of 30 mm or more is quite capable of withstanding the load, and it is much cheaper. If you use bars of a small cross-section (40x40, 50x50) for the tabletop, there will be much more joints where gaps can form than when using boards 150-200 mm wide. From such a block you can independently make a furniture panel for a tabletop by gluing the elements and holding the resulting sheet in a vice. But this is quite painstaking work.
The table, made entirely of 100 mm thick timber, is massive, solid and looks impressive. But such furniture will not fit into every interior, and moving it from its place will be problematic. Possible design options:
- squat coffee table (also suitable for oriental-style tea parties);
- model on 2 legs;
- model on 4 legs.
For the countertop it is better to use a rectangular beam, 100x150 or 100x200. It can also be used on supports if there are 2 of them. For a low table, legs from one piece of timber are sufficient; for a high table, several fragments are spliced together to create legs of the required height or width. The beam can be placed both vertically and horizontally. If there are 4 legs, it is better to use square lumber (100x100, 150x150).
The tabletop is assembled in the same way as a lid made of boards. The beams are laid side by side on a flat surface, fastened with the help of transverse bars and slats of small cross-section. The legs (supports) and the tabletop are connected using corners. Tables made from such massive materials do not have drawers or stiffeners.
There are much more options for designing a table from lumber; you can make a tabletop of complex shape, use rounded timber (for the tabletop it will have to be sawn in half). The main thing is to work with thoroughly dried wood so that it doesn’t leak later. Do not forget about treating with antiseptics, especially if the furniture will be placed in the open air.
Timber is an excellent building material from which walls and partitions are erected and used as support beams and columns. It is also used in furniture production: most often it is used to make frames for upholstered furniture, legs of tables and chairs. However, the same table can consist entirely of this material if operating conditions (street, bathhouse) or interior style (loft, retro) require it.
Such furniture turns out to be durable, but massive, bulky and very heavy, which, however, in some cases is very useful.
Another option for an unusual table
For example, if a table made of timber is in the courtyard of a country house, you don’t have to worry about its safety in the absence of the owners - you won’t be able to carry such a product under your arm. It will perfectly complement and emphasize the brutality of the interior of a country house in a rustic or hunting style.
Massive timber table
In a word, if you need such a table, do not waste time looking for it in stores - you are unlikely to find a suitable model there. It's better to do it yourself. This is not difficult, and if you have leftover timber from the construction site, it is also very profitable.
Stylish wooden table
Made of wood and epoxy resin
An excellent solution for a garden interior is a tabletop made of wood and epoxy resin. It looks as environmentally friendly as possible, is not afraid of humidity, cleaning agents, and does not deform over time. The only drawback is the relatively high cost. An average sized dining table can require over 10 liters of resin. However, if you want to have an original piece of furniture, you shouldn’t skimp on material.
- At the first stage, prepare the mold for the countertop. This can be a homemade box or a purchased silicone bowl of the desired size. The inner surface of the mold is covered with self-adhesive film.
- The wood is cleaned, sanded, primed, and dried well.
- A small amount of epoxy resin is applied to the surface of the wood to “seal” the pores. When the composition dries, dilute the remaining part. It will be used to fill the countertop.
- To add color, add powder dye and mix the entire composition thoroughly.
- The wood is placed in a mold and resin is poured evenly on top. The resulting bubbles are removed with a hair dryer or the flame of a hand torch.
- After 5-7 days, the tabletop is removed, ground, and polished.
In addition to wood, when creating such a tabletop, you can use stones, dried flowers, coins, wine corks, etc. A wooden cable spool, bars or metal supports, which can be purchased at any hardware store, are suitable as a support.
Table made from scrap materials
Step 2.
Next I assembled 2 identical frames with long bolts. Each frame consisted of 2 beams 0.75 meters high, and a 5 cm thick board on top.
Looking ahead, I will show this moment. Since there was no separate photo of the assembly, but the essence here is simple - the top board stands between the beams, and a hole is drilled at each edge with a long 6 mm drill, and long bolts 180 mm long are screwed into the beam. And the lower part was cut out with a jigsaw, and then also drilled from each edge, and screwed with a long thick screw of 180 mm. I’m sure those who are in the know will look at the photo and understand everything. I’ll tell you about risks and patterns below...
Step 3.
When you have 2 racks ready, you can start assembling the tabletop. You already understand that the assembly process itself is very simple, and there are no big difficulties here to come up with drawings. After all, everything was made from scrap materials, and at home. Without machines, and not in a carpentry shop.
The tabletop is a pleasure to assemble. We just put the boards, align them through the same slots, and drill through 2 boards so that we can fasten two fives with furniture bolts, we’ll use nuts from the bottom. But that will come later, after processing.
It so happened that it was not possible to screw the bolts along the edges into the beam itself, or something would have to be tricky. And with us everything should be simple, without complications. I drilled only 1 cm from the top in order to later install fakes from furniture bolts (by cutting off their threads and leaving the caps in the form of a mushroom). But how will they hold on then? It’s very simple - take a thick 120 mm nail, hammer it into the beam, and put a plug on top in the form of a furniture bolt...
This moment is only in the edge boards of the tabletop, and no one guessed how they were secured. In the future they can be glued to epoxy resin. But they hold up just fine anyway. And all the other boards of the tabletop will be firmly screwed from below with nuts.
Please note that each board has chamfered corners. That is, the edges of the board are not sharp
Next, we will also process them to look antique and polish them. There are still many interesting moments ahead.
Step 4.
Now we put on glasses and protection on the nose - since the process will involve dust and metal burrs in different directions.
Small table for the garden
The appearance of the entire structure is largely determined by the attractiveness of the tabletop. Several ideas are proposed for the design of this part of the table, used in one design: wavy edges of the boards, brushing and firing the surface, using imitation metal joints.
Step 1. The boards are cut to the size of the tabletop. For this you will need a jigsaw.
Cutting boards
Finished blanks are laid out taking into account their design and numbered so as not to confuse the order later.
The blanks are numbered
Step 2. A wave is created. To do this, markings of arbitrary shape are applied. The main thing is to get around the knots. Otherwise, they may fall out when cutting or milling.
Marking for creating a wave
Using a jigsaw, a wavy cut is made.
Making a wavy cut
The resulting drawing is transferred to the adjacent board. The operation is repeated.
The drawing is transferred to the next board
By combining two blanks, we get a result that is not ideal. However, you won’t be able to make a perfectly shaped cut with a jigsaw.
Combining two blanks
You can leave the boards in this form, but for those who want to get a perfect joint, it is recommended to use a router. To do this, the workpieces are separated to a distance slightly less than the diameter of the cutter and are rigidly fixed on the reverse side.
The workpieces are fixed at a certain distance
Edge milling is carried out, during which the wood is cut simultaneously from both sides, forming an ideal connection of the boards.
The result was a perfect connection
In the same way, a wave is created on the remaining boards. To speed up the process, you can mill all fixed boards at once. The resulting lamellas are folded into a single shield. Places of decorative fastenings are marked.
Marking boards folded into a single board
Step 3. Brushing (artificial aging) of the wood is carried out. To do this, you will need a drill or grinder with adjustable speed (you can use a metal circle attachment for brushing at a speed not exceeding 4.5 thousand, otherwise the steel pile will fly out). In a chaotic manner, damage is caused to the boards, giving the wood the appearance of an old one. The installation sites of decorative fasteners should not be touched.
Brushing is carried out
Step 4. The blanks are secured on the wrong side with a wooden plank. The places for fastening are being milled.
Milling places for fasteners
Step 5. Imitation of ancient fasteners. It is produced by pouring molten metal - tin. The shield is installed on a stable base using a level. To ensure that the metal holds better in the cuts made, it is recommended to drill shallow holes at an angle.
Shallow holes are drilled
Tin melts. You can use any unnecessary jar for this. The metal is poured into the designated areas. It can be poured “heaped”, and then the excess can be cut off with a knife.
Tin is poured
Decorative fastenings are cleaned down to the level of the boards.
Decorative fastenings have been cleaned
Step 6. Firing the wood. This technology makes it possible to increase the resistance of wood to external influences and gives the wood an interesting and expressive texture. Using a blowtorch or gas torch, both the surface of the table and the ends are burned.
The wood was fired
Step 7. Processing the countertop. Using a grinder and a nozzle with hard plastic fibers, the fumes are removed and the tin is given a shabby look.
Nozzle with hard plastic fibers
The cleaned surface is coated with tung oil, which allows the wood texture to be emphasized.
Step 8. Making the legs. They are decorated using the same aging and firing technology.
The legs are processed in the same way
The result of the time and effort spent will be an aesthetic table that can become a decoration for any country house.
The result is a very attractive table.
As you can see, if you have the desire, tools and a minimum amount of material, you can independently make interior items that are in no way inferior in attractiveness, strength and durability to factory models.
The choice is small - the material
In stores you can buy interesting tables made of stone, metal, plastic and glass. All these materials require skills, so wood is still the most favorite - it is environmentally friendly, easier to process, and fits perfectly in almost any interior.
Each tree species has its own characteristics, which must be taken into account. In the furniture industry they often use:
- Birch. Its strengths are strength, resistance to cracking and deformation. The Achilles heel is the fear of permanent humidity, which causes wood to rot. This weakness is eliminated by antiseptic treatment.
- Beech. The material is easy to work with and pliable, although it is a hard rock. Not so resistant to deformation when drying out. Rotting is also a defect that can be eliminated by treating with antiseptics.
- Oak is a beautiful wood; it is distinguished by its noble texture, special strength, and much greater resistance to decay than its previous representatives.
- Spruce is a knotty wood. When processed, it exhibits a tough temperament and becomes capricious when soaked in antiseptic.
- Larch. It is durable and can resist deformation and rotting. The downside is that it tends to crack and is not suitable for rooms where there are frequent changes in temperature and humidity.
- Aspen. Easy to process, does not crack, and almost does not rot. The disadvantage is that it is soft, leading to mechanical damage even from a pencil or pen.
- Fir is a good material for amateurs, as it is easy to process. Fir products are very susceptible to moisture, so they are not suitable for outdoor furniture.
- Pine. It is distinguished by its lightness, but strength, softness and pliability. The deformation is insignificant and can be treated well with antiseptics.
Despite the fact that soft woods promise easy work, it is better to choose a harder material. Among the favorites are beech, oak, larch, and pine. With them, a novice carpenter can be sure that his first table will become a reliable, durable piece of furniture.
Which wood is best for outdoors?
How to make a homemade table for a circular table with your own hands according to drawings
Garden furniture is not easy. Nature tirelessly ensures that it is constantly exposed to destructive factors. Their list is not limited to moisture alone - rain, dew or dampness from the ground. Wooden furniture also suffers from sunlight, weathering, fungi, ants, wood-boring beetles and even bird droppings.
Therefore, if you want your products to last as long as possible, pay attention to choosing the right wood
Best wood for outdoor use:
- Oak. Solid, durable wood that is resistant to rot. It has expressive texture and color. If necessary, lends itself well to tinting. Resists chips and dents. Oak end grains absorb less moisture than most other hardwoods. It can crack along the grain, so it is better to screw in self-tapping screws through pre-drilled holes.
- Larch. Among all the coniferous species actively used in woodworking, this wood is the most durable and hard. Larch has high density and resistance to decay. Excellent resistance to fungi and woodworms. At the same time, processing this wood is not the easiest task.
- Ash. Wood with high strength and good toughness, making it less susceptible to chips and dents. Ash tolerates a humid environment and is resistant to decay. It bends well, does not crack and warps little. Has a beautiful texture.
- Cypress. Lightweight, but very durable wood. It is superior to most species in its resistance to decay. Works well with hand tools. It has an expressive texture pattern similar to ash.
- IP. The wood is also called Brazil nut or ironwood, which already says a lot about its properties. It has high density, strength and stability. It resists rot and woodworms very well.
Getting the most out of ordinary pine
The breeds described above are good for everyone. Everything except its price. Therefore, when it comes to country house construction, most craftsmen are guided by the criterion of accessibility and choose pine. But even this not the most outstanding material can last quite a long time if you choose it wisely. Here are some important tips.
- Choose boards with radial or intermediate (semi-radial) cuts. They warp less and are more stable under changes in humidity. The expansion and shrinkage of such boards is almost two times less than that of tangentially cut lumber. Thanks to this, outdoor furniture does not crack and maintains the integrity of the paintwork longer.
Such lumber is more expensive. But you can prepare it yourself if you purchase wide boards with a mixed pattern, and then cut out the central part from them. The core is used for less demanding projects, and radial and semi-radial cuts are used for the manufacture of outdoor furniture.
- Try not to use sapwood as it rots faster. These layers are easy to distinguish by color: they are an order of magnitude lighter than heartwood (see photo).
- Choose material with densely spaced growth rings. Such wood is resistant to fluctuations in humidity, warps less and cracks less often, which compares favorably with lumber with widely spaced rings.
Types of tables
Such an element of furniture as a table is found in almost every home. It performs different functions. Can be used for cooking, for work, for board games or simply to complement the interior. Tables are made from different materials and according to different design schemes. They vary in size, shape and style.
Durability is directly related to the build quality of the product. When creating furniture for yourself, even a novice carpenter will assemble the structure carefully and reliably.
By purpose
For each type of furniture element, specific functionality is provided that determines the format of its use. The general classification of tables implies their division into:
- lunch;
- magazine;
- transformers;
- written;
- computer.
By making a table yourself, you can take into account all the nuances and create the ideal model for yourself.
By design
With a focus on the design parameter, all tables are divided into simple and complex models. The first category includes standard furniture elements, which consist of a tabletop and legs. Complex structures are characterized by the use of several massive countertops located one below the other, with the top element having a larger size.
The model directly depends on the functional purpose and features of the room.
Transforming tables are included in a separate category. They are usually miniature, but if necessary, due to special mechanisms, they can be folded out, resulting in a large working surface.
There are also stationary and mobile tables. Wheels are provided for mobile structures.
If the room is small, it is better to choose compact products.
By shape
The shape for the table can be any - square, rectangular, oval or round. It is determined by the size of the room in which the element will be installed and its purpose.
For a spacious dining room or living room, the ideal option is a classic rectangular table.
When planning to install a table along the wall, its rectangular design will save space in the room. The square shape is relevant for small apartments and a small number of people who will sit behind it. Round and oval tables are installed in large rooms, but they do not imply seating many guests at them.
If there is a need for a product with a large capacity, but the room does not require the presence of large items, you should think about a sliding or folding design.
What will you need to create a table from leftover timber?
If you want to do something simple and useful, then there is nothing easier than putting together a table from blocks that can be sawed from timber. In the end, you can get a truly high-quality item. The table can be used both in the apartment and in the country house. It will turn out easy and simple. Durable and beautiful. And you don’t need to spend money on buying a ready-made table in the store.
To create a table you will need:
- Several bars.
- Hand saw.
- Screws with a screwdriver.
- Primer.
- Wood varnish with brush.
A fairly simple set for those who want to assemble a good-quality table that will cost mere pennies. Many people believe that in order to create a good-quality and colorful thing, you must go to the store to buy something really worthwhile. In fact, only with a hand saw and a screwdriver can you make a very durable table for the garden, and if you also coat it with varnish, then it will not differ at all from the store-bought one.
It is also worth noting that the applied layer of varnish will not only play a decorative role, it will primarily perform a protective role so that the table does not begin to rot under the influence of moisture.
Where would a wooden table fit?
Of course, a table made of boards will look good not only in the garden. Also, a massive wooden table will come in handy in almost every room of the house. So if you are wondering how to make a dining table, the above instructions will also be useful, although the creation principle will be slightly different.
This type of furniture also looks great in the kitchen. A kitchen table made of boards will be a great place for eating and long conversations over a cup of hot coffee.
How about a wooden workbench? Great idea! If you want to make a table for the garage, it is better to use hard wood, such as oak. Pine is useful for garden and home furniture.
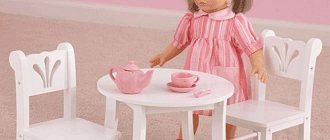
Small side table
Want to make a small side table like this yourself? It is very easy. First, remove a simple side table top. Apply a little glue to the edges between the boards, then glue and seal. Alternatively, you can use pocket holes, but gluing is easier. Then clamp the tabletop. While the glue dries, you can work on assembling the frame. Find the center of the 33cm board and mark 2cm on each side. Then mark 2 cm in the board from the edge. Use a jigsaw and chisel to cut out the notch as shown in the photo.
Apply a little glue to the notches and connect to create two identical intersections. This is called a semicircular joint. To secure the connection, you can screw a screw into the bottom side. Next, assemble the side table base. Drill one pocket hole in each leg using a jig and drill. Then cut off the legs and make a mark on the bottom of the legs about 5cm up. Line up the bottom of one of the legs with the mark and attach with a screw through the pocket hole. So attach all the legs. Do the same with the other X joints along the top of the legs. Attach the base and top. After cutting and sanding the top and base, flip the base over on top. Using 5cm screws, attach the legs of the X-joint top to the top as shown in the photo. Finally, get creative to decorate the table.
Photo source: jenwoodhouse.com/simple-diy-side-table/
Manufacturing process
For the manufacture of all parts, a 50 mm thick board was used, but there is no real need to use such massive lumber here. You can take thinner boards and not worry about the reliability of the product. The design initially included proper strength and stability, so the thickness of the workpieces does not play a special role here.
Start with the base elements
From a pre-prepared board, cut out four table legs and a leg. Alternatively, these parts can be made from timber.
Drill guides for fasteners. Then countersink the holes on the leg - the hidden bolt head will provide a more attractive appearance to the product.
- Table legs: 65x730 mm;
- Leg 1220x90 mm.
According to the dimensions indicated in the photo, make table frames and leg supports.
Assemble all base elements. To do this, it is better to use a bolted tie. This way you can periodically tighten the fasteners, which will become loose due to seasonal deformations of the wood.
Make a table top
Prepare four boards measuring 165x1270 mm. Plan their front faces well and remove the corners with an edge router. The absence of sharp edges will make the table cover less dangerous.
Screw the tabletop boards, leaving a gap of 10-15 mm between them. This is a very important point for the design of outdoor furniture, since thanks to the gaps, puddles of rainwater will not linger on the surface of the table.
You may also be interested in:
Making benches
If you wish, you can complement the garden table with one or two benches, which are structurally smaller copies of the table and are made according to the same principle.
Bench parts dimensions:
- legs (4 pcs.): 65x450 mm;
- leg (1): 1220x50 mm;
- drawers (4 pcs.): 400x60 mm;
- leg supports (4 pcs.): 400x60 mm;
- seat boards (2 pcs.): 165x1270 mm.
There are never too many benches - see three more projects of comfortable benches for your garden
Features of wooden products
Wood countertops are a welcoming addition to any kitchen thanks to their natural appearance, crisp color options and detailed texture. They also make a nice accent piece for any wood floors or kitchen cabinets.
Furniture made from high-quality solid wood is quite expensive. You can save money in the process of making a kitchen set by making a wooden kitchen countertop with your own hands.
Obviously, these wood products look warm and inviting, but they also serve a more practical kitchen purpose than most other cutting surface materials. A do-it-yourself countertop made from bars will help you add individuality to your kitchen interior.
Natural materials for making countertops are always durable, practical and beautiful.
Wood countertops can be made from hardwoods such as maple, oak, cherry or teak. However, countertops are not made from solid wood. Instead, they are assembled piece by piece: cut strips are stacked on top of each other and glued tightly.
It is important for every housewife that the kitchen is comfortable. The tabletop is the main part of the work area. Typically, tabletops vary in thickness depending on their use
Although all models are made in the same way, there are also several different ways to make your own tabletop
Typically, countertops vary in thickness depending on their use. Although all models are made in the same way, there are also several different ways to make your own countertop.
Benefits of wood
The most popular type of material used to make a country table is wood. This is due to the following:
- wood is easy to process and has an aesthetic appearance;
- the tree is resistant to natural phenomena and climatic factors;
- due to good shock absorption, chips and scratches rarely form on the wood;
- if necessary, a wooden product can be easily restored;
- the material gives room for imagination in terms of processing and painting;
- products can be decorated in various ways, adding originality;
- wood is environmentally friendly and safe for health;
- the price of wood material is affordable for many;
- wood is distinguished by its visual appeal.
How to make a table from plywood
Make a collapsible plywood table using a small amount of readily available materials and simple tools. Prepare materials (list on the website). Cut the plywood into 4 pieces. Two for the top and bottom of the table, and two for the walls. There should be a notch at the top and bottom. Measure a notch 15cm from the front and back of the table and 4cm deep. Cut on both sides. Cut out the tabs in the legs. The width of each cutout should be 15 cm. Then make spacers from the legs. Here, trim the table the way you want. You can customize it to suit your chair and to your liking.
Just make sure you trim the legs to the same height.
Then clamp, glue and screw the two outer spacers to the bottom of the table. Make sure they are flush with the edge. Then clamp and glue the two inner pads to the bottom of the table. You don't need to screw them in. Once the glue has dried, clamp and glue the top of the table and screw it to the outer spacers. Fill and sand the grooves and ridges until they fit snugly. Most likely, the legs will not fit on the first try. Remove a little excess from both parts until the legs slide in and out easily. Drill two holes in each support to allow the stem to be installed. Sand all surfaces so they are smooth, clean and level. Use your favorite paint or varnish. Do this while the table is disassembled. Transparent matte polyurethane was used here. Once the finish is dry, insert the legs and rods. Use nuts and washers on the inside of the legs and a washer and nut on the outside to tighten and secure the legs.
Photo source: www.instructables.com/id/Pack-Flat-Plywood-Desk/
Cheap plywood table
Another cheap, lightweight table that can be made from a sheet of plywood and a 2x3 (or 2x4) board. It's really simple. Measure and cut the plywood into pieces, there are not many of them. Glue and screw the "back" to the "top" and then the "legs" to the back/top joint. Take a 2x3 board and screw one in the back across the bottom, and one in the center under the tabletop to keep it from bending. This may not be necessary if thicker pieces were used. Perhaps not the best option for a computer desk, but you definitely won’t buy or make it cheaper. And so, a sheet of plywood and a couple of boards and the workplace is ready. If we modify it a little more, screw on some shelves and some niches for documents. But overall, the idea is good.
Photo source: www.instructables.com/id/Another-Cheap-Easy-desk—-1-sheet-of-plywood-and-/
Driftwood table
An original and stylish table can be made from ordinary driftwood found in the forest and a piece of glass. Here you don’t even need special skills to turn natural material into a beautiful coffee table.
Step 1. First of all, in the forest you need to find a snag of suitable shape and size. Usually, just the root part of a fairly mature tree is used.
First, find a suitable driftwood
Step 2. You need to remove all the bark from the surface of the driftwood, clean it of debris and soil.
Removing the bark
The snag needs to be cleared of debris and soil
Step 3. It is necessary to saw off the excess wood from the bottom and top of the driftwood, forming the most even cuts. One of them will serve as a lower support, the second - a support for the glass.
Excess wood is trimmed
Step 4. Next, the entire surface of the driftwood must be carefully sanded to perfect smoothness.
Sanding driftwood
Grinding process
Step 5. At the next stage, you need to coat the surface of the driftwood with wood varnish and let the varnish dry well. You need to cover the entire surface of the former tree.
Applying wood varnish
Step 6. Now it’s time to work on the tabletop, which will be made of glass. You need to cut a piece of the required size, and then sand its edges. It is important to remember that the glass must be thick enough and the edges must be sanded using water.
Sanding the edges of the tabletop
Step 7. Next, you need to place small wooden cylinders on the protruding parts of the driftwood, on which the tabletop will rest, and make marks on the glass itself in the places where holes for fastening will be made.
The tabletop will be located on such cylinders
Step 8. You need to drill holes in the glass for the bolts that secure the glass to the driftwood.
Drilling holes
Step 9. Next, you should fix the glass at the ends of the driftwood using special bolts.
Fixing glass
Step 10. All that remains is to close the bolts with decorative plugs and that’s it, the table can be used.
The bolts are closed with decorative plugs
Ready-made driftwood coffee table