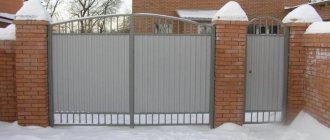
Photo: 2gis.ru A good and reliable fence around the site requires the same gate. Of all the variety of materials, it is easiest to work with corrugated sheeting, because besides it you only need a few pipes, fittings and fasteners. Moreover, you can definitely do it with your own hands. Let's tell you more!
Swing gates
This is a reliable conservative option. Very easy to install, do not require large time and material costs. They consist of several iron flaps tightly attached to each other, suspended on hinges. The frame for them is made of steel angle. Often a doorway is cut out in one of the parts. A simple mechanism allows you to install the entire structure yourself.
Recoil
They consist of several or one leaf; when opened, the gate moves to the side parallel to the fence or garage wall. Installed in large garages, hangars, at the entrance to the site.
Space is needed for free movement. The mechanism is complex, has many nuances, and installation of such gates will require the help of a specialist.
Lift gates
Single-leaf gates, when opened, rise up to the ceiling and become parallel to the floor. They move according to the hinge-lever type. They are considered compact and do not require much space to open them.
A good choice for a small garage, if it is heated, under unfavorable climatic conditions the mechanism can jam and become blocked.
Sectional garage doors
Sectional garage doors are very modern, easy to use, and can only be installed by professionals.
When opened, they move along the guides and ride up to the ceiling. They consist of refracting sections that move using a spring mechanism. They operate by chain transmission.
Possibility of original design solutions
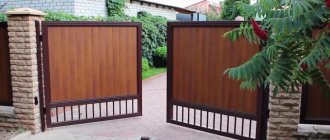
Metal swing gates with a wicket made in an antique or modern style (photos can be seen in the portfolio) may inspire you to come up with interesting solutions. Before making a choice, you can look at photos of swing gates of various designs, check prices and the cost of automation, if necessary. Be sure to, even in the most economical option, try to take into account the cost of installing a gate. The presence of a gate is not only a convenient option, but also increases the service life of the main driveway gate.
Design and drawing creation
First, you need to decide on the size of the gate; it depends on the height and width of the garage and the car itself. A sketch showing the layout and dimensions of the garage is drawn on a sheet of paper using a pencil and a ruler. A comfortable space for entry is considered to be 2.5-3 m wide and up to 2.5 m high.
The distance from the frame to the perpendicular wall is ideally at least 80cm. Entry and exit must be unobstructed and safe for cars. There should be at least 30cm between the edge of the machine and the nearest wall.
HOW TO ORDER DESIGNER WICTS IN A MODERN STYLE IN UKRAINE?
Our friendly team of professionals is ready to turn your idea into reality! All you need to do is send a request using the “Place an order” button, indicating your wishes. By calling +38 and +38 you can get full advice on individual production, as well as find out its cost taking into account current promotions.
CONTACT US FOR HELP
Samples of work and examples of designs are present in each exhibition salon “GATE 24 Ukraine”. Metal gates with a built-in wicket photo? Check out the products for arranging private territory today by visiting offices in Dnepr, Kharkov, Ivano-Frankivsk, Lviv, Odessa and Kyiv. We remind you that showroom guests always receive a 10% discount on the total order price!
How to treat the surface → Room decoration → How to choose the right paint → Surface treatment technologies → Leveling and finishing the walls → Selecting and applying a primer → Removal from the surface → Stretch ceilings and technologies → Reviews and testimonials
Manufacturing the mounting frame
- Prepare frame elements. Using a grinder, cut four pieces from a metal corner of a size corresponding to the height and width of the garage opening.
- Lay out the blanks on a flat space, in the form the finished frame should look like. Using a square, carefully measure the diagonals and adjust the angles to 90 degrees.
- Place the edges of the iron corners on top of each other and weld them together. This method is more durable compared to welding in one plane. Sand the seams with a grinder to ensure a tight fit of the gate to the frame.
- To prevent the steel corner from bending and the frame to remain rigid, scraps of metal should be welded into vertical “levers.”
Frame
The frame should be slightly smaller in size than the gate frame; metal doors are attached to it, for which you can use a 60*20 mm rectangular profile or a steel corner.
From any suitable material, make four pieces 10-15mm smaller than the height of the frame. Thanks to this, the movement of the valves will not be difficult. If there are two leaves, cut four sections corresponding to the width of the gate, divided in half and reduced by 30-35mm.
On a flat surface, preferably inside the finished frame, check the right angles and weld the frame.
We fasten the corrugated sheet
Self-tapping screws for corrugated sheets
Self-tapping screws for corrugated sheets
The width of the corrugated sheet is usually 110 cm. About 10 cm will be spent on the floors. Thus, to cover a two-meter wide door you need exactly 2 sheets of material. If desired, the gate can be sheathed on both sides.
We attach the corrugated sheet to the gate. We make cutouts for the hinges. We attach the corrugated sheeting to the gate. We make cutouts for the loops
We fasten the sheets using hex head screws and nuts or special rivets. It is better that the color of the fasteners and the base material be the same.
If necessary, pre-paint the fastening elements. We place bolts or rivets in the inner wave of the sheet (the one that fits tightly to the frame). We fix it in each wave of the profiled sheet. For greater convenience, we can pre-make holes in the frame to accommodate fasteners.
The gate is sheathed similarly to the doors. You just need to pre-cut the sheets to the size of the gate.
Front side
View from the yard
Gate leaves
The most common material for making garage door leaves is sheet steel. Running thickness 2-4 mm. The height of the sashes must exceed the height of the garage opening by 3 cm and in order to overlap, they must differ in length by 2 cm from each other.
We buy floor lamps for readingAre cacti in the house good or bad?
- Choosing entrance doors for your home
First, the corners and middle of the sheet are welded, then at intervals of 10-15 cm, with point movements, the rest of the sheet. To prevent deformation, excess welding in the corners should be cut off.
Then the reinforced hinges are welded. The lower part is to the frame, and the upper part is to the sash.
Using reinforcement and strips of metal, you can strengthen the fastening by welding a strip of about 6 mm to the upper half of the hinge and to the sash. The fittings are welded from the inside.
When everything is ready, the corners are straight, everything is securely fastened, the doors open and close tightly without hindrance, you can begin installing the gate.
How to make it yourself
To install a homemade gate, you must have construction knowledge and skills. It is necessary to carefully plan the installation location, develop a design, and take into account many nuances. To calculate the required amount of materials and correctly determine the rigidity of parts, it is necessary to prepare a drawing indicating the exact dimensions.
Should be considered:
- dimensions of each door;
- total width of the opening;
- the number and dimensions of support pillars, as well as the depth of their excavation;
- gate position and size;
- loop position;
- design and dimensions of locking elements;
- placement of reinforcement parts: metal corners, lintels.
Necessary tools and components
To make a gate with a built-in wicket, you need to stock up on:
- main materials: wood, euro picket fence, corrugated cardboard;
- self-tapping screws;
- metal pipes of different sizes for making shelving;
- profiles for the manufacture and reinforcement of frames;
- metal sheets;
- a loop;
- shutters;
- locks;
- metal paint of the selected color;
- brushes;
- decorative elements.
In addition, you will need the following tools:
- Bulgarian;
- electric drill;
- plumb line;
- welding machine + protective mask;
- metal scissors;
- building level;
- roulette.
Installation of supports
Installation steps
- First of all, we prepare the pillars: using a grinder, we cut pipes of the required length. Next you need to drill holes to a depth of 1/3 of the height of the stand. If possible, use a garden drill for this job. The diameter of the hole should be twice the diameter of the post.
- We fill the holes with sand mixed with crushed stone to a level of 15-30 cm.
- We install the supports strictly vertically and lay the foundation under them.
- We cover the racks with any facing material that does not allow precipitation to enter. Brick, stone and even wood will do.
Creating sashes
We take repeated measurements to eliminate possible errors and cut out parts. We make an opening for installing a gate. We carefully clean all edges. We weld the sheets, first coming out of them with each other.
We process the places where parts are welded. To do this we run:
- cleaning seams;
- degreasing;
- stuffing;
- painting.
You can do without a primer and cover the surface with metallic paint, which can also be applied against rust. After drying, paint again.
The next step is to weld the hinges to the support post, then to the frame with a recess of 20 cm from the frame. The way the doors open will depend on where the hinges are attached - only in one direction or in one direction and away. To prevent parts from dangling and damaging the upholstery, limiters are installed. Heavy gates are equipped with three hinges on each side; For lighter options, two are enough.
We attach the sheets to the frame through the protrusion of the profile. We attach the material to the frame and stiffeners. If there is a need to connect two sheets - one is not enough to make a door leaf, you need to overlap the profiled sheets in a wave that overlaps one or both sides of the door, depending on the wishes of the owner. It is better to secure the corrugated sheets using roofing screws made in the color of the polymer coating.
If corrugated sheeting is used on the roof, then an identical product must be selected for the gate.
Welding frame and other structural elements
Ideally, metal pipes should be used to make the frame. Their cross-section must be at least 60x40. You can assemble a frame from wooden blocks treated with protective impregnations. Choose the material that is at your disposal.
To build the frame you will need a flat horizontal base. It will be convenient to organize assembly on it. We weld the parts, reinforcing the joints with steel corners or spacers as we work. To assemble wooden structures we use self-tapping screws or bolts.
Gate painting
If a material that does not have a polymer coating was used in the manufacture of the gate, then the finished product must be painted. Painting is done as follows.
- The surface is coated with a primer (the type of primer is selected depending on the type of paint used: alkyd or acrylic).
- Allow the product to dry. If necessary, repeat the priming procedure, and then allow the soil to dry again.
- The gates are painted with a roller, applying parallel, uniform stripes. Each subsequent strip should overlap the previous one by 1-2 cm.
- Take a contour and a brush, paint over all hard-to-reach places.
Coloring can be done several times until the desired color is achieved.
Features and installation tips
When installing gates, a number of conditions must be observed. This will help you get the job done efficiently and get a durable and reliable product.
- It is better to design doors of such dimensions that only a sheet of corrugated cardboard can be used. By avoiding joining the canvases, you will ensure that there are no seams, which are always the weak point of the structure;
- if the space formed below is too large, cover it with a removable panel for the summer;
- when making a wide sash, stronger reinforcement will be required. When purchasing material, it is necessary to provide for this moment and purchase products in excess of the planned limit;
- if you are not a welder, buy pipes with a wall thickness of 3 mm. It is much easier to weld such rolled metal, and even a non-specialist can do it;
- It is recommended to cut the parts for fastening the corners at an angle of 45 degrees. This advice is especially relevant when cutting out parts that form the top seams;
- measurements must be taken carefully. The frame size must match the door size. If a mistake was made, it is easier to correct it when the sashes are slightly smaller than the frame. In this case, we weld a patch on the door that will close the gap. Otherwise, you will have to cut the parts, reduce their size and weld them again;
- When making gates with a wicket, it is better to use profile sheet No. 8, 10. This may be a “C” grade, but the best choice would be the “NS” option with the highest safety margin.
- When manufacturing the sashes, efforts should be made to ensure that there are no sharp protrusions of the profile along the edges. It is better to finish the sheets with “recesses” along the edges. Otherwise, the gate will look sloppy, and its edges will pose a danger to both the owners and visitors to the house, as well as to their clothing.
Errors in gate construction
Let's look at the main mistakes when building a garden gate with your own hands.
- The first common mistake is choosing the wrong season to install the gate. Do not install gate supports in frozen ground, as the entire structure may become scalded after heating.
- The wrong choice of material leads to disappointment. When people try to install gates more economically, they build wooden gates for them. Because of this, doors very quickly lose their beautiful appearance and structural strength.
- Incorrect or inattentive markings. Layout affects the outcome of construction work. It is important to approach this stage responsibly, otherwise it will be difficult to achieve a good result.
Installation
First, you need to attach the outer and inner parts of the frame to the slopes of the garage opening with metal pins. The ends of the pins are cut off, sanded with a grinder and painted over.
Using metal plates (jumpers) at a distance of 60 cm, the outer and inner frames are fastened together.
Finally, the doors are hung and the free movement of the gate is checked.
To prevent the gate from skewing and protect it from the harmful effects of wind and precipitation, vertical locks should be installed; they will ensure reliable fastening. It is also necessary to glue a seal to ensure maximum adherence of the sashes to the frame.
To protect the canvas from adverse conditions and destruction, the finished gates are primed and covered with several layers of oil paint.
Locks
To secure a garage, use padlocks, mortise locks, or use pin stoppers and deadbolts. The stopper is a part of the pipe into the cavity with which a metal rod is immersed. It should go through the loop welded to the gate and stick into the floor or ceiling. Basically, with the help of a stopper (lock), one gate leaf is closed, and an internal lock is cut into the other.
From the outside, it is advisable to strengthen the protection with a padlock, which is threaded into loops welded to the edges of the two doors.
Locks require timely careful maintenance and protection from weather conditions and corrosion.
Classification by opening method
There are two types. Let's look at each of them in more detail.
Automatic system
For those owners of private houses who love convenience and comfort, such a modern solution as an entrance gate in a private house is suitable; you will see photo examples below. Their peculiarity is that they are equipped with an electric drive and operate in automatic mode. All they need is a relatively low-power electric motor and simple electronics.
Electric gates allow the owner to open and close them while at home or in the car. Currently, there are designs equipped with sensors that are tuned to the owner's car signal and open or close upon delivery.
As a rule, the electric drive is installed on sliding gates. Automation of opening and closing of hinged structures is expensive and therefore rarely used.
Mechanical drive
Such designs require manual opening with a key or by turning a special lock. They are often used for swing gates. The constipation is purchased together with the main composition or made to order.
There are two popular types of mechanical constipation:
- Vertical. The sliding mechanism ensures reliable fixation. The handle block is placed between several metal rods.
- Horizontally. The most popular type. Suitable for any gate. The retractable lock is placed between the metal bars in a horizontal position.
There are several types of mechanical locks available for sale that are suitable for gates...
Such locks are equipped with an overhead mechanism that is mounted on the frame and enters the base from below. If the design is two-leaf, then each of them will require a lock.
Insulation of garage doors
Polystyrene foam is often used to insulate garage doors. Sheets of insulating material are laid out on the internal doors of the frame and fixed with plywood or clapboard.
You can make a wooden sheathing, lay it with polystyrene foam PSB-S or mineral wool and seal it with facing slabs. The main thing is to fill all the air space well.
Additionally, you can install a plastic curtain or hang a tarp inside the garage.
After carrying out insulation work, do not forget about good ventilation.
Making gates takes approximately 2-3 days of work, and the result is unique sizes and a special design. Do-it-yourself work increases self-esteem and improves your mood.
Preparatory work
At the preparatory stage, it is necessary to make a drawing with exact characteristics, as well as select the necessary tools and materials.
Drawing
To begin with, a drawing of a forged gate is created. On it it is necessary to note the shape and size of the entire structure, as well as its individual components. The shape of the gate can be: classic, rectangular, round, with elements of bends and peaks. The diagram must accurately reflect the distance between elements, the location of components and decorations.
The sketch includes the type of fastening of the gate with the fence, the configuration of the leaves and the type of their connection. Near the gate there is a wicket with its characteristics.
drawing of a forged gate
Tools
Make sure you have the tools listed below in advance. The material hardens quickly when welding, so to avoid failure, all means must be at hand.
- Welding equipment;
- Forge and anvil;
- Hammer;
- Ticks;
- Machine;
- Stitching;
- Gas welding machine (for spot welding);
- Vise;
- Electrodes;
- Metal grinding machine.
Materials
It is better to purchase materials in advance too. To save money and time, compare prices at different stores. Some materials will have to be ordered in advance, and this will take time.
- Steel sheets for continuous filling of 1 mm sashes;
- Sheet steel for forging pointed peaks;
- Bricks;
- Pillars;
- Mortar for installing pillars;
- Profile pipes for the frame;
- Tetrahedral elements.