Any work with wood is always exciting, because it gives you the opportunity not only to show your own imagination, but also to make something that fully suits your needs and tastes. Agree, it’s nice when there is something made by yourself in the house.
If, for example, you worry about how to make a wooden box with your own hands, you can get a useful and beautiful accessory! This box can be used to store collectible coins, jewelry, and other small items. The thing is, in a word, convenient.
How to make a wooden box with your own hands
The idea of beautifully decorating a box with your own hands
The nuances of making wooden boxes
There are various ways to make a wooden box. A simple method, which is most suitable for beginners, involves using a sheet of plywood, which must be carefully leveled and treated against various types of defects. After preparing the surface, it is marked in accordance with the drawing of the future box, which will require a ruler, compass and pencil.
Creative projects do not require a lot of time, complex measurements and planning
On a note! It is important to accurately work out the design of the product, because the quality of the final result will largely depend on this stage.
The most common type of box is the classic one.
To maximize savings on consumables, all elements of the box can be made rectangular - this way there will be almost nothing left over.
After checking the applied markings, the walls, lid and bottom of the structure are cut out. It is important to cut very carefully to obtain the smoothest possible contours. Otherwise, due to negligence, you will have to re-manufacture the damaged parts.
Plywood box
After this, the parts need to be connected. It is best to use wood tenons for connections. If the box is small, the tenons can be ordinary ones with a square cross-section (their height should be the same as the thickness of the plywood sheet).
Tenon joints
If you have cut out all the blanks and removed excess fragments from them with a file, then you can rejoice - the most difficult part of the work is over! Now all that remains is to build a box from ready-made parts. The spikes are driven into the sockets (if necessary, if they do not fit, the excess is filed off with a file). It is recommended to lubricate the walls with glue for greater strength, and then firmly connect them to each other, which is traditionally done using a vice.
Making a wooden box with your own hands
The bottom of the product is placed along the edges with glue, after which it is pressed against the walls and kept for some time. To secure the lid you will need small metal hinges. This is exactly how the simplest wooden boxes are made. Having finished manufacturing, you can begin decorating.
Graceful form, unusual style, modern design
Choice of shape and size
A wooden box does not have to be as simple as possible, having a standard square or rectangular shape. The product can be made more original and interesting. Everything here will depend on the wishes and project of the master who makes the accessory. Thus, models designed for various accessories and jewelry can have medium or small sizes. They often have soft inner lining.
For the latter, materials such as velvet or suede are ideal. Such additions protect expensive metals from accidental damage and scratches on the wooden surface of the box. Typically, these designs have wider compartments designed to store necklaces, beads and special rollers for fixing bracelets.
Wooden boxes designed for storing all sorts of household little things - keys, small documents and other similar trinkets can have similar sizes. Larger boxes should be made with drawers. They make a kind of mini-chests of drawers.
The size of the box being made directly depends on what exactly it is being made for. If you plan to store a lot of medium or large items in it, then its dimensions should be appropriate. If the box is made to contain all sorts of little things, then it can be made compact and neat.
The shape of a wooden box can be absolutely any. Here home craftsmen are not limited in anything. Of course, most users make classic models with a rectangular or square structure, but a more interesting option can be made.
Wooden boxes with the following shapes look vibrant and bright:
- chic options in the shape of a heart;
- elongated oval or round options (look especially interesting if complemented with carvings);
- curved options (in the shape of the letter “C”);
- in the form of an original wooden gramophone (this way you can make a music box);
- in the form of a luxurious royal casket;
- in the form of a complex mechanism with many small parts (difficult to implement options).
Today, unusual boxes with non-trivial shapes are especially popular. The accessory can be made in the form of a baby grand piano/upright piano, a safe, a book, or a treasure chest. The design of the product can be completely unexpected.
Often, at first glance, nothing in these items gives away the box - they seem to be just an interesting souvenir, but in fact the souvenir turns out to have a secret, and there is a place in it to store all sorts of things.
How to decorate a box?
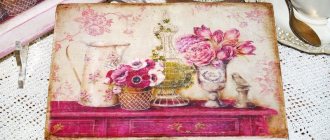
To decorate the product, you can varnish or paint it. Some people prefer carved boxes (such as the one in the photo below) or those made using decoupage technology. In any case, the final result will depend on the creativity and imagination of the master.
Chic vintage box created using decoupage technique
Peculiarities
Wood has always been a high-quality, sought-after material, from which not only reliable buildings or pieces of furniture were made, but also various accessories. The latter include charming boxes. These products can be safely called universal, since they can be used to solve many different problems. A beautiful wooden box can be a wonderful gift for a birthday, New Year or any other holiday.
You can store rings, earrings, chains and other ladies' jewelry in it. There are many areas of application for these products.
Today in souvenir shops you can find a lot of different models of wooden boxes. Consumers can find an excellent model that will become a spectacular interior decoration. However, many people do not want to spend extra money on purchasing such an accessory, because it is quite possible to make it yourself at home.
A homemade wooden box can be absolutely anything. The shape and size of the object will directly depend on the ideas of its creator. At home, it seems possible to make not only a simple, but also a chic carved model.
The process of making plaster itself is creative - here the master can let his imagination run wild. The main thing is to show a little patience and stock up on all the necessary materials/tools.
About carved boxes
To perform this type of woodwork, you should prepare:
- oblique knife;
- pencil;
- pen knife;
- compass;
- ruler.
Oblique knife
If you need to cut out oblong-shaped parts, use a feather knife for the job. It is more convenient to cut geometric shapes and straight lines with an oblique knife.
On a note! The required pattern must first be applied to the wood, for which you can use a ruler with a compass or a stencil. If a piece cannot be cut with a knife, then stripping will be required. Having finished cutting, all that remains is to sand the product with sandpaper.
Carved wooden box
Required materials and tools
If you decide to make a beautiful wooden box with your own hands, you need to stock up on all the necessary tools and materials. In order for the casket to turn out to be of really high quality and beautiful, you should not skimp on the specified details.
Let's consider what you will need to buy to make a beautiful accessory yourself:
- you will need sheets of plywood or wood - it is recommended to select boards with a preferred thickness of 1-1.5 cm;
- cardboard;
- special adhesive composition for wood;
- loops for installing the lid of the box;
- accessories;
- selected scenery.
Depending on what particular model of box you plan to make, you can use materials such as plastic, cardboard, bamboo, steel and even marble. It is important to have not only suitable materials, but also good tools, with which the process of making an accessory will be quick, easy and hassle-free.
You will need the following tools:
- pencil and ruler;
- hand saw or special electric jigsaw;
- set of files;
- wood saw (will be needed for cutting material);
- a screwdriver, if some parts will be fastened together with screws;
- hammer;
- wood file;
- a manual router may be useful;
- sandpaper for sanding workpieces;
- paint, rollers and other equipment that will be needed to complete the final finishing of the product.
Having all the necessary components, you should not immediately rush to make the box. First, you should draw up a detailed diagram, a sketch of the future product.
It is advisable to indicate in the drawing all the dimensional parameters of the casket. Having such a plan, making the accessory will be faster and more understandable.
Option #1. Beautiful wooden box
Let's start with something simple - with the plywood box mentioned above.
DIY plywood box
To make it, prepare:
- eight-layer plywood;
- router, end mill and 45 degree cutter;
- polymer glue;
- gold paint;
- electric jigsaw;
- acrylic varnish;
- sandpaper;
- gas burner;
- putty;
- screws;
- 2 loops.
Step 1. To begin with, future blanks are marked on a plywood sheet (these are 4 walls, 1 bottom, 1 lid and 4 lid walls).
Marking future blanks
Step 2. All parts are cut out using an electric jigsaw. Although it is better - if possible - to use a circular saw (this way the cuts will be smoother).
Cut blanks
Step 3. The edges of the workpieces are processed with a router at an angle of 45 degrees - this way the layers of plywood will be visible from the outside.
Workpiece edges after processing
Step 4. The surfaces of the workpieces are carefully processed with sandpaper, all flaws are eliminated.
Workpieces are sanded with sandpaper
Step 5. On a flat working surface, a box is created from the walls. It is better to use polymer glue for this - it sets quickly enough and has good viscosity.
Assembling the box with glue
Step 6. The walls of the lid are connected in the same way.
The lid walls are also assembled
Step 7. The walls of the lid are aligned flush with the box until the glue has completely hardened.
Fitting parts
Step 8. The result is the following design, which relatively clearly demonstrates what the box will look like.
This is what the box will look like
Step 9. The joints are puttied. By the way, if a milling table was used (and in our example there was none), then there would be no gaps, since manipulations with small parts would not be carried out by weight.
All cracks are filled with putty
Step 10. The parts are sanded using putty.
Sanding over putty
Step 11. Next, you need to mark the places for attaching the hinges.
Places for hinges are marked
Step 12. Seats are selected using a miter cutter.
Seats selected
Step 13 This is what you should have. You can guess.
Result of work
Step 14. The metal loops are fixed with screws.
Screwing the hinges
Note! Before screwing the hinges, the holes for the screws are made in advance, and with a drill of a slightly smaller diameter! Otherwise, the plywood may tear due to screwing in the screws.
Step 15. The hinges are removed. The product is fired carefully, but it is important not to overheat it (otherwise the walls will move like a screw).
Firing the box
Step 16. The hinges are reinstalled. The lid of the product is coated with acrylic varnish. Then the box is covered with masking tape, as in the photo below, and the edges are painted with a sponge.
Painting the edges with a sponge
Step 17. You can decorate the box with some kind of design. In our example, this is a hieroglyph, pre-printed on paper and cut out (the result is a homemade stencil).
Paper stencils are cut out
Step 18. The stencils are filled, after which you need to wait a while for the drawings to dry.
Stencils are stuffed
Step 19. Actually, that's all. The homemade box is ready!
Photo of the finished plywood box This is what the box looks like inside Another photo of the box
Now you can put something in it and put it in the designated place.
The box is in the place reserved for it. We are sure that it turned out quite beautifully.
Useful tips and tricks
If you decide to make a beautiful and high-quality wooden box with your own hands, then you should take on board some useful tips and recommendations.
- If you are making a box for storing jewelry, it is advisable to decorate its interior with soft, velvet fabric, and glue a small mirror under the lid. With such components, accessories will not be scratched, and they will be very convenient to try on.
- If desired, you can make a casket “with a secret”, in which, for example, you can store cigars. An interesting solution is a model in which pleasant music plays when you open the lid. Such products are difficult to implement and require special tools. It is better to do such options under the guidance of a more experienced master.
- You can make a box using pieces of wood of different species that have beautiful textured patterns.
- It is necessary to cut out all the details of the future design as accurately and clearly as possible. You should not violate the boundaries of the drawn blanks, otherwise it will be very difficult to assemble the product in the end.
- It is recommended to clean small parts with fine-grained sandpaper. This item will be especially relevant in the process of decorating carved elements on the casket.
- If you are making a chest not for jewelry or small trinkets, but for sewing accessories, then it is advisable to provide several separate compartments in it, and add an easy-to-carry handle to the top part.
- If the box is made of beautiful, dark wood, then its texture can be effectively emphasized by waxing. If the model is made of lighter wood, then it is best to coat it with linseed or other oils (if you have chosen this finishing method). To experiment with colors, you should turn to high-quality, water-based stains with coloring pigments.
Option #2. Original double-walled box
Making such a box is much more difficult, but we will help you figure it out.
Double-walled cherry box
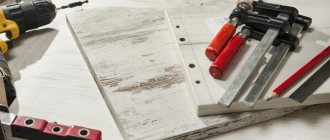
Step 1. On the pre-processed workpiece, you need to draw cut lines with a pencil. And here one important point should be taken into account: when transferring the sketch, it is imperative that the longitudinal orientation of the fibers be observed!
Drawing of a cherry box
Step 2. An even longitudinal part is cut from the workpiece (its thickness should be 1.5-2 cm). This part will serve as the cover of the product in the future.
Sawing the workpiece
Step 3. Next, change the inclination of the saw table. It is necessary to change the angle literally by a few degrees.
Changing the inclination of the saw table
Step 4. After this, the part is cut into 2 parts and the internal waste part is cut out. Thus, a conical cavity of the product is formed.
Cutting out internal waste
Step 5. The halves are glued back together. Thanks to this, by the way, internal stress is also relieved and cracking and deformation of the product are prevented. The glue should be applied in a thin layer, and all excess inside should be carefully removed.
The two halves are glued back together
Step 6. The glued parts are placed under the clamps. In this case, you need to carefully ensure that there are no distortions or displacements.
The glued workpiece is carefully placed under the clamps
Step 7. The table returns to the horizontal position, a couple of slices are cut from the waste part. This will be the bottom and cover of the future product.
Drawing of the blank for the lid and bottom
Sawing blanks
Step 8. The interior of the box is painted. It is more convenient to carry out painting at this stage, while there is free access from both sides.
Cavity painting
Step 9. The table returns to the inclined position, after which cuts are made along the outer contour.
Step 10. A thin layer of glue is applied to the ends of the bottom, then it is inserted into the lower part of the product (you need to press it with your fingers until it stops).
Bottom gluing
Step 11. The lid elements are glued to the workpiece, cut off at the initial stages of work.
Cover stopper
Step 12. When the glue has dried, the main outline of the lid is outlined, after which this part is cut out.
Sawing the lid
Finished lid for the box
Note! The technique described above is universal, because it makes it possible to experiment with shapes and designs, making original and beautiful boxes with your own hands.
Lesson #1
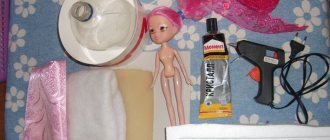
Let's start with the simplest and most affordable option, namely, take a ready-made cigar box and adapt it to a jewelry box. You will need:
- cigar box;
- scissors;
- burlap (or any other suitable fabric);
- a piece of any other fabric for the lining (the material and color do not matter, since the top will still be covered with burlap);
- decorations!
1: Measure the width of your cigar box and cut a piece of burlap to the appropriate size. The length of the piece depends on how large the box you have chosen - simply wrap it with fabric across it and measure the required length in this way, taking into account that the recesses for rings and bracelets will be made from the same solid piece of fabric.
2: Cut the “lining” fabric into 4 identical strips of the same length and width. Place them all together, place a piece of burlap on top and fold all 5 layers like an accordion. Glue it to the bottom of the box.
Option #3. Simple walnut box
The same steps must be followed when making another project - a wooden box with four walls. Having an unusual design and curved shape, such a box will look really modern and stylish!
A simple walnut box Drawing of a walnut box
Stages of making a box This box was made from walnut
Vinyl wallpapers
You can use leftover vinyl wallpaper to decorate the boxes. Thanks to simple steps you can make a unique item with a metal coating. For this you will need:
- wallpaper;
- PVA glue;
- towel (preferably disposable paper ones);
- acrylic paints of several colors (black, bronze, scarlet, silver, green, gold);
- varnish
You can decorate the entire box or certain elements. To complete the work, take the following steps:
- Cut out pieces from the wallpaper, taking into account allowances for the edges.
- To cover the surface with an even layer of glue, apply it to the back of the paper. The glue can be diluted slightly with water. The base should be very well saturated with the resulting solution.
- The paper needs to lie down for a while, and then it is pressed tightly against the box with a sponge.
Important! It is imperative to ensure that no bubbles appear.
This handmade box will be an extraordinary gift for family and friends
Classic box in vintage style
Vintage box made using craquelure technique
After the described steps, the product should dry and then really give the box the appearance of metal.
- Initially, black acrylic paint is applied as a base. You can use a dark color in a spray can.
- Using towels, the box is covered in red and dried.
- The next layer is silver, and then bronze.
- After this (in small quantities!) black and red colors are repeated
- Now carefully, using a damp towel, cover the entire box with green color.
- The last layer is gold.
After the box has dried, it is coated with varnish.
Exquisite box decorated using decoupage and craquelure techniques
Box in Provence style, made in different colors
Option number 4. Product with concave lid
Drawing of a box with a concave lid
Casket with concave lid
Making a simple box
Sawing a curved lid
Finishing the lid
Finish coating
The box is sent to the final stage of work - varnishing. There are many options for what exactly to cover the casket with. The most convenient for a beginner would be acrylic varnish in an aerosol can. It applies a protective layer evenly and quickly. The varnish will perfectly preserve the natural color of the wood, hide traces of superglue, and add shine. Finally, it will protect the box from the possible destructive effects of sunlight and oxygen, from water, dirt and dust.
If you are going to apply the varnish with a brush, be prepared for the fact that the process will be long and multi-step. It is necessary to cover the casket in several layers, each time waiting for the previous one to dry. Aerosol varnish is much more convenient.
All that remains is to wish you successful testing, deft management of tools and pliable, high-quality wood. And remember, appetite comes while eating: in the process of carving, new creative ideas and the mood for bringing them to life arise!
Option #5. Ice cream stick box
Box made of ice cream sticks
To make such a box suitable for storing various small items, prepare:
- ice cream sticks (29 pieces);
- scissors;
- acrylic paints (2 colors required);
- ruler;
- corrugated cardboard;
- pencil;
- satin ribbon;
- hot glue.
Step 1. To begin, the sticks are painted in 2 colors (choose them yourself). Since our number is odd, it is divisible by 15 and 14.
A total of 29 sticks were used. Painting the sticks.
Step 2. A pair of rectangles (70x55 mm) and a pair of semicircles (height - 30 mm, base - 70 mm) are cut out of corrugated cardboard, after which the cut out parts are painted.
Corrugated cardboard blanks
Step 3. For the bottom, 7 sticks are used, laid out in alternating colors. To prevent the sticks from moving, you can temporarily fix them in the center with tape.
7 sticks on the bottom
Step 4. Cardboard rectangles are glued to the sides.
Gluing the sidewalls The sides are glued
Step 5. Next, sticks are glued along the edges (also with alternating colors, 6 pieces per side).
Glue 6 sticks on each side
Step 6. Another 10 sticks are glued onto the semicircles - the result is the lid of the future box.
10 sticks per lid
That's it, now you can see exactly what the product will look like.
The box is almost finished
Step 7. Strips are cut out from satin ribbon. Next, the ends of the cardboard are sealed with these strips.
Cutting strips Sealing cardboard ends
Step 8. A couple of pieces of tape are glued to the lid of the product, but in such a way that the edges hang down on one side by about 20 mm. These hanging edges are glued to the box, resulting in a kind of “loops” through which the lid will open.
Pieces of tape are glued to the lid. Securing the lid.
Step 8. Additionally, a bow (made from the same satin) and a bead are glued. That's it, our beautiful box is ready! And if you have any other questions, check out the video below.
Finished box made from ice cream sticks
Video – Decorative box made from popsicle sticks
Master class on making a decorative cardboard box
Cardboard is one of the most affordable materials found in every home. To make a decorative box, you can use ready-made boxes or make them yourself.
What you need to make a cardboard box
To make the box we will need:
- corrugated cardboard;
- glue gun;
- scotch;
- PVA glue;
- double sided tape;
- decor
Step-by-step manufacturing instructions
The dimensions of our box are arbitrary depending on what things you plan to use it for. Let's take a closer look at all the manufacturing stages.
- Cut 2 blanks of the same size from cardboard for the bottom and lid, as well as the back wall of the box. Glue it to the bottom and connect it with tape on both sides from the top
- Coat the outside of the frame with PVA glue and glue decorative paper, wrapping it inside
- To avoid thickening in the folded areas, cut off excess paper
- Glue a sheet of paper from the inside of the frame, stepping back about 1 cm from the edge
- Cut two end sides and one longitudinal side from corrugated cardboard and wrap them in decorative paper
- Coat the bottom and side edges of the blanks and glue them to the frame
- Cut a small strip of decorative paper and glue it with double-sided tape to the lid and side of the box
- Decorate the box with decorative beads
Decorating a wooden box – what is worth knowing?
Despite the attractive design and shape, the box will look truly original only after decoration. The technique of relief carving provides in this case almost limitless scope for creativity.
You can decorate the box in different ways
Using key carving techniques, you can create original textures on the box. We can talk about both simple textures and complex ornaments or geometric shapes.
Chisels for applying relief
- A semicircular chisel used to texture the product with small dimples.
- Forming grooves with an angled chisel on the surface of the box lid.
On a note! In the photo below you can find more complex examples of decoration that use complex textures and geometric patterns.
Options for decorating boxes
A few more decoration options
Lesson #4
Favorite jewelry does not have to be stored in a box on a shelf or in a closet. It is much more convenient when accessories are always at your fingertips! We suggest you make these cute display cases in a few steps that you can hang in your bedroom or bathroom. You will need:
- wooden box;
- small cork mat;
- textile;
- centimeter;
- scissors;
- hot glue gun;
- 4 hooks;
- pins;
- wall mounting.
Tip: If you want to pre-paint or prime the box, be sure to wait until the paint is completely dry before you start decorating it.
1: Measure the length and width of the bottom of the drawer (from the inside) and cut a piece of cork mat to the appropriate size.
2: Take a piece of fabric 2.5 cm wider and longer than the cork bottom, wrap it, and secure the cuffs with glue.
3: Glue the resulting part to the bottom of the box.
4: Screw two hooks on the top left and right, on which you can then hang long chains.
5: Screw two fasteners at the back and hang the drawer on the wall.
Insert several pins into the cork base on which you can hang rings, earrings, bracelets and other jewelry.