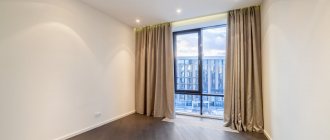
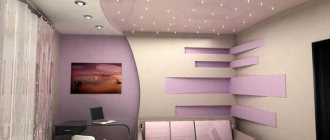
Today in the interior there is often a combination option, a suspended ceiling and a wardrobe. Practical and stylish furniture is functional, roomy, and the tension structure originally complements the decoration of the room. However, when it comes to repairs, difficulties arise associated with installing a cabinet under a suspended ceiling, because it is built in before the ceiling, and the canvas is mounted at some distance from the base ceiling.
What is a mortgage, why and how is it installed?
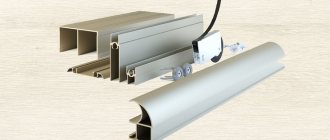
The embedded material is chipboard, a wooden or aluminum beam of appropriate thickness, usually in the shape of the letter P. It is mounted to the ceiling slab using dowels in the place where the cabinet is planned to be installed.
This part takes on all the loads associated with fabric tension and is not afraid of mechanical stress. The canvas can be joined to it at any level; this depends on the choice of room design by the owner or hostess. The cabinet is mounted directly to the same beam. The peculiarity of such a system is that:
- compartment panels are not subject to additional loads;
- the canvas is secured securely and at any height within this beam;
- The embed can be made in the form of a decorative visor, if that is what you want.
- Also, the beam can be made in dimensions exceeding the dimensions of the compartment, and baguettes for hanging fabric in this case can be mounted both on the facade and below, and even on the reverse side facing the door guides. In this case, the hanging canvas can partially or completely cover not only the top panel of the compartment, but also the upper door guides.
And finally, the promised exception to the rules - there are two options when a mortgage is not needed:
- the material of the furniture panels is strong enough to safely withstand the tension of the ceiling;
- the canvas is stretched along the entire perimeter of the room, the furniture is mounted below.
In this article, we briefly described the purpose and options for using (and not using) the mortgage, as well as attaching the canvas to it. What to choose and how to implement it is up to you to decide.
What to do if there is already a suspended ceiling, but there is no mortgage above it?
What to do if you have already had a suspended ceiling installed, but have not made a mortgage for fastening the sliding doors?
There are several opinions on this question. It all depends on how honest the people are working in the company you invited to measure sliding doors. Naturally, no one will work for free, otherwise there is no point in working. The only question is who wants to earn and how much? There are, of course, nuances in which even in theory it is impossible to make sliding doors up to the ceiling. Everyone has long known that in order to make better use of space for storing things, it is of course necessary to make sliding doors of maximum height. Then nothing will interfere with freely placing things, boxes, even the most voluminous ones, on the top shelf. Examples of projects for filling wardrobes can be found here. After all, if the depth of the cabinet is about 55 cm, and a false panel comes down from the ceiling to fasten the doors, then you need space for things to pass freely between the outer edge of the top shelf and the fastening of the doors. We conclude: the greater the height of the false panel, the lower you need to lower the top shelf, which means loss of usable space or reduce the depth of the shelf, but this is not practical.
When a surveyor comes to you and is faced with the problem of lack of mortgage, he evaluates the possibility of getting out of this situation.
Firstly, you need to understand that it is not possible to offer an economical way out of this situation for any cabinet width. As a rule, you will be asked to make a cabinet frame with a roof. This is the most expensive and not very convenient option, since the height of the cabinet is reduced and there is a place for dust to accumulate. But it has its place, especially if you want to add additional external lighting or your closet is located at an angle and has several sections.
Secondly, if you plan to install a suspended door opening system, then you will not be able to get rid of the additional cash costs. You may be offered to make a cabinet roof and sew the mechanism into the box, or you will have to change the suspended ceiling and make a mortgage.
Which comes first: cabinet or ceiling
According to the classic scheme of home renovations, they start at the top and gradually work their way down. That is, first they make the ceiling, then the walls and floor. Furniture is placed last. But with tension structures the situation changes.
The sliding wardrobe is assembled in two types:
- Built-in with door guides attached to the ceiling.
- Frame with a top cover that does not touch the ceiling (the height is slightly lower than that of the room).
Since nothing can be attached to the tension fabric, mortgages are pre-installed to the floor slab. And when assembling tall furniture, be careful not to damage the film with a tool or sharp edge.
If you want to install a wardrobe and a suspended ceiling, you can start by installing the canvas or install the furniture first. But each case has its own subtleties and nuances.
It is better to start with installing the cabinet, this eliminates the risk of damaging the canvas during furniture assembly, and the doors will reach the very top without the slightest gap.
If you first stretch the ceiling, you will need to provide mortgages. Otherwise, you will have to get very creative to secure the guides for sliding doors. A cabinet that does not reach the ceiling looks less aesthetically pleasing and requires great care during assembly, since it is easy to damage the fabric.
Separate design or film around the cabinet?
Independent installation is easier and requires less materials. This method allows you to mount the mount or housing to the ceiling with walls without interfering with adjusting the tension of the film.
An aluminum profile or wooden block with a thickness of at least 4 cm is installed on the concrete floor. Door guides are installed before fastening. Fixation is carried out at intervals of 60 cm, and self-tapping screws with a plastic dowel or anchor bolts are used as hardware.
The aluminum profile is attached to the ceiling bar of the cabinet and closes it
To cover the gap between the canvas and the guides, a decorative plinth is inserted into the gap. If the backlit design is implemented with a sealed LED strip, then it is necessary to provide a place to place the power supply, with access to it in the future.
Materials for production
Depending on the purpose, embedded parts for suspended ceilings are made from different materials:
- aluminum _ Used for fastening any products;
- plastic _ Used only when installing light chandeliers, soffits and baguettes;
- plywood _ Suitable for installing more massive lighting fixtures, cornices, etc.;
- tree . It is a universal option, suitable for mounting any interior items.
The reliability of fastening depends not only on the material, but also on the size of the platform for suspended ceilings.
Installation technology with a ready-made cabinet
The option of working with finished furniture, when you first need to disassemble it and then assemble it, but of a smaller size taking into account the height of the ceiling, raises even more questions. Here it is necessary not only to correctly disassemble the structure, but also to subsequently make its height smaller. You will have to be smart with mirrors and doors. This is where the big problems start:
- unaesthetic or incorrect cut of the material;
- errors in re-installation;
- replacement of mirror elements;
- replacement of the sliding system and internal mechanisms.
The most acceptable and most correct option is the simultaneous installation of a built-in compartment and a suspended ceiling structure. The essence of this solution is simple and reliable - the cabinet itself acts as one of the sides for attaching the mounting rail.
Installed ceiling with finished cabinet
Initially, the installation level of the stretch ceiling is determined. The coupe is ordered taking into account the fact that a rail will be attached to its lid or a specially applied additional strip. Since the rail is made of aluminum alloy, there are no particular problems in giving it the necessary bend. Considering that many walls have a shaped cover with built-in lamps, this decision is entirely justified, because as a result the ceiling covering will have an additional light source. Now you know what is installed first and under what circumstances.
Types by method of fastening
Mortgages for lamps for suspended ceilings are of two types:
- fixed;
- universal.
Fixed ones are selected individually for the specific size of the lighting fixture. Their cost is cheaper, but when replacing a lamp, you have to select a new model with the same diameter as the old soffit. Otherwise, difficulties arise during re-installation.
Universal ones are more common due to the fact that they are suitable for installing most chandeliers and spots. During installation, part of the plastic is cut off, leaving a hole of the required diameter.
Types by purpose
The desired type is selected based on what exactly needs to be fixed. The size of the distance from the floor slabs to the canvas is also taken into account.
Under the chandelier
The lighting market provides the widest selection of chandeliers of all shapes and sizes. Not all of them are suitable for installation in PVC film, but there is plenty of assortment that meets all requirements.
Depending on the individual parameters of the lamp, the platform for the chandelier can be designed as:
- Hook. This mounting method is suitable for almost all chandeliers, but there is a risk that the lighting fixture will hang unevenly. There are several types of hooks:
- anchor _ To install it, a hole is drilled in the floor slab, after which the hook is mounted by surprise;
- end-to- end It is used during the construction of a house, as it is attached through the ceiling;
- mortgage. It is used when there are hollow channels in the slab.
- Planks. With this method of fastening, a hook is not required. A bookmark is placed behind the canvas for a chandelier made of wood, plywood, or plastic. It is installed so that the bottom edge is flush with the PVC ceiling. Next, holes are made in the film for the chandelier, which are reinforced with special rings for the stretch ceiling. The lighting device is rigidly attached to the platform, as a result, the entire weight of the lamp is transferred to the floor slabs. For chandeliers of different weights and dimensions, the strips are available in different shapes:
- longitudinal dies . Suitable for compact lightweight luminaires;
- cruciform . For more massive chandeliers;
- I-beam. Used for heavy multi-tiered structures.
Hanging a lamp on a hook is easier than installing mounting brackets for a chandelier, but using strips guarantees that the lighting fixture will hang level.
Under the cornice
Baguette for curtains and curtains can be mounted in two ways:
- open. The curtain strip is mounted on top of the PVC ceiling;
- hidden. A secret niche is created in which the curtain rod is placed. In some cases, in addition to the baguette, lighting is installed in the recess.
In this case, the shape of the mortgage for the suspended ceiling depends on the method of fastening the cornice.
Both options have their advantages and disadvantages.
In the first case, installation is much easier. The embedded beam is made of wood or an aluminum profile of the required dimensions. It is rigidly fixed to the floor slabs, and the cornice is attached to it. The film is pre-strengthened with tread rings at the places where the baguette is attached.
To install a cornice under light curtains or curtains, a factory-made plastic platform with perforations for self-tapping screws will be sufficient. Such “bars” are attached to the floor slabs using metal hangers. In places of fixation, tread rings are glued to the canvas.
Making a niche is a more labor-intensive and expensive process, but the final appearance is more aesthetic.
The easiest way is to make a plasterboard box around the perimeter of the room, hiding a baguette in it.
If this option is unacceptable, then a niche in PVC film can be made in two ways:
- using a mortgage for a cornice in the form of a beam. This method is suitable for rooms in which there are no significant changes in humidity (otherwise the timber will behave over time). With this installation, the cornice is attached to the floor slabs, and the beam serves as a platform for the suspended ceiling;
- by installing a special profile (PC 5, “Niche Plus”). This installation method is more reliable and aesthetically pleasing, but more expensive financially. The stretch ceiling is actually divided by a profile into two separate canvases, but the end result looks laconic and modern.
If you don’t want to make curtains the entire width of the wall, the niche for the cornice can be made smaller. It is made according to the same principle, but the beam is located in an L- or U-shape.
Not everyone likes the view from the “wrong” side of the niche. Yes, this part of the ceiling is invisible from a normal angle, but for your own peace of mind it is better to improve the hidden area.
You can hide a wooden beam using a special profile for PVC ceilings “with a bumper”. During installation, a bend in the canvas is created, which hides the back side of the platform.
Instead of a wooden beam, you can use a special aluminum profile to create hidden niches. The film is attached to it in the same way, with an inflection. Therefore, the view is aesthetically pleasing from any angle.
Under a spotlight
You can make a platform for a chandelier or cornice with your own hands, but when installing spotlights it is better to give preference to factory-made products. This is due to the fact that the spotlights heat up during operation.
Mortgages for spotlights should, in addition to creating a rigid frame, perform the function of thermal protection. Factory products are installed complete with a special thermal ring. Thus, professionally manufactured fasteners for lamps protect the film from overheating.
It is also worth considering the shape of the spots. Difficulty may arise with the installation of square soffits (especially mortise ones). If there are doubts about the professionalism of the installers, it is better to give preference to round or oval shaped lighting fixtures.
Under the ceiling hood
Not everyone’s ceiling height allows them to hide the corrugation behind the canvas, although this option is quite convenient.
Most likely, you will have to make a platform of the required size yourself, based on the weight and dimensions of the hood. This can be done from OSB board, moisture-resistant plywood, or wooden beams.
It must be secured to the floor slabs using hangers, having previously secured the corrugation with clamps.
For home theater projector
Most often, the projector is attached to the floor slabs on a bracket that comes out through a hole in the suspended ceiling. The canvas is protected from spreading by a tread ring.
Depending on the tread model, installation on a platform is allowed.
Article about furniture
Author - designer of the company DEZALT Sukhanov Eduard
So, you're wondering - what's the best way to install a ceiling embed for a wardrobe? Your workers offer one thing, the ceiling stretchers advise the second, and what should you do so as not to regret it?
Now I will explain everything to you and even show some points on video, just be patient, read the entire article and watch all the pictures and videos.
Partition of compartment doors and suspended ceiling
If you need to partition a room or part of it with sliding doors, you will definitely need a mortgage.
Option 1. The mortgage can divide the ceiling into two parts and a suspended ceiling can be attached to it. In this case, if you suddenly decide to change the ceiling, you will not have to remove the compartment doors or unscrew the top track. Just call the masters and they will change the canvas.
Option 2. The mortgage can be located under a suspended ceiling and be invisible. The upper track, which will guide the compartment doors, is attached through the canvas to this mortgage. After this, if you need to change the ceiling, you will have to remove the doors and unscrew the top guide.
Option 3. Install the mortgage just above the expected stretch ceiling, for example at a height of 40mm. Screw on the top track of the compartment doors. After this, the craftsmen can stretch the ceiling using special brackets; they will press the canvas directly to the upper track. The brackets are attached to the concrete ceiling, not to the mortgage.
Once again you get independent ceiling parts and an aesthetically complete look. But consult with ceiling specialists; not everyone can do this.
Now about the nuances
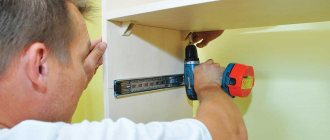
If you settled on the first option , consult with suspended ceiling specialists about what size the timber should be, or, if they do it for you, discuss how they will do it for you. Most often they take 100x100mm timber. attach it to the ceiling in a strictly horizontal position. Sure, can you hear me? Be sure to use a laser level! This is a mandatory requirement. If it doesn’t exist, don’t even start doing it and don’t let others do it. You will spend money, effort and get a skewed mortgage and compartment doors with cracks along the bottom, or even at the top. It's even better if you check the height difference between the floor and this beam. If there is a distortion of more than two centimeters, you will have to level the floors, or warp the mortgage, lower it lower in the place where the floor goes down. It is necessary to ensure that the height between the floor and the beam is the same. I repeat - allow a difference of up to two centimeters.
If you had to lower the embed lower, make it not horizontal, then you will have to stretch the ceiling too crookedly, not like a laser.
Further. You have decided on the size of the mortgage, found out that there is no difference in height of more than two centimeters, purchase timber. Know that wood is a living material, it must lie in the room where it will be screwed for 2 weeks in order to accept the humidity that is in the room. You can also make a mortgage from plasterboard with a metal frame inside, please. If your compartment doors are not suspended, but have a bottom track, then feel free to use drywall or other lighter material. Compartment doors with a lower track put pressure on the floor, on the track on which they ride. If the compartment doors are suspended, a strong mortgage is required. Check the operating principle of sliding doors with the specialists who will install them.
If you ignore my advice or follow the lead of the apartment repairmen, attach an overdried or damp beam, be prepared for it to crack and bend. Of course, there are nuances, for example, in an apartment after renovation there is high humidity. The timber became saturated with moisture, sat for 2 weeks, you installed it, everything in the room dried out, the timber became bent and cracked. All decent finishing craftsmen know such moments. They must do everything right for you. The wood may need to be treated with a special impregnation.
I undertake to assert that we are constantly dealing with failed mortgages that were installed at random. This greatly affects the appearance of the compartment doors; the doors also look skewed.
Further. Don't forget about the appearance of this mortgage. I strongly recommend that you putty the timber and paint it to match the color of the ceiling. People often forget about what the entire structure with compartment doors will look like. It’s easier for master finishers and especially ceiling makers to install a “shaggy” unprocessed mortgage for you with the words - well, they’ll close it...
Who will close it and with what? If the mortgage is visible between the suspended ceiling, the track of the compartment doors will not completely close it.
Watch the video in which I show why you need to improve your mortgage.
And this video tells how we suffer with careless repairmen. Don't make such mortgages!
Perhaps it will be easier for you to first make the compartment doors with a frame, and then stretch the ceiling. Watch the next video.
Let's look at the second option , this is when the suspended ceiling is made as one contour in the room, and a mortgage is installed under it.
Again, I strongly recommend keeping the timber in the room for two weeks so that it acquires the humidity that you will always have. It may need to be treated with a special impregnation, consult your specialists.
After this, fasten it strictly according to the laser level, at the border of the canvas. This should be done by ceiling craftsmen, but make sure that the laser beam passes almost along the beam, so that the ceiling material is at the border of the bottom edge of the beam. You can recess the timber by 2mm, no more. The ceiling will fall down the center of the room under its own weight, this is not scary. The scary thing is that if the beam is 1-2 centimeters higher than the border of the stretch ceiling, or even higher, the upper track of the compartment doors will press the canvas upward so that it will be very noticeable visually and can even break through the canvas with the ends of the track. That's why this is all so important.
The mortgage itself must be installed horizontally along the long side and without distortions along the short side, along its width. The beam should not be skewed or bent. When the top track is attached, it can follow the bend of the beam, because the track is made of aluminum alloy and is flexible. The track will fit like a screw and when the compartment doors move in it, they will rub against the twisted track. Very quickly, abrasions will appear on the metal and a characteristic cut will be heard.
Be sure to ask your ceiling craftsmen for special round patches for the canvas. We cannot screw self-tapping screws through the canvas without first securing the puncture site with a patch. The ceiling may stretch and come apart at the puncture site. First, a special patch is glued on, then a self-tapping screw is screwed through it. Masters should know about them. We usually attach the top track with two self-tapping screws every 60cm.
Very often, we come across all of the above problems at once. The beam is screwed, it is installed above the border of the tension fabric, there are no patches for punctures. When I come to measure sliding doors in such cases, when you need to partition a room, when there is already a suspended ceiling, and they say - we took care of it, we installed a mortgage. I immediately feel the mortgage with my hands. I’m interested in how exactly it was installed on the border with the suspended ceiling, this is clear near the wall of the room. If the timber is 5mm deeper from the beginning of the ceiling. I refuse the order and leave. As I already explained above, when we screw on the top track, it will simply tear the ceiling at the edges and that’s it.
If the beam is installed as level as it should be, I check its width to see if it is too narrow. Sometimes they make it literally 4 cm. width, which also negatively affects the bending of the upper track. After that, I take a laser rangefinder, press it against the beam and check the height between the embed and the floor. If the difference in height does not exceed 2 cm, further cooperation can be discussed. Otherwise, I turn around and leave.
There is also a third option , which I mentioned above. Unfortunately, I can’t explain much about it, because I didn’t see the whole process, I didn’t hold in my hands the brackets themselves, which allow you to bring the canvas closer to the beam. I know for sure that this method exists, I saw the result and came across information on the Internet. I tried to talk to ceiling makers about this topic, but they were surprised by my questions and stated that there were no such brackets. I guess they simply didn’t know about their existence. This is the same as ceilings without any plastic ceiling plinth. The canvas is stretched close to the walls and no decorative corner is required around the perimeter. Few people know about such ceilings. Search the Internet for information if interested.
I told you about the moment when you need to install sliding doors in a room and block off part of the room with them. There's no way to get a mortgage here. By the way, there was a case. Some craftsmen managed to attach the top track in a stretch ceiling with glue. I do not recommend agreeing to this. This is all from the same category: the bottom track needs to be glued, not screwed; laminated chipboard strips on the left and right are unnecessary, etc. Yes, at first it’s nice, it’s easy and simple for the master to work with. One, two, you're done. Only then will the client have problems, after a year or two. But that's another story.
What about wardrobes? The essence is approximately the same. If you don’t want the hassle of dismantling the entire closet, install a stretch ceiling up to the closet. You can also use a mortgage, or first make a wardrobe and then attach the canvas to it. All rules for fastening timber frames also apply to wardrobes.
You can watch an explanatory video for our client about how to make a mortgage for a wardrobe.
If you are sure that nothing bad will happen to your stretch ceiling, then feel free to stretch the canvas in one contour and you don’t need to make any embeds at all. Don't waste your energy, money and nerves.
The sliding wardrobe gives us one wonderful indulgence: we make at least one vertical rack inside it, and to it we attach a laminated chipboard strip, to which we attach the upper track of the sliding doors. Your stretch ceiling remains without a single puncture or crease. If you disassemble the wardrobe, the ceiling will remain intact.
Also, sometimes we are asked to make a ceiling from laminated chipboard inside the cabinet, so as not to accidentally tear the ceiling material. We have done this more than once. You will still need a stand in the middle. As you may have guessed, the wardrobe under the finished suspended ceiling will not have a single large mezzanine shelf, only this has a small drawback. The shelf will be divided by a stand, which serves as a support for the upper track or the entire laminated chipboard ceiling.
Below we attach a video in which we make a wardrobe under a suspended ceiling, but the wardrobe has its own roof made of laminated chipboard. You can appreciate the appearance of the ceiling from 35:59 min of the video. There are no mortgages under the suspended ceiling. The central pillars serve as support for the laminated chipboard roof.
I can also advise at what depth to install the mortgage, if you need it. Decide on the depth of the cabinet . The minimum is 650mm, well, 600 is possible, just be prepared for the fact that the compartment doors will constantly touch the clothes on the hangers, because compartment doors take up 100mm. Of course, you can place the rods across the cabinet, then it can be at least 300mm. Comfortable depth is 700, I’m talking about the total depth. If you stopped at a depth of 650, then mark 650mm on the ceiling. from the wall, this will be the face of the mortgage. There are no other tricks here.
I hope I will have to answer less questions over the phone to the same questions, sometimes several times a day, about how to make a mortgage correctly?
I wish you good luck and find a decent performer so that he will do everything conscientiously.
All articles
Mounting options
1. Installation method under a regular cabinet
With this installation method there are two options:
- the ceiling is installed, after which the cabinet is ordered;
- installing a ceiling when the cabinet is standing.
A) In the first option, a stretch ceiling is installed, then the height from floor to ceiling is measured, after which a cabinet is ordered. It is necessary to take the measurements correctly so that when installing the cabinet there is a gap of 5-7 cm to the ceiling. The negative aspect of this method is the eternal dust.
B) If the cabinet is already standing, the distance from the rough ceiling to its roof should remain at least 50 cm. This is necessary so that you can reach the wall with a hammer drill, screw the profile and tuck in the canvas. This installation option does not affect the price in any way.
2. Stretch ceiling and built-in wardrobe
There are situations when the wardrobe is fixed to the very top of the base ceiling. Then, before installing the stretch ceiling, a beam is mounted around the perimeter of the cabinet, then the profile and ceiling are attached to it. In this case, the installation cost increases, taking into account additional consumables and installation complexity.
3. Installation of the mortgage
Timber is also used here. It is mounted before installing the canvas to the base ceiling at the required distance from the wall, where the edge of the cabinet will extend. In the future, door guides will be attached to this beam through the material. Thus, the suspended ceiling appears between the “mortgage” and the guide track. It seems as if the track is attached to a suspended ceiling.
Situation two – the cabinet was installed earlier
Again this is normal. If the furniture is not mounted under the ceiling itself, we mount a wooden beam as a load-bearing element between the top cover and a concrete slab (hereinafter we will call it a beam, a mortgage), on which we then install the suspended ceiling profile. To give the design a full aesthetic perception, we mount a decorative strip on the tree.
However, you can do without a strap by attaching a baguette along the lower edge of the embed.
You can also attach the ribbon not at the end of the media, but under it, in front of the guides. In this way, a kind of visor is formed. If the compartment already has a visor, cut it out, fix it with a mortgage and use it as a battery. In this case, the canvas will hide the cut line.
If the door slats are attached directly to the slab, a recess is attached in front of them and hides the top of the cabinet.
In this case, it is necessary to leave a small distance between the mortgage and the guides, since the ceiling profile is fixed on the back side of the beam. Visually, in this case, it looks as if the cabinet extends into the ceiling. If the gap between the compartment cover and the plate allows you to mount moldings right along the perimeter of the ceiling and you want to do everything that way, add the cost of canvas to the cost of installing the system in a hard-to-reach place.
What difficulties may arise when installing a wardrobe in a room with a suspended ceiling?
There may be many problems, but all of them can be easily solved with careful planning at the beginning. Here are the main problems that may occur:
Installer mistakes
No matter how confident you are in the company that is doing your repairs, workers are different. Installing a wardrobe in a room with a suspended ceiling will not be the easiest task even for an experienced craftsman, let alone inexperienced installers. Careless handling can easily damage the ceiling. All this will lead to the waste of not only nerves, but also money, and a lot of it.
Limitation when choosing a cabinet
It is not always possible to install a wardrobe and a suspended ceiling together. It is quite possible that the option that you really like will turn out to be unsuitable for installation. This condition significantly narrows the number of cabinets from which you will have to choose.
Gap between ceiling and cabinet
Since nothing can be attached to the film, there will be a gap of several centimeters between the cabinet and the ceiling. This gap will quickly become the site of a huge amount of dust. It will be almost impossible to wipe it off, since the gap is very narrow. In addition, this gap will take up extra space, which means there can be no talk of rational use of the space in the room.
Overpayment for hidden ceiling meters
A stretch ceiling is, in principle, an expensive pleasure. For every square meter of high-quality stretch ceiling you will have to pay a considerable amount. In such circumstances, it will be very irrational and wasteful to hide several square meters of the ceiling with a wardrobe. It turns out that you paid for these hidden meters, but they are of absolutely no use.
Installing a wardrobe in a room with suspended ceilings is often very irrational. But sometimes that is the only possible way. Therefore, in order to avoid such problems, everything needs to be planned in advance.
Scheme of installing the cabinet before installing the ceiling
Installing a cabinet with an installed ceiling
A sliding wardrobe under a suspended ceiling is often sought by people who did not bother to plan the renovation in advance and are now forced to look for a way out of the current situation. However, the situation is not critical and it is quite possible to find a good solution that not only suits you, but may also be better than other options. To better understand the essence of installing a cabinet under a suspended ceiling, let's consider its pros and cons.
Professionals:
- Allows you to install a finished cabinet without touching the ceiling
- Installing a freestanding cabinet is often cheaper
- When moving, a free-standing wardrobe can be disassembled and assembled at your new place of residence
There are not many professionals, and most people may not even agree with them. But, nevertheless, in a hopeless situation this is far from the worst option. For the sake of objectivity, let's pay attention to the disadvantages.
The video shows the process of installing a cabinet with a suspended ceiling installed:
Flaws:
- The space between the closet and the ceiling, which will be the main accumulation of dust in the apartment
- Wasted space
- Overpayment for unused stretch ceilings
- Limited selection of cabinets
The disadvantages turned out to be more convincing, and this is not surprising, because the work will be high-quality and efficient only if it is thought out and planned in advance.
Placing a suspended ceiling above a wardrobe
First you will need to screw a wooden beam to the main ceiling slab. The fabric that will be stretched should be flush with the bottom surface of the beam.
Then follows:
- attach the guide to the beam with screws;
- Attach a panel from above to the guide; its function is to decorate the ceiling (the visible part of the screws should be on the panel at the top);
- the panel must be fastened with a baguette to fix the plastic sheet; it is better to use long screws for this;
- assemble furniture except doors;
- install the tension fabric, then you will need to hide the grooves in the baguette with a decorative element and install sliding doors.
The furniture will take up the entire wall. The decorative panel is not a necessary component; instead, you can attach the molding directly to the beam.
If the ceiling should be located around the cabinet
Stages to be completed:
- mark and adjust the timber blanks, after which you need to make holes in it and the ceiling slab with a drill;
- attach the harpoon baguette to the inside of the blanks with self-tapping screws, not forgetting to adjust the joints in the corners;
- screw the beam to the ceiling (accordingly, baguettes will be attached to it, along the level of which harpoon baguettes designed specifically for walls are attached to the wall);
- stretch the fabric and hide the gaps behind masking tape.
Harpoon systems are not particularly easy to install, so it would be better if you order them taking into account all the parameters of the room. Another advantage of this option is the ability to dismantle the suspended ceiling many times if necessary.
HOW TO REPAIR UNDER THE CABINET CORRECTLY?
Have you bought an apartment or started renovation? How to plan a room correctly at the initial stage of renovation work. What is meant by these words? Let's say that you have a small area, one room is 10 sq.m., the second is 20 sq.m. There is little space, but a lot of things, and the best solution is built-in furniture. But in order to correctly install the furniture, you need to prepare in advance while the rough work is underway. It is necessary to take into account the possibility of moving doors, building up walls, and placing lighting, if planned. Doing this after the work is completed will be problematic.
Freestanding and built-in wardrobes. Advantages and disadvantages
It would be incorrect to say that a built-in structure is better or worse than a free-standing one. Each of them is optimal for its placement option and deserves positive reviews.
The main advantages of built-in wardrobes:
- Lower price compared to free-standing ones (due to the absence of a box, material consumption and labor costs for production and installation are lower).
- No gaps (with high-quality installation) between the ceiling, walls and floor. This significantly improves the aesthetics of the appearance and makes cleaning the room easier.
- Possibility of installation in rooms with multi-level suspended ceilings.
- When updating the interior, the appearance of the wardrobe can easily be changed by replacing the doors. The fastening system is not affected.
When ordering a built-in wardrobe, you need to remember that its quality and appearance largely depend on correctly taken measurements and the qualifications of the specialists performing the assembly.
In this regard, we advise you to find a good company that will send an experienced craftsman to you. All measurements and calculations of the future design, as a rule, are performed free of charge. A good help for preliminary calculation of a built-in wardrobe is the online calculator program. It can be found on the websites of large manufacturing companies. For example, by going to the website of the Alait wardrobe factory, you can easily calculate your built-in wardrobe.
Among the disadvantages of built-in structures, we can note the fact that they are all made for a specific room. Therefore, if you move, the likelihood of optimal adaptation to the new room is very small.
Cabinet sliding wardrobes have the following advantages:
- Easier and faster installation. All structural parts are already adjusted to size and equipped with the necessary holes. Assembly proceeds without dust or debris.
- The appearance of the facade does not depend on the evenness of the walls of the room, its floor and ceiling.
- The possibility of dismantling the structure when changing place of residence and independence from the dimensions of the new premises.
- Possibility of rearrangement within the apartment when updating the interior.
Disadvantages of case systems:
- Irregularities in the walls of the room do not detract from the appearance of the cabinet, but become noticeable when it is located close to them.
- Compared to a built-in wardrobe, the box reduces the internal usable volume.
CASE STUDIES
1. A niche was planned in the corridor for a built-in wardrobe - a compartment, where there was a turned corner with a room height of 3100 mm
.
The customer did not know what to do to make it beautiful and inexpensive. I contacted our company for help in resolving the issue, they suggested the following: the corner part of the space is closed and covered with plasterboard, a partition is lowered from the ceiling, forming a straight and neat opening for the future wardrobe and the installation of compartment doors. As a result, the customer became the owner of a functional wardrobe in the hallway with a complex geometry, a “ problem angle
” and neatly “fitted” into the overall interior of the apartment
Photo 1
.
In Photo 2
we can see a gap between the vestibule and the wall, which does not look very nice, the choice is yours.
Stretch ceiling or built-in wardrobe
If before finishing walls and floors people often think about the order in which suspended ceilings are installed, then in the case of built-in wardrobes they also often forget about this.
Meanwhile, this is where the sequence of work is very important. If you do not think through the entire structure in a timely manner, after installing any of these objects, installation of the second may become impossible.
Sliding wardrobe with countertop
If the built-in closet must reach the ceiling, but the guide rails for its doors will be attached to the top cover (countertop), then the sequence of work should be as follows:
- Installation of stretch ceiling.
- Measurements and production of built-in wardrobes at ceiling level.
- Installation of cabinets.
Sliding wardrobe without countertop
Today you can often find fully built-in wardrobes, in which the guide rail on which the doors roll is attached directly to the ceiling. It is clear that a suspended ceiling cannot serve as the basis for such a structure.
When are ceilings installed in this case?
There are two options here:
- First, the suspended ceiling is stretched, but a wooden mortgage is installed between it and the concrete main ceiling at the level where the top rail of the wardrobe will be located. Subsequently, the guide is screwed to the mortgage through the stretch ceiling fabric.
Attention! To attach the guide to the embedded beam, holes for self-tapping screws are pre-made in film ceilings, reinforced with plastic or special rings.
- First, the wardrobe is installed. Then the suspended ceiling is measured and installed. In this case, it is attached directly to the beam on which the upper guide is installed.
As you can see, deciding what to do first - install suspended ceilings, finish walls or install cabinets - depends on the location and situation. If you find it difficult to answer this question yourself, stretch ceiling specialists will always tell you the correct answer.
Which is better to install first?
When you need to combine a built-in wardrobe and a suspended ceiling, you need to decide what will be installed first. Indeed, what comes first, a built-in wardrobe or a suspended ceiling?
If you first assemble the wardrobe, the stretch fabric will be smaller in area and, therefore, cheaper. In this case, you will need to attach the canvas to the top front panel of the cabinet, which may not be ready for such loads. If a suspended ceiling is installed first, then when installing the cabinet there is a high risk of damaging the canvas.
Let's consider possible solutions to the problem:
The cabinet is installed first
This option is especially useful in cases where the cabinet completely occupies the entire wall. Installers will then need to securely secure the top panel, which will be a few centimeters wider than the ceiling space between the elastic fabric and the ceiling. The panel will play the role of a wall to which a baguette made of stretch fabric will be attached. The presence of a gap in the ceiling facilitates stable fastening of the panel, allowing the installation of jumpers on both sides. The strength of the installation is a very important consideration as this unit will carry both the tension sheet and the cabinet door tracks. Further installation of the cabinet is carried out in the usual way, as well as subsequent installation of the stretch ceiling.
The suspended ceiling is installed first
In this case, you can use two options:
- The wardrobe is made separately from the ceiling. There is a small space (about 5 cm) between the elastic fabric and the top of the cabinet. The good thing about this option is that there is no contact between the ceiling and the cabinet, and there is no danger of damaging one or another element. The ability to install a wardrobe under a suspended ceiling successfully solves the problem, but for this you need to order the correct cabinet design.
- The tension fabric is not installed over the entire ceiling area, but only up to the cabinet installation line. The method is similar to that used for hidden fastening of ceiling cornices. A bar is installed on the limiting line of the canvas, through which the canvas is folded and fixed to the base. The sliding wardrobe is installed in the usual way, but the door guides are not mounted directly on the slab, but are smaller than the size of the ceiling slot. A small gap forms between the canvas and the cabinet wall, which can be closed with a ceiling plinth, decorative strip or other element.
Attention! For the second method, it will be necessary to discuss the installation technology in advance with representatives of the sliding wardrobe manufacturer in order to avoid misunderstandings and mistakes.
Sources
- https://made-box.ru/shifoner/kupe/shkaf-kupe-i-natyazhnoj-potolok.html
- https://Potolki-NikoMaks.ru/montazh/shkaf-kupe-i-natyazhnoj-potolok.html
- https://mebelclubspb.ru/shkafy-kupe/kak-sovmestit-natyazhnoy-potolok-i-vstroennyy-shkaf-kupe.html
- https://www.potolkoff.ru/articles/shkaf-kupe-i-natyazhnoy-potolok/
- https://HoroshijPotolok.ru/dizain/natyazhnoj-potolok-i-shkaf-kupe.html
- https://shkaf-kupe-info.ru/shkafkupe-svoimi-rukami/vstroennyy-shkaf-i-natyazhnoy-potolok-kak-sovmestit-i-chto-ustanovit-ranshe.html
- https://kakpotolok.ru/natyazhnoj-potolok/shkaf-kupe/
- https://str-mebel.ru/shkafy-i-komody/vstroennyj-shkaf-i-natyazhnoj-potolok.html
- https://stul-roznica.ru/shkafy/shkaf-pod-potolok-i-natyazhnoj.html
- https://Potolok.expert/konstrukcii/shkaf-kupe-i-natyazhnoj-potolok.html
- https://kuppe.ru/sborka/shkaf-i-natyazhnoy-potolok.html
- https://my-class.ru/kak-ustanovit-shkaf-kupe-yesli-uzhe-yest-natyazhnoy-potolok/
- https://severdv.ru/mebel/shkafy-i-shkafy-kupe/vstroennyj-shkaf-kupe-s-natyazhnym-potolkom/
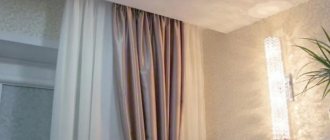
Methods for joining a wardrobe with a suspended ceiling
The specific method of connecting furniture to PVC fabric depends on how the wardrobe is located relative to the ceiling. If the wardrobe has already been installed, then you can fix the decorative trim in three ways:
- On a embedded beam sewn to the ceiling;
- Using an additional strip, box or panel attached to the body of the wardrobe;
- Independently mounted.
It is clear that after the upper deck of the cabinet has been assembled and fixed to the walls, there is no longer any need to talk about fixing the tension fabric to the profile from the rear wall of the room. As a rule, the depth of the coupe body is at least 45-50 cm, which means that there is simply not enough arm length to sew on a baguette and press the edge with the harpoon tape into the groove.
How to attach a suspended ceiling to a wardrobe using independent fastening
It’s another matter if the wardrobe is assembled, as they say, right up to the ceiling, and the upper part is reinforced with a wide metal profile or an additional chipboard strip.
In this case, the ceiling trim is attached directly to an aluminum molding mounted on a supporting decorative strip.
How to connect a wardrobe with a suspended ceiling using a false panel
For situations where the cabinet is 5-6 cm below the ceiling level, which is considered the norm for non-built-in cabinets, the problem of connecting the stretch ceiling and the wardrobe has to be solved with the help of an additional wooden panel.
From the diagram below it is clear that the decorative false panel is fixed to the intermediate mount without creating a load on the body.
The panel itself performs partly decorative functions and at the same time serves to transfer force from the tension sheet and baguette to the load-bearing brackets and the ceiling. In any case, the suspended ceiling is mounted near the wardrobe, photo, without loading the furniture frame.
How to connect a wardrobe with a suspended ceiling using a mortgage
For fairly decorative ceiling panels of considerable size, the strength of the additional strip or false panel is often no longer enough to reliably hold the polyvinyl chloride fabric in a stretched state. In this case, to solve the problem, you have to use a special part - a beam or a wooden embedded strip for a wardrobe in a suspended ceiling.
To hold the canvas, an embedded element is sewn onto the ceiling using steel corners. Fixing an aluminum baguette on a wooden bookmark is much easier than if you try to fix the profile directly on the brackets.
After laying the stretch ceiling, the embedded beam is completely hidden behind the canvas, so the use of timber fasteners does not affect the appearance of the room in any way.
Lighting
With the help of suspended ceilings, it will be possible to implement functional lighting for the wardrobe. Moreover, lighting can be installed when the cabinet has already been placed in a permanent place. The main thing that needs to be done before installing furniture and decorative coverings is to determine the location of the lamps and install the mountings for the devices.
More often, lamps are mounted under the canopy of a cabinet. If there is no visor - above the doors. If you combine a built-in wardrobe with suspended ceilings, when the canvas is inside the furniture, it is appropriate to use interior lighting. Choose lamps with motion sensors. Then the lighting will light up simultaneously with the opening of the doors.
When installing lighting, experts give the following recommendations:
- give preference to a diffused glow, then you will be able to avoid sharp shadows in the mirror;
- the number of lighting fixtures corresponds to the number of doors;
- mortise lamps will save space;
- install fluorescent lamps in spacious cabinets;
- replace point sources with multi-colored LED strip;
- Place the wiring in such a way that it remains invisible and does not spoil the appearance of the structure.
How to install mortgages correctly
Let's consider the sequence of installing mortgages in a suspended ceiling under a chandelier and spotlights. To do this you will need the following tools:
- ladder;
- perforator;
- screwdriver;
- roulette;
- painting cord;
- pencil or marker;
- hammer;
- construction or stationery knife;
- pliers;
- metal scissors.
Note! All work on installing mortgages, including laying and connecting electrical wiring, is carried out before the web is stretched.
Marking
When marking, you must adhere to the following rule: the minimum distance between spotlights should be 30 cm, from the wall - 20 cm. The optimal luminous flux is achieved by installing one spot for every 1.5-2 m².
There are many options for arranging lamps on a suspended ceiling; let’s look at the most popular schemes:
- In a straight line. Using a tape measure and a pencil, the places for attaching the mortgages are marked on the rough ceiling. With this scheme, as a rule, the lamps are placed in two rows, taking into account the minimum spacing and the recommended number of light sources. If you have a laser level, it is more convenient to mark on the floor and then transfer the marks to the ceiling. To do this, pieces of masking tape are glued to the locations of the lamps and marks are placed on them so as not to stain the floor covering.
- Around the circumference. First, diagonals are cut off using a painting cord; the point of their intersection will be the center of the room. At this point, a self-tapping screw is strengthened, a thread with a pencil at the end is tied to it and, controlling the tension, a circle of the required radius is drawn like a compass. Then you need to calculate the circumference using the formula L=2PR (P - Pi=3.14) and divide the resulting value by the number of lamps to determine the distance between them. After this, make the appropriate marks on the line.
- In an arc. The marking is carried out similarly to the previous method, only the self-tapping screw is attached in the corner of the room. Then a part of the circle is constructed and its approximate length is measured. Here you can use the same formula and divide the resulting value by 4. After this, the distance between the lamps is determined and marks are placed on the line.
The chandelier is usually mounted in the center of the room. The mounting location of the lighting fixture is determined by beating the diagonals with a paint cord, and a mortgage is installed at the point of their intersection.
Platform assembly and fastening
The platforms are attached to the sub-ceiling using metal adjustable stands, punched tape or flexible steel hangers. The latter option is the most preferable, as it is easy to install, can withstand quite a lot of weight and is suitable for all types of mortgages. The product is a galvanized steel plate 0.8 mm thick and 60x27 mm in size with holes in two rows. Additionally, you will need plastic platforms, self-tapping screws and dowel nails.
Let's consider the process of assembling and attaching platforms for spotlights:
- It is necessary to measure the diameter of the base of the lighting fixture. When using universal platforms, a ring of the appropriate size is cut inside so that the lamp fits freely into the hole. To do this, use a construction or stationery knife. Trimming is done along a special groove between the rings.
- Then the metal hangers are prepared. The plates are cut in half or bent to form a U-shaped stand.
- The prepared parts are screwed to the inside of the plastic platform in two opposite places, which have small protrusions and perforations for screws. For fastening, self-tapping screws “bugs” 3.5x9.5 mm are used - 2 on each side.
- The mortgage is applied to the ceiling and the places for fastening are marked with a pencil. Then holes are drilled using a hammer drill and plastic dowels are inserted.
- The platform is fixed to the floor slab with dowel nails or 5x40 mm self-tapping screws.
Installation of embedded parts in a suspended ceiling is carried out after installing a frame of profiles around the perimeter of the room. A cord is stretched between them. This allows you to control the level of the parts. The platforms must be level with the suspended ceiling.
The mounting for the chandelier is assembled and fastened in a similar way, but to support the weight of the lighting fixture, four support points and 3 self-tapping “bug” screws are used for each suspension
Electrical wiring
To complete the work, you will need a two-core wire of the ShVVP 2x0.75 brand, terminal blocks with a rating of 3-5 A and plastic dowel clamps for fixing the cable. If there are more than 20 lamps, 1.5 mm2 hard copper wire is used.
Note! You should not use pieces of hangers instead of clamps, this creates a risk of short circuit. In houses with wooden floors, the power cable must be placed in a corrugated pipe made of self-extinguishing PVC.
Electrical wiring consists of the following steps:
- The wire is attached to the ceiling using dowel clamps every 50-90 cm.
- In the places where the mountings for spotlights are installed, a loop is formed approximately 10 cm below their level.
- The cable is cut in a rounded section, and the insulation is removed from the ends.
- Next, using terminal blocks, two brown and blue wires are connected to each other. This way the lamps are connected in a parallel circuit and the failure of one lamp will not affect the operation of the others.
- The terminal block is placed on the mortgage so that it does not interfere with the tension of the fabric.
- Then the entire group of luminaires is connected to the power cable.
Important! The wire insulation must fit into the plastic housing of the terminal block. This will prevent accidental short circuit when connecting power.
Installation of lighting fixtures
After attaching the embedded platforms and connecting the electrical wiring, the fabric is stretched. Lighting fixtures are installed when the PVC film has completely cooled.
Installation of spotlights is carried out as follows:
- In the places where the mortgages are located, protective rings made of heat-resistant plastic are glued with special Cosmofen glue. They remove heat from the PVC film and prevent it from coming apart when cut. The diameter of the thermal ring should be slightly larger than the base of the lamp.
- Then a hole in the canvas is cut out inside the ring with a stationery knife.
- Next, check whether the lower part of the platform coincides with the plane of the stretch ceiling. If necessary, the structure is pressed or lowered a little. The platform should come to the level of the canvas, but not put pressure on it.
- The cable is removed through the hole and connected to the wire from the lighting source.
- Then the springs are clamped on the lamp body and inserted into the hole. They snap into place and securely hold the lamp in place.
The chandelier is attached using a mounting strip. Five holes are made on the PVC film using tread rings. The power wire will be brought out into the central one, the rest are intended for fixing.
The mounting strip is fastened with self-tapping screws to the mortgage. The studs on the bar are then aligned with the holes on the light fixture platform and secured with nuts.
Features of installing a wardrobe under a suspended ceiling
A more technically complex situation is considered to be when the ceiling decor has already been assembled and secured, and it is necessary to install a wardrobe in a room with a ready-made stretch ceiling. The problem is that the inability to fix the cabinet box to the ceiling significantly reduces the strength of the compartment system, and sometimes even makes it impossible to operate. So in some cases, owners have to make a choice for themselves, which is easier - to install a wardrobe before or after the stretch ceiling.
Advice! You can simplify the assembly and installation of a sliding wardrobe if you plan its installation before or at the time of assembling the stretch ceiling.
To do this, you just need to transfer the markings of the walls of the future piece of furniture to the ceiling and sew on a lining beam, to which the upper part of the compartment will be attached. After assembling the tension fabric, the mounting rail or embedded beam will be hidden behind the decorative fabric lining, so such reservation for the interior will not be a particular problem. And furniture installation will be significantly simplified.
Moreover, most craftsmen deliberately sew entire pieces of the mounting profile under the decorative fabric, on which the lamp and other parts of the ceiling decor will be installed in the future.
How to make a wardrobe if the suspended ceiling is already installed
Often the idea to install a wardrobe with a compartment system comes after the decorative fabric has been installed. In order to secure the wardrobe system, you can remove or even cut off part of the stretch ceiling. The idea is barbaric, so this method is resorted to only as a last resort.
The second option involves assembling a supporting box from timber. It is sewn to the walls and floor of the room. The rest of the wardrobe is tied to the previously installed box.
The most difficult way to install a cabinet with a finished ceiling
You can secure the furniture cabinet in a more radical way. To securely fix the furniture, you will need to place an additional fastening profile, brackets or wooden beam on the ceiling. As long as there is no tension fabric on the rough surface, it is not difficult to secure the boards or profile.
If there is already installed ceiling cladding, the timber is fastened as follows:
- The median line of the compartment door opening system is marked on the canvas;
- Four plastic rings used for mounting ceiling lamps are glued in increments of 50-70 cm;
- After a day, holes are cut in the rings, through which several wooden planks, 50 mm wide, are inserted in succession. The number of embedded elements depends on the height of the ceiling space;
- Through the outermost holes, the assembled package of slats is sewn to the concrete ceiling using dowels, and the pieces of wood themselves are glued with PVA.
All that remains is to install the frame of the wardrobe doors and fix the top bar to the ceiling beam using self-tapping screws. In some cases, a plastic tape is placed between them to protect the tension fabric from abrasions and scratches.
For light metal wardrobes, instead of wooden beams, screw fastening to the rough ceiling is used. In this way, it is possible to align the cabinet frame and avoid cutting unnecessary holes.
How to make a suspended ceiling with a built-in wardrobe
A rather interesting option is offered by German manufacturers of furniture made of aluminum and artificial wood. The built-in design of a sliding wardrobe is interesting because, thanks to the side support walls, the frame is strong and rigid enough so that the system of sliding door leaves does not deform or jam in the opening. This cabinet can be assembled quite quickly and without any problems.
It’s another matter if, after completing assembly work, you have to remove or retighten the decorative fabric. To simplify the process of repairing wiring or communications, it is necessary to remove part of the stretch ceiling, and for this you will need to redo the upper part of the furniture frame.
Usually craftsmen simply remove the top of the cabinet, motivating their decision by the fact that even without a panel the wardrobe has sufficient rigidity. With the “top” removed, getting to the baguette is not particularly difficult; you can carefully remove the edge of the stretch ceiling and put it back in place after the repair is complete.
Tips and tricks
When choosing furniture, it is better to choose a built-in model - you won’t have to pay for the cabinet, and the dimensions will be exactly the height of the ceilings.
If you are assembling a wardrobe with your own hands, you can make a free fastening beam for the guides from the remnants of laminated chipboard. It is enough to twist two or three pieces into a stack with self-tapping screws.
When choosing the height of the tension membrane for a finished cabinet, it is better to assemble the cabinet in the center of the room. Then nothing will interfere with the installation of the fastening profile. At the end of the work, just move the wardrobe to the desired wall.
Expert opinion
Bashir Rabadanov
Technologist at the furniture company Woodband
If the installation of the film is hampered by the mezzanine, you can use a hacksaw to shorten the upper part of the doors by 10 centimeters, and cover the resulting gap with a chipboard panel.
Useful tips
If a suspended ceiling is already installed in the room, be careful when assembling the furniture. Ceilings are easily damaged by sharp edges and objects.
If there is a small gap between the wardrobe lid and the suspended ceiling, you can use a ceiling plinth. You will get a feeling of the integrity of the structure.
Don’t be lazy to calculate all the dimensions at the planning stage, before purchasing furniture. A few centimeters can become critical when installing a wardrobe or ceiling.
If you are making the ceiling first, be sure to inform the craftsmen of your intention to install a wardrobe. Perhaps they will give you useful installation advice and take your wishes into account when installing the ceiling. You should also express your wishes when installing a wardrobe.
Installation of lamps and lighting
For decorative lighting or lamps, it is more rational to use LEDs. You can choose a comfortable color temperature: the backlight should be soft, warm light, and the main light should be neutral white. For the bedroom, lighting with brightness adjustment with a dimmer is installed.
The room should have an illumination level of 250-500 lm. Insufficiently bright lamps will negatively affect vision or light-sensitive hormones.
LED light sources require cooling to prevent the semiconductor crystal from degrading when overheated. Therefore, LED strips under the ceiling must be mounted on an aluminum profile, which will dissipate heat. It is better to install higher power lamps on a copper or aluminum radiator using thermal paste or a thermal pad.
The LED strip is mounted on an aluminum heat sink profile
General principles for installing spotlights for suspended ceilings:
- Before installing the membrane, the mounting locations for the lamps are marked, the wiring is routed using corrugations, and 12V power supplies for the LEDs are installed. Profiles are screwed under the lamps. To ensure rigid fixation, a base is mounted.
- The film is stretched and the coupe body is assembled. Where mounts for light bulbs are installed under the membrane, rings made of silicone or polyurethane are glued.
- When the seal adheres to the film, the inner space of the ring is cut out, revealing the base for the lamp.
- The lamp is connected and installed in the hole using hooks.
For suspended ceilings, incandescent lamps or light sources with strong heat cannot be used. You can use gas-discharge bulbs, but it is more economical to connect LED bulbs.