Installing and securing the cornice for a master is a matter of a quarter of an hour, but it is much more difficult for an amateur who, at all costs, wants to do his homework with his own hands. If you consider yourself one of them, we hasten to tell you how to properly hang curtain rods.
How to hang curtains on ceiling cornices is a question that is not alien to everyone who strives to create comfort in their home
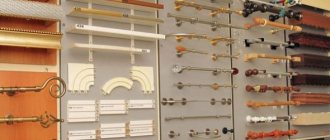
What tools will you need during the work process?
You will need to use the following equipment:
Naturally, in addition to professional tools, you will also need the cornice itself with a set of fasteners for it. These tools do not have to be purchased; they can be rented, which will allow you to spend much less money on installation.
Among other things, you need to prepare the wall for work. It is necessary to remove the old cornice and unscrew the screws. It is often necessary to correct the consequences of poor installation of the previous cornice, and to eliminate holes in the wall or ceiling with putty. This will ensure a high quality installation result.
How is the installation of a cornice carried out?
You must follow the instructions:
- the mounting location on the wall or ceiling is marked;
- the cornice is assembled on the floor and its length is determined;
- holes are drilled into which the entire structure will be attached;
- It is necessary to drive smaller dowels into the holes with gentle blows of a hammer, which will allow you to eliminate errors when drilling holes;
- After this, you need to fix the cornice itself by screwing it with screws.
You should expect a high-quality result of your work only if you follow the sequence of steps and carry out the markings correctly. If you are faced with the installation issue for the first time and do not know how to hang a curtain rod, then it is best for you to contact qualified performers, which will help save your time and money. An experienced master can be found on the YouDo website.
How to hang curtains on a cornice?
There are several mounting methods:
- hooks and rings;
- fastenings called “crocodiles”;
- eyelets;
- fabric loops;
- drawstrings.
Hooks and rings, as a rule, come complete with wall curtain rods. They are put on the structure after its installation, and the hooks can be paired with or without rings. In this case, you need to make sure that special loops are sewn on the curtains, since without them it is impossible to hang curtains.
Crocodiles work the same way as clothespins. The only difference is that their design includes “teeth” that allow the curtains to be securely fastened and prevent them from falling even under the weight of the fabric.
Grommets are used only on tubular cornices. In order to use them, you need to make holes in the curtain fabric into which special rings will be inserted. These rings can be used to hang the fabric on the curtain rod.
Fabric loops and drawstrings are also used on tubular curtain rods, since they imply the formation of loops or pockets in the curtains, which will allow the curtains to be hidden as much as possible in the future and give the impression of its absence. And if there is a certain distance between the loops, then the drawstrings will be able to disguise the cornice completely.
Submit your application now!
And get the best offers from trusted craftsmen and teams.
- Compare prices and choose the best conditions
- Feedback only from interested specialists
- Don't waste time communicating with intermediaries
Submit a request More than 10,000 performers are waiting for your orders!
Or call us and we will select a specialist for you ourselves
More information on the topic: https://remont.youdo.com
Required Tools
To install any model of cornice, a certain set of tools is required; without them, high-quality installation will be impossible. As a rule, manufacturers supply each product with a special set of fasteners that will be needed during installation. But additional fasteners will never be superfluous, since sudden breakdowns of fasteners are possible during the installation process.
In order to hang a curtain rod, you need to rise to a certain height. This can be done using a stepladder. A hammer drill is the main tool; without it you cannot drill holes, especially if the wall is concrete. A tape measure and pencil will be needed to mark the holes. Dowels are used as a basis for self-tapping screws; they are necessary for more durable fastening of the structure. To install the cornice evenly, you will need a building level; with its help, you can hang the selected model as accurately as possible.
How to hang curtain rods correctly and at what height
Do it yourself - How to do it yourself How to make a cornice invisible, hidden Invisible curtain rod with your own hands
Do you want to transform your home or have just recently moved into a new house and you need to install or change the cornice, then this article is for you.
A curtain rod is an amazing solution that allows you not only to hang curtains, but also to conveniently move them along vertical and horizontal lines, thereby opening or closing the window.
In addition, this is a good addition to the interior of the room.
How to hang curtain rods correctly
Hanging a curtain rod generally takes fifteen minutes, but this is only if a master is working. But if a person has never done this, difficulties may arise.
There are two types of cornices of this format: wall and ceiling. There are almost no differences in installation, except that wall-mounted ones are hung on the wall, ceiling ones are hung on the ceiling.
After purchasing everything you need, the question arises: at what height can you hang the curtain rod?
The most optimal distance from the ceiling to the cornice is 5-10 cm
You definitely need to pay attention to how the curtains will be attached
Which is better: cornices on the ceiling or on the walls?
When choosing a design, you need to consider not only the type of curtains, but also your personal taste
It is important to consider the place where it will be installed.
The installation height of the cornice above the window should be taken into account taking into account the aesthetic component.
In this case, ceiling products look nicer in appearance than wall products, and all because when mounted to the ceiling, the curtains completely cover the window opening and all the way to the floor.
The good thing is that the ceiling cornice well hides the entire curtain fastening system, which cannot be said about the wall-mounted version.
Three options for mounting the cornice to the ceiling
At what height can you hang a curtain rod? There are three design solutions:
- option - this method will visually shorten the room and reduce the window. Typically, it is used to brightly decorate trim around windows. Decorative and rich windows should always be on show, which means hanging curtains at the borders of the window so that the architectural features of the window opening are visible.
- This option allows you to properly hang a curtain rod over a window in a traditional style without adding visual interest to the room. This type is the most popular and practical.
- Option - installing a cornice in this form will make the window visually larger and taller, creating a feeling of freshness and modernity. That’s right, the walls visually appear higher, making the room look larger. In small spaces this option works very well.
How to calculate the length of the cornice?
The cornice must be chosen such a length that completely open curtains open the entire window opening. Visually it will be like this: the width of the window opening needs to be increased by one meter, i.e. half a meter on each side for assembled curtains.
Are you wondering how to properly hang a curtain rod over a window? Then imagine that on average the length of the structure reaches two meters, then for installation you can use only two fasteners. If ideally the length is longer, then an additional bracket should be made in the middle.
The length and dimensions of the brackets should also be taken into account. Curtains should not lie on window sills or heating radiators, because they usually protrude far beyond the wall.
The distance of the cornice from the ceiling should take into account the fact that the fasteners are usually mounted in a reinforced concrete lintel above the window.
There is a reinforcement cage inside it, which means that a drill should not get into this rod, because it will not be possible to drill the required size of the recess.
We have already found out the distance at which the cornice is attached from the ceiling; now it remains to determine how the cornices should be installed from the walls. Usually the brackets are located no closer than 15-20 cm from the walls.
In order for the cornice to hang evenly, you should measure an equal number of centimeters from the ceiling on both sides of the brackets. This can be done using a special horizontal level.
Important: walls are not always level, so be sure to visually ensure that you don’t get into trouble.
The process of attaching the cornice
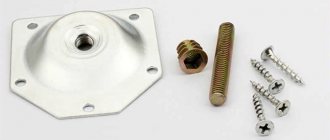
You can also secure the curtain rod with your own hands. First, you need to drill out the required socket for the bracket using a hammer drill.
A dowel is initially inserted into it; it should not protrude beyond the plane of the wall.
Next, you need to attach a special fastening element and secure it with screws, wrapping them in a plastic dowel.
After the supporting elements are secured, you should begin installing the cornice, according to the instructions for the cornice.
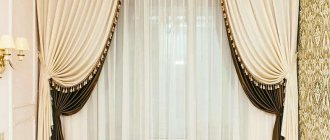
Application in different interior styles: photo, description
A sign of a harmoniously selected window opening design is its harmonious combination with the overall style of the room. Some people find it difficult to achieve such a result on their own, so they use the services of designers. However, do not rush to contact specialists. You can find a suitable cornice for any interior style if you take a few points into account.
A variety of options will allow you to create combined compositions that will undoubtedly decorate the room.
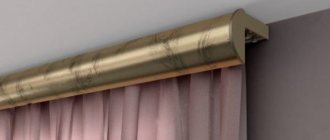
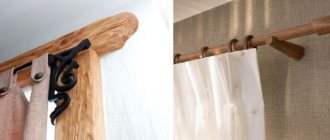
Wooden round crossbars will be an excellent solution for Provence, eco, and classic styles. They are made from natural raw materials and will withstand any composition of tulle, curtains, or drapes. It is very difficult to make a mistake in choosing wooden cornices. They all look gorgeous, as you can see for yourself by looking at the photo examples.
Their positive aspects include a noble appearance, environmental friendliness and versatility.
A wooden cornice will look harmonious in almost any style, of course, except high-tech and modern.
Flexible aluminum and plastic structures will be an ideal solution for rooms in the style of minimalism and hi-tech. With their help, you can beat a multi-level ceiling and windows of non-standard shape. Flexible models will allow you to zone the room if necessary.
At the moment there is a wide variety of colors and designs for cornices made from this material.
Due to their low weight, they can be used when mounted on drywall.
Forged metal cornices will become a real decoration of a large hall in the Art Nouveau, Baroque style. They will emphasize the bohemian atmosphere and will be ideally combined with multi-layer curtains made of expensive fabrics.
The heaviest curtains and multi-layer fabric compositions are usually hung on such a cornice.
Laconic and aristocratic design, original tips, brass elements add luxury.
Practical recommendations
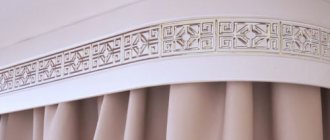
Designs of ceiling cornices for curtains
Remember, if your ceiling is not perfectly level, you should not mount the cornice too close. It is necessary to take into account the fact that if the cornice is placed too close to the ceiling, unevenness in the ceiling will be noticeable. Sometimes, in order to achieve evenness, the brackets need to be fixed at different distances from the wall. Install spacers between the brackets and the wall if the pipe fits tightly to the eaves.
Next, you need to mark the place under the brackets and draw a straight line. To keep the line as straight as possible, use a building level.
Then holes are drilled and dowels are inserted into them. After which the brackets are secured with self-tapping screws.
Check the fastening for strength by applying a little force to it.
After which the rod is taken and rings with tips are put on it and fixed in this position. However, it is worth leaving one ring between the tips and brackets. It is advisable to attach the hooks directly to the fabric, and then put them all together on the rings.
If you are attaching the cornice to the ceiling, initially measure the distance from the wall to the bracket. From the wall to all brackets it should be the same everywhere. But don’t forget about the curtains: they should not lie on the windowsill.
Interesting examples in the interior
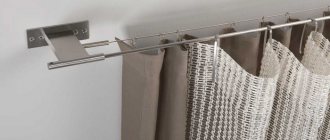
An interesting option is modern multi-level systems based on rail or profile cornices. Most often, they use automatic sliding mechanisms. If you want to keep up with the times, then this option is best suited. Such curtain rods are practical, comfortable, and among their assortment you can choose an option for any style.
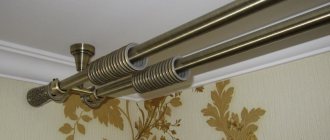
Lovers of the classics can consider round wooden or metal cornices. They look impressive with ring curtains and are easy to use. But one nuance is important here. They need to be hung perfectly straight, since even a slight tilt will move the curtains in one direction or another. Those who prefer reliability prefer powerful metal models that will look luxurious and hold the entire window frame.
How to choose a curtain rod for a suspended ceiling, how to attach it
How to attach a ceiling cornice, installation technology, fastenings used
The logical conclusion of any major renovation is the selection and hanging of curtains that are suitable in style and color. Giving preference to the standard option with wall mounting of the cornice, usually no additional difficulties arise. However, professional interior decorators have been putting a deeper meaning into the word “curtain” for quite some time, endowing this piece of furniture with more advanced functions. Having chosen such a modern option, you should study in more detail the features of the installation process, as well as the features of combination with suspended ceilings.
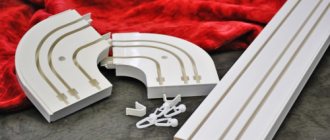
Tire cornice
Now we will talk about how to hang a ceiling cornice. By and large, it is possible to install wall fixtures with round holders on the ceiling due to their versatility.
In this case, the installation procedure is actually the same: you need to mark, make holes, install the holders, and then insert the guides into them. However, there are plastic curtain rods, also called tire rods, which are designed slightly differently.
How to properly install a ceiling cornice
The ceiling cornice kit, as a rule, includes all the necessary fasteners - dowels and screws. The cornice is fastened to the ceiling along the edges using brackets or ceiling fasteners. If the length of the ceiling cornice exceeds 2 m, then an additional bracket (ceiling fastener) must be installed in the middle. Increasing the number of fastening elements for the cornice is important when using several rows of curtains, with a large mass of curtains and the massiveness of the cornice itself
Marking and fastening the cornice
Before marking the ceiling for the cornice, you should make sure that it will not obstruct the opening of the window or door to the balcony. It should also be far enough away from the walls and window sill so that the curtains do not cling to flowers or heating radiators standing on it. It is recommended to mark the installation site in such a way that the curtains hanging on it are located at a distance of at least 40 mm relative to the window sill and radiators.
To attach the ceiling cornice with your own hands, you need to prepare the following tools:
- electric drill;
- hacksaw;
- roulette;
- screwdrivers;
- building level;
- ruler;
- pencil;
- screws and dowels.
The dowels and screws that will be used when installing the ceiling cornice must match the material from which the ceiling is constructed. If the ceiling is made of plasterboard, then you need to attach it to the guides. Drywall will not support the weight of the cornice.
First, you should mark the places where the brackets are attached to the wall or ceiling mounts.
After marking is completed, holes for the dowels are drilled at the fastening points using a hammer drill and the dowels are driven into them. Next, depending on the installation method, either brackets for the cornices are mounted, or the cornice is placed against the ceiling and screwed directly to the surface. If its length is more than 200 cm, then the cornice must be additionally fixed in the middle so that it does not bend under its own weight and the weight of the curtains.
Hanging curtains on the cornice
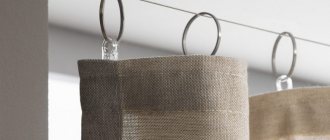
You can attach curtains to the ceiling cornice using the following fasteners:
- Hooks and rings. They can come complete with a cornice or separately. In this case, hooks can be used as independent fasteners or in conjunction with rings. The use of this method of attaching curtains requires the presence of loops in them that will be put on hooks. This mount is great for light curtains.
- "Crocodiles." According to the principle of their operation, they are similar to ordinary clothespins, only because they have teeth, the fixation of curtains is more reliable.
- Kulisok. During the manufacture of curtains, a special pocket is sewn into which the cornice is inserted. This creates the effect of its absence.
- Clip. According to the principle of fastening, clips are similar to “crocodiles”, only they do not have teeth, so it is better to hang light curtains and tulle on them.
- Eyelets. Such fasteners are metal rings that are inserted directly into the curtains. With their help you can easily gather fabric into folds. Grommets can only be used with tubular curtain rods.
- Fabric loops. This fastener has a beautiful and natural look and goes well with round cornices.
To achieve folds on the curtains, it is necessary to attach the rings at the same distance, equal to approximately 100 mm. If they are mounted on clamps, they can be alternated with round rings. This will help create a better mount.
To create many small folds evenly spaced along the entire length of the curtain, there are special tapes. This method is most often used for constantly drawn light curtains. The ribbons are sewn along the top edge and pulled to the desired length.
When hanging curtains, a very important parameter is the distance from the floor to the curtains, because this value plays a decisive role in shaping the style of the entire interior of the room. The most common option is curtains, the ends of which are at a certain distance from the floor. In most cases, this distance is about 3-6 cm. When sewing, you need to know exactly their length. The slightest error will lead to the fact that the processed edges will have to be embroidered and remade.
For the kitchen and nursery, we recommend short curtains that barely cover the window sill, or arched ones. But in rooms with low ceilings, this option will not look the best, because it will visually lower the room even more.
By choosing a suitable ceiling cornice, beautiful curtains and fastenings for them, you can create a magnificent visual effect that can transform your room, making it stylish and elegant.
Selecting wall brackets for curtain rods
There are several types of brackets - holders. This structural element is attached to the wall; it must be made of the same material as the cornice itself. It is thanks to a good connection that the reliability of the entire mechanism is ensured. Holders available:
- L-shaped, which are attached to metal structures, they do not create difficulties during installation work or difficulties in determining the hole for fasteners;
- round in shape, collapsible - they are 1.5-4.5 cm in diameter, they are made from metal, plastic or wood, they are used for mounting both on the wall and on the ceiling surface;
- solid ones, which have holes for installing fasteners, they are more often used for wooden structures.
If we compare the degree of installation complexity among the above types of brackets, it is most difficult to work with round collapsible holders.
The sequence of installing a plastic cornice with your own hands
Hanging a ceiling cornice is not difficult, but it is important to do everything correctly, in a certain sequence
- We decide on the location of the cornice. To do this, sketch out an approximate diagram on which the length of the main element will depend. For rotating elements, if any, it is necessary to take into account the required distance from the wall.
- If the cornice should be attached in a straight line along the window, everything is simple here - we saw off the profile of the required length with a hacksaw according to the diagram. If it is necessary to hang the curtain not near the window, but in the middle of the room and the cornice line will have turns and bends, then we draw up a diagram. Using it we cut individual elements to the required length, and then install each separately.
- To attach to the ceiling, we drill holes in the profile using a drill so that the screws firmly hold the profile together with the curtain. Sometimes the profile already has mounting holes for fastening. After complete installation of the product, these holes will become invisible, so do not make them too infrequently. The average distance between them is 0.5 m.
Accessories for ceiling plastic cornices
We apply the profile to the place of future fastening and mark with a marker the places that need to be drilled for screwing in the screws. We make holes in the ceiling in the marked places using an electric drill, insert plastic dowels inside. Next, we put the plastic profile back on the mounting location and screw in all the screws one by one. The profile is quite flexible, but it is better not to lower it suddenly during installation, holding it with your hand so that it does not burst or break. After fastening the main profile to the ceiling, the rotating elements are similarly attached, if they are provided for in the diagram. We pass hooks for future curtains through the internal holders, limiting their movement if necessary with special stops and plugs. We cover the plastic cornice with decorative tape, which can be made in any color to match the interior of the room. After installing the cornice, we hang the curtains to check whether everything is done correctly. Blinds and curtains are quite easily attached to the hooks of the ceiling cornice. The sliding of curtains should be smooth and easy.
Plastic cornice with bends and turns
How to attach a ceiling cornice to a wall?
Mounting on brackets to the wall
It is impossible to attach such a cornice to suspended plasterboard or suspended ceilings, so it is attached to the wall.
Manufacturers foresaw this problem and equipped the cornice with special brackets, which are also attached with screws and dowels, but to the wall.
The upper strips of the brackets can be of different lengths (10-30 cm), which allows you to adjust the distance of the cornice from the wall.
The cornice is attached to the top bar of the bracket with special plastic plates. The brackets are mounted at a distance of 1-1.5 m, and 0.5 m from each other if the cornice is two- or three-row with large massive curtains.
Plastic cornices are even easier to install on a wooden ceiling. Here you need to mark everything correctly and secure the structure with self-tapping screws. In wide cornices, the holes must be made in two rows.
If you plan to attach light curtains or curtains to a plasterboard ceiling, there will be no problems. But if you are hanging multi-layer, massive curtains, for reliability they are fastened to the wall using brackets, or you need to construct wooden anchors. Fix the timber embeds to the base ceiling at the location where the future cornice will be attached.
So, it is not difficult to hang the cornice correctly, following the necessary installation steps. A decorated plastic cornice along with matching curtains will decorate the entire room.
Useful tips
Before purchasing a cornice, take measurements of the window opening or other place where it will be mounted.
The main advantage of plastic curtain rods is their versatility
The fastening to the wall should not interfere with the opening of the windows, so we place it above 5 cm from the window opening. The removal of the cornice should be such that the curtains do not touch the ledge of the window sill, window handles, or radiators. Choose the length of the cornices so that the windows open completely and freely. The recommended distance from the window opening to the ends of the cornice is 30-40 cm. This value should be clarified depending on the density and width of the curtains and the location of the window. For heavy curtains, use durable plastic curtain rods secured through holes in the rail. The heavier the blade, the smaller the pitch between the mounting holes becomes.
More information on the topic: https://dachaprosto.com
How to attach a curtain to a loose wall
People often face the problem of installing curtain rods in loose walls. A thick layer of old plaster tends to crumble when installed in the drilled holes of plastic dowels. Naturally, nothing serious will be held in such a wall. You'd better forget about beautiful Italian curtains.
Loose material will not be able to hold a heavy curtain
To get rid of this problem it is not at all necessary to do a major overhaul. It is enough to drill holes of a larger diameter than the dowels purchased. The holes are sealed with tile adhesive or wooden “chops” with liquid nails. After complete hardening and drying, all you have to do is screw the screws into the wood.
Well-dried birch is best suited for making wooden cork.
The best solution would be to install a long anchor bolt, which will be fixed deep into the wall
Thanks to various types of fasteners and cornices, you can hang beautiful curtains in any room, with any of its shortcomings.
Wall location
To determine the location of the cornice relative to the window opening, mark the center of the window and measure equal distances from it to the left and right to the bracket locations (or to the ends of the cornice frame if it is attached directly to the ceiling). It should be taken into account that the brackets should be placed at a certain distance from the edges of the window openings (300-400 mm). This is necessary so that when the curtains are assembled, the window opening is completely open.
To properly hang the curtain, you must first mark the mounting location.
To hang the curtain correctly. First you need to mark the mounting location. To do this, we determine the length of the cornice, assemble it on the floor and measure the distance from the center to the consoles. Above the window, we make a mark on the wall with a pencil in the form of a vertical stroke, then we measure the distance from the ceiling on which our curtain will be located, and apply a horizontal mark. From the mark we set aside the distance to the cornice in both directions. At a similar distance from the ceiling, using exactly the same method, we find a place and apply 2 horizontal marks. The intersection of the marks gives us the points at which we will need to drill holes.
To properly install and secure the cornice, you must first mark the mounting location. To do this, having determined the required length and cutting off the excess with a hacksaw, we assemble it on the floor and measure the distance from the center of the cornice to the consoles with a tape measure. The consoles, in turn, are spaced from the ends of the cornice at a distance of 15-20 cm. Above the window in its center, make a mark on the wall with a vertical stroke with a marker, then measure the distance from the ceiling at which our cornice will be located, and apply a horizontal line. From the center mark we set aside the required distance in one direction and the other. At the same distance from the ceiling, we apply two horizontal marks in the same way. The intersection of the marks will give us the points at which we will need to drill holes.
Please note that we put all the points away from the ceiling, since it is parallel to the ceiling, and not the horizon line, that the cornice should be located. This is done due to the fact that if the ceiling is sloped, the cornice located along the horizon will appear uneven.
Work on mistakes
What to do if mistakes were made when choosing or calculating the mounting locations for the cornice? The main thing is not to rush to despair and get upset. Let's look at two of the most common mistakes made by beginners.
The problem of a cornice that is too long can be solved with the help of a hacksaw; the only limitation is the presence of decorative elements; there is a high probability that the cornice will lose its visual appeal.
If the cornice turns out to be too small or the standard models are not suitable for a long wall, you will have to go in search of special connecting elements that will easily allow the main length to join the additional one without disturbing the movement of the hook-runners.
How to hang different types of curtain rods
The first step, of course, is to decide on the type of cornice. They differ in the method of mounting and can be wall or ceiling. If we talk about the material of manufacture, they are made of wood, plastic, metal, steel, aluminum. In addition, these products may differ in shape:
Installation diagram for string cornice.
- Profile. Most are compact and easy to install. Made of aluminum or plastic, they are most often attached to the ceiling, but can also be fixed to the wall. There are three types of profiles: tire, flexible, rigid. The rail curtain rod is characterized by a flat rectangular shape and special grooves for fixing curtains. They can hang either one curtain (if the cornice is single-row) or several curtains, for example, a light daytime curtain and a thicker curtain for the dark. Flexible with an external rail is very interesting because it can take different shapes and create interesting effects in the interior. But you can only hang one type of curtain on it. There are also flexible types with an internal rail, the shape of which is given in production. They come in both single-row and double-row. The rigid one has only one row for attaching curtains; most often it comes complete with other curtain rods to fix the second curtain.
- Telescopic ones are characterized by their small size and the fact that the curtain completely hides them: the crossbar is threaded through a hole in the curtain. This type can be metal, wood or plastic, and is attached to the wall using brackets and screws, sometimes with special hooks.
- Rod cornices are a crossbar that has a round or rectangular shape. This view is not hidden behind a curtain. Curtains are fixed to it using special rings or ties sewn onto the curtain. This type can be fixed both on the wall and on the ceiling with special profiles included in the kit. Often has beautiful decorations - clamps at the ends of the crossbar. The rod can be made of materials such as plastic, wood, metal.
- String curtains consist of a thin steel cable on which the curtain is hung using special clips or hooks. This look is perfect for minimalist interiors. The length of such a product can vary from 2 to 5 m. The design of the fastenings allows you to pull the string in 1, 2 or 3 rows, which is very convenient for those who are going to hang 2 types of curtains. It can be attached to both walls and ceilings, in most cases using small brackets. This type is only suitable for light curtains, since over time the string may begin to sag from the weight.
The choice of cornice is determined by the material from which the walls and ceiling are made, and the curtains that will hang on it: you need to take into account their weight and design
Rules for fastening to walls
To attach to walls made of fragile material, it is usually sufficient to drill a hole of a larger diameter. So, for walls made of foam concrete or gypsum concrete, in most cases 12 mm is sufficient. Since dowels for such holes are designed for screwing thick and long screws, dowels of a smaller diameter are inserted into the holes of large dowels, driving them in with gentle blows of a hammer. Such fasteners have another advantage: they allow a large error when drilling holes.
To attach to walls made of fragile material, it is usually sufficient to drill a hole of a larger diameter.
Sometimes it becomes necessary to select fasteners for fastening yourself, for example, when re-hanging a cornice from one place to another or when the factory fasteners are lost. A good option in this case is to use commercial anchors with internal threads. To attach anchors, drill holes of the appropriate diameter, insert them into the holes and, by striking a punch or punch inserted inside the anchors, wedge them into the holes. Because anchors provide a stronger hold than plug screws, the number of anchors may be smaller than the number of screws designed.
String cornices are most often placed on the ceiling, although they are also suitable for attaching to walls. The installation procedure for them is as follows: we determine where it will be placed, then, attaching the fasteners to the ceiling, we mark the holes for the screws with a thin pencil. We drill, then hammer plastic dowels into the holes and screw the fastenings with screws. Then we insert the string, fix it and tighten it using the tension device, which is located on the mount. In the most common case, the tension device is a simple tube, which, moving along the thread as it rotates, is pulled into a string.
It is good to install a string cornice where, from a decorative point of view, it is undesirable to use a large-sized design of baguette cornices. The string is much less noticeable and creates an effect in which only the texture and color scheme of the curtains are visible. But along with elegance, string-type cornices also have their disadvantages.
Showcase Potolku Body
Clothes pegs for curtains
In most cases, fastenings are included as components along with the cornice. But you can buy clothespins separately and combine them with different materials.
1. Eyelets. For such fasteners, round or string-type cornices would be a good option.
2. Hooks, loops and rings. These options are universal for all curtains. To hide them, if they do not suit the style of the room, you can use a baguette panel.
3. Velcro. There are curtains that have adhesive loops or are stitched with an adhesive strip.
4. Creative approach. You can use paper clips, pins or clothespins as curtain fasteners.
Criterias of choice
Curtain holders are selected according to the shape of the window and the size of the room. You should also think about fittings for hanging curtains.
Design style
Rail, forged and wooden cornices are often used in interiors. Iron rods are chosen without decorations or with ornate decor, made in the form of a flower branch. Popular noble metals: brass, dark copper, blackened gold and silver. You can match the black and white plastic slats to curtains of any color.
Window configuration
Windows of standard and asymmetrical shapes are decorated with round cornices. A window in a sloping attic roof can be curtained with a curtain attached to a rod with ceiling brackets.
Rail and profile ceiling holders that follow the outlines of the openings are suitable for bay windows. You can also choose two types of cornices for complex-shaped windows: place a Roman cornice in the center, and round rods or ceiling profiles on the sides. The entire structure will be united by a wide baguette plank.
Room dimensions
A correctly selected cornice balances the room:
- rectangular, with a window on a narrow wall combined with a built-in ceiling structure;
- the large living room will be decorated with wooden holders, baguettes with rich carved and stucco decoration;
- in the middle room, bedroom, office, the strings will shade the window without distinguishing it from the overall composition.
Round cornices are suitable for small and large living rooms, bedrooms, kitchens and bathrooms.
Cornice mounting location
The choice of curtain holder depends on the density of the wall. If the mounting area is covered with plasterboard, a heavy cornice will damage it. Therefore, iron brackets are not screwed to the suspended ceiling, replacing them with lightweight plastic structures.
Material and type of product
Its price depends on the material of the cornice:
- plastic is an inexpensive and lightweight basis for ceiling structures. Built-in models of different shapes create the illusion of a curtain falling from the ceiling;
- wood - classic rods can withstand a lot of weight, combined with heavy plush, tapestry and light tulle;
- metal - copper, brass, chrome-plated, gold-plated holders are the most durable and expensive.
Based on the type of surface, matte and glossy products are distinguished. Wood, metal, and leather are imitated on plastic baguettes using decorative coatings.
Accessories used
Cornices consist of three main parts:
- holders - they are also brackets, hangers. Two main elements support the sides of a standard length crossbar. Long structures over 2 meters are supported by additional suspensions in the middle;
- base - rod, strings, profile;
- fleurons are decorative elements installed on the side brackets of the rod.
Brackets can be open or closed. On open-type holders, the barbell is placed on top and can be removed at any time. They are fixed on the wall. Closed brackets are also attached to the ceiling. The rod is tightly enclosed in them and cannot be removed.
To attach curtains use:
- eyelets;
- loops;
- ties;
- hooks;
- rings;
- magnets.
The fastening parts are matched to the types of holders so that the curtains can be easily removed for washing.
Closed-type curtain rods and curtains with eyelets additionally require hooks, otherwise the fabric cannot be removed from the rod threaded through the holes.
Purpose of the room
When choosing the type and shape of the cornice, take into account the purpose of the room. Simple, high-tech wall holders are available for non-residential premises. In living rooms, ceiling profiles, wall moldings and round cornices will maintain an atmosphere of comfort.
The interior design of the room is also taken into account. String and rail mechanisms and chrome-plated metal rods will organically fit into the hall or bedroom in the high-tech style.