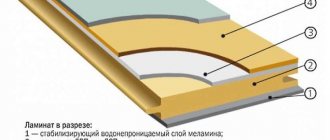
The popularity of laminate, which it acquired almost from the first days of its appearance on store shelves, can be explained by quite ordinary reasons - it is easy to install and maintain, has an excellent appearance, is capable of partial repairs, and you can do the laying of laminate yourself, without turning to outside specialists.
In addition, the surface of the laminate is warm and pleasant to the senses, which is important, especially in the off-season.
But the most important advantage of the material is its ability to be laid on old coatings that there is no desire or need to dismantle.
In some cases this can be very convenient, especially if dismantling the old material will lower the floor level too much.
Some types of old coatings serve as a high-quality basis for the laminate, increasing its performance.
Let's take a closer look at the question.
Is it possible to lay laminate flooring on linoleum?
This question is often asked on various online platforms. Doubts about this are a consequence of the unpreparedness of people who have little understanding of the technology of laying laminate flooring. It states that the base must be dry, clean and level.
If linoleum meets these requirements, then installation can be carried out without fear . At the same time, the evenness of the surface cannot be checked by eye, since the linoleum sheet always looks quite smooth and flat. But in reality there may be significant differences that are unacceptable when installing laminate flooring.
At the same time, the linoleum layer can be considered as a kind of substrate that provides an elastic gasket between the subfloor and the new coating. It helps to correct small potholes or bulges in the floor, promotes a tighter fit of the laminate, which eliminates noise when walking .
Sound insulation is an important aspect of laminate flooring; no measures in this regard will be unnecessary.
IMPORTANT!
Old linoleum must be solid, without cuts or holes. This will help ensure that capillary moisture is cut off from the subfloor.
Preparatory work
When laying lamellas on an old coating, preparatory work is kept to a minimum. Step by step, the entire preparation process is as follows:
- All unnecessary things are removed from the linoleum: furniture and baseboards;
- the surface condition is analyzed. During the inspection, the following are revealed: differences in height; the magnitude of the slope; condition of the material: are there any swelling, cuts, holes; surface humidity level;
- linoleum is vacuumed and then washed.
You can check how smooth the surface is using a level or rule. The tool is placed on the floor and moved along it. All obstacles are measured. If the height difference exceeds 2 mm, the linoleum is removed and the screed is leveled using self-leveling mixtures (there are no other technologies other than refilling the screed). But in this case, according to the editors, it is better to lay under the laminate not old linoleum, but a classic substrate - its behavior is predictable.
The slope can be checked using a rule and a level, or by pulling threads (cord, fishing line) diagonally, and then, using a level and a construction square, measure the slope. The situation is the same here: if the standards are exceeded, the base of the floor (screed) is leveled.
Cuts, cracks, holes are repaired. You can do this in several ways:
- at the cut, the edges are glued to the screed or double-sided tape applied to the back of the floor covering;
- holes and large gaps are cold or hot welded. To do this, damaged pieces of linoleum are cut out, and a patch of the same shape is put in their place, after which the connecting seam is filled with a special mixture. Vinyl, under the influence of cold welding, goes into a semi-liquid state for a short time, after which it polymerizes. The result is an even, strong and durable seam. During hot welding, the seams are brought into a plastic state by heating devices.
The bulges (waves) are cut along the crest and then stretched. The edges of the cuts are glued to the floor screed with polymer glue (when using adhesive tape there is a high probability of re-swelling).
A plastic film with an area of 1 m2 will help to check the surface moisture. It is glued to the floor with tape around the entire perimeter. After a day, the film is removed. If the surface of the linoleum or film is wet to the touch, ventilate the room until, after removing the film, everything is dry.
Important: many experts recommend gluing linoleum completely to the base of the floor, which, in the opinion of the editors of StroyGuru.com, is not entirely correct for several reasons:
- the costs of gluing linoleum to the floor and laying the underlay are almost identical. In this situation, preference should be given to a naturally new substrate;
- the functional role of the glue is unclear, i.e. there is no clear explanation of why this is being done;
- no one thinks about the day when the glued linoleum will have to be removed.
And the main argument is in the reviews of apartment owners, among whom no one glued linoleum to a concrete screed.
Which class of laminate is suitable?
Laminate classes determine the degree of its resistance to abrasion. They have nothing to do with the quality of the base, determining only the resistance of the material to external influences . Therefore, when choosing a laminate, you should be guided by its operating conditions.
If you plan to install it in a bedroom, where there are not many people and movements are minimal, you can get by with 31 classes. For busier rooms, resistance class 32 is suitable, the most common of all. 33 or 34 classes allow you to use the coating in crowded places, shops, discos or airports, but the cost of these materials is the highest.
NOTE!
The higher the class of the laminate, the higher its resistance to moisture usually is, although this is not directly related. When choosing a material, the issue of moisture resistance should be raised separately so as not to get an unpleasant surprise.
Step-by-step instructions for installing laminate flooring for the novice home DIYer
As always, you will first need to prepare well for the work, and then start doing it.
What you need to collect from materials and tools for effective work
Basic requirements for laminate
The thickness of the laminated board laid on a substrate on top of linoleum can affect the operation of interior doors. Be sure to check that they can open and close freely.
For laying floors in wet rooms, such as kitchens or bathrooms, there are special types of moisture-resistant laminate. To assemble it, manufacturers have developed an original technology that protects the locks from water penetration. It must not be violated.
The base layer of parts made of high-strength fiberboard slightly changes its shape and size when the temperature and humidity of the environment changes. In a residential setting, where optimal conditions for a person’s stay are maintained, this has virtually no effect.
However, after delivery from a warehouse or store, laminate flooring cannot be immediately laid on the floor. It must be allowed to naturally acquire the temperature and humidity of the room. To do this, it is enough to simply keep it in the room for about three days.
When choosing a laminate, pay attention to the manufacturer's recommendations for its assembly. On sale you can find products assembled using adhesives. They are not intended to be re-disassembled.
The preparatory work for laying linoleum also includes:
- checking the condition of the floor “pie” on which the entire installation will be carried out. Differences in height for one assembly of more than 2 mm are not allowed;
- choosing a laying scheme and purchasing the required number of laminate boards, substrate and consumables for it;
- preparation of tools.
Please note that a poor quality tool can do great harm instead of being useful.
How to choose a substrate
Sale offers various compositions from:
- natural substances: corks (with rubber, bitumen or in the form of crumbs);
- coniferous tiles;
- polyethylene foam (isolon);
Natural substrates are environmentally friendly products and are recommended for use in children's rooms. They are the most expensive.
More budget-friendly artificial materials work normally in any premises and are approved by sanitary standards for use in residential premises.
They do not pose a danger to life, as sellers of branded samples try to claim.
Simple laminate calculator: online calculation of material needs
When you decide to continue the reconstruction of the floor, you will need to find out the amount of materials needed. Our online calculator will help you here.
There are three methods for arranging boards relative to the walls of the room:
- length;
- width;
- obliquely
The third method is used quite rarely and requires increased consumption of materials. He ends up with a lot of unused scraps. I don't recommend using it.
To calculate material requirements using any of the first two methods, a simple online calculator is suitable. Enter your data into its cells and immediately get the finished result.
Link to online calculator (opens in a new window).
Practice shows that when laying laminate flooring, especially for beginners, it is necessary to purchase boards with a small margin. This reserve will be required for selecting colors, accidental damage to locks, and other unforeseen situations.
If the store is located far away, and it is problematic to purchase one or two blanks of the same series, then the lack of a reserve can delay the completion of the work for a long time.
Checking the evenness of the floor
The condition of the floor is the main point in the laminate installation technique. Allowable differences are within 2 mm per meter of floor length. At the same time, it is very difficult to determine the condition of the surface; at first glance, it often seems that the floor is ideal.
Verification methods:
- Use a flat, straight strip, ruler or meter-long building level. By applying them to the floor in different areas, you can obtain information about the presence of differences or folds.
- The hydraulic level gives a completely accurate idea of the rise or fall of the floor topography relative to one point.
- The oldest and most effective method is stretched cords, which clearly show the condition of the floor, the presence of folds or bulges and other parameters of the old coating.
There are also methods for checking the floor with a laser level that give an accurate and high-quality result, but in the absence of this device it is quite possible to get by with these methods.
Advantages and disadvantages
Laying over an old floor has both advantages and disadvantages. Among the main advantages are:
- saving money and time;
- no need for dusty rough work;
- ease of preparation.
Among the disadvantages are the possibility of early failure of laminate locks and the creation of an unfavorable microclimate between the linoleum and the new floor. It is worth noting that in some cases the old material is extremely strongly glued to the screed or any other rough covering. Removal will not only take time and effort, but may also disturb the evenness of the base. In this case, it is recommended to begin installation immediately, bypassing dismantling.
Preparation for installation
Preparatory work begins with removing all foreign objects and dismantling the baseboards. The surface of linoleum is thoroughly cleaned of dust and dirt . It is checked for the presence of moisture under the coating, for which a plastic film is laid on the surface and pressed tightly with the edges to the floor.
After a couple of days, the film is checked and if no droplets of water are found on the side facing the floor, then the condition of the base is good and the humidity is normal.
Cut or torn areas of linoleum are extremely undesirable, but if necessary they can be partially restored. To do this, the damaged areas are glued to the subfloor. The edges of the cut fabric are bent to the sides, a layer of glue is applied to the floor, the edges are laid back on the surface and pressed while the adhesive layer dries.
If you have replacement material, you can fill the holes in this way by cutting out the problem area from the old coating and gluing a fragment that exactly matches the shape into the resulting hole..
If the old covering has folds or waves, you can carefully trim it around the perimeter and stretch it across the area of the room, smoothing out the folds and achieving a flat surface.
Base requirements
The key condition for installation work is a prepared floor. If homeowners decide to leave the old flooring and use it as a subfloor, then the following requirements are taken into account:
- Manufacturers' recommendations indicate that the installation of lamellas should be carried out on a flat, smooth base. The level of floor difference should not exceed the established limits, 1-3 mm.
- Maintain humidity. In this case, we are not talking about the humidity of the room, but about the humidity of the base of the floor itself, which should not exceed 2%. If the linoleum is wet, it must first be dried, but do not forget about the possibility of condensation forming on the surface of the polymer coatings. It occurs when there is a temperature difference between the floor and the room, and it cannot be completely eliminated. To avoid the greenhouse effect, the development of mold and mildew between two artificial coverings, it is necessary to use a thermal insulation substrate.
The humidity of linoleum is checked at home. This will require plastic film, which is used to cover old linoleum, and several days of time. After two days, you can evaluate the result. If there is condensation on the film, we can say that the floor is very wet and is not suitable for use. The problem is solved by purchasing a special substrate that prevents the formation of moisture and acts as a noise and heat-insulating barrier.
Selecting a substrate
Any of the popular materials can be used as a substrate.:
- Rolled technical stopper.
- Izolon.
- Expanded polystyrene.
- Slab coniferous substrate.
The quality and performance characteristics of these materials are quite satisfactory for most users. The hottest debates are regarding isolon (foamed polyethylene) and technical cork.
At the same time, the arguments of both sides are quite convincing, but they relate to specific situations and do not consider the possibility of other conditions. Therefore, the choice of material is easiest to make based on considerations of economy and the thickness of the substrate, so as not to cause too much rise in the floor level .
Is it necessary and what kind of substrate to use?
To improve protection from moisture, heat loss and sound penetration, you can lay a substrate on top of the linoleum, and only then install the laminate. This solution will create a truly strong and durable structure.
Important. You should not use soft substrates when there is a thick felt base. The presence of two soft layers in the floor structure will lead to deformation even with a small load.
The best options for lining under laminate:
- Cork. Made from natural material, they are resistant to fungi and also effectively dampen sounds. An excellent option for a children's room, where it is important to provide step absorption.
Cork backing – natural and soft
- Polypropylene. Very soft and lightweight artificial material. High humidity will not harm it. A polypropylene backing can also hide base defects.
- Expanded polystyrene. The main properties are heat retention indoors and protection from moisture. An additional plus is the ability to withstand high loads, so it is suitable for rooms with heavy furniture and high traffic.
- Conifers. Pressed material, sold in tile form. It has a dense structure, withstands heavy loads and does not deform.
- Foil. They are used when the main task is thermal insulation of the room. Double-sided models operate on the principle of a thermos: they do not release cold and do not release heat.
- Polyethylene. They are produced in the form of a thin layer of canvas, so they are suitable for laying on linoleum. Protects against moisture penetration, eliminates defects.
It is recommended to choose a substrate based on the features and characteristics of the room. In any case, it will improve the insulation characteristics, but will also slightly raise the floor level.
Is installation possible without a backing?
The underlay is a mandatory element when installing laminate flooring. There are known cases of laying material without it, which were without consequences, but one should not hope for such a favorable outcome . The absence of a backing will cause a drum effect; the covering fabric will begin to slap the base when walking, which greatly gets on the nerves of both the apartment owners themselves and their neighbors.
Therefore, laying without a backing is considered extremely undesirable. At the same time, if the coating is linoleum on a thick felt base, then you can do without a backing, especially if the area of the room is small and does not have height differences.
What if you need to insulate?
There will be difficulties with this, since the heated floor system must be placed on a concrete base; it cannot be placed between the laminate and old linoleum. That is, the linoleum needs to be removed, and then you can do without it.
If you want a multi-layer cake, then put linoleum on a warm floor, a backing on top, and then the laminate itself.
If it is important to insulate the room, but not disassemble the floor covering, then it is best to use a foil backing that will not let heat out of the room and let cold in.
Required Tools
The list of tools used for installing laminate flooring is quite wide.
It includes:
- Ruler, square, tape measure.
- A hammer with a regular or rubber striker.
- A hacksaw with a fine tooth, some prefer a hacksaw for metal.
- Electric circular saw or jigsaw.
- Electric drill.
- Shoemaker's or stationery knife.
These tools are quite widespread and are available to almost every home craftsman.
Specialized devices are also needed, used only when installing laminate flooring.:
- Tamping block. Unlike the usual one, it has a special profile that does not destroy the locking part of the panels.
- Installation wedges. You can cut them yourself, but purchased special wedges have the required thickness, expansion angle and special notches that prevent the wedge from being squeezed out when the load is applied.
- Bracket for laminate flooring. It simplifies the padding of panels located near the wall, for example, in the last row.
- Clamps for laminate. They allow you to carefully and tightly press the panels against each other, eliminating the formation of cracks or gaps.
- Knife for laminate. It looks like a photo cutter, only greatly enlarged. Allows you to cut panels in a perpendicular direction. clean and precise.
IMPORTANT!
You can purchase these tools separately, or buy a set for laying laminate flooring, which includes all the most necessary accessories for installation.
Rules for the use and care of laminate flooring
Any material comes with care rules that increase its service life.
Basic requirements for caring for laminate flooring:
- For household products, dry cleaning is preferable;
- wet cleaning is carried out no more than once a week;
- To treat the coating, use specialized cleaning products, soft brushes and rags to remove stains;
- the products differ depending on the type of laminate (matte, glossy);
- in the absence of severe dirt or stains, you can use warm water (40-50°C), which must be changed frequently;
When cleaning laminate flooring, use a barely damp cloth.
- furniture legs should be equipped with protective protectors made of felt, Teflon or cork;
- Teflon self-adhesive overlays will not only protect the laminate, but will also allow you to move furniture without effort;
- laminate is “afraid” of sharp objects (falling cutlery, scissors, heels);
- The main enemy of laminate flooring when cleaning is strong moisture;
- For wet cleaning, a soft mop is suitable;
- The ideal option is to use a water-wash vacuum cleaner with a special soft non-scratch nozzle or a steam cleaner.
You can use a steam cleaner to clean laminate flooring
To prevent life in your home from turning into a nightmare, consider where the risk of damage to the coating is highest. Additional protection for the hallway, for example, can be provided by laying a special rug.
How to properly care for laminate flooring
Laying technology
The material is laid using technology standard for the selected type of coating and indicated on the packaging.
Basic installation steps:
- Installation of the substrate. The material is laid end-to-end, without cracks or gaps. The strips can be connected together with strips of tape.
- The first row of panels is located at a distance of 1-1.5 cm from the wall. This is necessary to create an expansion gap that allows the material to move when heated. Dense laying will certainly cause the canvas to bulge, the coating will flap when walking and will gradually collapse. The gap is provided by wedges placed between the wall and the panels.
- The second row of panels is laid with a length offset of approximately one third. This is done for stronger adhesion of the entire canvas.
It is not recommended to use sections smaller than 35 mm!
- The panel connection is made in an inclined position of approximately 45°. The locking part is inserted into the gap of the panels of the already laid row, pressed into it until it stops, after which the panel is lowered to a horizontal position. The lock connects with a specific clicking sound.
- The remaining panels are installed in a similar way.
- The outer row of panels usually requires adjustment in width. To do this, you need to measure the remaining gap, subtract 1 cm from it (temperature compensation) and cut the panels to width . The best solution would be to fit each panel separately, as the walls may have unevenness.
- After installing the entire canvas, wedges further tighten the canvas and allow some time for compaction. Then the wedges are removed and the baseboard is installed.
Laying laminate - material calculation
Let's say you decide it's time to redecorate your room. And we chose laminate flooring from the nearest construction market. First you need to calculate the amount of material. Typically the margin is about 5%. But if the room is small (corridor), then the cost of trimmings may increase as a percentage and 5% will not be enough. Also, 5% of the laminate may not be enough for a room size of 6 * 3 meters, if laid lengthwise.
With standard laying of laminate flooring, with random spacing of the boards, for an area of a rectangular room of up to 15-17 m2, a supply of laminated parquet of at least 1 m2 is required. If the area is more than 17 m2, it is better to take a larger one.
You can more accurately calculate the required amount of material by dividing the width of the room by the width of the board (it may differ for each manufacturer and brand of laminate). You can use the built-in laminate calculation calculator. It happens that when laying the last row of covering there is a gap of 30 mm. That is, we cut out a narrow insert. Then the consumption is large, since almost the whole board is wasted for ejection. With a room length of 6 meters (this is about 5 panels), which is equal to 1-1.2 m2. Plus, unexpected defects are possible both during the cutting of lamellas and during unloading.
If you are trying to lay laminate flooring for the first time, it is better to take an extra package of laminate flooring in reserve.
Reviews
Feedback from people who have used linoleum as a base for laminate flooring will help you get an idea of the qualities of the technique:
| Author's name | Review |
| Larisa D. | We laid laminate flooring in the hallway directly on top of the linoleum. They didn’t know whether it was possible to do this or not, it’s just that the old linoleum was on a soft base and was all covered with dents and small holes from the heels. They laid it without a backing, since the laminate has a soft layer at the bottom. So far everything is fine, no noise, no deterioration. |
| Igor M. | We thought for a long time whether it was worth laying the laminate directly on the linoleum, or removing it. We consulted with friends, they said - put it in, it will be better. That's what they did. Nothing special, the laminate just lay there and that’s it, no problems were created. |
| Victor N. | For anyone who wants to lay laminate flooring on linoleum, be sure to use an underlay! Laminate flooring on linoleum rattles like a drum! We laid it just like that, without a backing, we thought that linoleum was soft, but it knocks with every step, as if you were walking on iron barrels. |
| Yuri G. | I really didn’t want to remove the linoleum, because underneath the floor was full of small chips. This did not have much effect on the coating itself, but small dots appeared. I thought about it and laid it on a plastic backing. It seems that it turned out fine, we’ve been walking on it for 2 years now, it doesn’t rattle. |
| Ruslan I. | There are no and cannot be any objections to laying laminate flooring on linoleum. If, of course, the floor is flat, without drops or holes. But this is a requirement for all floors where laminate is to be installed. |
| Lyudmila O. | My parents removed the linoleum, but I didn’t. Everything fit perfectly, but a backing is needed in any case. Otherwise you will hear how you walk. |
| Evgeniy P. | We laid laminate flooring on linoleum and wanted to save time. The result is a step almost 2 cm high, everyone trips over it. The doors had to be cut from the bottom. There is already laminate in the hallway, so lay at least one more layer of laminate on linoleum... |
| Grigory E. | If you want to put laminate flooring on old linoleum, you must check whether the floor is level or not. Linoleum doesn’t care, but laminate doesn’t like changes. We laid it like this without looking, then cracks appeared in the middle along the joints. We measured it, and our floor has an arc. We need to check. |
| Dmitry V. | I didn’t know if this was possible or not, I just took it and put the laminate on the old linoleum. I was in a hurry to finish the renovation in time for my wife's birthday. In general, everything is fine, in one place I was in a hurry, there was some kind of bump there, the coating in this place slams a little. In general everything is good. |
| Timur S. | No need to remove old linoleum! No need. The floor underneath is uneven, there is all sorts of rubbish, and other problems. Lay laminate on top and don't hesitate. All my friends did this, no one complains, everything is fine. |
Judging by the reviews, the problem may not arise from the presence of linoleum, but from a lack of understanding of the intricacies of using laminate flooring, which leads to erroneous actions.
When you can and cannot leave old linoleum
No master can give an exact answer to this question, and the manufacturers themselves do not recommend using linoleum as a base for laminate flooring. However, there are situations in which this installation option is not excluded, and it is worth evaluating a number of factors:
- Quality linoleum. Worn-out, deformed material cannot serve as a reliable basis for installation work, especially if there are significant differences in level. If the linoleum is relatively new and was laid using the adhesive method on a smooth, level floor, then installation is allowed.
- The presence of deformations in the form of holes, cracks, breaks is a direct indication for dismantling the coating. The concrete surface must be thoroughly polished, and to achieve the optimal effect, experts recommend installing a polymer screed.
- "Age" of linoleum. The evenness and strength of the coating does not indicate the possibility of installation, especially if the old coating has been in use for 10-15 years. The service life of polymer coatings is limited by the manufacturer, and after the specified period has expired, the material begins to deteriorate, which can cause damage to the integrity of the locks and deflections in the laminate.
- Linoleum base. Older product samples used a fabric base, which wears out more during long-term use.
- Environmental component. Linoleum is an artificial floor covering, and under the influence of ultraviolet radiation, moisture, and prolonged use, bacteria, mold, and fungi can develop on its surface, which cannot be detected visually. Violation of sanitary standards leads to an irreversible effect on human health.
- Rigidity. Laminate flooring can only be laid on hard linoleum; if the material is soft, this will lead to deformation of the boards of the new coating.
No code
Is it possible to lay laminate flooring on linoleum if the latter is damaged? If these are small holes that do not have a noticeable effect on the difference in height of the base, then such damage is not critical. But if through holes, deep cuts, or bubbles are found on the surface of the coating, the idea of saving on standard preparation of the base for laminate will have to be abandoned.
Also, you should not use linoleum as a base for laminate if peeling of the insulating felt is detected.
Main stages of work and instructions
New material can only be laid in compliance with technology. All actions are performed step by step and in stages. Among the main stages are:
- foundation preparation and measurements;
- purchasing the required amount of material;
- laying the substrate.
The underlay and laminate are used simultaneously. First, a substrate is placed along the entire row, after which the laminate is placed on it. The installation itself is performed as follows:
- Individual lamellas are connected into a whole row, after which this row is pressed against the wall. You should retreat 5-10 mm from the wall (this distance is required so that the boards can expand when humidity changes).
- After this, the second row is assembled and connected to the first.
- Then all actions are repeated. The technological gap is ensured by special wedges. After installation they are removed.
During the work, it will be necessary to carry out various types of cuts and adjust individual lamellas. The boards must be laid in a checkerboard pattern. After connecting the first 3 rows, the process becomes much easier.