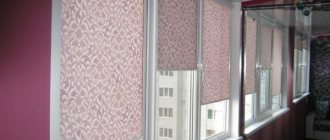
Curtains are increasingly being chosen to frame windows. Recently, blinds have been considered fashionable, but roller blinds look much more attractive. With their help you can adjust the lighting in the room. Windows are not only the eyes of apartments, but also a connection with the outside world. Stylish curtains are often called light filters.
Roller blinds protect the room from the sun and give an original and attractive look to any room
For the kitchen, housewives usually purchase things that are easy to clean. More dense ones are suitable for the bedroom, colorful and bright ones for the nursery, and transparent ones for the dressing room. So, a product made of non-toxic, natural material is selected for the bedroom. This should be noted. Today there are products with the following systems:
- Open type, when the curtain is wound directly onto an open roller.
Open type roller blinds are the most inexpensive - Closed sample, when the fabric is wound onto a roller. The directional line is located on both sides. The weighting makes the fabric fit very tightly.
In closed curtains, the shaft with the fabric is hidden inside the body
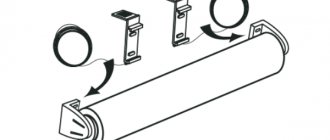
Components of roller blinds
In order to prepare the box, light wood species are used. The fabric must be environmentally friendly and non-toxic. The components of the cornice include:
- canvas;
- plugs on the sides;
- inside – control mechanism;
- on the side is the control chain.
Main parts of roller blinds
An example of an open type roller blind configuration
Thus, the package includes the required components, fasteners and instructions with pictures. Let us add that installation can be in the window opening, on the frame or simply on the sash. The last method is most often chosen. They can even be installed on a glass door. It's comfortable!
Role in home decor
The main purpose of these roller blinds is to protect the room from sunlight. They effectively absorb light, providing pleasant shade in the room. The functional component does not prevent roller curtains from performing another task - decorative.
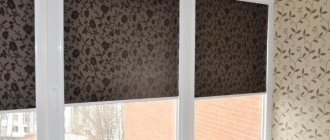
Roller blinds can be combined with regular curtains
The canvases fit perfectly into any style direction. They are used in classic design, hi-tech, minimalism. Curtains of this type bring a special piquancy to Art Nouveau, Provence, and English style. Light tulle can be used to complement their attractive design.
Multifunctionality
When assembled, the canvas is rolled into a roll. The material used ranges from completely transparent to dense. The basic one has dust-repellent and antistatic qualities.
In the open position, the curtain fabric is wound onto the shaft; when closed, the curtain falls down thanks to the weight strip
Important! Housewives purchase stain removers for cleaning based on the type of fabric.
The advantage of mini-roll is that the frame remains free. If you want the curtain to have a long service life, it must be dense and moisture resistant. When choosing, it is advised not to settle on the cheapest options. There are currently such types of roller blinds as:
- cassette;
- open;
- large rolls;
- mini.
Cassette roller blind with guides
Open roller blind in the window opening
Large roller blind on a panoramic window Mini roller blind on the window sash
Please note that assembly requires some skill and sleight of hand. Each method has its own advantages. The installation process may vary depending on the model. Experts call fixing with glue the fastest method of fastening. But this method is quite controversial.
Lightweight devices can also be attached with Velcro. The cheapest installation method is installation using liquid nails. So, self-tapping screws will hold a heavy structure perfectly. It's comfortable! Many models are designed so that installation is not too difficult.
Fixing directly on the window is widespread. Experts advise using removable latches. Devices that are installed without a drill look very neat. You can find out how to assemble a roller blind on a plastic profile here.
Mini-curtains are usually installed directly on the window sash using double-sided tape
Important! Before starting work, the surface must be degreased with alcohol. Also, before installation, you need to measure the width and height of the roller blinds.
If necessary, the curtain can be cut to the desired width
Tools and parts/accessories needed for DIY installation
Self-installation requires not only the purchased model of roller blinds, but also auxiliary equipment.
To install on a wooden window, opening, wall surface or ceiling you will need:
- plastic dowels;
- self-tapping screws;
- drill;
- drill (for a brick base - regular, for a concrete base - pobedit).
Tools needed to install roller blinds
Double-sided tape is required for installation on the sashes.
Marking in all options is done using a tape measure and pencil.
Ready-made purchased products include a base for the structure and fasteners. Before use, please check that all necessary parts are included.
Installation instructions for roller blinds “Day-Night”
You should purchase and install roller blinds only after taking into account:
- window profile material;
- method of tearing off the sashes;
- room style;
- the presence of additional window decor elements.
You can install roller blinds yourself or invite a specialist. The simplest installation with adhesive tape takes only a few minutes, including window preparation.
Detailed assembly sequence
- First, assemble the bracket and fix the parts until they click.
- Then double-sided tape is glued to the platform (if the installation takes place on it).
- The brackets are connected to the platform until there is a characteristic click.
- The structure is assembled on the windowsill first.
- Place it on the window sash and mark with a pencil the placement of the left and right landings. Then glue the pad into place under the markings.
- The right bracket is installed, and a shaft with fabric is put on it. Next, add the left one, make a note regarding the location of the left site. Then the left one is disconnected from the platform. The empty part must be glued to the marked place on the profile.
- You need to place the shaft in the right one and fix the left one.
- Then release the curtain and mark the position of the latch.
The process of assembling and installing curtains is quite simple, but requires precision and accuracy
Note! It is recommended to attach the curtain to the sash based on the width of the material. Double-sided tape can only be applied once. Although they are installed quickly in this way - in 10 minutes.
If you are not confident in your own abilities, it is advised to turn to specialists. It is recommended to call a surveyor by leaving a request on the appropriate website.
Another roller blind assembly is proposed, step by step instructions below. There are the following stages of installation on a “blind sash” using adhesive tape:
- Use fastenings without self-tapping screws. The window profile must be degreased in advance, markings must be made and the installation locations must be marked with a pencil.
- Then remove the protective layer of double-sided tape and attach the brackets. First, they are mounted where the manual or automatic control element will be placed.
Installation on hanging brackets is only possible on movable window sashes - Next, the shaft with the blade is placed in the cavity of the bracket. When clicked, the other side of the shaft is attached. Free movement of the part that rotates will help to do this without problems.
- It is believed that to secure curtains with a width of up to approximately 75 cm, tape fasteners are sufficient. But they recommend drilling holes in the profile and tightening the screws.
When installing curtains on glazing beads, the length of the screw should not exceed the depth of the glazing bead, otherwise the glass unit may be damaged - The final stage is the installation of device covers.
Possible installation errors
Problems that are often encountered:
- Incorrect location of brackets.
- Violation of the geometry of the structure: distortions and waves appear when the canvas moves.
- Damage to the plastic profile when installing curtains with screws.
- The roll structure has been assembled incorrectly, causing the fabric to move with difficulty.
Roller blinds can be glued or attached with self-tapping screws. Each method is selected under certain conditions. For example, self-tapping screws are used inside the opening, on the wall and ceiling. To fix the structure on the frame or sash, choose the mounting option using adhesive tape.
After installation is completed, it is allowed to attach plugs. It is possible to attach such curtains using clips. They are hung through the doors from above.
Aesthetic and practical
The use of plastic profiles has led to changes in the design of houses. Heavy curtains have been replaced by functional devices. They are easy to maintain. This should be taken into account.
Roller blinds, often used in modern interior design, are easy to care for and use.
The only disadvantages are that they cannot adjust the direction of light and look a little “laconic”. Although the entire space of the room is used as rationally as possible.
Let us add that plastic windows differ from their wooden counterparts. Ordinary curtains do not look very aesthetically pleasing with such glazing.
In office premises
In office premises, an excellent solution would be to use roller blinds with a light transmittance of 50%; this will allow you to avoid sunlight, and the evenly transmitted light will not distract from work, also eliminating the appearance of glare on computer monitors.
In conference rooms, curtains with blackout fabric that completely isolate light are suitable. Allowing you to concentrate on negotiations, and the simplicity of the design of roller blinds is an undoubted advantage over classic blinds or fabric models.
How to take apart curtains
It will be easier to disassemble the curtain if you understand its structure. The diagram shows a typical open type roller blind design
- If the material is attached to adhesive tape, you will need to peel it off.
- If the product is attached to self-tapping screws, they should be unscrewed, then the base should be removed.
- If the curtains are mounted on a spring bracket, you need to pry up one of the fasteners and remove the roll.
Day-night curtains: features, types, installation procedure without drilling
One of the most popular models of roller blinds is “day-night”. Some . The curtains acquired these names because of their original design. It is based on fabric with horizontal stripes. The fabric wraps the lower and upper strips. When the lifting mechanism is activated, the strips begin to move and align. As a result of such movements, it is possible to create completely different levels of lighting. During the day, owners need to leave transparent areas at the same level, and dark ones at night. If desired, you can set the “intermediate” mode. With its help, a light twilight is created in the room.
Thanks to their two-layer structure, day-night curtains make it easy to adjust the level of illumination in the room
Day-night can be called a universal option for the home. Such curtains are used in children's rooms, kitchens, bedrooms, and offices. The model fits perfectly into any style and is unpretentious in the process of care. To clean it, just use a light soap solution and a soft cloth.
Good to know! Of the entire range of roller blinds, the day-night model stands out due to its composition. The fabric of the product is treated with special impregnations. Impregnations make it possible to achieve a dust-repellent, antistatic effect.
The day-night model is produced in several versions:
- mini;
- uni;
- standard.
Mini roller blinds are equipped with an open mechanism. At the bottom, the canvas is supplemented with a tubular weighting agent. They are purchased for small window openings, sometimes for doors. The uni look is complemented by special guides and a protective box. Standard roller blinds are distinguished by a design with reinforced elements. They are usually purchased for window structures and large doors.
The fabric of the day-night system consists of two layers in which alternating strips of fabric with different opacity
How to install roller blinds on window frames without drilling? For home use, open-type minirolls are often purchased.
First the curtain needs to be assembled
To attach them you need to take several steps:
- Step one is to attach the tape to the hanging bracket. The tape is applied to the flat side facing the windows. Next, the fixing clip is inserted. You can't lock it all the way yet. Fastening elements, a chain mechanism, and a plug are inserted into the hanging brackets.
- The second step is marking the installation site and degreasing the surfaces. We try the assembled system on plastic windows, mark the places, and degrease them.
- The third step is fixing the holders. We attach the holder brackets to the plastic, press them, and snap the latches.
- The last step is to install the roller blinds and check the mechanism.
Installing day-night curtains on a movable sash
Installing day-night curtains on a blind sash
Additional Information
Such devices must be kept clean. The housewife's dust is removed with a vacuum cleaner at low power or with a steam generator. To wash, it is recommended to rinse in the shower, unfolding the fabric in a horizontal position, or clean with a natural-based stain remover. As a last resort, there is also dry cleaning.
When cleaning the fabric, try not to rub or press too hard on the fabric.
How to take measurements
You can measure the window yourself, but for open and cassette models they are performed differently. For closed roller blinds, measurements are made depending on the configuration of the glazing beads. If they are straight on a plastic window, only the glass should be measured: the width is equal to the distance between the side beads, and the height is between the upper and lower beads. If the glazing beads have a beveled edge, the distance is taken taking into account their width, that is, the width of the glass + 2 widths of the glazing bead. The height of the curtain is measured in the same way - the height of the glass + 2 widths of the glazing bead. Measurements should be taken with an accuracy of 1 mm.
Since open curtains do not require such precision, taking measurements for them is much easier. First, the width of the glass is measured and 30 mm is added to the result. Then the height of the glass is measured and added 120 mm. Additional millimeters can be increased depending on the size of the plastic window, but it is important that the additions are made equally on all sashes.
If something is not clear, watch this visual video:
Tips for use
If you need to wash them, you should:
- roll them up;
- disconnect the fishing line;
- unhook the weight plug;
- remove the protective capsule;
- remove the tube with tissue using a screwdriver.
To pull out a roll of fabric, you need to press on the latches located in the side brackets
Important! This item cannot be wrung out. You can iron the curtain with a slightly hot iron.
The advantages of such curtains include:
- variety of control systems;
- the ability to fix the material at almost any height;
- cleaning with a damp cloth;
- technology of impregnation of the product with a special composition;
- combination with traditional curtains;
- Possibility of placement in doorways;
- large selection of textures and shades.
The only disadvantage is that the working mechanism sometimes quickly fails.
Lubricating the rubbing parts of curtains increases the service life of plastic parts
How to care for a roll structure
An unusual curtain requires special care, different from the care of a standard curtain.
Cleaning. It is better to clean curtains frequently using a dry method, namely with a vacuum cleaner. Wet cleaning of dust is carried out as it gets dirty (usually once a month) and for this use a standard sponge slightly moistened. Do not wash or soak the fabric in water, as this procedure will lead to damage. If there is a stain on the curtain, it should be treated with a stain remover spray and only then carefully remove the remaining spray using a damp sponge.
Drying. After wet processing, the curtain fabric does not need to be rolled onto a roller, but wait until it dries completely unrolled.
Exploitation. The process of folding the panel must be done slowly to avoid the formation of folds and creases. When preparing food, it is advisable to raise the curtains so that they do not absorb fat and food aromas.
Even such dense fabric as polyester with cotton can wrinkle somewhere when rolled up. Rolling must be done carefully and carefully
Roller blinds will help bring the spirit of modernity. They are varied in color, print, structure and method of fastening, so you can definitely choose a roller blind to suit your taste.
An incomparable solution for anchor windows is to decorate them with roller blinds. They perfectly take their place clearly on the window, do not hang loosely on the eaves, and most importantly fulfill their purpose - they darken the room
Here is a popular type of roller curtains called “day-night” or in common parlance – zebra. By adjusting the dark and light stripes, you can direct the flow of light in the desired direction
Here is another example when a solid sheet of fabric blinds is wide in size and can outshine three functioning doors at once. The appearance is attractive and does not interfere with the passage
An extravagant combination of open-type roller curtains with screws and regular curtains with grommets. This mix can fit into any room
User manual
- Movements are made without jerking, smoothly.
- Do not touch the fabric with wet hands.
- Do not hang products near radiators or stoves.
- If the mechanism jams, experts advise lubricating it thoroughly.
You need to use roller blinds carefully, as they have plastic fasteners
A variety of colors will help you choose a product for almost any room. The window will look unusual. It's economical and practical! With their help, it is quite possible to create a unique apartment design.
Varieties
You can decorate standard double-glazed windows with curtains of different types. The varieties are discussed in more detail in the table.
| Classification feature | Types of sun protection systems | Character traits |
| Mechanism type | Classic | The fabric is in the public domain. The canvas does not fit tightly to the plastic. At the bottom there is a weighting agent. It prevents the fabric from sagging. The matter is additionally fixed with fishing line. |
| Cassette | This type is equipped with a special box. It's called a cassette. The fabric is not visible when twisted. When torn off, it adheres tightly to the windows, providing one hundred percent protection from sunlight. | |
| Type of fabric | Transparent | They easily transmit light and diffuse it pleasantly throughout the room. Used as a window frame decoration together with curtains. |
| Day Night | This type is usually installed in the kitchen. The canvas consists of alternating transparent (day) and dense stripes (imitation of night). The strips allow you to independently adjust the level of darkness in the room. | |
| Dimout | Used in office and commercial premises. They have medium density and diffuse light well. | |
| Blackout | Very thick fabric. Create good shade in the room. They are often hung in children's and bedrooms. |
Curtains made of thick fabric can completely block out daylight
Good to know! Having chosen the cassette type, you must separately select the color of the box. It should be in harmony with the color of the window frame.
The cassette curtain box, matched to the frame, is hardly noticeable on the window block, and the canvas does not interfere with opening the sash
Photo ideas for decorating windows with roller blinds
PreviousCurtainsDescription and types of lambrequins: what they are, what models there are
Next
CurtainsCurtains: what is it, what are they, what is it called differently
Installation instructions
As an example, consider one of the options for installing the Uni system.
- After carefully unpacking, check the completeness of the product. The control chain is released. By slightly lowering the fabric, remove the side covers from the control unit located on the cornice.
- The product is applied to the window to check (on both sides) the symmetry of the gap between the canvas and the window bead. Use a pencil or awl to mark the locations of the fasteners.
- Using self-tapping screws, secure the cornice to the vertical glazing beads of the window.
- Place the covers on the control unit and check the functionality of the product.
- The places where the side guides will be glued are degreased with acetone or solvent.
- Remove the protective film from the side guide, insert its upper edge under the side cover of the control unit and, pressing, evenly glue the guide.
- Do the same with the other guide.
- Using a control chain, the panel is lowered until it touches the rubber seal of the window bead. Install a control chain limiter.
- Install the control chain retainer using self-tapping screws. Place the lid on it and snap it on.
Installation of roller curtains using special clips
You can hang the canvas on the opening sash without using an electric drill using special clamps made of plastic or metal. To install roller blinds with your own hands, you need to:
- Install clips on both sides at the top of the frame.
- Secure the parts with tape.
- Install the curtain roll.
- Check the functionality of the mechanism.
Before starting installation work, it is advisable to degrease the areas where the fasteners will be installed using a cloth moistened with alcohol.
Installation on a wooden window
The installation procedure is slightly different from installation on a plastic window.
Mini curtains
Instructions:
- Try on the assembled curtain at its location on the window.
- Mark the mounting locations of the brackets with a simple pencil. Make sure that the roll is positioned strictly horizontally. To control the correct placement of the roll, you need to ask an assistant to pull out the canvas and check that the canvas overlaps evenly on the side slats of the sash.
- Remove the brackets from the bushings.
- Insert the fishing line guides into the holes in the brackets and tie the ends into a knot.
- Screw the brackets with 10 mm screws to the top wooden strip of the sash.
- Insert the curtain into the brackets and secure its position with decorative inserts.
- Stretch the curtain.
- Thread the fishing line through the holes in the fabric weighting material.
- Lower the panel to the very bottom.
- Mark with a pencil the correct position of the fishing line guides on the bottom bar of the sash by drawing a line.
- Screw the line tensioners to the bottom bar so that the inlet holes in the tension screws are located opposite the lines.
- Thread the fishing line through the holes in the tension screws.
- Using a flat blade screwdriver, turn the tension screws clockwise so that the free play of the line in the middle is no more than 1.5 cm.
Installing the cassette
Instructions:
- Mark the middle of the top edge of the wooden sash strip with a simple pencil.
- Mark the middle of the cassette with a simple pencil on the top of the casing.
- Place the cassette against the front edge of the top sash strip and align the lines marked on the cassette and the strip.
- Align the top edge of the cassette casing with the top edge of the sash strip.
- Screw a 10 mm long screw into the upper right hole of the cassette.
- Keeping the cassette horizontal, screw a second 10mm screw into the top left hole of the cassette.
- Screw two 10mm long screws into the bottom holes on the cassette.
- Prepare PVC guides for mounting with screws. Remove the double tape and clean the surface of glue. Drill three holes in each guide with a drill with a diameter of 1.5 mm (two at the edges, one in the middle). In the U-shaped guides, drill additional holes with a diameter of 6 mm to pass the tip of a Phillips screwdriver.
- Stretch the roll web.
- Attach an S-shaped guide to the edge of the canvas, inserting its upper end into the cassette. Attach a level to the bar. Align it vertically. Draw a line along the bar with a simple pencil. Remove level. Screw the strip with 10 mm screws from top to bottom along the drawn line. Repeat the same steps with the second guide.
- Installation of U-shaped guides is carried out in the same way. Before screwing them in, remove the weight strip from the canvas and twist the canvas completely into a roll to make room for screwing in the screws.
- Insert the bottom plugs into the guides.
- Check the operation of the curtains. Install blade limiters on the chain.