Unremarkable plots of land are turned into beautiful places only after long and hard work. At the same time, decorating a garden plays no less a role than planning it and planting plants. Independent creation of furniture for a public garden is accompanied by some difficulties due to the large size of the structures, but at the same time it is an interesting and educational process. The style of the site is usually coordinated with the appearance of the house, primarily with the facade. Those who do not know how to assemble the necessary structures or design them will have to seek the help of experts. New knowledge is gained from designers, experienced gardeners and owners of large plots. In any case, it would not hurt to develop a garden or nature theme on the site. The most experienced ones equip the square with beds for their pets, play areas for children and large furniture for relaxation. Assembling garden furniture with your own hands will require care and complete dedication.
Peculiarities
Garden furniture usually belongs to one of 3 types, which include portable, permanent and folding. The first category includes chairs and tables, some versions of swings. If something happens, there is a place for them under the terrace cover, in the garage, basement or inside the house. Permanent furniture can only be dismantled. The folding type is the most difficult to implement, but the resulting structure can be reduced in size if necessary, sometimes several times. Living up to its name, it is made by movable joints. Folding furniture can be either permanent or portable. If possible, it is better to assemble structures for the garden indoors with a workbench and a large table for work. Then the accessories will be protected from moisture, and the storage of waste materials will be convenient, and there will be better opportunities for recycling.
Photo gallery of ready-made options
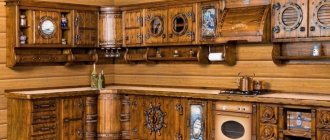
Below are solid pine cabinets in various shapes, finishes, and styles.
A cabinet made of natural pine will be a great addition to many interior styles, and a homemade design will also save money, which you can spend on decorating your home.
Garden furniture style
Rustic is the first on the list of justified options. The main milestones of the style were wood, rounded lines, relief and slight negligence. Proponents of perfectionism will more like crafts in a somewhat similar loft style. The rustic style will help in arranging a natural environment for spending free time in peace and quiet. Furniture in the English style is made with classic “notes”, balanced proportions and lines. The combination with small unevenness in the landscape will be organic. The Japanese trend in design involves the observance of straight lines and, in fact, Japanese motifs, designs and patterns. Decorative plants will complement the street ensemble. The garden in the spirit of French classicism is furnished with sophisticated products. At the same time, symmetry should be maintained in the arrangement of furniture.
Other relevant styles in this context:
- eco-style;
- Oriental;
- Mediterranean.
What to make from
Everyone can find more or less suitable materials. Wood, metal, plastic and unnecessary old things contained in the basement or garage are, one way or another, stored for future use, but sometimes these materials are forgotten about. The first step is to carefully inspect all storage facilities. There will definitely be blanks for several original homemade products there. Old fabrics are useful in creating screens, curtains, and seat upholstery. Sheets, boards, beams, sections and solid wood are sold in most hardware stores, although sometimes you have to order blanks, and sometimes it makes sense to make them yourself. The required metal structure is more difficult to find. Metal products stored on site, as well as their parts, only occasionally suit the shape, quantity and aesthetics of the coating. Additional materials and fasteners are selected in advance, almost simultaneously with the main workpieces.
Metal
The best solutions for DIY production:
- bronze;
- aluminum;
- brass;
- steel;
- stainless steel;
- copper;
- cast iron;
- iron.
A long service life coupled with the anti-corrosion properties of modern products is what makes the material suitable for manual assembly and, accordingly, additional savings. Metal tables and chairs fit perfectly into the green background of bushes and trees. It is better to assemble your own products from aluminum - it is not for nothing that it is considered the best. Seats are often made of plastic or wood, but the qualities of aluminum are also suitable for creating a comfortable seat. The legs can be made from heating pipes. For fastening you will need welding or bolts. Pipes are bent using a car disk. To prevent the workpiece from cracking, sand is poured into the cavity and sealed with small blocks. For countertops, QSB sheet and treated boards are suitable. The seats are often made of foam rubber, covered with vinyl leather or dermantine.
Tree
The popularity of wood is guaranteed by its natural beauty and environmental friendliness. Wooden products remain among the most prestigious. For garden furniture, slats, bars and boards are usually chosen, that is, materials that are easiest to work with. It is not recommended to use coniferous wood in open spaces, as it damages clothing with the resin it produces. The raw materials can still be simply deresined. Logs make massive benches. Working with the material is not easy, but with pre-processing it is possible to assemble mobile structures, sometimes without a single fastening element. Coffee tables, armchairs and sofas can be assembled or finished using sections of tree stumps. Some take the idea further and drive the stumps themselves into the ground, treating them appropriately to ensure a tight connection. Solid wood, driftwood and firewood will make interesting designer furniture; you just need to add some imagination.
From unnecessary things
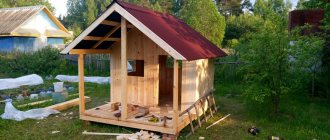
Old, unused items will make the task of organizing your garden even easier. Thanks to thoughtful presentation, shabby and broken furniture will become the hallmark of the yard. The beds will be used as low fences, and the cabinets will be used as doors or gates. A broken piano will play the role of a secret bar, and the cabinet will serve as a tiered flower bed. Old shelves are turned into stands for flowerpots. A skilled craftsman will assemble a whole set of medium-sized furniture from tires: tables, chairs, sofas. The tires are converted into comfortable poufs, having previously been covered with rope and installed on the legs. There is definitely room in the yard for an additional table made from an old door. And if desired, you can install a trellis from the door leaf on the site. If there is a sufficient amount of raw materials, a gazebo, a country shower, and houses for animals can appear at the dacha.
Adviсe
Starting to make garden furniture is much easier than inventing and making a piece of furniture for your own apartment. This is due to the fact that there are no special aesthetic requirements for it. Well, who can blame you for the fact that the bench turned out to be a little uneven?! And by the way, this is a great experience. And if you already have a chic garden sofa or table, then think about making your own furniture for the kitchen or bath.
When choosing materials, do not immediately run to the hardware store. Take a closer look at what you have available. Perhaps you or your friend have had beams and boards lying around for several years that you would hate to throw away. Stumps and snags that interfere with the site can also become a unique item or part of it. Do you remember if you have any hunting trophies lying around on your mezzanines? Antlers, skins and other paraphernalia will fit very harmoniously into the interior of your recreation area.
Pallets (pallets) can be bought for little money at construction sites, in stores or online. You'll save significant time on cutting and assembly with these versatile designs.
Interior items that have already lost their relevance can also become the basis for future garden furniture. Take a closer look, is it time for you to replace the table at home if you hate to part with it? Then feel free to pick up the tools and transform it. Sanded and repainted, it will not only look new, but also have a second life as a picnic table.
DIY garden furniture made from pallets
List of convenient options for assembly without the help of specialists:
- Dinner table.
- Coffee table.
- Armchair.
- Sofa.
- Bench.
- Chaise longue.
- Swing.
- Bar counter.
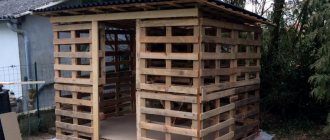
The structure of the pallet is ideal for the installation of rectangular structures. Painting will hide the wear of the material and emphasize its shape. Medium-sized products are mobile, and the increased number of fasteners provides them with an adequate service life. Chairs and tables are moved to a convenient place on the site at the first need. Pallets must not be used without first being cleaned. They are also polished and treated with various compounds. Pallets are assembled into work tables, flower stands, and pet houses. The site is equipped to suit any needs. Sometimes entire sets are assembled from pallets, starting with ottomans, coffee tables and ending with benches and long sofas. All you need is time, material and desire - and an obstacle course or an interesting play area will be assembled from old boxes.
How to handle pallets
Pre-treatment is mandatory and ends with the application of a protective layer. Pallet preparation includes 5 stages. First of all, it is cleaned of dirt - using detergent, water and washcloths. There is no point in treating new pallets this way; simply wiping them with a damp cloth is enough. Then the boards are sanded to remove roughness and splinters. In this case, processing open areas will be enough. A small pallet should be processed manually with sandpaper. Special attachments for drills and grinders are also suitable. It is advisable to choose a well-ventilated area for work. After this, the wood is given water-repellent properties, for example, by applying a primer. For use in the garden, the oil solution will not be enough. The best solution is acrylic primer. If desired, the pallets can be painted, and preliminary priming will make this process easier and save paint. The treatment is completed with varnishing.
Coffee and dining table
To create a coffee table you will need the following tools:
- clamps;
- electric drill;
- metal mounting strips;
- connecting bolts;
- Grinder.
The coffee table is made from just 1 Euro-size pallet. Euro pallets do not take long to process, because removing irregularities from the corners and ends is enough. The tabletop is usually a sheet of plywood, which is attached to the pallet, after cutting off the excess. The fragment is screwed to the top of the box with four bolts. After installing the planks, you will also need glue. The structure is fixed with clamps, and then proceed to similar processing of the lower surface of the pallet. Pallets are used to make nice-looking dining tables. In addition to the tools for the coffee table, you will need a long pallet (more than 1.5 meters), wood sealant, 2-8 cm screws, ready-made metal supports, etc. First, the long pallet is sanded and treated with sealant. The size of the boards for the tabletop is adjusted to the dimensions of the pallet. The boards are glued to the pallet and secured with clamps until the glue dries. Then confirmations are used. Metal plates are installed at the bottom corners, and legs are placed on them.
Chaise lounge
First, visually form the back of the lounger. We place one pallet on top at an angle, and then remove several boards from the top pallet. We reduce the width of the lower pallet to a value equal to double the thickness of the end. We take into account that the opposite side ends of the upper structure do not always have the same thickness. We carefully remove the boards of the upper pallet that need to be dismantled, because they can be useful for modifying the design of the finished chaise lounge. Next, we place the backrest on the legs, and connect the seat and backrest with a few more fastenings. We choose movable fasteners to adjust the backrest, but a regular, awkward chaise lounge looks good. The finished product will need to be carefully processed and painted. As an alternative, you can make a different pattern for the back, and form the base for it as a continuation of the lower tier.
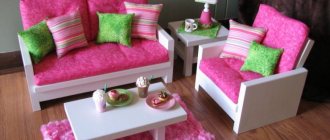
Stylish armchairs, sofas and benches
Benches are made in the following way: a standard pallet is divided into two unequal parts. A fragment with four boards will serve as a seat, and an element with three will serve as a backrest. The parts are fastened with screws or self-tapping screws, single or double fastening. Reinforcement of fasteners is carried out using bars. From the remaining boards, 4 legs are obtained, ideally wide and low. They are connected not only with hardware, but also with corners. At the end, the back is decorated: it is given a rounded shape, sometimes painted. The chairs are made in a similar way, but assembly can be done by stacking pallets on top of each other and highlighting a small backrest. U-shaped, corner and straight sofas are also assembled from pallets. For this purpose, pallets are combined into a line of the desired shape, in two vertical tiers. After this, the question about the legs will remain open. You don't have to do them. At the end, the backrest is attached, choosing the optimal height based on the parameters of the pillows.
To fasten pallets together, a hybrid of a nail and a self-tapping screw is sometimes used.
Garden swing
It is better to make supports and fastenings for a mini-attraction in the form of the letter “A”. In this case, operating the swing will be easy and the risk of injury will be reduced. The structure itself is made portable or stationary. A large tree is usually chosen as a place for a rocking chair. In the absence of such opportunities, you will have to be content with a stationary swing. For the second option, you will need a frame with an angled connection. Before installing the structure, prepare a place for installing the crossbar. The soil is compacted, after which the stationary posts are immersed to a depth of half a meter. Concrete and gravel are added to the pit. Assembly of the backrest and seat usually begins from this point. They use 2 pallets, and to create the back, one of them gets rid of everything except the bottom. Fixation of 2 elements is carried out at a slight tilt back. Sometimes the part “under” the seat is assembled from several pallets. Then load-bearing beams are installed underneath them.
Bar counter in the garden
For those who prefer to spend long periods of time outdoors, a garden bar will come in handy. Material consumption will directly depend on the scale of the project. The side base of a C-shaped counter is made from at least four connected pallets placed vertically. A linear structure is assembled from 2-3 or more. The foundation itself is constructed from approximately the same number of pallets. It is made with a depression, and the soil is strengthened with gravel. The tabletop is assembled from wide and thick elements, not from pallets. The boards are nailed to the top tier of pallets or to vertically standing boxes on the side base. The height of the bar counter must be selected taking into account the standard length of the pallet - 1.2 m. For ease of use and ergonomics of the product, it fits perfectly. You will need chairs for the counter. It is better to collect them not from pallets, but from waste boards for the tabletop. For this reason, when making the latter, you should think about the cutting points in advance.
Making a bench with a back
A rather unusual and beautiful version of a country bench made by yourself is a transforming bench. Compact and functional design: when folded it is a bench with a backrest, when unfolded it is a table and two benches. When disassembled, the transforming bench is designed for 6 people. It will not be possible to assemble such a bench quickly, but if you are patient, the result will be amazing.
Tools and materials
Materials:
- boards 30x80 mm (for reliability it is better to take hardwood);
- metal corners;
- self-tapping screws;
- liquid nails or special glue;
- bolts size M12;
- nuts, washers and nails.
Tools:
- hacksaw;
- screwdriver;
- drill;
- hammer;
- ruler;
- pencil;
- protractor;
- corner;
- roulette.
Assembly steps
First you need to draw all the necessary templates, and then cut the boards to size. When finished, there will be two benches; it is advisable to assemble the outer one first, and then the inner one. The height of the legs is 44 cm, the distance at which they are located: at the top – 25 cm, at the bottom – 40 cm. This is done for reliability and stability. The crossbar between the legs is located at a distance of 15 cm from the supporting surface; it should be located on the inside. The length of the seat is 138 cm. Before starting assembly, all parts must be sanded and chamfered. The design of the bench is quite simple, all fastenings are made with self-tapping screws and glue, and corners are added for reliability and rigid fixation.
The next step is assembling the inner bench. The height of the legs should be the same as that of the first bench, but here the crossbar is moved outward. The length of the top bar increases from 25 cm to 35 cm. A hole is drilled on the protruding part, 4 cm from the edge, where an M12 bolt will be installed; To hide the bolt head, this hole needs to be slightly enlarged. The seat length should be 144 cm.
Next you need to make brackets from two bars. They are connected in such a way that an angle of 100-105 degrees is obtained. One beam is the width of the tabletop, the second is the distance from the bench to the tabletop. A hole is drilled in the second block (which is responsible for the distance) where an M12 bolt will be installed. Now the finished brackets are connected to the inner bench. To prevent the joint from wearing out and the parts not touching each other, you need to install a washer. The head of the bolt is recessed into the drilled hole, and the same actions are performed on the opposite side.
Afterwards, the brackets are installed in a level, that is, in an unfolded position. Now you can connect the tabletop to the outer bench. This is done using two strips, 75.5 cm long. Holes are drilled at both ends at a distance of 4 cm from the edge. A limiter is needed on both slats so that in the future the tabletop does not move out and is securely fixed. It’s not difficult to make: a small piece of board needs to be cut at a certain angle (the desired degree of angle is selected by trial and error) and connected to the plank using self-tapping screws. The same thing is done on the second bar. One end of the plank is connected to the bracket (with the part responsible for the width of the table top) from the inside using an M12 bolt, the second end is also attached using a bolt to the outer corner of the outer bench. Washers are installed at the joints. The final stage is assembling the tabletop. Pre-prepared boards are screwed onto the brackets. The transforming bench is ready.
Furniture made from treated boards
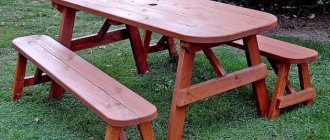
Working with prepared materials takes less effort, and, therefore, you can work longer and more carefully on the final result. An example of a processed material is planed boards. To assemble garden furniture, choose dry solid lumber of the highest or first grade. Then the boards will not warp or move. For a garden near an expensive house, furniture is assembled from radially cut boards with minimal texture. Conventional garden options are made from fragments of tangential or semi-radial cuts. To emphasize the natural beauty of wood, radial cut boards with distinct concentric rings are used. They are additionally varnished or waxed, but almost never painted. The material makes beautiful tables with attached chairs, armchairs, partitions, shelves and stools, as well as gazebos and sandboxes.
Benches and tables made of stumps and logs
The log elements are connected with dowels: into through holes made with a 20-25 mm Lewis drill. The cups in the logs are not full-sized. For benches, trunks without resin pockets and a minimum number of knots are selected, and resin particles are also removed from the surface. It is better to refuse coniferous species in principle, especially if there are no special wishes for them. The adjacent halves of the table are chamfered, and then they are firmly attached, again with wooden dowels. Stumps are used in different ways to create furniture. Firstly, on the territory itself, after the trees are cut down, stumps remain, which at any moment “will become” a chair or its likeness. But benches and tables are assembled from driftwood and stump cuts. The tops of the stumps are decorated with mosaics. Wide ones are cut so that there is both a seat and a back. A croaker is placed on top of the stumps - the bench becomes suitable for use.
Selection of timber
Which timber is optimal for creating furniture or household utensils? Whole, chamber drying.
Why him?
- Timber with natural moisture requires long-term (up to six months) atmospheric drying. In addition, uneven evaporation of moisture can lead to its deformation or the appearance of deep cracks;
- Using laminated veneer lumber will expose the glue seams, significantly degrading the appearance of your masterpiece. In addition, the price of glued material is at least twice as high as that of solid material.
Coffee table. Material – solid oak timber.
What type of wood should you prefer? Unambiguous instructions are impossible here: each option has its own advantages and disadvantages.
| Wood type | Key Features | Cost per cubic meter, rubles |
| Pine | Light, light, resinous with an unexpressed texture. Rot resistance is limited | 8000 – 11000 |
| Larch | Bright, pronounced texture. Does not absorb water, does not rot | 14000 – 18000 |
| Oak | Does not rot, gains strength with prolonged contact with water. Extremely resistant to mechanical stress | 40000 – 80000 |
| Ash | Has all the properties of oak with a more pronounced texture | 35000 – 70000 |
Ash timber.
Useful: a special method of surface treatment - brushing - will help to emphasize the texture of pine and make it more expressive. We will talk about it in the corresponding section of the article.
How to care for wooden garden furniture
Wood actively responds to weather shocks, as well as to sudden changes in environmental conditions. After frequent rains combined with high temperatures, mold appears. The scorching sun causes color fading, wooden furniture to dry out, and cracks to form. It will not be difficult to periodically treat all wooden surfaces. Caring for different types of wood is almost the same, but the compositions are used only for a specific option. In any case, the furniture is first washed of dirt; sometimes it is immediately wiped with vinegar to “drive out” the pests. When everything is dry, a special oil is applied to the tree - different for each species. The procedure is not required if the furniture is coated with paint. Sometimes a plaque forms on the surface of the wood - wet wiping followed by the use of fine-grained sandpaper will solve the problem. Additionally, means are used to create a protective film.
Choosing the appropriate type
Taking into account the purpose and the room in which it will be installed, the following types of cabinets are distinguished:
- Coupe. Great for bedroom, living room or hallway. The sliding door system saves space. Designed for storing things. Dimensions are often adjusted to the size of the room.
- Wine. This is a set of interconnected wooden cells mounted on a slope. Bottles are placed in it for long-term storage. Since it should be located in a cool place, it is worth taking moisture-resistant wood (oak) as a basis.
- Book. Open type cabinet. Consists of shelves for books. Placed in the living room, home library, hall.
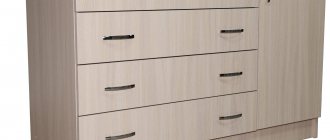
- Clothes. A classic product designed for storing clothes. The door system is hinged. It is easier than other types to do it yourself. Shelves and a pipe holder for hangers are installed in the wardrobe.
- Angular or triangular. Used in rooms with a small area to save space. Equipped with one door. It can be installed both in the kitchen for dishes and on the balcony for storing various things. Convenient for a small house on a summer cottage.
In addition, there are built-in, kitchen with drawers, display cabinets and others.
Photo: wooden furniture in the interior of a country house
The choice of a specific model is influenced by the area of the room, purpose, and required capacity. The appearance of the cabinet should harmoniously fit into the interior style of the room.
Visitors are also looking for:
- Furniture from scrap materials
- DIY hanging hammock chair
Furniture made of metal and wood
In everyday life, you often see a combination of a wooden table top and metal legs. There is no point in changing anything in this combination. In the case of shops, sometimes they act differently. In design options with an abundance of technological forms, metal often “turns out” higher. The thickness of the seat is then kept to a minimum so that it does not warm up excessively in the sun. It wouldn’t hurt to decorate furniture that is interesting in terms of geometry. For example, internal lighting. Excellent combinations of wood and metal are found in the designs of gazebos, recreation areas, and terraces. Combinations can be diluted with stone, glass, plastic, epoxy resin. It wouldn’t hurt to fill a table with a metal mesh as a support under the tabletop with stones. In the garden, you should allocate an area for storing accessories such as shelving, and it is better to do it using metal and wood.
Beautiful examples
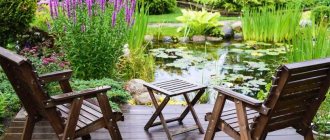
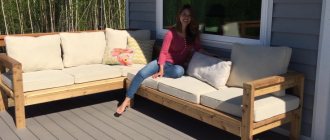
Do you already have an idea of what the recreation area in your garden should look like? Whether it will be a cozy corner in the shade of trees or a large area with a platform and a long garden sofa - it all depends only on your imagination and desire. The examples below can serve as a starting point for you and become a source of inspiration for future transformations.
Proper placement of all the necessary pieces of furniture on the site will create the right atmosphere and help you spend time with loved ones comfortably. Making furniture with your own hands requires a lot of effort and time, but as a result you get unique pieces of the size and shape you need, which you will be proud of for a very long time.
Barrel furniture
Washbasins are installed in the garden or lawn. Sometimes the material is a metal barrel, and the option looks better with a dark color and matte texture. Tables with compact tabletops and chairs with the same small seats are made using the same principle. The “cherry on the cake” will be multi-colored metal barrels with cut-out holes for seats and backs from the resulting fragments. Moreover, the products will fit perfectly into a closed environment. Wooden barrels are used much more often. Parts for large and small furniture are cut out of them. Wine barrels become part of chairs, sofas, tables. Planters for large plants, a portable cooler, or an ice bin are also great options for the warmer months. Even such an unremarkable device as a garbage can is also sometimes made from a wooden barrel.
Other good options for using barrels:
- sports equipment;
- container for hot food;
- tank for summer shower.
Facades
Kitchen fronts and furniture doors are usually made of more elegant material. But if you are making a drawer door inside a sliding wardrobe that no one will see, you can use regular 16 mm laminated chipboard with a 2 mm PVC edge for it. But the cabinets in the kitchen should look more presentable.
The facade is a separate furniture element. It is usually made to order. If the dimensions of the facades are non-standard, their production may take several months.
You can easily navigate the standard dimensions: usually the facades are made 2 mm smaller than the cabinet itself on each side. Therefore, for a standard 600 mm cabinet, a 596 mm façade is used.
The height of the kitchen cabinet also depends on the facade and ranges from 715 to 725 mm for floor cabinets (without legs) and low wall cabinets, and 915-925 mm for high wall cabinets.
Standard front sizes for kitchen cabinets
Types of facades
Since facades serve mainly a decorative function, the choice is huge; they differ in appearance and material.
MDF facades
- In addition to standard blank facades, there are also options with figured cutouts for stained glass. The glass is attached to the cover on the reverse side.
- Softforming - such facades are similar to ordinary MDF, but have a characteristic two-color layout with relief on both sides. They can only be used in dry rooms, bedrooms or living rooms.
Softforming
Postforming
Plastic facades in aluminum profile
Wooden facades
Aluminum facades with glass are suitable for a high-tech kitchen. They look modern, but are difficult to manufacture and install. Non-standard fittings are used for their fastening.
From cable reels
Coils of wire find a place in interesting design objects. Original chairs with round sides, reminiscent of a rocking chair, are assembled from rounded boards. Coils are sometimes trimmed to give the shape a custom look. Stands and small tables are sometimes attached to the boards. The very shape of the spools “hints” at the possibility of being used as a tabletop and at the same time as a table base. A set of garden furniture can be assembled entirely from spools, with a minimum number of cut parts. Then there won’t be many options for decoration, but any metal products that are mounted on a wooden surface will become decorations. A minimum of effort will be required to assemble the pouf. All you need to do is sand, polish and paint the drum, then cut out the fabric and prepare the filling. Furniture is finished using furniture staplers.
Special design programs
These programs greatly simplify the design process. They help to make the correct sizing calculations and more. Using programs you can:
- Create a sketch of a certain thing;
- Create a design project, for example, a kitchen set;
- Narrow down the selection of materials to a specific category;
- Select options for decor, finishing, fittings;
- Build a 3D model of the future structure;
- Optimal placement of parts on the sheet - precise cutting of sheet material;
- Manage the material cutting process.
Using computer programs, you can create the correct sketch and accurate drawing of future furniture
In short, you can computerize the entire process, thereby ensuring that mistakes are avoided, and everything that is difficult to do with your own hands can be done on a computer.
From tires/tires
Garden furniture is made from tires in several ways. In one embodiment, the tires are connected without changing their shape. The second approach involves obtaining strips from blanks. Well, the last method is to cut the tires into different parts. An ordinary table is assembled from just 2 tires superimposed on each other and a tabletop made of wood or glass. One tire with a disk is enough to make a swing. If you assemble a partition with hangers and chains, then the tires on them will act as flowerpots. Original chairs are made from tires. One technique involves using a cut ring to form the back and armrests. In this case, the supporting legs and the back part of the backrest are formed from rigid half rings. The legs are placed on metal supports. The seat is made either from a round wooden board or from a plexus of rubber flaps.
Tires should be coated with a special fire retardant compound!
Original designs
You don't have to be a professional carpenter to create original garden furniture. It is enough to learn to see the natural beauty of the things around you.
If there are pallets of building materials left at the dacha, do not rush to throw them away. The products make original coffee tables, with minimal processing required: sand the surfaces and varnish the wood.
Pieces of cut trees with a thick trunk can easily be turned into interesting chairs. It is enough to clean them of bark and knots and cover the surfaces with wood varnish.
Made from PVC pipes
PVC pipes are a good option for high chairs. First of all, the elements themselves are studied in order to create an accurate installation drawing along with the mounting option. Individual pipes are prepared and, if necessary, cut. The frame is assembled using glue and fittings, and if necessary, soldering. Then prepare the seat: a thick fabric option is suitable - for example, for a folding version. You will need to check the strength of the seat with the frame. Painting of pipes is carried out before final assembly. In most cases, it is better to leave the original color, especially since the external imperfections of furniture in an open space can be presented as an original solution. A product made of polyvinyl chloride is sometimes decorated with decorative self-adhesive film. Painting and curly slots will add originality. In addition to chairs, it wouldn't hurt to try your hand at creating a swing. Then there will be even more options for decor.
SOFT OUTDOOR CHAIR
Unobtrusive style, soft pillows, sewn by yourself - that convenience for the garden that is beyond competition. It’s easy to secure it for yourself by studying the drawings of this chair. For convenience, all dimensions can be converted into centimeters, for example, 23 1/4 "= 59 cm, etc.
General instructions:
- First you need to take all the necessary measures to guarantee safe and convenient work. You must work on a clean surface without defects or debris.
- To make your own garden furniture, you should always use straight boards.
- The assembly is checked after each step.
- Before connecting parts with screws, holes must be drilled.
- For secure fastening, glue is used.
- Before painting or varnishing, the wood is sanded.
- To level the surfaces, you can use wood putty.
- The wood must be treated with special compounds that will prevent it from rotting.
Dimensions:
Chair diagram for a summer house
Step 1. Making the first part with your own hands, as shown in the picture.
Step 2. Assembling the front frame.
Step 3. To create the seat, the two previously made parts are joined together using two more boards. After this, bars are attached that will make the legs of the chair stable.
Step 4. Now the back of the chair is assembled, as shown in the drawing. It should be remembered that the lower part of the chair will be located at an obtuse angle in relation to it in order to create an ergonomic backrest angle.
Step 5. Now you can attach the backrest to the seat.
Step 6. After this, you can begin making the armrests; they are also placed at an angle for convenience.
Step 7. And finally, you can begin installing the slats on which the pillows will be laid.