“Which comes first, the chicken or the egg?” - a burning question, but even this is not associated with as much controversy and discussion as with what to do first - laying the backsplash or installing the kitchen?
Most likely, the designer will advise you to install the kitchen first, and the tiler to lay the apron, and then hang the set. Who is right? Let's figure it out.
In fact, both options have a place to be. An acceptable option is selected by the customer based on several factors. Let's analyze both cases, their features, pros and cons.
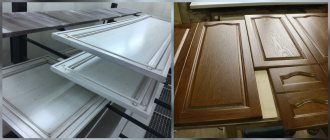
Kitchen apron – tile or glass?
If the first thing you think about when you hear the word “apron” is cooking dinner, then you haven’t started the renovation yet.
An apron is needed not only for the housewife, but also for the kitchen itself. It protects the walls of the kitchen and gives it a more elegant look. What kind of apron is there, how and when is it best to install it? Let's tell you in order! The appearance of an apron can be very elegant.
Question one - what kind of aprons are there?
Most often, the choice falls on one of four materials:
- ceramic tile,
- glass,
- fake diamond,
- plastic.
Each of them has its own advantages, disadvantages, installation and maintenance features. In order not to overload you with information, we decided to split the article into two parts and today talk about glass and ceramic tile backsplashes.
Preparation of materials and tools
When laying an apron, the following materials and tools may be required:
- tile adhesive;
- grout for seams;
- plastic crosses;
- primer mixture;
- spatulas with smooth and serrated edges;
- drill;
- building level and tape measure;
- pencil or felt-tip pen;
- grinder or tile cutter;
- cleaning materials: bucket, rag.
Grout for joints must be chosen that is resistant to moisture, otherwise liquid will accumulate between the tiles and deform the surface over time. The colors of the grout can be different: from pure white to any color that matches the decor of the tile. Shades of white are in great demand. If desired, you can make your apron with your own hands bright and expressive not only with the help of colored tiles, but also with contrasting grout.
The primer mixture is necessary to protect the walls from moisture and condensation that may form on the surface. In addition, a wall coated with a primer will allow you to fix the tiles even more reliably and firmly.
Tile backsplash - a classic of the genre
A kitchen apron made of ceramic tiles is one of the most common options. Such aprons have been made for many years, and their popularity has not decreased. The secret lies in a large set of advantages:
- These aprons are easy to care for,
- A variety of design options - textures, colors and images,
- Resistance to high temperatures and cleaning agents,
- Ease of matching with other finishing materials, for example, floor tiles,
- Wide selection of solutions for different budgets.
Tiles are not necessarily classic “squares”.
There are two ways to install a tile backsplash
The first method is to lay out the apron before installing the kitchen
In this case, you should have a laying plan - you can ask your kitchen designer for this. And the apron itself must be laid out at least two days before installing the kitchen, so that the glue has time to dry. However, this option is not the best. The fact is that if you make a mistake even by a centimeter or for some reason when assembling the kitchen the furniture suddenly slightly does not coincide with the tiles, you will get gaps and cracks along with the apron.
Tiles allow you to implement such original ideas.
The second method is to lay the apron after installing the kitchen
This is precisely the logic that most designers adhere to today. If you are afraid of damaging expensive furniture facades when laying tiles, then you can ask the installer to hang them in the kitchen after laying the tiles. The main thing is that with this method you avoid the risk of making an apron of the wrong size.
As you can see, you can lay tiles in this way even in the most difficult way - “diagonally”.
Which color should I choose?
The choice of color and design of ceramic tiles depends entirely on your desires. Some people prefer the tiles to be combined with the floor, others - with other elements of the kitchen. You can also choose an original design and turn the apron into a painting. The right pattern will help convey the style of a particular culture or country. If desired, you can even make a photo print of any design on the tiles! Speaking about design trends, we note that mosaic tile patterns have been gaining popularity lately.
The tiles can also have an oriental pattern.
. and matte, suitable for kitchens in a modern style.
The location of the sockets is determined before laying the tiles - most often, according to the scheme proposed by the designer. First, a hole is made in the tile, the tile is applied to the wall, and then a hole is made in the wall for the box for the electrical outlet. The same applies to roof rails - the place for them must be determined in advance.
Option 2. First the kitchen set
pros
- With this approach, the risks associated with incorrect calculations of the configuration and design of the apron tend to zero.
- This option is more aesthetically pleasing, because... The set fits flush against the wall, so there is no gap. The cabinets are sort of “lined” with tiles, and in the junction areas they are grouted or a plinth is laid. You can lay the tiles directly on the countertop. In this case, it is better to remove the upper cabinets, and then hang them and fasten them back.
- You will need fewer tiles for the apron.
- Perhaps after some time you will get tired of the tiles on the backsplash, and you will decide to put another one, or even join the ranks of supporters of the skinali (tempered glass backsplash).
Glass aprons - a modern solution
A kitchen apron made of glass (sometimes you will come across the name “skinali” - this is the name for aprons with photo printing) looks very modern and is suitable for a kitchen in the modern or high-tech style.
Such aprons, unlike solutions with tiles, are independent products that are produced in an industrial environment, and only then installed at the customer’s place. First, all the necessary holes for fastenings are made in the apron, then the glass is tempered.
There are two ways to apply a design to a glass facade.
- Photo printing - a film with a finished pattern is glued to the back of the glass. This option is the most common.
- The design is applied using special ink. This is a more expensive method, but the design is also more durable.
As a rule, manufacturers of their glass aprons provide a large selection of designs. Moreover, the technology allows you to order a photo print of any image you choose - a successful travel photo or even a family portrait. However, most often they choose either landscapes or monochromatic solutions that are in harmony in color with the rest of the kitchen.
A classic example of using a glass apron.
You always want to remember some trips, don’t you?
Due to the nature of the technology, making an apron takes 2-3 weeks.
The action plan is:
- Installation of the kitchen itself,
- Measurements for the apron - mistakes should not be made here under any circumstances,
- Manufacturing,
- Apron installation.
The main advantages of a glass apron are its durability, resistance to detergents and beautiful appearance. Compared to tile, it is usually somewhat more expensive and requires more careful maintenance - it leaves easily visible traces of grease and oil, and will need to be wiped down regularly.
Glossy, ultra-modern kitchens are beautiful, but require constant maintenance.
As for the “fragility” of glass, you should know that if the glass is tempered, then it is very strong. Moreover, even if such glass breaks, it will crumble into many small, non-sharp pieces. This makes tempered glass much safer than regular glass.
What do we need
To lay out a kitchen apron with your own hands, you will need the following equipment:
- Hammer for cleaning old coating;
- A screwdriver, supplemented with a special device for mixing the adhesive composition - a mixer;
- Buckets for water and glue with a capacity of at least 10 liters each;
- Spatula for working with the adhesive mixture: narrow for - a set of glue, serrated - for distribution, rubber - for working with seams;
- Construction levels - short - to check the location of each individual tile and long - to check the entire plane;
- Tile cutter and nippers, abrasive block for cutting tiles, correcting broken areas;
- Rubber mallet for checking the tightness of the apron;
- Crosses and pegs that allow you to set the thickness of the seam;
- Hard pencil, ruler;
- Cord (beat).
An important factor is time!
In conclusion, we would like to remind you that when choosing an apron, as always when renovating an apartment, it is very important to plan your time correctly. Think about when to invite which specialist, what instructions, diagrams and drawings to give him, where and from whom to get them in advance.
Of course, when buying a kitchen, you should trust a professional in complex issues - the designer will figure out the tile laying scheme or help you choose glass. And an experienced master will lay the tiles so that the apron will delight you for many years! Well, the choice of material and design is yours.
Preparing the adhesive solution
The strength and reliability of the apron in the kitchen depends on how well the adhesive mixture is prepared. Therefore, before you begin the glue preparation procedure, you need to read the instructions.
The adhesive should be prepared just before laying the tiles. To do this, take a container, usually a bucket, pour water into it and pour out the powder. Next, you should mix the solution so that there are no lumps left. Using a drill with a special attachment, it is necessary to bring the glue to a homogeneous state. Leave everything for ten minutes and stir again.
Advice! People who do not have experience in laying tiles should prepare the adhesive solution in portions so that it does not have time to dry out. Otherwise, the mixture will lose its properties, and the tile will not adhere firmly to the wall. It is also not recommended to dilute the dried mixture with water.
The prepared adhesive solution should be used within several hours. You should not skimp on the material, since the reliability of fastening the tiles depends on its quality. And for the apron area this is especially important, because it is exposed not only to moisture, but also to steam, as well as high temperatures.
Apron or kitchen, in what order?
This question may not be asked by experienced designers or those people who have decided to renovate their kitchen for the first time on their own. In fact, if you look at it in detail, everything will become as simple and clear as possible.
Experienced repairmen and designers know these subtleties that will help you make high-quality repairs that will not lose their attractiveness over the years.
Of course, the first step is to install the kitchen unit. The kitchen set means not only the lower part of the cabinets on which the countertop is located. It is necessary to install all hanging cabinets in the places where they will hang in the future.
How to prepare the wall surface before installation?
The first step is to clean the wall in the kitchen from the old tile covering. To do this you will need a hammer drill. After the old coating is completely removed, you need to walk over the surface of the wall with a stiff brush. Wallpaper can be removed using a metal spatula.
Next, on the already cleaned wall, you need to mark the future apron. To do this, you need to calculate its dimensions in advance. If you plan to lay the apron along the entire countertop, then you should know the size and location of the kitchen unit.
To work you will need a pencil and a tape measure. All notes can be made on the wall, marking the initial and final stages of work. For ease of laying tiles, it is recommended to draw vertical and horizontal lines, and it would also be a good idea to sketch the future apron on paper in advance.
To keep the tile firmly on the wall, you need to make several notches on it using a chisel. So, the glue will not flow down the surface and, therefore, will fix the tile more reliably.
When decorating the apron area with your own hands, you can fix wooden slats or metal profiles from its lower edge. This design will help hold the tile and prevent it from falling down during installation. Before laying the tiles, the wall should be primed, approximately two or three hours before starting work.
Saving materials
No matter how hard you try to measure everything before the kitchen set is installed, you will not succeed. If you make a slight mistake in the calculations and finishing of the apron, then ultimately the appearance will be compromised. It is enough to make a mistake in the calculations by just one centimeter and the finishing of the apron will rise by this unfortunate centimeter above the tabletop. Then there is no need for it completely and there was no point in creating it.
It is better to first install everything in its place, so that later you can calculate exactly how much finishing materials will be needed. It will be much easier to visually assess the amount of work if you see its boundaries. Otherwise, you can simply decorate the entire wall with tiles or other finishing materials, and then install a kitchen unit. But these are extra costs that we don’t need, since no one will see the space behind the cabinets.
Mounting the working wall after assembling the furniture
The sequence of work is performed in reverse order. First, kitchen furniture is assembled and installed. And then the working wall is mounted. Advantages of the method:
- The calculation error is reduced to zero. The apron is precisely mounted in a given area.
- It is easy to avoid the formation of gaps between the tabletop and the wall. The kitchen looks more attractive.
- In case of replacement of elements of the working area, easy dismantling.
The main disadvantage of this option is the complex process of installing the apron, which can damage the furniture. The work should only be carried out by a professional.
If there are problems with electrical wiring or sockets, additional work will have to be done. Wall cabinets with complex configurations are difficult to hang in place.
Financial costs are much higher than in the first option. The entire sequence of operations should be thought out in advance. It is recommended to carry out all calculations at the design stage of the kitchen design.
Patterned tiles
If you decide to make a backsplash from patterned tiles, then this is commendable, since it will look as beautiful as possible and, perhaps, will become an accent wall in your kitchen. But if you lay it out before the kitchen set is installed, it may turn out that when the countertop is laid, it will literally cover a small part of the tile, but still. Believe me, visually it will look very ugly, since it will give the impression that the owners decided to save money and bought used tiles that were already lying somewhere before.
But if you lay out such tiles after the cabinets are installed, you can adjust the installation height and make everything as beautiful and aesthetically pleasing as possible.
Choosing tiles and its advantages
Since the apron is located in the sink area, hob and along the work plane, the materials for it must meet certain requirements:
- easy to wash and does not absorb dirt,
- be resistant to high temperatures,
- do not fade or fade over time,
- be strong, durable, environmentally friendly.
Tiles have all these qualities. In addition, you can easily put it on with your own hands. Even a beginner can handle this task if he follows the instructions and prepares all the necessary materials and tools in advance.
Before you start making the apron, you should decide on the design of the tiles. It comes in different sizes. It is most convenient to cover surfaces with large tiles; they are faster and easier to obtain a good and high-quality result. But medium-sized products of 100-150 mm will look better in a kitchen apron. Tiles like mosaics will accentuate the splashback area and give the interior a special, unique look. But it is not as easy to install as large-sized parts. In addition, the process will be much longer.
In addition to sizes and shades, tiles can have different textures: glossy or matte surface. Matte tiles are more common in kitchen flooring. Glossy products are perfect as a material for an apron. They are beautiful and easy to care for, and do not require much effort in cleaning. Simply wipe the surface of the tile with a damp cloth or sponge with detergent.
When making an apron with your own hands, you should purchase tiles with a little reserve, since during the work you may need to cut them to size, and accidental deformation of the products is also possible.
Angled cabinets
Another fact that will allow you to make the right choice and begin installing cabinets is the angle of inclination that can be achieved in hanging drawers. If the tiles are laid before the cabinets are installed, the backsplash may visually fall into the gaps. But as a rule, it only seems so. But in reality, when the installation of the drawers begins, their lower part lies precisely on a piece of tile. Everything would be fine at first glance, since the angle is not so large and nothing will fall out of the cabinets, since the angle of inclination is the opposite inward. But if you look from the side, it immediately becomes clear that the gap looks very ugly.
To correct this inaccuracy, you can raise the cabinets higher. But this will not be convenient for residents, since not all people are more than two meters tall. Then, in order to correct the situation, you will have to select the color and attach the decorative corners of the outer bend in order to cover the unevenness that occurred after installation. As a result, the doors slam shut on their own, and everything round rolls into the depths of the closet.
Methods for laying tiles in corners
So, how to lay tiles in corners? There are two options for combining it:
- rectilinear - elements are placed one to another at right angles, so that one end is visible, the other is hidden by the top element. When the tile needs to be adjusted to size, the cut edge is placed on the bottom. The disadvantage of this method is the formation of a seam at the joint. Although it is masked with white or colored grout, the appearance of the surface is not ideal;
- perpendicular at the corners - suitable for decorating protruding borders. The main thing is that the cladding is not visible from below. To do this, the tile is glued in such a way that the horizontal tile “hangs” over the edge. Note that the designed corner will look neat only if the canopy width does not exceed six millimeters and the edge is intact.
Trimming edges
To obtain an even seam at the joint, a bevel for the internal corner is possible - trimming the end of the tile at 45°, which is performed:
- angle grinder;
- roller tile cutter;
- fine sandpaper.
The ideal solution is to use an electric tile cutter with an inclined bed design.
How to make a neat corner of a kitchen apron? To do this, the tiles are cut, laid on the mortar in a corner so that the ends coincide and form a solid coating. It will not be easy for novice craftsmen to complete such work. First, they need to practice.
Important! Laying tiles in the corners must be done on a perfectly flat wall surface, otherwise the width of the adhesive composition will be different, which will negatively affect the position of adjacent elements.
Application of trims
They are decorative PVC profiles that allow you to form a corner of a certain direction. The outer protrusions are covered with L-shaped overlays, and the inner ones are covered with pressed-in arc-shaped overlays. Convex narrow tapes are also widely used.
Let’s answer another question: how to glue a decorative corner to a ceramic tile? Used for this:
- liquid nails;
- silicone sealant;
- glue.
Typically, such overlays have a special design that allows them to be laid on the solution. A special plate goes under the slab and is secured with glue. This method of installation is easy and simple, as a result the surface of the apron acquires a neat, beautiful appearance, while the joints are reliably protected from the ingress of microbes, dirt, and water. To attach trimmers to external corners, silicone or acrylic-based sealant is used.
L-shaped tile
To decorate the kitchen apron in the corners, you can use specially shaped ceramic tiles. Many modern manufacturers produce special corner parts from clay, which are connected to each other at 90°, forming perpendicularly connected parts. Laying such tiles is an extremely simple job. It is attached to a flat surface with a special solution.
Important! When you use L-shaped pieces, they are laid first on the leveled wall, and the rest of the tiles are laid out from them.
Differences between interior and exterior corner design
When doing work, it is important not to forget about the differences between external and internal L-shaped parts. Some are protruding areas, others form a space in which the surfaces of the adjacent kitchen walls intersect.
The greatest difference between external and internal corners is noticeable when installing decorative PVC corners. Trims vary in shape and size, are installed in different areas of the apron, and simultaneously perform decorative and protective functions.
It is worth considering that it is easier to stick the internal trim tiles, because... with a slight deviation from the norm, the situation can be corrected with grout or adhesive.
Note that colored fillers look beautiful only on the inner corners, due to the fact that over time they crumble and fall out, they are additionally covered with profiles that not only protect the surface from external damage, but also wonderfully decorate it.
Elimination of defects
Novice tilers rarely manage to lay tiles on a wall correctly. But it is still possible to eliminate some defects. So, when it is not possible to tile a corner evenly, you can eliminate the defect by adding a small amount of cement mortar under the element.
When trimming the end, a slope of 45° is not always obtained - the excess is ground off manually with fine sandpaper. When you get an uneven joint, you can fix the problem in two ways: mask the gap with colored grout or, after setting the mixture, attach a decorative profile to the outer corner using liquid nails or silicone.
Installation instructions
- The first stage is to make markings using a hard pencil, a cord with a weight for a perfectly straight vertical line, and a plasterboard sheet for the bottom border.
- Dilution of the adhesive solution. It is important to maintain all proportions so that the glue holds the tile firmly and prevents it from falling to the floor. After two hours, the glue will begin to dry and lose its important properties, so you need to use it up as quickly as possible. The thickness of the adhesive layer should not exceed 10 mm.
- Laying the apron. An adhesive solution is applied to the wall, the lower border is marked with a profile. It is important to press the tile firmly against the wall so that the adhesive adheres firmly.
- You can start laying from the edge, then you will have to install a special corner in the corner. If any part lies unevenly, it can be disconnected and reinstalled.
- The first row is the most critical; you can proceed to laying the next one when it is completely dry. You need to install crosses between them so that the seam spacing is uniform.
- The final stage is cutting the tiles and grouting them to give the backsplash its original appearance.
Preparing the wall surface
Preparing the wall surface before laying the kitchen apron
Before you move on to laying a tile backsplash in your kitchen, it is important to properly prepare the wall. First you need to remove the previous coating - paint, wallpaper, decorative material. To clear the wall of old tiles, you will have to use a hammer drill. Fill all irregularities with primer and putty so that the surface becomes smooth and the tile lays on it without problems.
The angle when moving from one wall to another should be perfectly even. Professionals advise making small notches so that the adhesive solution adheres better. To remove fungus, mold and salts from the surface, it is better to use a high-quality fungicide so that the dirt does not spread further and spoil the materials.
Marking
Particular attention should be paid to the markings so that the pattern is not disturbed and the tiles lie flat. The standard distance from the tile to the floor is 70-85 cm, the recommended height is 55-65 cm. The upper edge of the tile is marked with a hard pencil, the lower edge is limited by an even wooden beam, which will support the tile if the glue does not have time to dry.
The wooden beam can be replaced with a metal profile or sheets of plasterboard. A vertical mark can be made with a special cord with a weight. It is mounted under the ceiling and goes down in a straight line, marking the border. Under the force of gravity, the cord will create a perfectly straight line. You can start laying from the edge or from the center.
Preparing the adhesive solution
Preparing the adhesive solution before laying the kitchen apron
Before laying kitchen backsplash tiles, the wall should be treated with a primer so that the adhesive adheres better and adhesion increases. The adhesive solution must be diluted according to the instructions, observing the proportions and dosage.
First, a small amount of glue is applied to the wall itself. The surface should be covered with a shiny film. The remainder is applied directly to the tiles. For better adhesion, the adhesive is removed from the tiles with a knife or scalpel; the residue should be left in the recesses and cracks to ensure better adhesion.
Using a notched trowel, spread the adhesive evenly over the wall. The composition will begin to harden in 15-20 minutes, during which time you need to start laying the tiles. The adhesive solution can remain in the bucket for no more than two hours.
Trimming and styling
Anyone who has tried to lay a tile backsplash in a kitchen with their own hands knows that in most cases it has to be cut to fit the dimensions of the room and the features of the walls. For convenience, it is recommended to use a special tile cutter, however, there is no point in buying one specifically for laying a kitchen apron.
How to cut tiles for a backsplash:
- This can be done with a regular glass cutter. Use a marker to make the necessary marks and draw the tool along the line, pressing firmly on your hand. Separate the unnecessary part with your hands, placing it on the corner of the table.
- To make it break better, it is recommended to place it in water at room temperature for 10-15 minutes before starting.
- If you have a grinder, you can cut it with it. However, in this case, you will have to get a tight respirator to protect your respiratory system from fragments.
Laying tiles for a kitchen splashback
The next stage is laying the tiles. You should start with whole pieces; it is better to place them in the center so as not to spoil the integrity of the design and the appearance as a whole. Leave the trimmings at the very end, for example, along the edges, under the tabletop, where they are not so visible.
It is extremely important to lay it in even rows. Vertical and horizontal marks are made differently. The first tile will act as a kind of beacon, relative to which the remaining elements will be aligned.
The tile must be pressed tightly against the wall so that all the air escapes and the glue sets well. Then the material will not peel off and will last for many years.
How to lay a backsplash tile in the kitchen:
- The pattern should be uniform; its integrity should not be violated, otherwise the apron will look untidy. To make the installation process as simple as possible, on the back of each tile, manufacturers mark with arrows which direction the pattern is located.
- The profile is screwed to the edge of the picture. It is on this that the horizontal mark of the tile is placed. It is better to place plastic wedges under the first element so that you can adjust its position until the glue dries.
- After the first row is completed, plastic crosses should be placed in place of future seams. The thickness of the seams depends on the depth of their immersion.
- The undercuts are attached at the very end in the free areas.
Grout
Grouting the kitchen apron
The kitchen apron will take on its final appearance at the very end. Grouting is carried out upon completion of all work. It is important that the composition does not contrast with the color of the tile, so that the design does not turn out faded. The grout is applied with a rubber spatula; excess can be removed with a sponge.
To protect the seams from fraying, they can be additionally treated with a water repellent.
Output of wires and sockets
The outlet for the wires is installed at the very end, after grouting. The hardest part is making the holes for the socket. The lining of the future location for wiring should be done carefully. If the wires have already been laid, while laying the tiles they should be protected from glue and other liquids using film or a plastic bag.
Once it is installed, you can proceed to marking the location for the future outlet. Mark the boundaries directly along it with a marker or paint and drill holes with a tile drill. Remove dust. It is important that during the process the tiles do not crack or begin to crumble.
If glue gets on the wires, it should be quickly removed with a dry sponge.