One of the important stages of any renovation is painting the internal surfaces of the walls. This work is not too difficult, but it requires special attention and accurate execution of all operations. If everything is done correctly, then you can paint the walls yourself without the involvement of experienced specialists.
What is the best tool to use to carry out painting work efficiently and accurately? A regular roller will evenly distribute the paint over the entire surface of the wall.
Painting walls with a roller: selection of tools and process features
A roller is used to apply paint and varnish composition faster, while obtaining an even distribution of the layer without unnecessary streaks that remain when using a brush.
The device allows you to adjust the thickness of the paint, change uneven areas if they appear, before the painted surface has dried.
The advantages of using a roller are:
- Easy to apply paint on the base;
- Paintwork materials do not accumulate in one place;
- You can use textured fur coats or in the form of stencils;
- Hair loss is unlikely compared to brushes.
The roller is used to apply the paint and varnish composition faster, while obtaining an even distribution of the layer without unnecessary streaks.
Pros and cons of working with a roller
Among the undeniable advantages of this painting tool are:
- the ability to paint large areas with maximum speed;
- Ease of use. If necessary, you can attach an extension handle (“fishing rod”), allowing you to reach the most remote areas.
It also has its disadvantages:
- the difficulty of painting corners and other hard-to-reach places;
- the need to select the most suitable type of roller for each paint composition.
But, nevertheless, the advantages of this tool are much more significant than the disadvantages. Otherwise, it would not be so popular among professional builders and finishers. The roller is ideal for painting walls in the kitchen, bathroom, and toilet.
Painting technique: existing options
It is important to understand how to properly paint walls with a roller without leaving a mark; the process has its own nuances. It is necessary to ensure that the entire surface of the cylinder is well saturated with paint, otherwise unpainted areas may appear that are difficult to immediately notice. After the process, the defect will have to be eliminated by applying a new layer, which will entail an increase in paint consumption.
A popular way to use is the "W" shape, where the stripes are made to cross each other. The method is distinguished by the ability to quickly cover a large surface; as a result, the layer does not have time to dry completely before painting is completed, and a uniform color is obtained.
Work using the “letter W” technique should be performed with wide movements, so you should use the roller in a room free of unnecessary objects.
Another option on how to paint walls without streaks using water-based emulsion is the squares technique. It is required to divide the room into squares into corner zones. They are painted one by one, after which it is necessary to connect the zones by painting them horizontally. When performing the method, it is necessary to monitor the direction of the light.
The square method is more suitable for professional painters because it is difficult to paint the surface before the squares dry, otherwise the result will be uneven.
It is necessary to ensure that the entire surface of the cylinder is well saturated with paint.
What to look for when choosing
The material for making the fur coat is selected based on the type of paint used, but the roller also has other characteristics that need to be taken into account:
- The length of the pile depends on the condition of the surface. The smoother the wall, the shorter the pile is needed to prevent smudges from forming; Long pile paints well on rough and uneven surfaces.
- Fur coat width. It can be small (up to 180 mm), medium (up to 250 mm) and large (250–300 mm) - for foreign manufacturers these are the mini, midi and maxi classes (facade rollers), respectively. Wide rollers are used for painting large areas, but you should not choose a 30-centimeter tool in any case - it is very heavy, and labor productivity is unlikely to increase.
- Purpose of the roller. Like paints, they are divided into tools for interior and exterior use. The latter are denser and tougher.
The tools also differ in design - the method of attaching the reel to the clasp. Based on this feature, rollers are divided into models with a hairpin, a replaceable coat, and frame shock-absorbing ones. If you are not a professional painter and do not plan to paint hundreds of square meters of surface, there is no point in thinking about which roller is better in terms of design - you can choose any one.
Knowing the labeling will help a lot when choosing. Each model has a number and letter designation indicating:
- bobbin diameter - measured in mm, accompanied by the Ø symbol;
- the material used to make a fur coat is a combination of letters, for example, BB (velor), PE (polyesters), PC (polyacrylates);
- tool width - numbers after letters, measured in mm.
Thus, from the marking Ø50 VMP-180 it will be clear that this is a roller with a diameter of 50 mm and a length of 180 mm, made of polyamide faux fur.
The main thing you need to pay attention to when choosing a roller is the quality of workmanship. Threads should not stick out from the fur coat, the stitching should be even, there should be retaining rings
The presence of the manufacturer's marking is also important. If you are interested in painting with a textured roller, read a special article about it
If you are interested in painting with a textured roller, read a special article about it.
Roller selection
Rollers are available in various types. Such diversity is necessary to apply different types of solutions. They can also paint different areas. To choose the right tool, it is worth understanding their purposes.
To choose the right tool, it is worth understanding their purposes.
Size
The size of the roller is selected taking into account the area of the room. Thus, the following types of rollers are distinguished according to their dimensional parameters:
- Mini ones are suitable for processing small areas, in corner areas, when using stencil types. Rubber options are suitable for securing seam areas to improve the quality of wallpapering;
- Midi is used for many types of work, for covering ceilings, floors and walls. If you choose the right fur coat, you will be able to use the device many times;
- Maxi, it is difficult to control the evenness of the base coating with them; they are usually used for treatment with a primer solution, or for the 1st layer of painting, if it is meant to be covered with another layer of finishing material.
The size of the roller is selected taking into account the area of the room.
Foam rubber
The foam type is distinguished by its high-quality impregnation of coloring compounds. Can be selected for many substrates, intended for water-based paints, varnish products or adhesive solutions.
It is prohibited to use this roller for water-based emulsions and oil-based products; the components included in the paints have a detrimental effect on the foam base.
The foam type is distinguished by its high-quality impregnation of coloring compounds.
Velours
Suitable for ceiling areas or applying a finishing agent. You can use a velor roller to treat water-based and oil-based compositions, but keep in mind that they are poorly saturated, for this reason you regularly have to re-paint the velor coat.
Suitable for ceiling areas or applying a finishing agent.
Polyamide
They can withstand thinners in paints, so they are considered universal. They are well absorbed by the composition and release it to the surface. They are easy to clean and can be used several times for this reason.
They can withstand thinners in paints, so they are considered universal.
Fur
The layer is distributed evenly, and even wall defects are filled. The length of the pile allows you to cover the entire base with high quality. They do not splash when rolled; can be chosen for treating large rooms.
The layer is distributed evenly, and even wall defects are filled.
Preparing the walls for painting
Sometimes stains remain due to poor preparation, if the walls are dirty, the paint lays down in an uneven layer or begins to flow, leaving marks. To prevent this from happening, you need to properly prepare for painting, following simple rules:
- the walls are washed and dried;
- degrease the surface with a clean cloth;
- the primer is first applied with a roller;
- After it has dried, the walls are considered ready for painting.
The primer must be compatible in composition with the enamel. If you choose similar compositions, the paint will adhere perfectly to the surface. Thanks to good adhesion, it will be possible to achieve a uniform color and the absence of defects.
Preparing the room for painting
Painting walls with a roller, tricks when distributing a water-based product begin with the preparatory stage. It is imperative to remove the old finishing material. Applying the product over whitewash or oil-based compounds is not allowed.
Removing old whitewash and paint
Removing a thick layer of whitewash requires first making notches along the base, then soaking the wall or ceiling with water, leaving the surface to soak for 30 minutes. After this time has passed, the base is wetted again to wait for good wetting. Soaked whitewash can be removed with a spatula. Finally, you will need to wipe the surface with a sponge.
If the whitewash is not thick, then creating notches is not required.
If the previous coating is a water-based composition, then the procedure is similar. But with an oil composition it will be more difficult; usually the surface is heated with a hair dryer, and the softened coating is removed with a spatula.
If the hairdryer fails, you will need to use chemical removers. It is important to create good ventilation, the windows also open, the master must wear gloves, a respirator and protective clothing. The surface is impregnated with a sponge soaked in the substance. Wait the time specified in the instructions and wash the layer. The procedure may need to be repeated several times.
You can also use a mechanical cleaning method using grinding. It is more convenient to work with an electric tool.
Soaked whitewash can be removed with a spatula.
Puttying and priming
This stage is necessary if there are uneven areas; such problems usually exist on the surface. First, the base is tapped with a hammer to identify poorly adhering layers and clean them.
If large flaws are found, you will need to fill them with a sand-cement composition, then the entire base is treated with a starting-type putty composition, followed by a primer and finishing putty.
The stage ends with sanding the surface; you can use sandpaper or a sander.
The primer solution is distributed over the base with a roller. A two-layer coating is made, each one must dry completely before the next.
The primer solution is distributed over the base with a roller.
Where to start
Any painting begins with preparing the working surface. It is necessary to thoroughly rinse or otherwise clean the entire ceiling from traces of old finishing, dirt and dry it.
The preparation does not end there. In order for the paint to adhere well and during work, the material is not consumed too much, the entire surface of the ceiling will need to be primed. Depending on the type of base on which painting is to be carried out, a different primer may be required - there is a type for concrete, there is one for brick, and for special surfaces, for example, with a not very durable top layer, a completely different one is used.
To simplify the task, you can use universal priming compounds. This operation can be performed either with a brush or with a roller - there is no particular difference, the main thing is that the composition saturates the entire surface of the overlap. Once the primer is applied, it must be allowed to dry.
Recommendations for painting work
The choice of water-based coating refers to budget types of finishing, chosen for kitchens, entrances, living rooms and other rooms. Can withstand moderate humidity. If you act step by step, the result will be durable and beautiful.
The choice of water-based coating refers to budget types of finishing, chosen for kitchens, entrances, living rooms and other rooms.
Number of paint layers
According to the rules, for high-quality painting of the base, a two-layer coating is required. The first layer will be absorbed into the wall, leaving gaps, while the second layer will completely cover the base with shade. It is important that each layer dries properly, then it will be easier to get a uniform layer without smudges.
The shade will also influence how many coats should be applied; light colors may require three coats to cover the base.
It is important that each layer dries properly, then it will be easier to get a uniform layer without smudges.
Creating a textured surface
It is possible to obtain a textured coating with water-based emulsion. A roller with a hard coat is used, the length of the fibers is taken to be medium. You also need a lint-free tool and a sponge. The composition should be viscous and should not be diluted with water.
Using a hard roller, the first layer is distributed, then a lint-free roller or sponge material is passed over its protruding shapes. This treatment can be done in a different shade.
It is possible to obtain a textured coating with water-based emulsion.
Creating texture using a coloring composition
This technique can be applied without a plaster layer. Viscous type paint is applied with a regular roller, simply by quickly rolling. The dried surface will have textured patterns from the roller. The amount of coloring agent will have to be spent a lot.
The amount of coloring agent will have to be spent a lot.
How to choose?
When choosing a tool, you should follow the recommendations of the paint manufacturer and the advice of salespeople in a hardware store.
- A popular and cheap option is a foam roller. But it is not suitable for applying oil or alkyd paint, as it is not resistant to aggressive compounds. But it is suitable for water-based paint when working indoors.
- To apply oil, latex, silicate paint or enamel, you should purchase a fur roller.
The shorter the pile of the fur roller, the less it will crumble and the smoother the composition will lie. - A universal option is velor or with polyamide thread. All types of paints can be applied. This tool is optimal in terms of price and quality of work.
Attention
When choosing a tool, its quality is assessed. A good fur coat is stitched evenly, there are no threads sticking out of it. The roller itself has locking rings. A prerequisite for a quality instrument is the presence of markings and information about the manufacturer.
How to properly apply paint to walls
Before painting, you need to thoroughly mix the paint so that all sedimentary elements move away from the bottom of the container. If color is introduced, it is done gradually so as not to make the shade too bright.
The composition is poured into a special ditch, where the roller is rolled until well impregnated. Then roll the tool along the inclined part several times to drain off the excess. After high-quality impregnation of the pile, you can apply paint to the wall, rolling it while the coloring occurs, after which the composition is again drawn onto the fur coat in a ditch.
Before painting, you need to thoroughly mix the paint so that all sedimentary elements move away from the bottom of the container.
Preparatory stage
To obtain uniform coloring, it is necessary to carefully prepare the surface.
- Level as much as possible and clean from dust, dirt and debris. Undesirable elements on the base contribute to the appearance of streaks and bald spots;
- Don’t forget about a high-quality primer: it allows you to make the color more even and the paint will adhere better;
- The roller also needs to be cleaned of dust and dirt, even if you just purchased it at the store. Before starting work, the tool should be cleaned with running water, wrung out and dried;
- The paint reservoir into which the roller is dipped must be clean and suitable for this type of work; dipping the roller directly into a paint can or bucket is not recommended. It is most advisable to purchase a special rolling tray with a ribbed surface to evenly distribute the composition on the tool.
Surface marking and paint application
To correctly mark the surface into a square. The width of the tool is multiplied by five, the resulting result will mean how many centimeters are made on the side of the square sections.
The measured square should be divided into five strips, the first is painted, the second, after 5, then in order 4,1,3. The 2nd layer is painted in the following order: 3,1,4,5,2.
The tool is directed from the bottom up, having completed coloring the strip, the roller is sharply removed and the next strip is painted.
The tool is directed from bottom to top.
Application methods
To distribute the paint evenly, it must be applied correctly from top to bottom and try to ensure a smooth transition. To begin, lower the tool into the bath, and then distribute the paint by rolling the cylinder over the grooved surface to remove excess composition. When painting large walls, move the roller at an angle. In this case, apply layers alternately after drying.
Cleaning Tools
You can clean the roller by washing it with water and a special fabric softener, or simply with dishwashing detergent. First, the roller is rolled well over the ditch to remove as much paint as possible. Afterwards it is soaked in water with a softener and the paint is washed off under clean water until the fur coat is clean.
You must first dry the fur coat with a towel so that excess water comes out, and only then hang it on the dryer.
You can clean the roller by washing it with water and a special fabric softener, or simply with dishwashing detergent.
What to paint with?
There are various rollers, which are divided by size and depending on the material from which they are made. Foam rollers are suitable for water-based paints. They are not very durable, but they are cheap. In the case where you intend to apply enamel or an oil composition, it is better to use velor or fur rollers.
Polyamide thread ones are also popular. The length of the pile in them is selected depending on the desired relief. The deeper the relief is needed, the longer the pile should be. Such rollers are able to create the necessary surface texture, they are easy to wash, durable and will last for many years.
But it should be noted that it is important to handle them carefully, since any careless movement can lead to paint threads splashing. There is another type of these tools - textured rollers. They help create the necessary pattern and shape.
They help create the necessary pattern and shape.
Why streaks and streaks appear: expert advice
There are also recommendations from professionals on how to paint walls with water-based paint without streaks using a roller:
- Check whether the fur coat is good by running your hand over the fibers; if they return to their previous position immediately, then the material is good. Also, the pile should not fall off with a slight tug;
- The metal frame must be free of corrosion and contamination. The cylindrical part should rotate smoothly.
The cylindrical part should rotate smoothly.
By using a paint roller, you can complete the refinishing process quickly and get the desired result. If you do everything step by step, the layer will be smooth and beautiful.
Completion of work
Upon completion of painting, all tools used in the work are thoroughly cleaned. The soft roller is squeezed out strongly and placed under running water. Liquid waste is washed down the drain. This cleaning method is only suitable for water-based paints.
Brushes and grooved tray can be easily cleaned in warm water.
Advice. Before painting, it is better to put the brushes you used last time in warm water for a couple of hours. If you do not want to wash the tray, then before filling it should be placed in a plastic bag.
Paints Snezhka characteristics
The leading manufacturer of paints and varnishes produces a wide range of products for all surfaces.
This paint can be applied to concrete, plaster, drywall, wood.
All products of the plant are manufactured in accordance with European environmental safety standards and international standards.
The main characteristics of the “Snowball” paint are:
- strength and wear resistance;
- long service life;
- good adhesion and quick drying;
- free penetration of air and steam;
- environmental cleanliness and absolute safety;
- acceptable pricing policy.
Any surface painted with Snezka looks perfect and unsurpassed.
Painting compositions for ceilings are available on a water or acrylic basis.
There are several series of paints that differ slightly in their composition and purpose.
Thus, the Disney series, intended for decorating children's rooms, is absolutely environmentally friendly, does not cause allergic reactions, looks great and does not require special care.
The stable and breathable Snezhka Eco series is especially in demand.
The base color of ceiling paints is white.
If the design of the room requires the use of other shades, you can purchase ready-made colored paint or tint white paint by adding a special organic dye.
In this case, you should take into account the required amount of paint for all stages of finishing.
If there is not enough color dye composition, it is not always possible to guess the proportion of the dye and get a completely identical tone.
When adding dye, the paint should be thoroughly mixed until smooth.
It is advisable to use a construction mixer or drill with a special attachment.
Mistake #4: painting without testing
Choosing a color is a rather complicated process, especially if the shade has to be combined with another tone or pattern. The unfortunate masterpiece will have to be repainted, and so the process can be repeated ad infinitum. The same applies to the shade, which you have to “extract” with your own hands using a color scheme.
What to do: add coloring concentrate to the paint a little at a time, mixing the contents thoroughly. To begin, pour a small amount of paint into a small container and add a couple of drops of color – see what color you get. Achieve the desired tone, and then do the same in a larger jar if you like the result. To make sure the color is compatible with the overall decor of the room, try painting it - apply the paint in an inconspicuous corner and wait until it dries. If the result suits you, let's get going.
Which roller is best for working with acrylic paint?
Not only the work process itself, but also its final result depends on the correct choice of tool - including the uniformity of paint application, the absence of stains and streaks.
Before you go buying a tool, you need to familiarize yourself with the criteria for choosing it.
The criteria are:
The geometric dimensions of the roller are its width and diameter. The choice here must be made based on the size of the area of the ceiling to be painted. The relationship is direct - the larger the room, the wider the roller should be. This will reduce the required number of tool passes over the surface. Narrow rollers are used for painting ceilings near walls and other hard-to-reach places
But it is also important to take into account your physical capabilities, since a wide tool takes on more paint and weighs more, especially if it is equipped with a telescopic handle. Material of the surface of the roller (coat). Since acrylic paints are water-based, fur coats made of foam rubber or fur (natural or artificial) are most often used for them.
A foam roller is suitable for working with paints of this type, but it is better for novice repairmen not to use it, as this is fraught with a large amount of splashes that stain both the person working and surrounding objects. This is a tool for a specialist. Fur rollers can have piles of varying lengths. When working with acrylic paint, it is better to choose a medium-length pile. A short-nap roller absorbs little paint and requires frequent dipping into the tray. And a long pile during work can be divided into uneven strands, which can cause uneven coloring of the surface. To avoid such problems, some manufacturers reinforce the pile with metal thread, which improves the quality of the tool itself and the coloring. Additional details. On sale you can find rollers equipped with a special trough. This may seem strange to some. In fact, it is designed to collect excess paint that flows into it during work. The option seems to be necessary, but if you properly roll the roller along the ribbed surface of the tray, the excess paint will be removed without this.
We should also talk about fur coats.
The most common rollers found in stores are:
- from sheepskin;
- their mohair;
- made of nylon plush.
The best material in this case is sheepskin.
It can be used to work with any paint, ensuring high quality of its application to the surface. Natural fur coats are the most expensive.
- drum length 10-25 cm;
- drum diameter 4-7 cm;
- pile length 6-25 mm.
To work with acrylic paint, it is better to choose a tool with medium parameters.
Working with such a roller requires the following rules:
Before use, the roller must be soaked in water for 3-4 hours.
This allows you to achieve uniform rigidity of the pile over the entire surface of the fur coat, which is important for uniform application of the paint composition. After the roller has been dipped in paint, be sure to remove excess paint by rolling it over a special ribbed surface or fine mesh. If the roller is intended for repeated use, after use it must be cleaned with a solvent and washed with a soapy solution. It is undesirable to use the same tool to work with different types of paints. To do this, you need to replace at least the previously used fur coat.
Fur rollers with a coat of polyamide and polyacrylic synthetic fibers are also often used. These are also lint rollers.
Polyamide coats are characterized by uniform distribution of paint over the surface and can be used to work with any paint and varnish materials. They are resistant to aggressive substances and are quite durable.
Polyacrylic coats are very similar to natural wool. They also provide uniform coloring, but their service life is shorter than polyamide ones. At the same time, the cost is also less.
Types of water-based paint
Before painting the ceiling with ceiling paint, you need to familiarize yourself with the variety of water-based compositions. They are used much more often than acrylic or oil ones.
Water-based paints are less toxic and smelly and do not need to be diluted with solvents such as acetone or white spirit. To achieve the required consistency and follow the recommendations on how to properly paint the ceiling with a roller, you need to add ordinary water to the coloring composition.
The water-based coating is resistant to vapor and humidity; ordinary detergents are used to remove contaminants from it.
There are the following types of such paints:
- Silicate
. For their production, so-called “liquid glass” is used. They should not be used in rooms with high humidity, but they are suitable for painting ceiling surfaces in living rooms. - Mineral
. They are produced on the basis of lime or cement. Such compositions are used for facade work. - Acrylic-latex
. In addition to the coloring pigment and water, they contain low-toxic resins, thanks to which the coating becomes glossy or matte, which depends on the type of composition.
Mistake #1: Painting unprepared walls
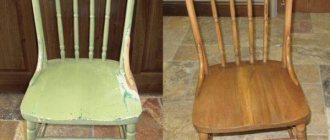
Minor defects, dust, grains of sand, and brush fluff from a previous painting may appear under the paint and negatively affect the result. All the imperfections will be visible under the layer of paint - all you have to do is either accept it or clean the wall and paint it again. And possible greasy stains will appear, no matter how many layers you cover the surface. Defects will be especially noticeable if you use glossy paint.
What to do: To avoid double work and unpleasant surprises, prepare the wall in advance. Take sandpaper or a special plaster sanding tool and go over the uneven areas and defects. Afterwards, brush off the dust with a brush or broom. Stains can be removed by wiping the wall with a damp cloth and soap.
How to paint different types of wallpaper?
New wallpaper must be thoroughly dried before painting. It usually takes 24-48 hours after sticking them on the walls. If the repair was carried out more than 2-3 days ago, then painting can be started at any time.
The biggest concern is the paper covering. But if you work carefully with a roller, even this fragile material will not be damaged. When painting paper wallpaper, you can also use a non-contact method: using a paint sprayer.
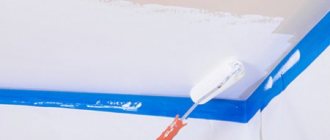
The first stage is painting the corners of the room, where the walls meet the ceiling or baseboard. If it is possible to remove the baseboards, sockets, and decorative door trims, then it is better to do this before painting the walls. But in old buildings you will have to cover the edges of these interior parts with masking tape. This measure will protect the surfaces of parts from water-based paint, which is more difficult to wash off after drying.
You need to paint difficult areas with a soft paint brush, without trying to press it too hard. Walls near doorways, corners, rosettes and other protrusions should be painted by hand to a width of about 5 cm. Without waiting for the paint to dry, proceed to the next step:
- Pour a little coloring composition into the cuvette and roll it with a roller along the ribbed surface to thoroughly saturate the pile.
- Start painting from the middle of a small area in the upper corner of the wall. Move from the center to the edges, capturing part of the pre-painted stripes.
- When the paint on the roller has dried up, roll it several times over the water-based emulsion poured into the ditch. Continue working in the specified sequence.
You need to paint 1 wall in 1 step, not allowing the paint to dry on the edges of adjacent areas. When applying the emulsion to a new area, use a roller to cover 1-2 cm of the already painted surface. This way the paint will lay down in an even, continuous layer.
Next, dry the surface and apply another layer of dye. When working, observe the same conditions as when treating the surface for the first time.
Preparing the room
Once the necessary equipment is at hand, proceed to preparing the room for painting. Take the following steps:
- Remove the curtains from the windows.
- Move the sofa, chairs and other pieces of furniture to the center of the room, then cover them with PVC film.
- Lay the film material on the floor and secure it around the perimeter with masking tape. This step prevents the coating from moving during work.
- Cover baseboards and other parts of the room that cannot be painted with masking tape. Try not to miss anything so that after work you don’t have to wash drops of paint off objects.
- Turn off the power supply to relieve voltage. Immediately remove covers from sockets and switches. Cover open areas with masking tape to prevent paint from getting into them.
- Remove batteries indoors. First close the taps, unscrew the nuts and drain the remaining water. Before draining the liquid, prepare an empty container.
Before you begin, try painting a small area to see the color and determine drying speed. This is necessary to understand when to apply the second and third coat.
Mistake #10: Wrong timing for painting
Applying paint in bright sunlight can cause the paint to dry too quickly, even before you can spread it evenly. The paint may also begin to foam or peel. And if you paint under the light of an electric light bulb, all errors will be barely visible.
What to do: the best option for painting the surface is during the day, without direct sunlight falling through the window. It is better to paint the south side in the morning or evening, when the sun does not shine so brightly.
Learn more about decorating rollers
On the surface of the roller intended for decoration, recesses or protrusions are applied, allowing you to create an imitation of natural stone, wood structure or brickwork.
In addition to rubber, there are products with a leather working surface, which allows for the application of an ornament similar to Venetian plaster.
Only an experienced craftsman can apply neat decor using a roller. If the trajectory of movement is violated, the pattern turns out to be crooked and asymmetrical.
Varieties of rollers for decoration.
What do you need to know about water emulsion?
Attention: Water emulsion contains water, tinting pigments, and various additives - mineral particles or polymers. During painting, the water component dries out, leaving behind a thin film.
This composition does not have an unpleasant chemical odor, which is a huge “plus”: people with allergies to such building material can use it without fear of having another attack. And it will be more comfortable for healthy people to paint walls in a room where it is impossible to open the windows.
When purchasing, evaluate:
- Composition (depending on the amount of antiseptic, thickener, fillers, it may or may not be suitable for interior work, for dry or wet rooms).
- What walls are needed for: concrete, enamel, wood or something else.
- Viscosity level (what, how it needs to be diluted).
- Consumption (average consumption per square meter - 200-400 ml).
- Temperature during application and drying.
- Permissible humidity level during operation, during operation.
- Specific gravity (a high-quality water emulsion in a 10-liter jar will weigh approximately 15 kg).
The jar should be stored in a dry place where sunlight does not penetrate.
Mistake #2: Ignoring Primer
Don't use primer before painting walls? Don't be surprised if you end up with an unevenly painted wall or overused paint. The fact is that the primer provides a lower hygroscopicity of the surface, which allows you to save paint. The base also gives the surface “adhesion” to the paint, which improves the painting of walls.
What to do: Choose the appropriate primer for the walls. Apply it with a brush vertically in small stripes, and then horizontally - perpendicular to the first layer. After the base has dried, you can cover the surface with the first layer of paint.
Mistake #8: Painting over wet paint
Of course, I want to finish painting faster and enjoy the result. That’s why we often don’t think about the consequences of painting on a “raw” wall. As a result, the undried layer begins to come off and stick to the brush or roller. Oil paint, in turn, may bubble and you will have to start all over again. True, after waiting for the paint to dry, and sanding the areas with defects.
What to do: Be patient. While the paint dries, do anything else. Pay attention to the instructions on the can, which indicate how long the paint needs to dry completely. If it's a single-base emulsion, it won't take long before you can get to work again.