Restoring furniture with your own hands at home is a fun and creative activity that allows you to give new life to your favorite items. At the same time, self-restoration helps you save a lot of money, because the services of professional furniture makers can be so expensive that it would be easier to buy a new cabinet, armchair or sofa.
You should only contact specialists when you want to restore expensive furniture or valuable, antique interior items - here, independent restoration by an inexperienced craftsman can only do harm. You can restore old furniture or something that was bought in a regular furniture store with your own hands - below we will talk about some of the tricks of this process.
DIY furniture restoration
Pros and cons of DIY furniture restoration
Before you begin restoring any piece of furniture, it is worth assessing the advantages and disadvantages of doing the work yourself. Let's figure it out - should you do it yourself, or entrust the restoration to a professional furniture maker?
A simple restoration can be done quickly and efficiently yourself
Advantages of doing the work yourself:
- Saving money. Firstly, you don’t have to pay a restorer for the work, and secondly, to deliver the furniture to the workshop, you may need the services of loaders and a truck.
- Possibility of control. You independently purchase all the necessary materials for furniture repair, and have the opportunity to carry out each stage of the work exactly according to the instructions, thereby obtaining a better result.
- Realization of your own ideas. The furniture will look exactly the way you want. If you wish, you can change or supplement the progress of work without coordinating the adjustments with anyone. So, it may seem to you that the resulting paint shade is not the best and the furniture needs to be repainted, whereas once you receive the furniture from the workshop, you will not be able to change anything.
Complex pieces of furniture are best left to professionals
Disadvantages of home restoration:
- Recreating the original shape of furniture, coverings or complex elements is best left to a professional craftsman. A beginner does not know many of the nuances, and when doing complex work for the first time, you may not guess correctly and ruin the furniture forever.
- Saving effort and time. Having handed over the furniture to a restoration workshop, you forget about it for a while, and then accept the finished result. If you do the repair or restoration of furniture yourself, then you will have to work on weekends or in the evenings - during the time allotted for rest. It may suddenly turn out that work will be a burden to you.
- Lack of space to work. When restoring furniture, you will certainly encounter wood dust in your apartment, the smell of various chemical compounds, and cluttered space. If possible, work should be carried out in a non-residential space - in a garage, on a loggia, in the warm season - on the street.
Many wood products have a strong unpleasant odor.
Advice! If you nevertheless decide to carry out restoration work in the apartment, allocate a separate room for this. All other furniture must either be taken out or covered with film or sheets. The floor should be covered with newspapers to avoid the appearance of permanent stains from spilled removers, varnish or paint.
Disposable protective covers for furniture can be purchased at hardware stores.
What materials and tools are needed?
Of course, the exact set of tools will depend on the piece of furniture you will be restoring. But there is a universal list of tools that come in handy during work. So, in many cases it is more convenient to use an electric tool rather than a manual one, so it would be advisable to borrow such devices from friends in advance or even rent them.
Professional tools not only save effort and time, but also give better results. Those planning furniture restoration may need the following:
- jigsaw;
- grinding (orbital) machine;
- a screwdriver with a good long-lasting charge;
- construction hair dryer;
- a powerful construction vacuum cleaner (to prevent dust from spreading throughout the room).
Popular models of construction vacuum cleaners
Achieving a smooth surface by hand is time consuming and difficult, so it is better to use a grinder
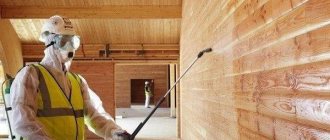
Advice! In addition to large tools, you will also need smaller accessories: brushes and rollers, spatulas of different sizes, sandpaper of different grits. Do not forget to purchase protective durable gloves, as well as a respirator that will not allow toxic fumes of varnishes and paints to enter the respiratory system.
In addition to tools for restoration, consumables are also needed - all kinds of removers for varnish surfaces, furniture wax, sealant or wood putty (compositions that fill cracks or chips), as well as paints and varnishes: enamels, paints, waxes or impregnations.
The modern market offers hundreds of types of finishing coatings for furniture
Note that furniture finishing can be purchased without any problems in any store, but restoration accessories (special pencils, adhesives, furniture edges) are best looked for on specialized online sites.
In addition, on advertisement sites in your city you can find a seller of the material you need - often people sell surplus or goods that do not suit them in color or texture.
Almost any furniture product can be ordered in the online store
How long does it take for restoration?
You can repair and restore furniture at home as much as necessary - small items can be dealt with in one day, larger projects can take months to restore. The service life also depends on the materials used - each varnish, primer, putty or paint has a certain drying period, which must be waited. If you do not allow the layers to dry, the final result will be unpredictable.
Important point! Read the instructions carefully before using any product and follow them. Before applying the next layer, the previous one must dry for as long as the manufacturer recommends.
To prevent paint and varnish coatings from deteriorating, tightly close the containers with them in between work.
To speed up the restoration process, purchase in advance such compositions that dry quickly. Thus, there are many coatings on the market that do not require long drying. Before purchasing, it would be useful to read reviews about a particular product.
Preliminary planning, by the way, is necessary for all stages of work and acquisitions. In order not to go to the hardware store several times, even at the initial stage you need to carefully think about what tools, devices and materials you will need - you need to buy them at once and keep them on hand. Then the process of restoration work will not drag on for long.
It’s better to go to the store with an approved list of necessary purchases
Methods for eliminating minor defects
Now let's talk about methods that can be applied at the initial stage. The appearance of any minor single defects does not require extensive surface restoration work:
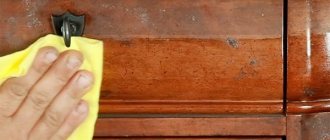
- How to update furniture with your own hands if it has lost its shine? In order to return it to its original appearance, you need to find a furniture care product in stores that contains orange oil. The process itself consists of heating a foam sponge moistened with water in a microwave oven. Next, the product is applied to the surface and immediately rubbed with a heated sponge.
- If minor abrasions appear, we restore the surface with the inside of a banana peel. For more significant defects, the following products are used: furniture marker for retouching, alcohol, wax. First, the surface is cleaned of dust and dirt using a soap solution. After drying, begin to wipe with a soft cloth soaked in alcohol. In this way we restore the original appearance of the coating. If the scratches are deeper, then alcohol will not help. We retouch them with a marker. Then polish with wax.
- When wood swells, when, for example, water leaks and the furniture board absorbs it, you can use salt and olive oil. The products are mixed and applied to the damaged area, left for half an hour. Salt will draw out moisture, and olive oil will prevent the wood from drying out.
- How to repair furniture with more serious damage (chips, dents, etc.)? You can’t do without the puttying process here. A special mixture for wood is perfect, although you can also use car putty. Defects are carefully repaired, the mixture is allowed to dry and then sanded with fine-grit sandpaper.
Repairing wooden furniture is a simple but labor-intensive process that requires endurance and patience. By performing all stages of restoration correctly, you can extend the life of your favorite things. Basically, options were considered on how to restore old furniture with your own hands, which was still made from natural wood. Nowadays, furniture is mainly made from chipboard sheets. It should be noted that repairing cabinet furniture with your own hands is basically no different. You can use all the algorithms presented above.
Folk remedies to help (2 videos)
Furniture before and after restoration (20 photos)
Actions for furniture restoration: sequence
Of course, as is the case with the necessary tools and materials, the sequence of actions may be different, but there is a mandatory order of work that is worth considering if this is your first time dealing with furniture.
Video - Painting wood with an antique effect
Table No. 1. Correct sequence of restoration work
| Stage | Description |
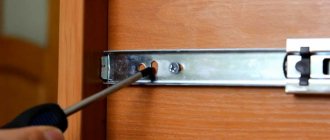
| Dismantling of furniture and fittings | It will be much easier to work with furniture if you first disassemble it into individual elements. Usually they remove the hinged doors, drawers, take out the shelves, and if possible, unscrew the frame parts. The adhesive frame should not be disassembled unless you are sure that you can then connect the parts properly. You also need to remove all the fittings - handles, hinges, locks. Before disassembling the furniture, take photographs showing the fastening points - this will make it easier to assemble. It is better to put the fittings that you plan to put in place into boxes or bags and sign them. |
| Removing paint or other top coating | Depending on the piece of furniture that you are going to restore, you can use one of three ways to remove the old coating: - sandpaper; — construction hair dryer; - varnish remover. Methods can be combined - the main thing is to achieve a flat, smooth surface. At this stage, be sure to use protective equipment against dust, varnish residues, and chemical compounds - wear a mask or respirator, goggles, and gloves. |
| Repairing various damages | Using specialized compounds and products (putty, furniture wax, grout) you need to mask all defects - cracks, differences or unevenness, scratches and chips. The choice of material depends on the amount of damage. So, it is better to fill deep cracks with wax, putty on large worn areas, and rub over scratches and chips. |
| Preparing for the final coating | Before applying the finishing coat to the furniture, you need to level all surfaces again - remove excess grout and matte them. For this, the most delicate sandpaper is usually used, after which the surface is polished with a rag. If you plan to use furniture primer, it should be applied as the last step. |
| Applying the finishing coat | If you want to preserve the structure of the wood, use tinted or colorless products - you can take varnish, stain, oil or wax. In another case, paint (it is better to use water-based paint) or furniture enamel will come in handy. Please note - if you have chosen a bright but light paint, it is better to first paint the furniture white; then a different shade will fit better against such a background. |
| Installation of accessories | The very last step is installing the fittings. You can return old elements to their rightful place, or replace them with new ones. |
New pens can change a familiar thing beyond recognition
Brief characteristics of restoration compositions
A common way to eliminate small defects on a furniture surface in everyday life is to wipe it with a cotton swab soaked in alcohol. After treating the damaged area, you can correct the situation for a while. But in some cases, this method can harm the decorative layer. Therefore, you should not experiment; it is better to choose a specialized composition.
Let's present the characteristics of some varnishes for furniture restoration:
- Shellac varnish. The composition, after application to the surface, can successfully highlight the texture of the wood and provide it with an original shade. This is a proven material that has been used to restore varnish for quite some time. The consistency of the polish is not viscous, it resembles colored water. Restoring the varnish layer takes quite a long time; to achieve the desired result, up to 40-60 layers of the composition are applied.
- Nitrocellulose. This composition can restore the polish of a large area. To carry out repairs and apply a layer, it is necessary to use sprayers that can provide the required speed of work. Otherwise, droplets may form that will quickly harden. Under such conditions, it will be impossible to achieve a smooth surface. Conventional spray guns for paint and varnish compositions are not suitable; it is recommended to seek the services of a restorer.
- Pentaphthalic composition. This varnish is very convenient for doing furniture repairs yourself, since no special equipment is required for its application. After complete drying, thoroughly sand and apply the finishing layer using a paint brush. In this case, the surface will be glossy. If you want a matte effect, then the product must be applied with a swab. There is no need to purchase additional product for priming. The first layer of pentaphthalic varnish acts as a primer. A total of at least four layers are applied.
After choosing a varnish for polishing furniture, you should decide on the color of the coating. Very often colorless varnishes are used to preserve the structure of the wood. However, when lacquered furniture is updated, they try to match the varnish to the surface.
We restore an old cabinet: repainting, aging, decoupage
Before you start working, you need to figure out (or better yet, sketch in color) what the finished product will look like. Having considered this point, you can begin purchasing the necessary materials. We will need:
- synthetic paint brushes of medium hardness (one for paint and one for varnish - at least two centimeters wide);
- wood paint;
- sandpaper (harder and finer);
- water-based varnish for wood (matte or glossy - at your discretion);
- acrylic primer for wood;
- masking tape;
- paraffin candle;
- napkins for decoupage or drawings printed on thin paper;
- PVA glue;
- spray bottle with water.
Step-by-step instruction
Step 1. First of all, you need to remove all the fittings, and you need to start work by cleaning the surface of the cabinet from old varnish. To make the work go faster, it is better to use a sander, but if you don’t have one, you can sand the cabinet manually.
To treat the surface of the wardrobe, a small round nozzle is enough
Step 2. The entire surface of the cabinet that is planned to be painted must be coated with a primer. You need to apply the composition with a brush in one layer, and then dry for the time recommended by the manufacturer (usually the primer dries for at least three hours).
The primer is usually colorless
Step 3. Cover with masking tape the parts that we do not plan to paint. We paint the remaining elements with a brush in one layer. Leave to dry, then, if necessary, cover the surface with a second layer of paint.
The first layer can be applied with white paint, the next layer is colored.
Step 4. Apply paraffin. We need to use a paraffin candle to treat those areas that we plan to make aged (for example, the side edges). This technique will allow you to remove part of the paint layer and expose the previous one. This achieves the “scuffed” effect that is relevant for old furniture.
Paraffin should be applied in a fairly dense layer.
Step 5 . Next, the cabinet needs to be covered with another layer of paint - this time it should be slightly lighter than in the previous layer (you can add white paint and stir). Doors and protruding elements can be painted in a different shade or color if desired, after sealing the joint lines with masking tape.
Strips of tape will allow you to draw even boundaries between shades
Step 6. We decorate individual elements (in our case, drawers and door ends) using the decoupage technique. To do this, apply a napkin with a pattern to the surface of the cabinet, moisten it with water from a spray bottle, then smooth it with a brush. Afterwards, cover the napkin with a layer of PVA glue and wait for it to dry.
PVA glue dries in about 20-25 minutes
Step 7. We varnish the finished cabinet in two layers (each layer must be dried according to the instructions).
Result of work
Video - Decoupage of furniture made of laminated chipboard
Features of partial restoration
Oak products are quite strong, so restoration of oak furniture is mostly carried out partially. In this case, techniques such as decoupage or artificial aging are used. Let's take a closer look at how to partially restore wooden furniture. To do this, we prepare the following tools:
- adhesive composition for decoupage;
- acrylic based paints;
- scissors;
- napkins with the desired pattern;
- craquelure varnish.
Let's look at how to restore old furniture with your own hands using the example of an antique table top. When updating some areas, they must be fenced off from others. Therefore, we use masking tape to protect the unnecessary surface area. Then we carry out the following operations:
- We paint the selected part with green acrylic paint and give it time to dry thoroughly.
- A craquelure varnish is applied over the paint, and we also wait for it to dry.
- The next layer of paint will be beige in color, after some time the coating will begin to crack. To speed up the formation of cracks, you can use a hair dryer.
- At the next stage, cut out the design you like from napkins. We place the images on the surface of the tabletop and coat the top with decoupage glue.
- When the glue dries, apply a finishing coat of clear varnish.
Important! All work must be carried out with a horizontal surface. This will prevent the formation of smudges and streaks.
As a result, we get a table with decoupage elements, which, by and large, will not differ from antique products.
On video: a chair using decoupage technique.
Simple tips for quick furniture restoration
It is not necessary to spend a lot of time and money to give old furniture a new attractive look. So, there are quick and simple methods for updating interior items:
- Cover with clear or white varnish. Light wood can simply be sanded and then coated with a new layer of furniture varnish. For dark wood, you can use the “dry brush” technique - the surface is also sanded, and then white varnish or paint is applied on top, as a result of which the dark base appears through the finish coat.
- Just paint it. If the purpose of restoration is to change the appearance of the furniture, it is enough to repaint it. To do this, you need to remove dirt from all surfaces, sand with medium-hard sandpaper, and then apply a wood primer and paint one or two layers. If the furniture is not damaged, the result will be excellent.
If you're tired of your old kitchen, you can simply repaint it a different color. - Draw an ornament. Scratches, chips and roughness on some furniture can be disguised by painting it with various ornaments. You can depict both abstract patterns and full-fledged scenes - it depends on your artistic skills. If you don’t know how to draw at all, it’s easy to find various stencils on the Internet and simply transfer them to furniture. The drawings are made with acrylic paints and secured with colorless varnish.
- Decorate with decoupage. The decoupage technique involves transferring various patterns onto furniture from old newspapers, already worn but beautiful geographical maps, from magazines, and also using special decoupage napkins. Furniture decorated with decoupage looks especially good in Provence style interiors.
You can read about how to decoupage furniture in the Provence style in our special article.
The decoupage technique is very often used when remodeling furniture.
Self-restoration of furniture allows you to update your favorite interior items as you wish. This solution is suitable for those who are not ready to spend money on purchasing new furniture, or want to keep things dear to their hearts.
As practice shows, the issues of restoring pieces of furniture are quite solvable even in an apartment, and the process of work can be mastered by every person who knows how to hold the simplest carpentry tool in their hands. Simple work takes one or two days, but if it is carried out according to all the rules - the master is in no hurry, carefully follows all the instructions, then the result will be excellent, and old unsightly furniture, given a new life, will delight the eye for many years to come.
How and where to purchase products
To buy Novoryt wax for the restoration of furniture, ceramic tiles, doors, various types of floors or other products, select what you need and add to cart. Then you can make a quick order (leave a request by phone number) or place a full order, where you indicate the payment method and delivery or pickup details. You can also purchase Novorit products by contacting our specialists by phone, email and even on social networks. Delivery of orders is carried out throughout Russia. We try to do everything possible to make your purchase comfortable!