From the author
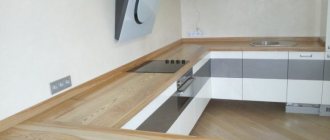
The background to the work described in this article is as follows. For the kitchen, a 2400 mm long kitchen worktop was ordered. Since the tabletop is sold in 3000 mm pieces, the manufacturer received a completely finished tabletop 2.40 cm long and the remainder of the tabletop 60 cm. It was this remainder that had to be glued to the edge of the tabletop.
Installing a countertop is a complex and time-consuming job that requires special tools and practical skills. Installing a countertop without practicing such work is almost impossible. Therefore, I recommend that if you do not have similar work experience, you invite professionals to install the countertops. The craftsmen of the company santex-mastera.ru, who can be invited on the website https://www.santex-mastera.ru/, will carry out professional installation of the countertops, using modern tools and linking them to your kitchen furniture.
Lifehacks
Professionals advise paying attention to the following tricks:
- Ends hidden from view are often not processed. This is acceptable according to GOST, but in practice it is not very reasonable. It is optimal to go through parts that are invisible during operation with at least the thinnest melamine edge. This will reduce the absorption of vapors and moisture, and extend the life of the furniture. Relevant for shelves, drawer bodies, countertops.
- When working with an iron, it is highly advisable to wear a fluoroplastic attachment or add thick cotton. This reduces the risk of overheating the glue and melting the tape itself.
- The edges are selected either tone-on-tone or in strong contrast. A difference of 1-2 tones will make the furniture visually uneven.
How would you disguise the end of the furniture?
EdgeProfile
- To improve the fit, the ends must first be vacuumed and wiped with alcohol to degrease.
- The optimal heating for an iron and hair dryer is medium mode (usually 2).
- For facades and external ends it is better to use PVC edges 2 mm thick. There the friction is highest.
If it is necessary to replace the old tape, it is removed in the same way, but in reverse order. Heat the surface, use a knife or spatula to separate a piece from the end. Clean the surface, then begin installing fresh material.
Purpose of edges for chipboard countertops and panels
The aesthetic purpose of the edge is not the main one. The main task of the chipboard edge is to protect it from moisture. This is especially true in the kitchen and all ends of the kitchen countertop need to be covered.
The edge also protects you from the release of formaldehyde from the chipboard (chipboard) countertop.
As an alternative to edges, special end caps for tabletops are sold. I wrote about them in an article here. Overlays are easy to install, but add unnecessary elements to the appearance of the countertop that may seem unnecessary.
By the way. If you buy a tabletop without cutting from a manufacturer, you should know that a factory tabletop 3 meters long, of any thickness, has a technological edge of about 10 mm, which needs to be cut in any case. And if you do not order this from the seller, you will have to cut the tabletop and seal its edge on site.
Related article: Advantages of artificial stone countertops
How to update an old countertop made of natural and artificial stones?
The optimal method of restoration is polishing and grinding, because the tabletops have an identical texture throughout their entire thickness. Care must be taken with cast stone applied to the base in a thin layer; it will only withstand 2-3 polishing updates. In the future, it is optimal to improve it in the same way as wood or plastic - by gluing, painting, glazing. The same methods can be used to transform a stone if the set has already become boring.
Before you get tired of the set, scuffs and scratches form on the stone surface, it’s time to sand and polish it. Required tools:
- Sander.
- Polishing machine.
- Polishing paste.
The device for grinding and polishing can be one with different attachments: for the first stage abrasive P120, for the second - up to P1500.
You can update your kitchen table top with your own hands by following these steps:
- Adding water to the surface to reduce the heating of the stone, sand the countertop, leveling the top layer.
- Using polishing attachments from coarse to fine, process the surface to a matte, semi-matte or glossy texture using polishing paste.
Important . Neither the polishing nor the grinding wheel should be dry, they must be moistened.
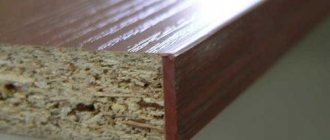
Types of edges
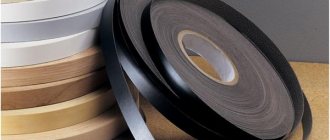
To seal the ends of chipboard you can find the following types of edges:
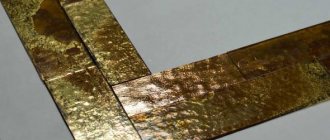
- Melamine (paper) edge with adhesive layer. An excellent option for DIY work at home. Easy to glue, but not practical to use.
- PVC edging . Strips of polyvinyl film intended for sealing the ends of chipboard panels and countertops. They do not have an adhesive layer and are difficult to work with your own hands.
- (Acrylonitrile Butadiene Styrene) plastic edge A practical option, it is sold with an adhesive layer, so it is convenient for DIY work. It is the ABS edge that will be used in the description of the work in this article.
Useful tips
It is possible to edge the tabletop yourself, but you must follow the instructions and take into account the recommendations. Helpful Tips:
- The edging material is sold with or without an adhesive base; this determines what tools and materials are prepared, and the progress of the work itself.
- If an iron is used as a heating device, the strip is covered with paper or cloth to prevent the top of the strip from melting.
- Leveling and pressing is carried out until the material cools completely;
- The end side of the tabletop must be cleaned of dust deposits and dirt, otherwise the glue will not provide the necessary adhesion.
- The glue is applied to the two surfaces to be glued, and the required time is waited for impregnation.
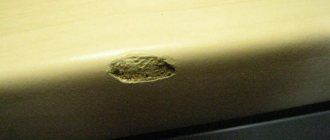
- If there are chips on the edge, sanding is done, but do not make any effort so as not to scratch the surface.
Material and tools for work
To glue the edge to the tabletop with your own hands, we need the following tool:
- The iron is a household iron, it will be used as an edge heater. Can be replaced with a hair dryer;
- Construction knife with new blades;
- Fine-grained sandpaper;
- Scissors.
We prepare from the material:
- The tabletop itself;
- ABS edge according to the color and thickness of the tabletop.
Installation technology
Before starting work, you will need to prepare the surface and collect the necessary accessories.
Toolkit includes:
Glue Moment, Liquid Nails or construction PVA (if not a self-adhesive type of edge).
The edge itself (calculate the quantity in advance around the perimeter with a margin of at least 20 cm).
Sanding block or fine sandpaper.
Painting knife, scissors (depending on the softness of the edge).
Pressure rubber roller.
Thick rags.
Hair dryer or iron.
A file and wood putty may be needed if the end has large defects.
The main task of preparing an object is to remove all burrs, seal large holes, and level the surface as much as possible. When using sandpaper, the surface must be completely dry. If putty is used, it must be given time to completely cure. Then start gluing the tape.
How to glue
The algorithm for using tape without an adhesive layer and with it is slightly different.
Self-adhesive
- Measure and cut a piece of tape 2-3 cm larger than the end.
- Apply an area of about 20 cm, level it and heat it with a heated iron or hairdryer for several seconds.
- Roll the heated area with a roller.
- Proceed to the next segment. Continue this way the entire length.
- Trim off excess tape with a paint knife. Glue the edge.
Without adhesive layer
- Measure and cut off the tape to spare.
- Apply glue to the end and level the layer.
- Wait for the initial drying time (indicated on the packaging for each type of glue).
- Apply the tape in small sections, rolling it with a pressure roller.
- Wait until the adhesive has completely cured. Cut off excess.
When working with a self-adhesive edge, it is possible to level the entire length to the end, secure it with masking tape in several places, then warm it up. Before treating the area with tape, it must be removed before heating.
Expert opinion
Korzhavin Daniil Dmitrievich
Designer of stylish home furniture
Adhesive may come out during the process. It is collected with rags immediately, without waiting for it to dry.
How to glue an edge to a tabletop with your own hands
Let me draw your attention to the fact that the quality of the cut of the tabletop matters. The edge will not hide the unevenness of the cut, and will hold perfectly, only on a perfectly even cut.
Place (lay) the tabletop so that it is convenient to work with the end;
Wipe the sawn end of the tabletop with a damp cloth to remove dust and sawdust;
Using scissors, cut the edge to the required length;
Place the cut edge on the dry end of the tabletop with the adhesive layer facing down. Drop the edge of the edge along the top edge of the tabletop so you don't have to trim the two edges of the edge later;
Warm up the iron for ironing synthetics;
Cover the edge with a single layer of newspaper. Next, iron the edge with a heated iron for 3-5 minutes. Under the influence of temperature, the adhesive composition of the edge will melt and glue the edge to the end of the tabletop;
After gluing, all that remains is to trim the edge with a knife. Keep the blade of the knife parallel to the surface of the tabletop so that you don't get an angled cut on the edge;
Related article: Laying porcelain tiles on the kitchen floor with your own hands
ABS edges are difficult to cut and small nicks may form at the edge of the cut edge. They need to be carefully removed with sandpaper;
All. You managed to glue the edge to the tabletop with your own hands.
If you choose to work not with an iron, but with a hair dryer, you will need a hard wallpaper roller. Use a hairdryer to heat the edge attached to the end, and use a roller to press it against the end of the tabletop.
Profiles for processing furniture edges
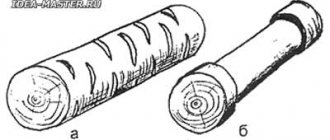
You can trim the edge of furniture not only with edge tape. There are also furniture profiles that are attached mechanically. They are available in two sections - T-shaped or U-shaped (also called C-shaped).
For T-shaped furniture profiles, a groove is milled in the edge being processed. The profile is hammered into it with a furniture (rubber) mallet. The edges are cut at 45° to make the angle look attractive. It is brought to perfect condition with fine sandpaper. This type of profiles is produced from PVC and aluminum; with the same installation method, they look very different, and the differences are significant.
T-shaped furniture profile for processing furniture edges
In width they are available for laminated chipboards of 16 mm and 18 mm. There are also wide ones, but they are much less common, since they work less with such material.
C- or U-shaped profiles are most often mounted with glue. They coat the edge with it, then put on a plastic profile, press it well and fix it. These PVC profiles are soft and hard. Hard ones are harder to bend and it’s difficult to paste them over curved edges. But they have great strength.
Gluing C-shaped furniture profiles does not cause problems
If you still need to “fit” a rigid C-shaped furniture profile onto a bend, it is heated with a hair dryer, then given the desired shape and secured with masking tape until the glue dries.
How to seal the gap between the apron and the countertop?
If there is no gap between the apron and the set, you don’t have to use the baseboard at all. In this case, the seam is filled with sealant or epoxy grout. You can lay the tiles through a metal layout profile. 7.
Interesting materials:
How to uninstall Modern Warfire? How to remove Korben's Modpack? How to remove a module in Visual Basic? How to remove a module? How to remove Daze mods? How to remove Minecraft mods? How to delete my books in Litres? How to delete my notes in contact? How to remove mts services android? How to delete music from an Android phone?
How can you surprise your guests?
Note that recently owners have often tried to cover the kitchen facades with self-adhesive film with photo printing. Anything can be used as a print, but the most relevant for a kitchen theme are always beautiful flowers or juicy and ripe fruits.
Or no less beautiful representatives of the animal world. This also includes one of the most common options - butterflies.
There are also purely abstract photographic prints using geometric shapes and their derivatives.
The coffee theme always looks organic and advantageous. Grains scattered over the surface, beautiful foam, cups filled to the brim with a fresh invigorating drink - that’s all.
Well, if you really want to surprise the guests of your home, then try covering the kitchen countertop with self-adhesive film imitation wood or marble.
Which glue to choose for edges
In most cases, the edge is supplied with an adhesive applied to it. But if this is not the case, then you need to purchase universal glue or PVC.
As a rule, the first option is not recommended for every type of work, since the glue can have a specific effect on the material, but at the same time this also applies to PVC. The second is that it does not always withstand moisture and can begin to deteriorate under its influence.
But before buying universal glue, you need to ask the seller whether it has a negative effect on the material of the table top and edges. A good choice for purchase would be Lux glue. This glue can be used to easily attach the edge to the tabletop.
Tabletop care
Proper care will help increase the service life of your countertop. There are five golden rules, the observance of which will allow you to update your work surface much less frequently:
- Use a cutting board to cut food, even if it's just one piece of bread.
- Do not place hot dishes on the countertop, even if the work surface is made of stone.
- Do not use abrasive cleaners to clean the surface. It is better to replace the latter with more gentle ones.
- Try to avoid hitting the surface, so it’s better to beat the meat in a different place.
- Do not leave the tabletop wet; it must be wiped dry with a cloth after each wash.
Despite the apparent simplicity of all update methods, in some cases it is better to trust the professionals. This is due to the need to have certain skills, tools and experience.
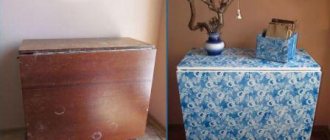
Film - quick design of the facade of a kitchen unit
This option for updating the headset turned out to be the cheapest and most accessible, because each of us can use self-adhesive film. Modern film can imitate natural materials such as leather, wood or stone. The only thing when choosing a material is not to give preference to the most inexpensive options, because the film must be of high quality and practical. For myself, I selected vinyl film, which is resistant to moisture, sudden changes in temperature, and also retains its color and appearance for a long time.
Renewing the tabletop with film
Before updating your old kitchen set, stock up on the following tools:
- Film
- Knife
- Ruler and pencil
- Centimeter
- Scraper
First you need to take measurements of all kitchen surfaces that are to be updated. Usually, for such processes, all cabinets are disassembled, since it is very difficult to carry out any repair work with an assembled and installed set. High-quality preparation requires not only cleaning the headset from dirt and dust, but also sealing cracks and chips. This will require putty, which we are all so used to.
Important! Self-adhesive film has one property that should not be forgotten - it highlights all surface imperfections. Therefore, the preparation process must be serious, and the foundation after it must be smooth.
After the dimensions are made, we will make marks on the reverse side of the film. The fabric is cut along them into the required pieces. When using a film with a pattern, make sure it matches. Use a utility knife and a ruler to cut the pieces as evenly as possible. When gluing, a rubber scraper allows you to smooth out places where bubbles form. You may not be able to paste the parts the first time, but after completing the renovation process, your kitchen will sparkle with new colors. Do not forget that fittings also play an important role and therefore it is worth purchasing them too. Unlike purchasing the entire kitchen set, purchasing individual parts will be very beneficial in terms of inexpensive repairs.