Basic rules for cutting plywood or chipboard
More suitable tools might have been circular saws or band saws.
There are many cutting tools, and not just one, but several are used.
To get a clean cut, you must follow the rules:
- Fine-tooth saws are suitable for work;
- First, the material is sawn across the grain, then along. This method will free you from splitting corners
- The front side of the material is sawn with a hand or band saw;
- From the seam side. Saw with contour or circular saw;
- When working with a circular saw, you need to watch for high speed and low material feed;
- The teeth of the saw blade should penetrate finely to the surface;
- In order for fewer wrinkles to appear on the board, it is necessary to run the saw along the bevel strip of the cut, using light pressure and a slight rollback;
- Adhesive tape attached to the bevel strip will protect the material from chipping.
In practice, two professional interchangeable tools are used. Jigsaw and jigsaw.
In a home workshop you can achieve an even cut. But it is better to entrust the work with dimensional sheet materials to experts with special equipment.
Application of adhesive tapes
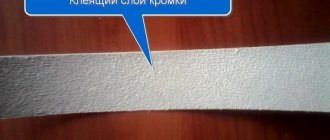
Adhesive tape (for example, ordinary tape) is used to protect the back side of the material. It is necessary to glue a tape to the cut line to protect the processed fabric from tearing off large elements. Masking tape cannot be called a very effective option for preserving material when cutting with a jigsaw, since its strength indicator is extremely low.
A fairly wide (each side of the cut material should be covered by at least fifteen centimeters) aluminum or fiberglass reinforced tape is best suited. In addition, the adhesive tape must be pressed with a dry cloth to eliminate the risk of wrinkles.
hunter_cbx
Honestly, the title “How not to cut a countertop” would be more correct
The first cut of the tabletop was done with a hand saw in the entrance on the first floor in order to drag it into the elevator. The cutting was done with a large margin (about 8 cm) and in haste. This is what we ended up with (you can take it as a standard).
Next, according to the original plan, the edge was leveled using a straight edge cutter. As you can see in the photo below, the top edge turns out to be perfectly smooth, but due to the wrong direction of work with the router, the laminate cracks on the side of the facade. Of the three attempts to level the edge using a router, all ended with a similar result (the photo shows the results of the third attempt). After the experience of previous work with a wood router, I had the feeling that the router was working hard on 38 mm thick chipboard and slightly overheated.
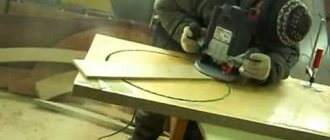
The next cutting attempt was made with a jigsaw. When working with a jigsaw, the cut is made from the reverse side due to the direction of the teeth on the file (they say that there are special files with the reverse arrangement of teeth, but I have not found any). A Boche T101B (clean wood) file was used for a smooth and clean cutting edge. First, a guide was attached to the tabletop with clamps, along which the cutting was carried out. After 20 cm of cutting, the jigsaw begins to move slightly to the side and the file overheats - and this is the result. Although the edge of the cut (in the photo it is the top) turns out to be quite clean. As a result, we have an overheated file and overheated inserts (these are two small parts that are responsible for the correct positioning of the file during operation) - now all this requires repair (replacement).
And finally it was the turn of the circular saw. Similarly to working with a jigsaw, we fasten the guide using clamps and saw along it. You should start cutting from the front edge (facade) to avoid chipping on this part. We select a saw blade with the largest number of teeth to ensure an even cut. I used a blade with 48 teeth for a diameter of 130 cm - in the end it turned out that the diameter of the saw was too small - in some places the lower edge was undercut by about 2 mm. For this reason, I had to do all the cuts from the front side, which ultimately led to small chips (which are completely covered by the aluminum side panel). Unfortunately, I did not have the opportunity to check the cleanliness of the cut when sawing from the inside out; most likely the edge would have been smoother.
Well, this is the result of cutting with a circular saw. On the left - chips when sawing the tabletop, on the right - a not entirely successful cut (two turned out perfectly, but the third tilted slightly to the side, then I had to slightly straighten it with an edge cutter, it’s good that it turned out to be the back wall. Apparently the reason for this is the length of the cut or crooked hands.
And now the actual conclusions: 1. It is absolutely not necessary to buy a 38 mm thick tabletop; it is more difficult to process at home. You can get by with a standard thickness of 28 mm.2. If it is possible to order cutting of the tabletop in a workshop, then do so (especially if you have no experience in this matter). 3. IMHO, it is best to cut with a circular saw with a disk of about 190 cm and a fine tooth, starting from the front edge (facade) and most likely from the back side (but I could not check this).4. The experiments took a total of 25 cm of the countertop, it’s good to have a margin of 60 cm. 5. If I fix the jigsaw before the weekend, there will be a new post about installing the sink
What cannot be sawed
A grinder or an angle grinder is something you should not use to saw a tabletop. Some masters recommend this method to save time. However, it has more disadvantages than advantages.
Use a level to make precise cuts.
Firstly, the quality of the parts is low: due to the sudden movement of the disk, many chips appear. Secondly, if large discs are used, there is a high risk of injury.
Professionals will make better cuts thanks to the availability of special devices.
In addition, after work a lot of dust remains, which is unacceptable at home.
Tools and materials
If possible, it is better to cut the chipboard with a hand router using homemade guides. This method is not very comfortable when cutting huge sheets, since when working with this equipment you need a table. In addition, this method often requires the configuration of the cutters. But in the end you will get cleanly processed, “beveled” edges.
Electronic jigsaw. The most popular tool for sawing chipboard
Some craftsmen use a jigsaw in their own work, but, in the absence of skill, it is difficult to cut, and chips can form.
If such methods are not suitable for you, then we will prepare for work to cut out chipboard at home:
- A fine-toothed hacksaw (the kind best suited for iron work). In this case, the teeth should be torn to 1/2 the thickness of the blade and hardened;
- Cardboard tape;
- File for rough processing of cut bevel strip;
- Sandpaper for processing the cut strip.
How to cut a countertop using a circular saw
When working with a tool called a circular saw, you need a finishing saw blade with a fine tooth. A circular saw is more convenient than a jigsaw for making long straight cuts. However, during such work, much more chips are formed, since the side with the teeth cuts into the material and breaks off pieces.
But even when working with a finishing disc, many chips form on one side of the tabletop, which then must be subjected to lengthy processing. Moreover, it is not a fact that after processing there will be no millimeter chips or microcracks left, which in the future will render the material unusable or highly susceptible to moisture.
Therefore, it is better not to use this option for cutting tabletops. Better leave the use of a circular saw for another job. If this is the only option for you, then you will have to work hard at the stage of final processing of the sawn material.
What else do you need to know?
When you plan to saw off everything without chipping on one side, it is permissible to use files with both upper and lower teeth. Most craftsmen prefer small files with straight teeth. Such devices chip less material, but still work quite well. After cutting, it is best to process the ends with emery stretched over even bars. If you don’t have a ready-made crayon of a suitable color, you can mix different crayons, like paints in an artist’s palette, and get a new color.
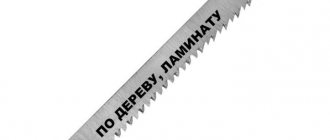
To cut without errors and quickly, you must always take into account the brand markings. There is no generally binding designation standard yet, but almost all companies strictly follow the classification developed by Bosch specialists. Or at least they list it along with their own abbreviations and terms. CV saws (sometimes referred to as HCS) are well suited for cutting wood and wood-based products.
Hardwood files are intended for processing laminated panels (they are also useful, note, when processing hard wood).
Some inscriptions indicate in which mode the tool works optimally:
basic - a simple blade that allows you to make a clean cut of high quality;
speed - a device whose teeth are set apart (this allows you to cut faster);
clean - a blade that has not been cut (usually gives the cleanest cut).
If the workpiece is relatively thick, it is preferable to have a saw blade with large cutters that are not set apart, then the deviation from the vertical will be minimal. A longitudinal (relative to the fibers) incision is most often made with helical saws. For a transverse one, a straight blade is better suited. When you plan to make a piece of furniture, it is advisable to choose a less productive, but more accurate tool. Since most saws produced today cut the material as it is pulled in, the workpiece will need to be processed from the inside out.
What tools to use?
If the question arises of how to cut a tabletop, then first of all you need to decide on a cutting tool, and most often several tools are used.
For example, using a circular saw, you can get the perfect result, but this is quite an expensive pleasure, because a high-quality tool costs a lot of money. Therefore, this unit can be found mainly only in special factories.
Grinder - has similarities with the previous tool, but the result will be far from ideal. When working with an angle grinder, many chips may form.
Usually, to cut a tabletop, two main professional and interchangeable tools are used - a jigsaw and a jigsaw.
Construction specialists divide blades or, as they are also called, saws into two main categories:
- tearing little by little on both sides;
- tearing strongly, but only on one side.
When working with a tabletop, you will need the option that breaks on one side.
Before starting the main work, it is necessary to thoroughly sharpen the blade of the tool so that chips do not form during the work. With a sharpened blade, before you start cutting the material directly, you need to make a groove, the depth of which will be about 2-3 mm. This will make it possible to complete the job without injuries or chips.
Fraser
The milling cutter allows you to get the cleanest possible edge of the workpiece, while the quality will not be so easy to distinguish from the formatter, and sometimes it will be even better.
First, you need to cut the workpiece with a jigsaw, making an indentation from the marking line by 2-3 mm, and then align the line according to the template. Usually, for this purpose, a second piece of laminated chipboard is used, sawn on a format saw, so that it is of a suitable size.
It is necessary to use a copy cutter, that is, one with a bearing. This way you can get a very clean cut. Among the disadvantages of working with a router, there is a lot of hassle, since there is a need for precise markings, preliminary filing of workpieces and setting templates for the router.
Tabletop connector - euro saw: hidden docking (photo)
A method of processing ends that uses patterns. To create it you need a milling machine. Only with high-quality equipment it turns out flawless.
Sometimes euro-sawing is produced on a cutting machine - this significantly reduces the cost of production, however, with such economical production, the ends are obtained with fluctuations of a millimeter or more. Therefore, when purchasing, you should check this point very carefully, especially if the price of a prefabricated kitchen surface is significantly reduced. A poorly made joint will not connect as it should, leaving gaps.
Correctly executed ends after assembly form a surface on which the gap is not visible at all - it is there, but its width is a fraction of a millimeter. If the coating is dark in color, it will not be easy to find where the euro-cut table top was cut (photo).
Such ideal quality can only be obtained using a router, and the patterns must be new or at least not worn out.
Can ice cream go bad?
Since ice cream is stored at subzero temperatures, many people think that it does not spoil at all under such conditions. But this is fundamentally wrong. Sub-zero temperatures only slow down the growth of bacteria. When thawing, a favorable environment is created for microorganisms. If ice cream has spoiled, its taste and consistency changes:
- the dessert takes on an uncharacteristic taste (sour, salty, metallic);
- large ice crystals appear;
- the glaze is covered with a white coating;
- the consistency is heterogeneous, reminiscent of sand.
If you eat such a delicacy, you can get serious food poisoning.
Does the quality and taste of ice cream change over time?
When ice cream is stored in the freezer according to all the rules, its nutritional value and taste still become lower over time. Ice cream that is past its expiration date and freshly made dessert will taste different, even if stored properly.
Can ice cream go bad in the freezer?
If ice cream is stored in the freezer under temperature conditions, then it is suitable for consumption throughout the established shelf life, but only if the delicacy has not been defrosted. If the dessert melted and then was placed in the freezer again, then there is no guarantee that it is not spoiled.
Is it possible to consume previously thawed ice cream after re-freezing?
If the ice cream melted slightly on the way home from the store and was immediately placed in the freezer, then you can safely eat it. But already when buying ice cream, signs of re-freezing may be observed:
- the product has lost its original shape;
- Drops of water appeared on the glaze.
It is better to refrain from such an acquisition. It is unknown how long it was kept warm before it was placed back in the freezer.
Is it possible to eat expired ice cream if it was stored in the freezer?
The expiration date indicated on the packaging of ice cream implies that it will be stored in compliance with the temperature regime. After the expiration date, ice cream is not suitable for consumption, like any other expired product.
What does it mean if the package is inflated?
If the ice cream packaging is swollen, this indicates improper storage, or more precisely, that there have been temperature changes. You should not choose such a product in a store.
How and what to use to properly cut a hole in a countertop for a sink?
Admin1 10.13.2018 Repair Comments on the entry How and what to use to cut a hole in the countertop for a sink? disabled 6,518 Views From our article you will learn how to correctly cut a hole for a sink in a countertop, what you need to consider, and what is the best way to cut a countertop for a sink.
“To save, to the fullest,” reason the zealous owners. And they not only order a budget kitchen, but also plan to cut a hole in the countertop for the sink themselves. True, this operation seems simple only at first glance. To successfully achieve results, you need:
- know how to work with this or that material (for example, a quartz countertop will not cause any difficulties);
- have a set of necessary tools (or know where you can rent them);
- understand the nuances so as not to spoil the product (expert advice is important here).
Only then can you achieve maximum quality and, after completing the entire complex of work, enjoy the flawless functioning of your kitchen for many years.
Problems of choice
When drawing up a kitchen renovation plan, we expected to install black granite countertops on all work surfaces, including the island, but after calculating the costs of materials and installation, we came to the conclusion that we did not have enough money. Savings did not force us to abandon the renovation; the dream of granite slabs was postponed until better times, and aged wood became an alternative.
It is not difficult to purchase such material; several private entrepreneurs offered magnificent boards that had aged under the influence of natural causes. Thick pieces look very beautiful; they were once part of barns, fences or floors. We almost made the deal, but realized that we were taking a rash step. After the inevitable sanding, the boards will lose their charm, which means there is no point in investing in the purchase.
So we were faced with no alternative reality - practice has shown that we will have to buy freshly sawn boards and then age them. Refusing pine blanks, we opted for poplar. To ensure that the finished tabletop does not resemble a cutting board in any way, we selected boards of different widths, trying to find samples with a pronounced pattern. It was decided to make a pilot version using the example of a kitchen island and hood cladding in order to understand how practical wood would be in use.
How to cut a hole for a sink in a countertop?
When you have experience in a certain matter, then you don’t notice the difficulties, everything seems simple and understandable. But when you begin an operation for the first time, even minor details raise questions. How to cut a hole in a countertop for a sink, where to start?
Start by designating the place where the sink will be located on the surface, because there are at least three options:
- on the edge;
- in the middle;
- in the corner.
In this case, it is necessary to take into account:
- how water will be supplied to the tap;
- how the mixer will be installed;
- how drainage is carried out;
- is there enough space for additional equipment (filter, soap dish, garbage container, etc.).
After understanding and presenting the full picture, you can proceed directly to the question of how to cut out a sink in a countertop. It’s good if it’s rectangular, but if it’s round or oval or even of a complex geometric shape, then how to cut out the countertop for the sink?
A template will help you, or rather, you can’t do without it. Some manufacturers, in order to make the task easier for future sink owners, offer a ready-made template along with the purchased product.
But if you don't have any luck with this, don't worry. Since you are already set up and have an idea of how to cut out a countertop for a sink, making a sink template on your own will not be difficult.
Take cardboard or thick Whatman paper and trace the contours of the future hole for the sink with a pencil on a sheet of paper. Then use scissors to cut out the necessary parts
Please note that you need to navigate by external measurements, not forgetting about the gap when cutting
So, when the template is ready, you can move on to the next step - markup.
Draw a line for the future cut on the surface of the slab with a simple pencil. To do this, place the template where the sink will be located in the future and outline the contours of the desired hole.
Some people attach the template to the surface and immediately begin sawing. Experts recommend abandoning this method and be sure to mark with a pencil. Why? Because how to properly cut out a countertop for a sink if the template moves all the time? There is a possibility of cutting along with the cardboard, which will distort the required dimensions.
Don't want to make a template at all? You can turn the sink over to face the surface of the countertop and trace its outline with a pencil.
Now you need to make holes for the sink with a drill so that a jigsaw can fit in for cutting. Moreover, for:
- rectangular - 4 holes (in each corner);
- triangular - 3 holes (in the corners);
- oval or round - one hole (anywhere).
Thus, the surface is prepared directly for sawing. If possible and space allows, it is advisable to unfasten the slab of the future desktop during the cutting process.
So, how to make a hole for a sink in a countertop, depending on the material of the product? Let's talk about this further.
Types of jigsaw blade shanks
The first thing you should pay attention to when choosing a jigsaw file is the type of shank. And this is logical: if your tool is not designed to work with this variety, then you simply will not be able to use the new blade. There really aren't that many options:
It is often called “Boschevsky”, since it was this company that developed files with this type of shank. Since Bosch is the market leader in jigsaws and jigsaw accessories, and other industry giants are trying to switch to this standard, it is not surprising that T-shank files are currently the most common. The T-shank fits most modern jigsaws - Bosch, Makita, Metabo, Hitachi, Skil, AEG, DeWALT, Sparky, Interskol, etc.
The second most popular type of shank is the American standard. This is a universal shank for older models of jigsaws Skil, DeWALT, Wolf, Ryobi, Stayer, BlackDecker, etc. These files are suitable for all jigsaws with block and screw clamps.
Files with this shank are only compatible with older Makita jigsaw models.
It differs from the T-shank only in the presence of a second stop. These files are only suitable for older Bosch models.
Tile
You need to prepare a file without teeth and apply abrasive to it. The pendulum stroke must be turned off and the speed reduced to minimum. In this case, a jigsaw is one of the effective devices for cutting out curved elements on tiles.
READ Why You Can't Saw Walnuts
How to cut a countertop for a sink?
Most often, the question of how to cut a hole for a sink in a countertop is asked by owners of laminate slabs, since in this case it is easiest to make a cut. But we need to take into account the subtleties:
- working according to the markings is a repetition of what has been covered (important information);
- saw with an electric jigsaw, inserting it into the holes prepared with a drill;
- Guide the jigsaw blade perpendicular to the surface being cut, pressing the tool tightly;
- sawing the tabletop should be done from the laminate side to avoid the formation of chips and cracks;
- It is imperative to support the part being cut, since it can break off under its weight and form a crack in the slab.
TIP: don’t be lazy and as you move along the cutting line, stop and tape the cut area on both sides (outside and inside) so that the cut part of the table top holds tightly to the last millimeter.
How to cut a countertop for a round sink? In the same way, with a jigsaw, slowly, passing the blade along the marking line, gluing the cut with tape.
Place the sink in the resulting hole. Fits? The sink should fit freely. If it’s tight, go through it with a rasp and sandpaper. Clean the resulting cut from sawdust and cover with a thin layer of sealant.
How to cut a countertop for a sink if the material of the product is artificial stone?
In this case, you can use a metal drill as a tool for drilling holes, and make the cut with a milling cutter. Or you can use the same jigsaw, but then make the cut with a centimeter indent from the marking line, and then use a cutter to bring the cut line to the desired size
These precautions are necessary to prevent the formation of cracks and chips.
When the hole has been cut, processed, and the fitting of the sink has gone well, they move on to installing the sink and connecting the plumbing.
Ensuring a clean cut
In many cases of material processing, the size of chips can be reduced to half a millimeter. Such minor imperfections are not noticeable; they can be removed by chamfering with sandpaper or covering up the chips with a correction pencil. You can also sand the end with sandpaper or cut through the top layer of the surface with a utility knife.
To begin, make 2 cuts half a millimeter deep on both sides of the part, indicating the thickness. Two grooves should be marked along the edges of the cut, which can be done using an oblique shoemaker or segment knife (for uncoated wood material or chipboard), or using a sharp drill and a pobedite cutter (for laminate).
Disadvantages of Eurosaw connection
The positive side of the euro saw is its smooth surface, on which the joint is not visible.
There are also disadvantages, they are few, but they are quite noticeable. Eurozapil is a lock that requires a clearly defined arrangement of parts of the tabletop; they cannot be moved. Placing a headset with a top panel requires an absolutely flat wall and correct angles. If the walls are uneven, then the countertop will not adhere to it, and there will be a gap between it and the wall. It cannot be closed by changing its position. You will have to cover it with a table plinth. If the curvature is significant, then the gap will still remain. You'll have to level the wall.
If you plan to install a set with the letter “P”, then the curvature of the walls will disrupt the arrangement - there will be gaps along all the walls.
In this case, small irregularities will have to be covered in this way: the installation is carried out as close to the wall as possible, and the surface should be worked on separately. The gaps in it will have to be sealed with special planks, and the sides adjacent to the wall will have to be filed down. Therefore, in addition to the question of how to connect a tabletop without a joint, you can immediately figure out how to quickly make the walls straight and even.
For a kitchen with uneven walls and corners that are far from correct, it is better to make a connection using a different type of connection.
Reworking the jigsaw sole
When setting up a jigsaw, you first need to check the perpendicularity of the sole, since sometimes the clamp is not firmly fixed. Specialists often modify the sole of the tool, that is, they reduce the gap between the leg and the pressure pad. This eliminates "breaking" of the crust in the layers of material on top.
When using pads, it is important for every novice craftsman to remember that they should not scratch the surface of the part. In this case, they need to be replaced every five meters of cutting. Zero clearance can be achieved by attaching the cover plate to the jigsaw support leg.
The lining has only one narrow slot that fits tightly to the cutting element. Therefore, even a weak feed of the teeth can cut off small chips, and not turn out the chips of the top layer. The highest quality pads, which are guaranteed to last you a long time, are usually made from:
- sheet plastic;
- metal material;
- fiberglass.
Nuances of chipboard processing
First of all, let's look at all the materials and tools that will be needed for the job:
- the laminated chipboard itself;
- pre-sharpened blade;
- jigsaw;
- ordinary jigsaw.
By the way, chipboard in the furniture industry and construction began to be used only in 1940 in the United States of America, but after a fairly short time the popularity of this material increased and spread throughout the world. Thanks to this, the industry has made a significant step forward, and all sorts of varieties of this material have appeared.
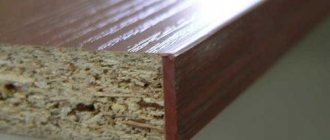
One of the most popular and frequently used types is laminated chipboard, which is not just a product of pressing sawdust with glue, susceptible to high temperatures, but also acts as an additional chemical and physical protection in the form of a melamine film.
Usually, when cutting chipboard, no complications arise, but with laminated chipboard, this seemingly simple process can become complicated. The fact is that countertops are often coated with multilayer HPL plastic from the manufacturer. This significantly complicates the sawing process. This coating can vary significantly in quality and basic properties, and it is not always a polymer coating. Therefore, when processing this material, many different nuances arise.
Step-by-step description of the process itself:
Using a well-sharpened blade, a groove 2-3 mm deep is made. If there is a polymer coating of various types, it is recommended to slightly warm up the blade, and then immediately begin direct use. Due to the resulting pressure of cold steel on hard plastic, even if the sharpening is very good, minor microcracks and chips may occur, which is best avoided if possible. Using a tool called a jigsaw, you need to carefully and smoothly make the cut
During operation, it is important to carefully adjust the direction of the blade. If there are places where the direction changes, it is better to use an ordinary hand jigsaw as a secondary, auxiliary tool
Or you can use the thinnest file in a jigsaw. But this is not always convenient.
After the work has been done, you can proceed to the final stage of sawing the chipboard.
File sizes
Canvas length. The length of the saw blade can vary over a fairly wide range - from 40 to 250 mm. The longer the file, the thicker the workpiece it can cut. It should be borne in mind that the actually achievable depth of cut depends not only on the length of the blade, but also on the capabilities of the tool itself. For sawing thin materials, it is better to use short files: their use guarantees a neat, clean cut, because the process is not hampered by the deformation of an excessively long canvas.
Web width. The width of the blade is selected depending on the type of operations that are supposed to be performed using a jigsaw. Wide saw blades are ideal for straight cuts: they are easier to guide in a given direction, which means the cutting line is straight.
For curly cuts, on the contrary, you need a blade with a narrow back, which makes it easier to perform various maneuvers, “drawing” smooth curves.
Thickness of the canvas. And finally, the thicker the file, the less it will deviate from the vertical position during operation, i.e. the cut along its entire length will be perpendicular to the surface of the material. However, in pursuit of a neat cut, do not forget that too thick files may not fit jigsaws with a quick-release mechanism.
Sawing a tabletop without chipping
When making kitchen furniture, it is very important to know all the details. So, one of the most difficult moments when working was and remains the subtleties with chipboard
The reason for this is quite simple: a board or simple chipboard is then perfectly sanded and coated as needed with the materials of interest, while the laminated chipboard is already covered, and it is unlikely that it will be possible to replace it.
The countertop is one of the most important components of kitchen furniture.
Most often, the problem arises from the question of how to cut a tabletop, because there are all sorts of situations, and the result must be perfect. To begin with, it is worth noting that there are many cutting tools, and not one, but several will be used at once. So, a circular saw will give a wonderful result, but a high-quality unit costs a lot of money, so it is found only in special factories. The grinder, in turn, despite its similarity, will cause a huge number of chips.
In practice, two professional interchangeable tools are used - a jigsaw and a jigsaw.
Experts divide the blades (files) for them into 2 categories: tearing little by little on both sides or tearing strongly on one side. In this case, you will need those that tear on one side.
The secondary instrument will be used like a surgeon's scalpel. You need a very sharp blade that will fit comfortably in your hand. With this blade, before sawing, you need to make a groove 2-3 mm deep, which will allow you to complete the work painlessly.
Final cutting steps
- rasp or file;
- sandpaper;
- paste GOI;
- adhesive tape;
- decorative corner made of duralumin.
Everything here is quite simple, and you don’t need to use millimeter precision, and each stage is performed in several versions.
At the very beginning you need to sand the wood. To do this, first use a rasp (file), which removes the excess. Then, using a sanding machine (zero sandpaper), the wood is brought into an attractive form. This stage is necessary even in cases where nothing is planned to be done after it. Torn wood elements attract moisture much faster, which is why wear occurs at a tremendous speed.
After the wood has been restored to normal, the plastic needs to be restored to the same condition. Usually special polishes are sufficient, but finding them in retail sales is not always easy. In addition, there is one more complication - you will need very little polish, and it will be a pity to throw away the rest. The ideal option is GOI paste, which is available in almost every home, and the directions for its use allow you not to worry about future use.
Even with successful cutting and high-quality grinding, you need to make sure that even missed millimeters do not make themselves felt. To do this, you can use a special furniture decorative corner made of duralumin. The corner is fixed in place without spoiling the appearance.
There is one more piece of advice from experts: when cutting, you can use a guide tape with an adhesive layer, which will prevent the blade from deviating from the route.
You shouldn’t be afraid to cut the table top without chips with your own hands when it’s really necessary, but if possible, it’s better to take it to the nearest workshop, where it will be done using special equipment very quickly and with the utmost quality.
Why does a jigsaw cut crookedly?
The saw blade leaving the pre-designated mowing line can be due to several reasons. The operator may not have enough experience in handling the tool, the file may be defective, and the rod and guide roller for the jigsaw may have serious play. In order not to guess from the coffee grounds, it is worth starting to sift out the factors that determine the accuracy and evenness of the cutting line cut in your individual case.
As usual, it’s better to start with yourself and your approach to sawing. Often, novice craftsmen rush things and, wanting to speed up the cutting, apply a lot of pressure to the jigsaw . The tool does not have time to bite evenly into the material and create a clear groove for the file, which begins to follow the path of least resistance and makes unpredictable movements. This problem is especially common when working with thick timber (from 40 mm) and varnished plywood from Soviet times.
This is one of the reasons why the jigsaw moves to the side. What to do about this? The answer is obvious. Apply the minimum pressure sufficient to guide the tool along the mowing line and set the maximum number of revolutions (when working with wood). The pendulum mode usually does not affect the evenness of the cut if its design is in good order.
The quality of assembly and wear of tool parts can be a good reason for the formation of beveled lines when sawing. There are basically no complaints about devices from the budget segment (up to 2,500 rubles), as well as hopes for their conscientious assembly. It’s another matter when original, branded instruments begin to perform such tricks. Often, the cause of a crooked cut is the guide roller, the jigsaw rod or its sole.
You can check the reliability of the element’s fixation by simply tugging it with your hand. Loosening of the rod or roller by more than 1 mm determines that this device is not capable of producing a perfectly even cut. The more play there is in the parts, the less accurate the cutting line they form. This problem should be corrected based on the circumstances. If the part itself is worn out, it can be replaced with a similar one. It is difficult to fix a breakdown if the attachment point to the mechanism is worn out. Not every modern Kulibin undertakes such repairs, and this problem is usually solved by purchasing a new tool.
READ Chainsaw Shtil Ms 280 Original Carburetor Adjustment
Unfortunately, the products of many trusted brands are often counterfeited, and jigsaw files are very popular in this regard. It so happens that low-quality and counterfeit products have a rather short service life, which brings many problems to the owner. One of these problems is a crooked cut. An initially smooth blade can bend due to poor-quality metal, which can cause deformation of the tooth set, if it was present at all. In this regard, if your jigsaw cuts crookedly, replacing the saw blade can correct the situation. The process of choosing a high-quality jigsaw file was discussed in detail in a separate topic.
How to cut a countertop using a circular saw
When working with a tool called a circular saw, you need a finishing saw blade with a fine tooth. A circular saw is more convenient than a jigsaw for making long straight cuts. However, during such work, much more chips are formed, since the side with the teeth cuts into the material and breaks off pieces.
But even when working with a finishing disc, many chips form on one side of the tabletop, which then must be subjected to lengthy processing. Moreover, it is not a fact that after processing there will be no millimeter chips or microcracks left, which in the future will render the material unusable or highly susceptible to moisture.
Therefore, it is better not to use this option for cutting tabletops. Better leave the use of a circular saw for another job. If this is the only option for you, then you will have to work hard at the stage of final processing of the sawn material.
Sawing with a format saw
To cut with a machine, the workpiece is placed on the left fixed table up to the adjustable stop. The required length is measured. The saw unit starts. When the disk reaches the required speed, the table moves forward.
The workpiece, together with the table, is fed onto the disk for sawing off the desired piece.
Basic machine settings:
- workpiece position;
- depth of cut;
- cutting angle.
There are three types of machines:
- light (designed for a workload of five hours);
- medium (8-10 hours);
- heavy (16-20 hours).
Design
The most popular models are Mj 45kb-2, JTS-315SP SM, Woodtec ps 45, Altendorf F 45. Despite their different features, they have a common design.
Required components of a cutting machine:
The bed is the basis on which all mechanisms are attached
Heavy beds eliminate vibrations and vibrations, which is extremely important for precise cutting. A saw unit consisting of two disks. The first disk is located in front of the unit and is used for preliminary filing of the workpiece. The second is for completely sawing the slab. Three desktops
The first one is stationary; a node is located on it. The second, format, is movable; it feeds the slab onto the disk. The third supports the parts to be sawed off. The carriage is a part that allows the format table to move. Stops and rulers that secure the workpiece in the required position.
The second is for completely sawing the slab. Three desktops. The first one is stationary; a node is located on it. The second, format, is movable; it feeds the slab onto the disk. The third supports the parts to be sawed off. The carriage is a part that allows the format table to move. Stops and rulers that secure the workpiece in the required position.
Depending on the model, price and cutting features, machines may have different design nuances.
Additional components of the machine:
- a pipe that removes shavings and sawdust and connects a dust removal system;
- clamps for securely securing the workpiece to the table;
- a rotating ruler and corner stops, with the help of which the cut is made at the desired angle and without markings;
- frame with a stop leg for cutting long workpieces;
- ball and roller carriages.
The first formatting machine with a moving carriage was assembled in 1906 by the German carpenter Wilhelm Altendorf.
Guide rail for jigsaw
The guide for a jigsaw is a simple device, at first glance, similar to a large metal ruler or rule. The main difference between the tire and the above devices is a special groove along which, like on rails, the sole with a jigsaw mounted on it moves. Most guides have rubberized strips that prevent sliding on the surface of the material, and for additional fixation, they are attached with small clamps. The average length of such devices is from 1.5 to 3 meters, and can be increased by another, similar ruler, using an adapter.
Sawing rules
Before sawing, choose a method, as well as accessories and tools.
- scotch;
- masking tape;
- pencil, ruler;
- sandpaper.
- hacksaw;
- milling cutter;
- a circular saw;
- tire;
- jigsaw;
- sawing machine.
How to saw chipboard without chips step by step:
- Apply dots to the end part of the chipboard. You need to determine in advance what type of cutting will be done - straight or figured. Their cutting technique is different.
- Connect the dots into a line and stick adhesive tape on top. It is advisable to saw laminated chipboard using adhesive tape. It will reduce cracks when cutting, since the wooden slab is subjected to strong pressure with increasing temperature.
- Cut the board. The accessory is installed at the desired angle to achieve extremely smooth edges. The process should occur smoothly, rhythmically and without strong pressure.
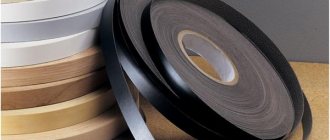
- If necessary, process irregularities and edges with a file and rasp. The edges can be covered with veneer of the appropriate color. This will provide them with protection and will look more beautiful.
To disguise low-quality ends, a decorative finishing method is used - veneering (gluing the sides). Thus, not only the appearance will improve, but also the service life of the product will increase.
Only after placing all the necessary tools on the table can you start cutting.
Completing of the work
When the file has been selected, you still need to correctly saw the laminated board at home. Experts recommend sawing along a guide (a rail clamped in clamps will also work). If you use a new, unworn blade, you can cut chipboard as cleanly as you would with a circular saw. It is advisable to turn on the jigsaw at the lowest speed possible. This will significantly increase the resource of each file used.
The blades themselves are placed at right angles to the jigsaw sole. The easiest way to adjust the angle is with a square or protractor. Important: the straight line passing through the cutting edge of the tool must be parallel to the rigidly fixed part of the jigsaw. It is recommended to use special inserts that reduce the likelihood of splitting. But to make them work more efficiently, they usually cut the laminated layer on the side where the blade will come out.
To learn how to cut laminated chipboard with a jigsaw without chipping, see the following video.
Source: stroy-podskazka.ru
How to dock and do it yourself (video)?
If you purchased a solid canvas with the expectation of completing it yourself, then before purchasing it would be a good idea to assess the amount and complexity of the upcoming work. At the same time, you need to understand that a general idea of how to connect a countertop does not mean that it is a simple process. To really assess whether you can solve the problem yourself, you need to find and watch a couple of videos that tell you how to make a Euro-cut tabletop with your own hands.
- Sawing requires careful marking and precise, strictly perpendicular cuts. Sawing should be done with a circular saw with a new blade, but it must be taken into account that chipping is unacceptable. You can also cut by hand, but using a file, even a perfectly sharpened one, will not allow you to achieve perpendicularity throughout the entire length of the cut. Any deviation from the vertical during sawing will affect the assembly - gaps will appear that will be noticeable.
- To make the task easier, you can attach a ruler to the slab, securing it with clamps (special joints for tightening - tabletop connectors), and lay the slab itself with the laminated surface down - this will reduce chipping.
- Euro-sawing is made according to a template, which is also pressed against the slab with clamps. The corner is milled with a straight edge cutter; on the second part, an internal cut is made according to preliminary markings. The rounded part is cut off with a jigsaw.
- To place the ties, you need to mark and drill blind holes and grooves - two for each joint.
- The distances from the edges to the clamp are from 70 to 150 mm, depending on the design of the lower tier (cabinets) and the installed reinforcement strips.
- The grooves for the clamps are milled; for this you buy a router, which is quite expensive.
- Before starting work on placing the fasteners, you need to carefully check whether the fastenings will interfere with the installation of built-in appliances, sinks, stoves or hobs. You can find videos online that clearly demonstrate how to make a euro-cut table top (video).
Despite the difficulty of doing it by non-professionals, you can do it yourself if you think about each stage of the work. There are a lot of tips online on how to join a kitchen countertop without a plank.
And one more thing - you should remember that this is not a solid canvas, so there must be a strong support under the tabletop. If you press on the joint, the parts should not change their position in any way. If possible, it is recommended to secure the seam with the euro saw with a chipboard tire on the bottom side.