Currently, such a design element as cutting down trees is found in eco-friendly interiors. Designers have recently begun to actively use it in interior design. Using wooden elements you can make not only crafts, but also very useful and unique things for your home.
Difficulties in laying out a modular floor
This type is quite complex, so it is better to be patient and get to work. Choose thick trunks to avoid the formation of large voids when laying out circles. Hardwood logs are selected to make the floor, because the floor is exposed to impact every day.
There are two reasons that will make you sweat:
- Solution. If you put all the parts on glue, then the floor will not last long, even if you cover it all with varnish. Modules will begin to fall off due to constant pressure. You will have to use a solution, possibly cement-based.
- Leveling the surface. If the thickness of each element does not play a big role in the design of the vertical plane, then for the floor this is the main condition. It is necessary to adjust all the modules to the overall thickness, and start grinding after installation. The procedure will take quite a long time, because achieving a smooth surface is not easy.
70 New Year's decor ideas: decorating your apartment and house
Next, start covering the finished surface with varnish. It will protect it from pests and external influences. The floor is easier to clean, and it will last longer in a “protected” state. An unprotected surface can be attacked by pests or it will simply begin to rot due to excessive moisture.
Rules for working with wood
To make various crafts, wood cuts, logs, and thick branches can be used. However, all materials used must be subjected to optimal pre-treatment:
- The selected cut is carefully inspected for damage, sharp edges, traces of pests or signs of rot. If any defects are found, it is better to choose a different base for independent work.
- When making crafts for the dacha and summer terrace, the bark does not need to be removed. Making crafts for the home will require first removing the bark from the consumable material.
- If a recess or niche is to be made in the chock, the wood is removed even before the surfaces are pre-impregnated.
- To protect finished products from moisture (for example, furniture for a garden or bathroom), ready-made moisture-resistant oil is used. As an alternative, a mixture of melted wax, turpentine and drying oil can be used. Be sure to maintain the recommended time for complete impregnation of all wooden surfaces.
- If the future craft will be located next to a fire source, all surfaces should be soaked with an antipyrine solution. In this case, it is better to give preference to non-coniferous wood, which releases caustic resins when heated.
Crafts that will be used in everyday life must be sustainable. To do this, one of the surfaces must be leveled using a plane and sandpaper.
Preparation of cuts
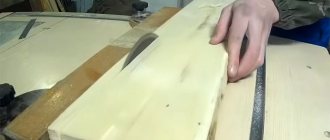
Having prepared the tools and materials, you can start working with wood. The choice of wood for the path depends on the operating conditions and purpose of the path. For example, those who want to make a path from wood cuts with their own hands in a kindergarten do not necessarily need to take the same hard wood as for the path between the utility rooms of a summer cottage. However, for greater reliability, it is recommended to use harder types of wood in any case.
As a rule, one of three types of wood is chosen for cuts: pine (lasts up to 7 years); oak (lasts up to 10 years) or larch (lasts up to 25 years). If the issue with service life is not fundamental, then you can use any other breeds that are at hand. They will deteriorate faster, but restoring the track will not be difficult at all.
Whole logs must be cut into identical fragments about 20 centimeters long. The length of the cut may depend on its diameter. The minimum length is 10 cm - if you make cuts shorter, they will fall out of the track due to uneven mechanical impact on the surface.
The next step is to clean the logs and bark. Despite the fact that the bark makes the tree look even more attractive, it is worth getting rid of. The fact is that it quickly breaks and rots. In parallel with removing the bark from the logs, it is worth checking them for cracks. Even if there is a small defect on the log, it will be the weak link of the path. It is worth noting that cracks in a tree look very attractive, so many sacrifice the durability of the stump for the unusual appearance of a path created with their own hands. Photos of paths made from wood cuts using cracked stumps look really interesting. In this case, you should definitely prepare spare cuts, thanks to which it will be possible to repair the path when the cracked stump completely collapses.
When the saw cuts are prepared and sorted, they must be protected from the external environment, pests, rotting processes and other troubles that may arise during the operation of the track. The simplest, but at the same time very effective way to protect wood is to treat it with drying oil. Before you start covering the stumps with drying oil, it should be heated to boiling temperature. When the drying oil dries, it is recommended to treat the tree with antiseptics, which will ensure its bioprotection. In addition, it is recommended to additionally treat the lower part of the cuts with bitumen in order to finally protect the tree from damage. If you want a path made from sawn wood or lumber to look aged, you can coat it with copper sulfate.
Stages of working with saw cuts
It is logical that when an object is made using wood cuts, it not only has its own uniqueness, but also nuances associated with the care of the material.
Cross cutting opens gaps that make the wood and the future object it will be applied to vulnerable. Therefore, it is imperative to carry out initial and then carpentry processing in order to avoid unwanted nuances in the future.
In the case of restoration of such wood, the method of filling with a special resin is used. The process takes place in several steps, the first of which is covering the cracks with paper tape, then resin is poured in layers. Each layer must dry thoroughly, only then can the next one be poured. The final stage will be milling the cut and removing excess residue. Then the product can be sanded.
The second step is polishing and oiling, after which the cut becomes even and smooth. At this stage, the transitions of natural colors and the color of the tree itself are clearly visible. At the same time, oil impregnation allows you to see the structure and pattern of the cut. It will also protect against the negative impact of the surrounding space.
In the end, we can summarize that wood cuts are an indispensable material both for decorating floors and walls, and for making other household items we need. The main advantage is that all this is made from natural and environmentally friendly materials that have a positive effect on our health.
Related article: Mold on plasterboard ceilings
Wood cuts as finishing material for house walls
Wall surfaces are the most convenient and extensive area for decorating a room. Here you can realize the most daring and creative ideas in room decoration. This time we will use wooden slices as a decorative element. They are smooth transverse layers of a tree trunk. Each layer has its own original and unique pattern, which is obtained from the growth rings of wood. Well, are you ready to get to work? First, let's find out how to make wood cuts for the interior. The process is extremely simple and even a beginner can handle it. Often, a transverse cut (also called an end cut) of a log takes part in the design.
- We cut tree trunks into plates of the thickness we need. Their diameter can be different - this way the decorated surface will look even more beautiful.
- We clean the cut from sawdust and shavings, you can also remove the bark.
- We treat the layers with stain or special paint.
- We apply an adhesive solution to each cut and place it on the wall.
- You can lay out the wall plane partially or completely with cuts.
- We wait for the glue to set and finally cover the surface of the glued sections with varnish.
Types of wood used for cuts in decoration
Important! The interior combines wooden elements, decorative stones or plaster well. When using wood material for decoration, it should be taken into account that when cutting a log, cracks and cracks open. Consequently, layers of wood must undergo carpentry processing.
And provided that the wood material is planned to be used in a functional role, then I advise you to restore the cracked sections of the cut. To do this, fill the damaged area with a special resin solution. After the resin has dried, we mill and sand the layer.
The following types of wood are used for decoration:
- spruce;
- pine;
- fir;
- ash;
- birch;
- oak.
When completing the finishing work, the cut of any type of wood must be coated with a paint and varnish composition. We discussed above how to process tree cuts for the interior (stain, paint, varnish).
Gouache for painting as an alternative
A cutting board for the kitchen is one of the practical items of regular use. To make this accessory pleasing to the eye every day, it is recommended to paint it; this can be done with gouache paints on wood. This coloring material is similar to acrylic, but is slightly inferior in saturation.
Painting on wood with gouache consists of the following stages:
- Sanding the board. If the surface of the product was not smooth enough, it must be polished with sandpaper.
- Structure protection. If the board does not have a varnish coating, it must be treated with stain.
- Priming. For this, acrylic of any suitable color is used. The wooden board should be carefully coated with paint without gaps. This will make coloring easy and quick.
- Drawing. After translating the image or drawing it yourself, you need to start painting on the board. For beginners, it is better to choose simple patterns or floral motifs. Before painting the tree with gouache, you can add a little PVA glue to the jar for better adhesion.
- Varnishing. After finishing the process, it is recommended to open the product with varnish. You can use any composition that you have at home, but odorless acrylic varnish is considered the most suitable.
The master class presented in the photo below is designed for people who do not have the skills to paint kitchen boards. Painting on wood brings pleasure, and the resulting result delights everyone around you.
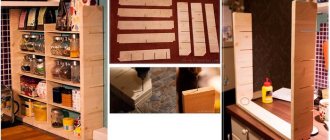
Required materials and tools
To carry out any plumbing work, the master needs a comfortable workplace, where there will be a workbench, clamps or a vice for fixing parts, high-quality ventilation and lighting. For independent work you will also need the following set:
- Plane.
- Electric jigsaw.
- Marker for marking boundaries and attachment points.
- Pins, screws or glue are used as fasteners.
- Be sure to prepare compositions for impregnating surfaces.
- Sandpaper will allow for better sanding of the finished product.
- To obtain a niche, you need to prepare a hammer and chisel.
Some craftsmen use various techniques for decorating wooden crafts, for example, pouring with epoxy resin, opening with stain and acrylic varnish, burning and wood carving. Each technology has its own specific set of tools.
Recommendations for decorating with wood cuts
- The main condition for quality work is a well-prepared and cleaned surface. The wall plane must be leveled and treated with a primer.
- Decide in advance exactly how you will decorate the surface. A wall with a partially covered saw cut will look good. It is not recommended to lay all the walls of the room with wooden plates, since the room will seem too small and overly cluttered.
- Partial installation looks natural in bedrooms at the head of the bed, in living rooms near fireplaces or modern electric fireplaces, as well as in the kitchen or hallway.
- Decorating surfaces with wood cuts is excellent for country and country houses.
Wood cut frame
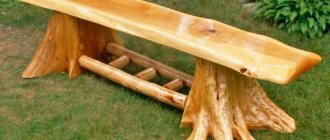
Types of furniture made from slabs
In addition to tabletops, completely unexpected pieces of furniture can be made from wooden blanks.
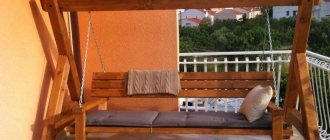
- The benches will look original, especially in a large hall or in the local area.
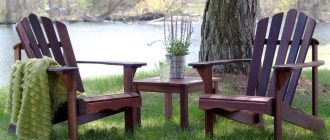
- An impressively sized table with an original tabletop will fit perfectly into the living room.
- Coffee tables with irregular geometry diversify the room and fit into almost any style.
- Kitchen furniture with horizontal surfaces made of slabs will fit perfectly into the Loft, Provence or Country style.
- A slab desktop diversifies the usual geometry of space.
Wall made of wood cuts
Wooden saw cuts in the interior of a country house look very stylish and give the room a certain naturalness and primitiveness. Most often used to decorate walls. Such a cut is made very simply - the branch or trunk must be cut into thin “pancakes”, which will become a finishing element. Each "plate" will be unique, even if they are all made from one single piece of wood. For wall finishing, the thickness of the layer does not matter much.
The creator himself decides whether to remove the bark or leave it, although if it is too thick, then most likely there is no place for it on the wall. Although such finishing is intended to introduce a certain element of wildness into the design, it is advisable to sand the surface so that a careless guest or the owner himself does not get hurt by accidentally touching the rough product. It should be remembered that natural wood is an attractive environment for numerous insects, so it must be impregnated with special protective compounds. For a greater aesthetic effect, it can also be coated with stain, varnish or paint.
How to place the saw cuts on the wall surface is up to the owner to decide. Such finishing can cover both the entire wall and part of it, as if zoning the space. The option of a separate framed panel is also possible. In any case, the decoration of the wall with saw cuts is made using special glue.
Important! In order for the glue to firmly hold the wood cut, the wall surface must first be cleaned and leveled
Hot coasters
The process of creating square coasters for hot dishes from wooden saw cuts consists of the following steps:
- Take the trunk of any tree with a diameter of 1 to 3.5 cm. Saw it into round timber about 1.5 cm thick.
- On a sheet of plywood, starting from the edge, begin gluing the cuts with any wood glue. Use both large and small parts as you work.
- Fill the plywood to the width you need. After complete drying, cut it into strips of the desired size.
- Sand the workpieces thoroughly. They must be completely flat. After this, cut the strips into squares.
- Saturate the stands with wood oil.
- If desired, to protect the table, you can glue silicone legs to the bottom. Your coasters are ready.
The stands can also serve as a board for cutting food. To save space, they can be made two-tiered.
Wood detail as an accent in the interior
Small inclusions of “forest” in your usual surroundings will mentally bring you closer to nature. Saw cuts in the interior are used as decoration and perform certain functions.
DIY decorative fence +50 photos
We create fancy accents with our own hands:
Watch. The unusual use of sawn wood in any interior looks nice. Especially if it is an uneven circle with bark on the surface. The bark is fixed, because it can deteriorate over time. The more careless the wooden “pancake” looks, the more interesting the watch will be.
Flower vases. Give free rein to your imagination and use different types of branches. An ornament made with your own hands from small branches looks expensive, and no one will guess that the vase cost you pennies. It will harmonize with the design and will resonate with items with similar decor.
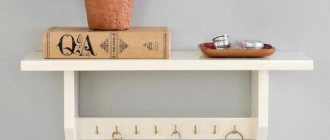
Mirror frames
When creating a product, it is important to adhere to rhythm or metricity, but chaos will be inappropriate. Alternate large cuts of wood with small ones, or make the entire frame from circles of approximate size
Any of the options will be correct.
Making a floor from saw cuts yourself is quite possible. Not to mention small interior items that can be made in a minute using wood, glue and your imagination. Surprise your friends with a tastefully decorated home and make your life more comfortable. This is an environmentally friendly product that will benefit your health. If the product is made of pine needles, then the light pine aroma can even help you treat a cold.
If you can handle the floor, then decorating an entire wall with wood will seem like a matter of five minutes. You will need to use your own taste and knowledge of composition, although most people trust their instincts.
Everything will work out, just “assemble” these products and secure them with glue, or simply cut out a solid object. Create an image in your head and try to bring it to life. You do not need special knowledge or skills; adhere to the basic rules for choosing materials and processing tools. After all, why spend a lot of money on a designer’s work if you can handle this task yourself without spending a penny.
Creating a designer wall
For decoration, it is advisable to choose one side of the room. The design of all planes is a sign of bad taste, and the room will look overloaded. Any room needs to be given air, and it’s not about the windows. It should breathe space, and light empty planes give this effect. Only one “woody” edge of the room will become a kind of accent, which will become its mood. You can lay out the “wood puzzle” yourself, and now we’ll talk about how it’s done.
Floor vases in the interior +51 photos of different styles and shapes
Everyone has a dead tree in their yard that needs to be removed. Now it's time to chop it down. We take a branch and cut it into bars of medium thickness. You can remove the bark from the resulting “pancakes” and then sand it. Thanks to this, you will not drive a thorn when touching the wall. The resulting wood layers should be treated with a special insect repellent, and then placed on glue. It is advisable to varnish the resulting relief - varnished wood can last a long time.
Video Decorating a wall with a panel made from timber with your own hands
Home / Tips and ideas / DIY / Wood cuts in the interior: 20 inspiring examples and a master class
Anastasia Kuzmenko Mon, 29 Sep 2014 17:45:00 +0300
Tired of urban beauty, metropolitan residents are increasingly striving to return to natural sources, choosing an ecological lifestyle: ecological products, ecological cosmetics, ecological interiors. The latter can be called the main trend in the world of modern design.
You can find inspiration and tips for creating an ecological interior not only in the forest landscape, but also in fairy tales familiar from childhood. Remember Pinocchio? No, we are not suggesting that you cut out a talking doll from a log. There are many other ways to use logs, stumps and wood cuts in the interior. Today we will discuss how to use wood cuts in the interior and make decor with your own hands.
Thanks to their flat shape and the ability to choose almost any size (diameter and thickness), the scope of use of saw cuts in decoration is incredibly wide. Products made from wood cuts can be used as independent decorative accessories or in compositions, used as furniture parts or finishing materials. The number of original interior solutions involving this natural element depends only on your imagination.
For example, now such a design technique as the “inverted wall” is very popular. We are talking about the fact that inside the room one or more walls look the same as the outer cladding of the house, that is, the finishing material used is not standard wallpaper or tiles, but concrete, brick or wood. Cutting wood in the interior is a great way to achieve a similar decorative effect, as evidenced by the photo below.
If such an abundance of wood does not quite fit with the rest of the interior, you can create an original fragmentary finish. You can also use tree cuts, converted into art objects, in wall decor. A few natural or painted wooden circles in a picture frame will look very impressive.
The flat round shape of a wooden cut beckons experimental designers to find a master class on the Internet on how to create a homemade chair or coffee table in eco style. And those who are unfamiliar with needlework can simply use ready-made saw cuts as charming coasters for all occasions.
Crafts and toys for children
You can make many different crafts from saw cuts for a school exhibition or kindergarten.
Toys made from this material look original: stylized animal figures, play furniture.
Many ideas for New Year's crafts from saw cuts can be found on the Internet: snowmen, snowflakes, flowers, decorations with a pattern applied to them.
From coniferous wood cuts you can make unusual Christmas trees that will not only decorate the room for the holiday, but also fill the house with the aroma of pine needles.
To make a classic triangular-shaped Christmas tree, you will need a frame of thin slats. Round blanks should be placed inside the frame, the voids should be filled with transparent glue or epoxy resin.
Advantages of decorating the interior with wood cuts
Wood cuts surprise at the same time with their visual appeal and the complexity of their creation from a technical point of view.
Now let’s see what advantages wood finishing has:
- Durability. If the wood can be properly processed and is protected from moisture and various mechanical damage, then it will last quite a long time. If it is a whole wooden wall or floor, then you can save on annual repairs.
- Thermal insulation. Firewood is a source of heat not only in a fire. The raw material has the ability to maintain temperature, so for a cold concrete apartment this is the best type of insulation, albeit partial. In winter, such an insulated floor will warm any feet.
Decorative tree from branches
Uniqueness. You can, of course, hang wallpaper with images of wood cuts, or lay laminate flooring, but in such pictures a pattern is used - a simple repetition of one module. Natural finishing with saw cuts is a composition where each element is unique. The pattern on the saw cut and its shape are unique.
How to process branches before use
If you want to make crafts from hard tree branches (oak, maple) , then you need to know that they need to be processed immediately after they are cut . In order to make a small figurine, birch branches are perfect. Because they are very easy to cut and will not take you much time to make the craft. But, for example, black birch wood is harder. If you dry the birch wood a little, it will become even more docile.
How to treat branches before using them at home?
- The first step is to wash them thoroughly.
- And then, in order for the craft to be smooth and even, we take sandpaper (or a hard sponge) and rub its surface, leveling it.
- After this, you need to dry the cut branches. To do this, you need to put the branches in the oven for 1-2 hours. Make sure they don't dry out.
If the wood dries out, you just need to moisten them a little with water before you start working, since dry wood is more difficult to work with.
Kitchen ideas based on semicircular cuts
This figure is an unusual piece of decor and a reliable assistant in the kitchen. The material can withstand high temperatures and does not heat up as much. From saw cuts you can create simple one-piece stands and modular ones, the material of which is easier to find. Everyone has seen such stands in a store and thought “No, you can’t do this yourself” - a wrong opinion. Why pay more if you do it yourself?
The kitchen will be complemented by fancy semi-circular shelves, which can be put together from solid cuts of wood, dividing them into two parts. The illusion is created that the “round block” is in the process of sinking into the wall. An interesting technique is if the shelf is round, this creates visual movement. The effect is achieved due to the dynamic relief on the bark. Cookbooks or personal collections of the housewife's recipes will harmoniously be placed on the shelves. And the product will withstand quite a lot of weight, even if its dimensions may not inspire confidence.
Creating home comfort with homemade furniture
Furniture looks completely different depending on the type of raw materials available. Tables and chairs are made, since the silhouette of the cut itself already resembles a small table or chair.
There are two basic principles for creating furniture:
Modular - assembly of an element from small parts (modules). Actually, we are already familiar with this method. It allows you to create a product of absolutely any shape. Here it is also necessary to achieve a perfectly flat surface. Dishes will be placed on the table, and to prevent them from overturning, the surface of the table must be perfectly polished.
Solid - a solid element is taken as a basis. This option is much simpler than the previous one in technical terms, but it is more difficult to find a large diameter bar. Things are better with chairs, but if you want a table where the whole family can dine, you will have to tinker with finding a large-diameter cut. The price of a dimensional cut is quite high.
It doesn’t matter what principle you apply to creating a product, the main thing is to immediately assess your capabilities so as not to spoil the material. Any method is good, because wooden furniture is famous for its strength and durability
Stools
Modular elements are used to make stools. These are almost the same cuts that are used to decorate walls, but larger in size. The stool is a metal frame with a transverse layer of wood. The parameters of the latter material must be sufficient to allow one to sit freely on the wooden frame. Such products can be very different in design and type of auxiliary materials. It would be nice to make blanks for stools from tree trunks with wavy contours. The products made from them turn out to be very beautiful.
Video Decorating a wall with a panel made from timber with your own hands
The faster industry develops, the more people try to get closer to nature. He surrounds himself with nature not literally, but by creating the illusion of being in the air, even if he is relaxing in the living room. This is the desire not only to live in a house that is built from natural raw materials, but also to come up with an appropriate interior design. Therefore, everyone strives to use hand-made wooden decor in their home in order to feel like a real owner.
The fashion for wood appeared a long time ago, but now not everyone can furnish their own home in the style of the TV series “Twin Peaks”. The room should not be oversaturated with wooden furniture, furs and animal heads. This already speaks of the bad taste of the owners. These blanks are available for forest areas, but for steppe areas, finishing a house in this style will cost a pretty penny. There is an option to dilute the usual surroundings with rare inclusions of wooden cuts, which result in absolutely any image. You can create such a design yourself, spending only on fastening materials.
Drying process
After carrying out the procedures for dissolving wooden cuts, you need to carefully study the drying methods. The process is extremely necessary; it is the one responsible for the quality and service life of the future slab.
Drying occurs naturally in special drying boxes. You can dry the wood yourself, without using special chambers.
Certain conditions must be met:
- Choose a place where the sun's rays do not reach. Dry indoor air will speed up the process.
- Build the canopy so that there are air gaps in it.
The process of drying the blanks takes place over the course of a year by about 2-2.5 cm. A wooden cut, 5 cm thick, will dry for about 2 years.