In an attempt to create the perfect kitchen, many try to pay attention to all aspects, even those invisible at first glance. One of these optional, but “final” nuances of decorating furniture is the plinth, which is also often called the drawer or sidewall, but we will call it the generally accepted one.
Stylish metal base
What is the role of this element? Firstly, it allows you to hide from prying eyes what is under the legs of the kitchen furniture.
Secondly, you won’t have to sweep away dust, dirt and crumbs that have accumulated during the use of the kitchen from the farthest and “blind” corners.
Clean and tidy, everything is closed
Thirdly, the furniture is significantly transformed, and the overall design of the kitchen becomes complete. The base comes in three types depending on the material from which it is made:
- plastic;
- from chipboard;
- aluminum.
Let's take a closer look at each type.
How to install a plinth in the kitchen
You can decorate the bottom of the kitchen set in two ways: cover the legs along the front part with a plinth or leave the furniture legs open, installing decorative supports in visible areas.
The choice of one or the other option depends on your preferences, style and interior design of the kitchen. The kitchen plinth creates visual unity of the kitchen unit. Also, if there is a plinth, there is no need to frequently wipe the floors under the lower modules. But if you still need to wash the floors, the base can be easily removed and then put back. The kitchen plinth can be made of plastic, aluminum or chipboard. All these materials have their advantages and disadvantages. Installation of a kitchen plinth , regardless of its types, is similar.
Since the kitchen plinth is attached to the lower supports of the kitchen unit, before installing the plinth in the kitchen, you need to correctly install the kitchen legs on the lower modules. The legs for the kitchen set are supplied with special clips, with the help of which the legs and base are fastened together.
The kitchen furniture legs along the front edge and on the sides, if the plinth will also be installed there, should be installed as accurately and evenly as possible, at the same distance from the edge. The approximate distance from the edge to the front row of legs should be 8 cm - 10 cm, so that the installed kitchen plinth is not flush with the kitchen facades, but is slightly recessed under the lower modules. This is necessary so that if you are too close to the worktop, there is a small distance for your feet. If the design of the kitchen unit provides for the installation of a kitchen plinth on the sides of the modules, then here too a small distance should be left between the plinth and the edge of the cabinet. You may not approach the kitchen unit from the side, but visually this arrangement of the plinth will make the kitchen unit more unified and attractive.
installation of a kitchen plinth
Before installing the kitchen plinth, you should mark the location of the legs on it and screw the fasteners to the self-tapping screws in these places. It is better to use self-tapping screws with small heads to attach the clips to the base. It is not necessary to mount fastening clips for all legs; it is enough to fasten the base to the legs at the edges and to a pair of legs in the center if the length of the kitchen set exceeds 2 meters. Since it is quite difficult to install the legs on kitchen modules at the same distance in a straight line, the base attached to all the legs at once may bend, and this will affect the appearance of the base.
Once the necessary fasteners are screwed into the kitchen plinth, it can be installed on site. For plastic and aluminum plinths, do not forget to purchase the corners, plugs and connecting elements necessary for the kitchen set project.
Source: proekt-kyhni.ru
How to attach kitchen plinth to legs
Even at the kitchen design stage, you have to decide how to finish the bottom of the kitchen, called the plinth. There are two options: either use decorative legs or install a plinth. Most often the last option is chosen. Using this option, you can easily decorate the base, additionally decorate the kitchen with lighting, or organize places to store food or kitchen utensils. How and from what you can make a kitchen plinth will be discussed in this article.
By and large, the choice is small; the two most popular materials for kitchen plinths are chipboard and plastic. Both types will cope with their task perfectly, but they differ fundamentally in possible use cases. Therefore, the choice of base material should be based on the tasks assigned to it.
The plinth for the kitchen, chipboard, will be made of the same material as the kitchen set itself. The advantage of chipboard is that such a base can be made of any size, which is important for a non-standard kitchen. Another advantage is that there are a huge number of color options when using chipboard, which will allow you to make the base and kitchen unit the same color or choose a contrasting color at your discretion. When choosing a plinth for a kitchen made of chipboard, you should be sure to provide an edge on the chipboard panel; this will protect it from moisture, which is always abundant in the kitchen.
PVC plinth for the kitchen is no less popular. The main advantage of a PVC base is its resistance to mechanical stress and moisture, which is very important for a kitchen. The PVC base is equipped with various connecting elements, which, when installed in the kitchen, allows you to hide the joints of the panels. If you are the owner of a kitchen with smooth curves, then plastic is practically the only option to make a base with a bend.
Plastic kitchen plinth versus aluminum: who will win?
A modern kitchen is a set of furniture made up of heterogeneous components, united by common façade elements. A plastic plinth for the kitchen is a strip installed at the bottom of the kitchen unit, hiding the lower supporting elements. Its goal is to complete and refine the appearance of the furniture.
The plinth for the kitchen is the lowest level of the set
Who, where, why
The plastic base is all over the place.
Simply put, the kitchen plinth is the bottom strip on the kitchen facade, which hides everything that is under the kitchen unit. And taking into account that today’s material is a kind of instruction for use and selection, we give a more complete definition.
So, kitchen plinths are entire structures that consist of mandatory and additional elements.
- Mandatory elements include: a plinth for the kitchen, a seal and fastening strips with fixing clips;
Plastic bracket (clip) for fastening.
- Additional elements include connecting elements that allow you to set up a structure with different-sized fragments connected to each other at a certain angle. This also includes radius elements, which make it possible to abandon sharp corners and introduce smoothness into the design.
Interesting to know! Connecting elements come in three types, with angles of 90 degrees, 135 degrees and 180 degrees. They allow you to completely repeat the perimeter of any rectilinear surface of the kitchen set.
These planks come in different heights. The plinth strip is available in three standard sizes.
The height of the kitchen plinth can be:
For your information! There is no special wisdom here. Considering that the height of the kitchen set's legs can be adjusted, the proposed sizes are more designed for the tastes of the owners than for any technical features. It is believed, for example, that in kitchens with high ceilings the plinth should be high, but in standard kitchens with a height of 2.50, a 100 mm plinth will be sufficient.
The next dividing criterion is the material from which the base is made.
What materials is the plinth made of?
There are two ways to decorate the lower part of the set: make the kitchen legs decorative or cover them with a special strip. In the first case, dust and dirt falling under the floor cabinets will complicate the daily cleaning process. The use of a plinth strip solves two problems at the same time - it gives the structure an aesthetically neat appearance and protects the furniture from debris getting under it.
The plinth for kitchen furniture is not necessarily made of the same material as the set itself. It performs not only a practical, but also a decorative function, so it can be made of any other material and provide a stylish contrasting furniture frame. The base is made from the following materials:
Yes, yes, the base on the headset is also made of metal
Why do you need adjustable legs in the kitchen?
The reason for purchasing adjustable legs for a set is most often uneven floors in the kitchen. A big advantage of the design is the ability to install the headset level and so that it does not wobble.
In second place, the reason for the purchase is the height of the lower cabinets that does not meet the requirements. In standard kitchen sets, the height of the floor cabinet is about 90 cm. The calculation includes the thickness of the kitchen countertop, the height of the body and legs. This size is designed for the average height of a woman (165 - 175 cm), in order to make her cooking activities as convenient as possible. These dimensions also correspond to household appliances, which are often built into kitchen cabinets.
Growth may exceed standard calculations. Being behind a low surface for a long time, as a result, the user will begin to experience constant back pain due to the load on the spine. Also, due to the discrepancy in size, your hands will also suffer from fatigue. Adjusting the legs helps avoid these problems by raising the cabinets higher.
| Tip: For people who are short, the lower limit of the cabinets should correspond to the height of the built-in appliances (dishwashers and washing machines). |
And, of course, modern design style also plays an important role in the use of adjustable legs. Many consumers really like it when the working surface of a kitchen set is divided into parts of different heights.
In the video, why do you need adjustable legs in the kitchen:
Advantages and disadvantages of each type
It is easy to make planks of any height and length from chipboard - this is an advantage of this material. They are edged around the perimeter and secured with self-tapping screws. The base made of chipboard has a significant drawback: the seams at the junction of the edge and the laminate are a vulnerable place for moisture. When water penetrates there, the plank swells and the element requires replacement. The chipboard structure requires additional sealing of the seams. Advantages of the plinth:
- ease of self-production;
- variety of sizes;
- a large number of colors;
- the ability to choose the laminated surface of the plinth exactly to match the tone of the furniture.
- low moisture resistance, the need to seal the seam.
The plastic base is practical in terms of water resistance and ease of cleaning. It is attached using special fasteners. Its advantages:
- practicality - easy to clean;
- water resistance - does not deform under the influence of moisture.
- a small number of colors - it is difficult to choose exactly the tone of the furniture;
- limited size range: kitchen plinth height – 10, 12, 15 cm.
Installation of plinth system
A false panel made of wood materials must be covered with a laminate and protected with a special water-repellent profile.
Installation of the basement system is carried out after placing the kitchen unit in the selected location. It is quite possible to do this yourself. You need to prepare sealant or glue in advance to attach the aluminum or plastic base.
The false chipboard panel is installed using a screwdriver and wood screws. There should be twice as many self-tapping screws as there are plinth legs for kitchen furniture.
When assembling kitchen furniture that is supposed to be placed in one line, the plinth legs on the kitchen modules should be placed every half a meter. Thus, the base will subsequently be securely fastened to the legs.
For modules protruding from the furniture installation line, a plinth is attached to each leg. Especially if the angle formed by the set with the participation of these stands differs from 180º. The fastening is fixed in special grooves or with self-tapping screws, like other chipboard products.
Next, a seal is put on the base from below. It is secured to an aluminum or plastic base with sealant or special glue, and to the chipboard base with nails (8-12 mm).
After fixing the seal, the plinth is fitted to the furniture legs. This will help determine the location of the mounting base, which needs to be marked with a marker. The mounting base is attached to the chipboard plinths with self-tapping screws. On aluminum and plastic strips, the fasteners are fixed by inserting them into the provided grooves. When all the fasteners are fixed at the points marked with a marker, the entire structure can be installed in place.
Features of fastening the planks
Installing the plinth strip is the simplest step in assembling the entire kitchen set, but it should also be done according to the rules. Attaching the bar to the legs is possible in two ways:
- on self-tapping screws (this is how the chipboard plank is attached);
- fixation in grooves.
To work, you will need the following tools (the set depends on the material of the element):
- measuring instruments: tape measure, marker;
- hacksaw, knife;
- screwdriver, screws, nails, hammer;
- adhesive sealant, sealant;
- base, connecting, finishing elements (round corner elements, ventilation grilles and others).
If the plank is made of chipboard, then to prevent it from getting wet from below, a sealant is pre-glued to the lower edge. It is desirable that the edge of the element rises 3–5 mm above the floor without touching the surface.
If plastic is used, then connecting elements and corners will be needed to decorate the edges.
Installing a plastic plinth in the kitchen is easy
Kitchens with legs are equipped with a special fastening for the plinth strip. They need to be installed in such a way that the subsequently attached plinth is “recessed” deep into the cabinets. If this is not done and the bar is installed flush with the plane of the doors, then it will be impossible to get close to the sink or table. Moreover, it is unacceptable for the plank to protrude in front of the facade. The acceptable distance at which the base is located deep from the surface of the facade is 7–10 cm; accordingly, the legs are placed at the same distance from the facade during installation. From the sides of the kitchen the distance may be smaller.
The kitchen plinth is not attached to all the legs of the cabinets, but to the outer ones, provided the length of the set is no more than 2 m. Additionally, a fastening is made in the middle. It is usually impossible to ensure that all legs are aligned along one line; if you attach a plastic base in a row, you will end up with a wavy line rather than a straight line.
The plinth strip, ready for installation, is tried on and, if necessary, cut to size. Markers are made on it with a marker where it comes into contact with the legs. Fasteners are screwed here - clips that come complete with the legs: two clips on opposite edges of the bar.
Advice. The clips are attached to the chipboard plank using self-tapping screws with small heads: they will not create obstacles when adjusting the structure.
The installation is completed by placing the base against the kitchen and snapping the clips onto the legs.
Accessories and mounting hardware
No matter how funny it may sound, the base needs to be attached to something. For these purposes, legs, clips and grooves are used in the profile design.
Bracket (clip) made of plastic
In order to hide joints, cuts and irregularities, profiles are often used that allow the base to be “rotated” by 90, 135 and 180 degrees, respectively.
Connecting element
If it is necessary to join two strips, a special extension adapter is used. The fastening system here is almost the same as that of modern skirting boards, so there is nothing complicated.
We prepared the elements, assembled them using adapters, inserted the clips and that’s it!
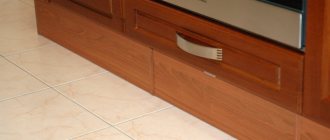
Additionally, you can purchase a plinth element with a ventilation grille, which can be mounted under an oven, built-in refrigerator or washing machine.
Features of the plastic base
The plastic strip is mounted by fixing it in grooves that are made in the product on the reverse side.
The standard height of the plastic strip is 10 cm, length 4 m. If the ceilings in the house are high, then the kitchen legs can be adjusted higher, and the base can be used with a height of 12 or 15 cm.
To complete the appearance of the plastic strip, the following elements are used: connecting elements, end elements, rounded corners. Elements with radius curves of 90, 135, 180 degrees are available. If desired, you can additionally install a plastic ventilation grille.
The plinth for the kitchen is a necessary finishing touch to the overall furniture ensemble. It is not difficult to install it yourself, and the choice of material is a matter of individual taste and preference.
Source: obzorkuhni.ru
A little more about the kitchen basement
A modern kitchen plinth is a kitchen façade strip (raised panel) that covers the space under the lower modules. The standard height of such a design is 10, 12 or 15 cm. The specific height of the plinth strip is selected depending on the height of the kitchen ceiling, the taste of the owners, etc.
The plinth is one of the components of the plinth system, which also includes:
- kitchen furniture plinth legs;
- clip-like staples;
- fixing clips;
- seal.
It is possible to install drawers in the base.
In addition to these mandatory elements, the plinth system can be supplemented with connecting and radius elements of various sizes. With their help, kitchen modules can be combined into one structure without sharp corners.
The connecting elements can have an angle of 90, 135 or 180º. Thanks to this, the panel can be neatly laid around the perimeter of a kitchen unit of any design.
A correctly assembled plinth system makes the false panel itself easily removable. This allows you to restore order and cleanliness under kitchen tables and cabinets without moving them out of place. In addition, a movable base is necessary for the free passage of hoses for drainage and water supply systems for washing machines and dishwashers. Since the kitchen plinth also becomes an element of the kitchen interior, it must be matched in color, material and other characteristics to the kitchen unit and the entire interior.
Kitchen plinth, types, installation instructions
The kitchen plinth is a special fence that helps keep the kitchen floor clean even in places where a mop or vacuum cleaner cannot reach. Dust, dirt and food often accumulate under furniture. To prevent this from happening, a base is used, which is attached to the headset, or rather, to its legs.
A special clip is installed on the furniture legs, thanks to which the kitchen plinth is attached. Materials for the production of the base
The most popular types of plinths are plastic (PVC), MDF and chipboard plinths, and aluminum. Each of them has a number of features that need to be taken into account when choosing.
Choosing the dimensions of the base
The most popular sizes are 10, 12, 15 and 20 cm, however, if necessary, you can purchase other types of such structures. If the floors in the room are not perfectly level, it is necessary to purchase plinths equipped with adjustable hangers.
Important! The plinth system can consist of only a strip and fasteners, or it can be supplied complete with a plinth. This is a U-shaped profile that can be made of plastic or metal. Usually it increases the height of the structure by 5 mm, which should be taken into account when selecting a base.
Thanks to the presence of the plinth, a tight fit of the plinth to the floor surface is ensured. In addition, this profile is characterized by excellent moisture insulation. For greater tightness, some experts install such a structure with a specialized adhesive-sealant. The result is a more durable and reliable structure, but if dismantling is necessary, it will not be so easy to remove; you will have to use a knife, which simply removes the layer of sealant.
Advice! According to designers, the size of the kitchen plinth should be selected taking into account not only the appearance of the unit, but also based on the height of the ceilings. So, for rooms with low walls, it is advisable to choose planks with a width of no more than 120 mm, but if the ceiling height is more than 3 meters, then plinths with a width of 200 mm can be used here.
Plinth made of chipboard
If you want to save a little money, choose a chipboard plinth. It should be borne in mind that this material absorbs odors and moisture, and changes color to darker with regular washing. Therefore, it will very quickly lose its original appearance and become unusable.
When exposed to moisture, the chipboard is subject to distortion, so this base will have to be replaced immediately. A special seal in such cases is completely useless.
It has a standard height of 100 and 150 mm.
Installation of the leg and its adjustment
Companies that produce furniture produce adjustable legs of 10 cm, 12 cm and 15 cm. The most common adjustment is 3 cm. Rules that will help you install the legs correctly:
- The leg is screwed to the furniture using self-tapping screws, which are included in the product package.
- When adjusting the height of the cabinet, it is better to use a building level. This will help prevent the surface from tilting to the side.
- If the dimensions of the cabinet exceed 80 cm, then for greater reliability it is better to increase the number of legs and add an additional pair in the middle of the product.
| Tip: If you attach the legs 8 - 10 cm away from the edge, this will make the kitchen set more light. |
Comfortable height for different surfaces, depending on the type of process performed on them.
- It is better to install the sink at a height of 1 meter. This rule will help to avoid unnecessary stress on the spine when constantly bending over while washing. And if you choose a corner cabinet for a kitchen sink, you can still save space.
- The cooking zone will be comfortable and most importantly safe (when removing hot pans and pots) at a height of 80 cm.
- The most acceptable height for a work surface is 90 cm. Although if heavy tasks are often performed (kneading dough or cutting vegetables), it is recommended to increase the height by another couple of cm.
Video: how to screw the legs
The video shows the installation of the leg and its adjustment:
If you want to create a spectacular kitchen by installing it on non-chrome legs, there is an opportunity to save a little. To do this, plastic structures are installed in distant corners, and chrome ones are installed in the foreground. We also recommend that you familiarize yourself with the chrome kitchen chair in this material.
Adjustable legs for kitchen cabinets do not require special care or operating rules. It will be enough to regularly wipe them from dust and possible dirt using a damp cloth. In our other articles you can familiarize yourself with the standard sizes of kitchen furniture and the dimensions of the kitchen corner.
Plastic base
A PVC base can easily replace a wooden one in the kitchen. Even a beginner in finishing work can install the bar without outside help.
Most often it is used in kitchens with geometric asymmetry and curved facades. This choice is completely justified, because the plastic base bends easily without cracking.
It should be noted that it will be easy to select all the necessary components for a PVC base.
Plastic plinths are available in various colors, so they easily match any set and interior. And to make the furniture more floating, you can choose a transparent plank option for finishing.
A mirrored plastic plinth will help visually expand the kitchen space.
The height of the base is standard and is 100 and 150 mm.
Installing a plastic base
Even a person without experience can install the plastic strip correctly. In this case, you won’t even need to study the instructions or look for a video with all the nuances of the work.
The first step is to choose the right base. It must have a seal that fills the space between the furniture and the floor. A silicone seal with a long service life is best suited for such purposes.
When purchasing a base, you need to pay attention to the package contents. Standard components include snap clips with clamps, corner joints and PVC end caps.
The procedure for installing the base is identical for all types of dies. After preparing all the necessary elements, the structure should be secured with adapters.
The last step is installing the clips. They need to be placed in the grooves on the back side of the plug, and then simply snapped onto the legs of the headset.
The corner structure is mounted if it is necessary to rotate the bar in a certain place.
After all the manipulations done, you only need to install the end caps.
You don't need a ton of experience to install a kitchen plinth that will help keep your entire space perfectly clean.
Source: shik-meb.ru
What is a kitchen plinth and why is it needed?
The plinth in a kitchen set is a fairly important component. This element is a strip attached to the support legs or bottoms of kitchen cabinets , which performs several functions in the interior:
- Aesthetic. A correctly selected kitchen plinth can significantly improve the appearance of your kitchen unit. In addition, this element allows you to hide kitchen communications, such as electrical wiring or water pipes. If necessary, you can quickly unfasten such a strip, thanks to special latches that ensure reliable fastening of the structure to the furniture.
Advice! If kitchen furniture consists of modules, then a properly selected kitchen plinth will allow you to achieve harmony and integrity of this design.
- Protective. Here, the functions of the plinth are both to protect the space located under the furniture from the entry of pets or children’s toys, and to prevent the accumulation of dust, household waste, etc. here.
- Convenience. Since the seal for the kitchen plinth does not allow dirt and dust to penetrate under the furniture, such strips make cleaning the kitchen much easier.
Structurally, a PVC plinth for a kitchen consists of the strip itself, a seal, fasteners, which are most often presented in the form of clips, and end caps. Modern plinth systems can have various design parameters that allow them to perfectly follow all furniture contours.
For example, in addition to standard strips, installing a plinth on a kitchen set may involve fastening the following elements:
- Standard corner connectors that are designed for 90 and 135 degree angles.
- Adapters that allow installation in areas of different heights.
- Fragments of the radius type, thanks to which it is possible to outline bends while making smooth turns.
- Ventilation grilles for the kitchen basement. Thanks to such elements, natural circulation is ensured under the kitchen furniture and the appliances built into it. The grille of the kitchen plinth ensures the natural movement of air masses under the refrigerator, oven, dishwasher and washing machine.
Advice! The attachment of the plinth to the legs of the kitchen should be so tight as to ensure that there are no large gaps, so it is very important to choose the right height and shape of the slats. In this case, the design features of the headset and the evenness of the floors should be taken into account.
How to choose and install a kitchen unit plinth?
The base of the kitchen set performs several functions: decorative, protective. It is not considered a mandatory element during installation, but thanks to this detail the possibilities are expanded:
- a barrier appears at the bottom of the furniture, preventing dirt, children's toys and other items from getting under cabinets and cabinets;
- the amount of work during general cleaning of the premises is reduced;
- money is saved on finishing the lower section of the headset.
This part can be purchased and installed together with the rest of the furniture or separately.
Legs for floor cabinets - a useful set for kitchen furniture and stoves
When purchasing a ready-made kitchen set or a custom-made one, the first thing you should pay attention to is its base. The most common options for its design are kitchen plinths or legs. Less commonly, lower cabinets are attached to the side wall, creating the effect of furniture floating in the air.
The main requirements for a kitchen base are:
- Strength endurance . The base provides support for the entire height of the kitchen unit. He has to withstand the weight of not only the furniture itself, but also all the utensils that are stored inside it. And sometimes the weight of a person during force loads that arise during the process of cooking at the cutting table.
- The second function that the base must perform concerns the appearance of the product. It should not stand out from the overall design of the entire kitchen, but harmoniously correspond to it.
Design and characteristics
If you are interested in the answer to the question of what is the plinth located at the bottom of the kitchen unit, you need to learn more about the structure of this element. It consists of main parts:
- external bar is always in sight;
- clip-on fasteners are used to secure the entire structure;
- plugs located at the ends;
- seal - this structural element is used to ensure tightness, due to which dust and dirt penetrate under the furniture less intensively.
The design is subject to change. If you are deciding how to install a plinth in the kitchen, you should also consider auxiliary elements that are not mandatory during installation, but improve the appearance:
- elements with roundings, radius fragments;
- corner parts, they are presented in 2 options: 90 and 135°;
- an adapter that allows you to install the front panel, even if the standard height of the plinth changes in some areas;
- fine-mesh ventilation grilles, thanks to them it becomes possible to protect the space under the furniture from large debris, and at the same time maintain natural air circulation under the set mounted on legs.
The base may differ in the color of the front panel. It is characterized by minimal thickness. For this reason, such a structural element is not characterized by increased strength. In addition, there are many voids inside the front panel, which means that a pinpoint impact can cause damage to the integrity of the product. Considering that there is quite a lot of free space behind the front panel under the kitchen unit, it can be put to good use. So, wiring is laid under the cabinets; it is not visible from the outside thanks to the external strip.
The base is quite easy to install. For this, special clips are used. The advantage is ease of fixation. To dismantle the front panel, it is enough to act on the clamps. Most often, structural elements with dimensions are used: 100, 120, 150, 200 mm. If you plan to install the base unit in the kitchen, take into account the quality of the horizontal surface. Thus, it is not recommended to carry out installation if the floor is uneven. If desired, you can use the design on adjustable hangers.
There is also the option of installing a special base for the plinth in the kitchen. It is transparent and secured with silicone sealant. If such a need arises, this structural element can be removed for cleaning or replaced with a new one. The height of the base of the base in most cases does not exceed 5 mm.
Design features
The plastic kitchen plinth is a simple design. The plank serves as the main part here. It has mounting clips installed. They provide fixation on furniture legs.
The structure consists of the following elements:
- Radius bars that allow you to make turns.
- Adapters for slats of different heights.
- Side connectors for 90° and 135° angles. There are also straight lines that connect two planks on a line.
- Ventilation grilles that allow air to circulate under the kitchen unit.
- End caps for arranging the ends of the planks.
A plinth is also a great way to hide electrical wiring and install additional outlets . They are usually made from the inside so as not to accidentally spill water.
It is necessary to select the height so that the base fits snugly against the furniture. It depends on how level the kitchen floor is.
If it is not completely level, choose a plank with pendants. The structure is installed several centimeters deep to remove cracks. Standard plinth sizes are 100 mm, 120 mm and 150 mm.
Attention. The plinth system consists not only of fasteners and strips; in addition there is a sub-base, which takes up approximately 5 mm of height.
The plinth is a kind of lining (metal or plastic) that is attached to the bottom of the plinth, ensuring its connection to the floor. Many people fill the space under the bar with silicone. But this is not entirely convenient, because if you need to remove the bar, the silicone layer will have to be restored again.
How to choose the right base?
To get an attractive and functional headset, it is selected taking into account a number of parameters:
- dimensions, which allows you to choose the most suitable option for the kitchen;
- appearance: texture (if any) and color, it is not always necessary to purchase a base of the same color as the furniture; you can use neutral (steel, gold, gray) or contrasting shades;
- the distance between the countertop and hands is 15 cm while working in the kitchen;
- determine the dimensions of built-in household appliances: stove, dishwasher, etc., which will prevent errors when installing the lower front panel in these areas.
The appearance of the base is important; for this reason, such products must be intact. You should also check the quality of the base in the store. Install it only if there are no chips or cracks. It is necessary to calculate the type and number of auxiliary elements. In this case, the total length of the kitchen unit is taken into account. Having determined the basic parameters, you can consider products of different price categories.
Manufacturing materials
Plastic
What is good about a plastic profile? Firstly, it is lightweight, secondly, it is cheap, and thirdly, it is reliable and durable. Moreover, a plinth of any shape, width and texture can be cast from PVC, which is important. Additionally, the structure is equipped with seals that prevent water from seeping under the furniture.
Plastic base
The plinth can vary in height from 100 to 150 mm, which is quite enough to hide the legs of the cabinets. Plastic perfectly resists mechanical damage such as bending and breaking, so an accidental “kick” with your foot will do absolutely nothing to it.
The plastic plinth can be easily matched to any furniture. If you have not found a suitable pattern or color of the material, order an individual model for yourself from the same factory where you purchased the kitchen.
The main advantages of the material
- Relatively low price, which fully corresponds to the quality.
- Thanks to the corners and connections, it can be installed under a kitchen of any shape and configuration.
- Insensitive to sudden temperature fluctuations.
- It is not afraid of various mechanical impacts during operation: scratches, abrasion, etc.
- He doesn’t care about the sun’s rays, nor does he care about burnout.
- It is lightweight, so even a child can remove it when cleaning.
- He is not at all afraid of not only moisture, but also water.
Plastic and fastening and joining elements
However, this type of kitchen plinth also has several disadvantages:
- Despite the fact that the plastic base is resistant to various types of mechanical stress, various dirt and liquid leaks will immediately be evident, so it will need to be wiped more often.
- A kitchen plastic plinth can be damaged if you use aggressive cleaning products with a high pH level to clean it, so try to use their counterparts with a more neutral pH level.
The next drawback does not relate to the operation of the product, however, in order for our readers to be fully aware of it, we will still dwell on it.
Despite the resistance of PVC material to high temperatures, at 400 degrees Celsius it begins to burn, releasing chemicals into the air that can cause suffocation. For this reason, in some countries it is used with restrictions in medical and child care institutions and other social facilities.
Aluminum
As for aluminum, let's start with the fact that the aluminum base is quite expensive, although durable. It has all the advantages of PVC, but lacks its disadvantages. It is also not afraid of temperature fluctuations, mechanical damage and direct exposure to sunlight.
Aluminum plinth
The material is environmentally friendly and durable, but its main drawback lies precisely in the price and complexity of installation. Cutting off an extra piece of aluminum base without the appropriate tool is quite problematic.
This material is the simplest and cheapest of the above. For the manufacture of the plinth, laminated chipboard (chipboard) is used, which has many advantages , thanks to which it is still used in the manufacture of these products:
Types of kitchen unit plinth
There are several varieties of similar products on the construction market; they differ in properties and appearance:
- plastic;
- products from MDF and chipboard;
- structures made of natural wood;
- aluminum.
The first of the plinth options on the kitchen set looks less attractive than some other analogues. However, these products look neat and perform the tasks assigned to them. In addition, the cost of this option is low, and installation is easy. Products of this type are characterized by low weight. Plastic front panels are quite durable and do not lose color. This is a moisture resistant material.
Analogues from chipboard and MDF are more susceptible to the influence of water. This means that either additional processing will be required, or the possibility of moisture affecting the structure will have to be eliminated. Such products are presented in a wide range of options, different in color. Sometimes there are leaks between the set and the kitchen plinth of this type.
Wooden analogues are more expensive. They are susceptible to the influence of liquids, which shortens the service life of such a base. In terms of attractiveness, this option is superior to its analogues. Another expensive type is aluminum construction. The main advantage is called high strength, which, combined with moisture resistance, makes this option a leader among other bases.
Lesson 16 - Base in cabinet furniture
The plinth is a mandatory attribute of free-standing cabinet furniture.
It gives rigidity to the structure and prevents its deformation due to uneven floors. In addition, by raising the contents of the cabinet above the floor level, we are thus protected from dirt and dust. As a rule, the base has several overhangs that emphasize the expressiveness of the furniture and also perform some functions:
- front overhang - can reach a depth of 50 mm - will allow you to get as close to the furniture as possible without bumping into the platform or going inside;
- The rear one - usually 30 mm - is a cutout for the plinth;
- Lateral ones - usually about 10 mm (although there are exceptions - see Fig. 1), may be absent altogether.
Structurally, the plinth is a rectangular box; with a length of more than 1500 mm, it is recommended to separate it with transverse jumpers for greater rigidity.
The elements of the box can be connected by various types of connections; for clarity, we will present a plan diagram, indicating the connections by numbers.
Connections No. 1, No. 2 and No. 3 are visible, so through types of fittings are not allowed on them. It is recommended to use the following fixation options:
Compound No. 4 is a priori hidden from view. Therefore, you can and should save money on it. The optimal fixation option is confirmat (the optimal combination of ease of installation, price and connection strength), but other methods are also acceptable.
The plinth must also be attached to the lid (cabinet floor) with hidden fittings (see connections No. 1, 2, 3). Through fixation is allowed for the front part with an overhang of no more than 50-70 mm in sliding wardrobes. In them, the heads of self-tapping screws or confirmations will be hidden by the lower guide of the Versailles system. In addition, Euroscrews (or simple self-tapping screws) can be used if their heads are hidden by uprights (when screwed into the crossbars). Personally, I prefer to fasten the base to the bottom with mounting angles (plastic or metal) - it’s quite simple, does not require special markings, is cheap and invisible from the front side.
A plinth option is also possible, in which there are no side overhangs and the walls of the housing rest directly on the floor. In this option, it is necessary to cut off the lower rear corner of the side walls under the baseboard.
Let's look at these connections on a diagram:
In this case, the same types of fittings are used (in connections No. 1-3 - hidden) in connection No. 4 - any.
Installing a kitchen plinth
To work you will need silicone sealant, self-tapping screws, and adhesive. It is recommended to install the plinth in the kitchen according to the instructions:
- You need to attach the front panel to the legs of the headset and make marks: along the edges and in the middle (if the product is of significant length).
- The base made of plastic and aluminum is fixed using special fasteners, which are included in the kitchen set (clips). For products made from chipboard, it is possible to install them using self-tapping screws.
- If the kit includes special linings, they are used to ensure the tightness of the structure. An alternative option is silicone sealant around the perimeter.
- The structure is installed in a recess up to 15 cm from the edge of the front panel of the headset.
Source: remkasam.ru
How to install and adjust the height of the legs?
So, if you have already decided on the design, height and shape and have already purchased suitable legs for kitchen furniture, then the second stage will be their installation.
To install and adjust the legs, you will need the following tools:
- screwdriver with attachment for fasteners;
- 4 self-tapping screws for each support (length – no more than 2 cm, diameter – no more than 4 mm);
- construction level.
Usually they are mounted in each corner of the cabinet at a distance of 50 mm from the edge to the center of the support. But sometimes, in order to ensure a comfortable position for the legs of a standing person, this distance can be increased to 70 mm.
The number of legs can also be increased if it is necessary to increase the strength endurance of the support.
Adjustment is made only with the help of a building level. To do this, the cabinet needs to be turned over.
Watch how to install them correctly and adjust their height in the video:
Plinths for the kitchen: varieties and tips for choosing
join the discussion
Share with your friends
To make the kitchen interior look laconic, when arranging the room and arranging furniture, you may need additional components of the set. Such attractive and functional components include kitchen plinths, which stand out with a number of features.
For or against?
There are no significant pros and cons to the kitchen plinth. Personal taste preferences rather play a role here. Some prefer the shiny chrome of metal legs, while others prefer the monolithic plane of the facade.
Most often, the advantages of the base include its aesthetic appearance. The decorative “skirt” makes it convenient to hide hoses and wires leading to the sink and kitchen appliances.
But you should realize that by hiding communications in this way, you can create a lot of problems for yourself. So, the breakthrough of a hidden hose will become known only when the size of the puddle is quite large (and, perhaps, the neighbors below will report the “flood”). After all, the sealing rubber will hold water under the kitchen unit for some time.
Having free access to the space under the headset is also a controversial issue. The absence of a plinth allows this gap to be used for storing various household items.
True, children and pets will regularly push things into this gap that shouldn’t be there. Yes, and the appearance of the kitchen will suffer if strange boxes and packages peek out from under the furniture.
The space behind the plinth can also be used by placing drawers there. But this solution will only allow you to store something flat there, such as baking sheets.
At the same time, the implementation of such a design will cost more, although it will look nicer.
You should not install sockets in the floor plinth under the kitchen unit. At first glance, this solution seems very practical, but according to fire safety standards, this is prohibited.
According to the regulations, the distance from the floor to the kitchen outlet must be at least 10 cm, otherwise in the event of a flood, a short circuit may occur and, as a result, a fire.
The gap between the floor and the lower kitchen cabinets rarely exceeds 10–15 cm, which makes it impossible to install sockets without violating fire safety standards.
What it is?
The decorative strip located at the bottom of the kitchen unit is called the plinth. This additional element allows you to hide legs, communications or free space between the bottom of the cabinet and the floor. This component has a positive effect on the appearance of the overall decoration of the room, since it gives the furniture set a finished look.
The presence of a plinth strip for furniture is not a prerequisite; in addition, not all models and varieties of kitchen sets and floor cabinets are sold complete with it. Each owner of a residential premises is guided by personal taste preferences when considering the purchase or use of such a component element.
However, it is worth noting that the plinth performs not only a decorative function, since it is able to protect furniture from dust, dirt, food debris, moisture and other things that can negatively affect the condition of the set. In addition, installing the bar allows you to avoid the inconvenience of cleaning in hard-to-reach areas of the room.
Kitchen plinths are available in a wide variety of colors and designs, can be made from different raw materials, and have several shapes, so in each case the planks are selected individually to match the furniture or room design. Installing and dismantling a furniture plinth is not particularly difficult, so all work related to the additional element can be done with your own hands. As a rule, the planks are additionally equipped at the edges with a special rubberized seal, which ensures the tightness of the joints on all sides. The peculiarities of the materials used for the manufacture of planks prevent their deformation from thermal effects or contact with a humid environment, therefore, during the cleaning process, such components retain their original attractive appearance.
Source: vplate.ru
Types of materials for plinth strips
The market offers kitchen plinths for every taste. They come in different shapes and are made from different materials: the planks are selected to match the furniture in the room or the overall design of the kitchen.
Plastic sockets
Such plinths are now especially popular on the market.
Low price is not the only advantage:
- plastic is moisture resistant;
- to keep the material clean, you only need a sponge and detergent;
- bends are formed using plastic;
- The plastic base has grooves for clips, and their installation is quite simple.
They also have a wide range of colors . The profile can be transparent, mirror or stainless steel in color, which creates an imitation of a metal base.
But plastic also has its disadvantages.:
- Over time, the material loses color. For example, white strips become yellow.
- Plastic should not be cleaned with detergents that contain fine-grained substances, as scratches may occur.
- Thin material is easily deformed.
Products made from chipboard or MDF
Only high-quality chipboard models can withstand high humidity . Plinths made of this material have corners with adhesive edges, which peel off over time.
Attention. In order for laminated chipboard planks to last a long time, their surface is protected from moisture and the panels are sometimes removed to dry.
This type of base also has advantages.:
- Imitation wood.
- Large selection of colors.
- Resistance to mechanical stress. If you accidentally touch the base, there will be no dents left on it, but if the damage is significant, fungus will appear inside.
Installing an MDF base will cost almost twice as much as a plastic one . But most of them are moisture resistant. In addition, MDF copies the texture of wood well. The protective layer on such panels lasts much longer due to the absence of large sawdust in the composition.
It can be useful:
All about the transition from tile to laminate in the kitchen
Ceiling and floor kitchen skirting boards
Everything about tiles or laminate in the kitchen: which is better and how to combine them
Practical metal
Aluminum kitchen plinth is considered the most reliable . This plank will last for many years without being affected by temperature and humidity.
The kitchen aluminum plinth is a durable and lightweight material . Its height is 150 mm or 100 mm. It is easy to install; there is a silicone seal between it and the floor, which eliminates even barely visible gaps.
The kit includes plugs, corner connectors and ventilation grilles . The aluminum base can be matte or glossy, while the matte base can be grooved or smooth. It looks good in a high-tech or modern kitchen, especially if the color is in harmony, for example, with a chandelier or table legs.
Protection and decoration
To make the usual protection of the basement system also a decoration for the kitchen, take note of a few interesting ideas :
- If it's hard to choose, consider the option with a mirror finish. It looks stylish, but will require careful care.
- Lighting gives the kitchen interior some fabulousness. To create this effect, the LED strip is attached to double-sided tape. If the base is high, install spotlights.
- Built-in drawers are a great option for those who value every corner of free space. The fronts of such drawers and the base are lined with the same material. They are used for various kitchen utensils and household chemicals.
Types and forms
Plinth strips cannot boast of a wide variety of designs. The entire range can be divided into straight and radius (for sets with curved facades).
It should be noted that kitchens with complex shapes may require custom-made plinths. In this case, there are many more possible design options.
Corrugated profiles (most often aluminum) are produced in limited quantities.
It looks original, but requires increased attention, since more dirt and dust gets clogged into the relief of the design. Typically, this type is chosen only when it fits perfectly with other interior elements, for example, chrome legs of a table or chairs.
Dimensions: height, length, depth
To order, you can make a plinth of almost any length and height. But they do this extremely rarely. Most manufacturers of protective strips produce their products in three heights: 100, 120 and 150 mm.
These sizes were chosen for a reason. This height is ideal for the length of standard legs for kitchen furniture. Therefore, individual production of a base may only be required when working with an exclusive set of non-standard sizes.
Some manufacturers produce only the maximum width option, but with the ability to trim to 120 and 100 mm.
As for the length of the strip, it is also tied to certain standards. Depending on the manufacturer’s brand, it can be 3 or 4 m. Subsequently, such a blank is cut to the specific size of the headset.
The thickness of the base depends on two factors: the material and the manufacturer.
MDF and chipboard planks are usually produced from a standard 16 mm thick sheet. All accessories for them are produced in accordance with this standard.
The base is made of plastic and aluminum and is slightly narrower. Its thickness varies in the range of 10–14 mm. To reduce weight, planks made of these materials are produced hollow. There are special stiffening ribs inside, which make the structure quite strong and reliable.
Colors
The color palette of the plinths differs depending on the material from which it is made.
Aluminum decorative strips most often remain in a natural metallic color, and are divided only into mirror and matte. It is possible to apply an individual pattern on them in the form of engraving, but this type of finishing is not particularly widespread.
Plinths made of MDF and laminated chipboard are usually colored “wood-like”, “stone-like”, or in plain matte or glossy colors. The palette of this type of plugs is quite wide. It allows you to choose the right option for almost any kitchen design.
Protective strips made of natural solid wood are also left in their natural color, or they are opened with tinting varnish to match the headset.
Plastic bases have the widest range of possible shades. You can choose either monochromatic solutions or an option with a pattern (most often imitating the pattern of natural wood or stone). Delicate pastel colors or bright and aggressive - the choice is huge.
It is not always possible to select a decorative plug to match the kitchen set. A solution with a contrasting base is common. In this case, the protective profile matches the color of kitchen appliances or other interior elements. This solution looks stylish and emphasizes the originality of the design.
You should not choose a “custom-made” base from a catalog or based on the palette of samples provided. Colors in the photo and in reality may vary greatly. Moreover, the shade may vary from batch to batch (especially if we are talking about a natural array).
When arranging “to order” delivery, you may find yourself in a situation where the decorative strip is significantly different in tone from the facades. The best option: take the protective profile complete with the headset. If this is not possible, you should select a base only from stock.
When choosing a color scheme, you need to take into account the features of care. So the mirror base will have to be regularly rubbed with glass detergents. Doing this while lying on the floor is not very comfortable.
Glossy bases in bright colors will also require more careful care than matte ones. They show all the stains that most often remain after contact with a mop when wet cleaning the floor.
Additional plinth elements
By installing a plinth, you severely restrict ventilation under the kitchen cabinets and if you have a built-in oven, this may violate safety requirements. A ventilation grille in the kitchen basement will completely solve this problem. There is a special ventilation grille for the kitchen plinth. The advantage of which is that it is produced in the color of the base strips and has the size specified by the manufacturers of the built-in equipment. This allows for optimal ventilation. In addition, the design of these grilles allows them to be installed in a plinth without unnecessary problems; you just need to cut a groove of the required size.
Despite the apparent versatility of a laminated chipboard plinth, it is very vulnerable to moisture. Therefore, it is necessary to purchase a plinth seal for the kitchen. A silicone seal for the kitchen plinth will protect the chipboard and hide the uneven fit of the plinth to the floor. This way, contaminants will not get under the kitchen unit.
Accessories
When installing a plinth made of MDF or chipboard, additional installation of PVC protection may be required. There are usually no problems with this.
The plinth protection is produced in standard sizes (for MDF sheet thickness 16 mm), and the strip is simply inserted into a plastic case (like a mobile phone) without additional fastening. The connection is tight and reliable, with virtually no gaps.
The thickness of the silicone protection is small, so its installation has virtually no effect on the overall height of the base. But the plastic “skirt” reliably protects the chipboard base from moisture and swelling.
In addition, there are models with a seal; they make the fit of the plank to the floor tighter, completely eliminating the possibility of moisture getting under the kitchen set.
The plastic cover does not spoil the appearance of the decorative strip, since it is completely transparent and makes itself felt only by the slight shine of the lower part of the base.
There are also a number of plugs and connecting strips. With their help, you can refine the ends of the plinth, or connect several parts of the decorative strip into a single structure. Depending on the configuration of the kitchen modules, the individual parts of the plinth can be connected at different angles, exactly repeating the shape of the set.
The following connectors are available as standard:
It is best to purchase such accessories immediately, complete with a plinth. At the same time, you need to make sure that it is from the same manufacturer and does not differ in texture and shade,
Also, when installing the base, you cannot do without special plastic clips. With their help, the strip is fixed on the legs of the kitchen set. Fasteners can be included with furniture legs, but are often purchased separately. The number, shape and size of clips are selected based on the material and dimensions of the base.
Attaching the base - how to fix a base made of solid wood or plywood?
Modern technology for fastening plinths involves fastening to adjustable supports. These supports are installed on the bottom of lower kitchen cabinets. Suppliers of good fittings sell clips for installing solid or plywood plinths along with kitchen supports. The clips are screwed onto the inside of the wooden or plywood base. The clips are then snapped onto the adjustable kitchen supports. This is the best way to secure a kitchen base made of solid wood or plywood.
UNIQUE CUSTOM KITCHENS
Articles on modern kitchens:
Mounting the plinth - a similar opinion from another author
When assembling a kitchen set, special adjustable furniture legs are used, the design of which includes a clip for the kitchen plinth. The plinth strip is attached to the kitchen legs using this clip. The clips are attached first to the base plate, and with the help of a special clamp to the kitchen leg. For a base made of chipboard, the clip is attached using self-tapping screws; for a plastic base, a special groove is provided where the clip is inserted.
A kitchen plinth fastener is included with each leg, but this does not mean that you need to use all the fasteners. The plinth fastenings should be placed at a distance of 1 m from each other and along the edges of the strip. This way the plinth will stand level and possible mutual displacement of the legs will not affect the appearance of the plinth, at the same time it will be securely fastened.
Installing a plinth in the kitchen involves another important issue: the depth of the plinth. The plinth should be recessed relative to the kitchen facade by 7-10 cm. This is necessary so that when you stand close to the countertop, your feet do not rest against the plinth. The required displacement of the base can be ensured by correctly installing the legs. When assembling the kitchen, the legs of the front row should be shifted 7-10 cm relative to the facade. This is enough to ensure correct installation of the base in the future.