First, let's understand the definition of the word “base”. Its origins are in the Italian language, it sounds like “zoccolo” and refers to shoes with wooden soles. At first, this definition was only in architecture and meant the foot or sole of a building, located between the foundation and the walls; now it also refers to a piece of furniture, more precisely, to a low strip located near the floor. Plinths for cabinets may have different heights, but may be absent altogether.
Plinths for the kitchen: varieties and tips for choosing
join the discussion
Share with your friends
To make the kitchen interior look laconic, when arranging the room and arranging furniture, you may need additional components of the set. Such attractive and functional components include kitchen plinths, which stand out with a number of features.
What it is?
The decorative strip located at the bottom of the kitchen unit is called the plinth. This additional element allows you to hide legs, communications or free space between the bottom of the cabinet and the floor. This component has a positive effect on the appearance of the overall decoration of the room, since it gives the furniture set a finished look.
The presence of a plinth strip for furniture is not a prerequisite; in addition, not all models and varieties of kitchen sets and floor cabinets are sold complete with it. Each owner of a residential premises is guided by personal taste preferences when considering the purchase or use of such a component element.
However, it is worth noting that the plinth performs not only a decorative function, since it is able to protect furniture from dust, dirt, food debris, moisture and other things that can negatively affect the condition of the set. In addition, installing the bar allows you to avoid the inconvenience of cleaning in hard-to-reach areas of the room.
Kitchen plinths are available in a wide variety of colors and designs, can be made from different raw materials, and have several shapes, so in each case the planks are selected individually to match the furniture or room design. Installing and dismantling a furniture plinth is not particularly difficult, so all work related to the additional element can be done with your own hands. As a rule, the planks are additionally equipped at the edges with a special rubberized seal, which ensures the tightness of the joints on all sides. The peculiarities of the materials used for the manufacture of planks prevent their deformation from thermal effects or contact with a humid environment, therefore, during the cleaning process, such components retain their original attractive appearance.
Bottom row
First of all, it should be noted that this parameter is directly related to the material from which the countertop is made. As standard they have widths of 600, 900 and 1200 mm. It is on the basis of these three sizes that the idea of the lower drawers is formed. However, they are not mandatory and can be trimmed if necessary.
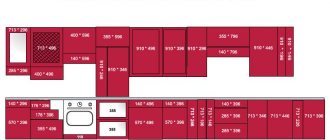
Detailed design of a corner kitchen indicating all required dimensions
Worktops 600 mm
- Typically, in this option, the depth of the kitchen cabinet is 460 mm.
- Making it smaller is simply impractical and unprofitable, and the design itself will not allow for more, since it is necessary to allocate space for pull-out cabinets and the gap between the wall and the back wall.
- This size can be considered standard and is used in numerous advertising photos or standard projects.
Advice! When using a tabletop of this size, it is necessary to take into account that when leveling some niches and corners, its solid surface is simply not enough. Therefore, in such places it is necessary to take a little more material.
Specific countertop with large lower cabinets
Table top 900 mm
- This material is well suited for large and spacious kitchens.
- Typically, the depth of the kitchen cabinets located underneath is 760 mm.
- This size is used to create boxes that should be located in a niche.
- They are also used in exclusive furniture that has extraordinary shapes or designs.
- Drawers of this size are good for storing large dishes or various household appliances.
Advice! You should not use wide countertops if the overall length of the kitchen is small. The furniture obtained as a result of this combination will be angular and ugly.
Worktops 1200 mm
- This type of countertops is used quite rarely, since many video instructions on design skills recommend avoiding large and open planes, which are very bulky and unaesthetic.
- Typically, this material is used to create dining tables to match the wall.
- They are also used in industrial kitchens to make large work surfaces that can include multiple stages of culinary processes.
- Their price is quite high, and the ability to place things in the space under such a cabinet is justified only if such a table is accessible from two opposite sides.
Advice! A large countertop looks good in the middle of the kitchen when it serves as both a dining table and a work surface. Such design projects are very popular in the northern United States.
Using a large tabletop to create a dining table
Types of plastic plinth for the kitchen and installation features
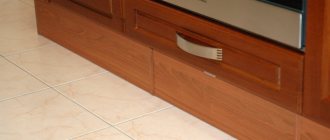
Kitchen plinth is a strip that helps protect the kitchen floor from dirt in hard-to-reach places. It is attached to the legs of the headset, covering the space under the furniture, where it is almost impossible to reach either with a mop or a vacuum cleaner, which leads to the accumulation of food debris, food debris, dust and dirt.
The gap between the floor and the lower edge of the headset is usually 150 or 100 mm, which is equal to the width of the strip with a seal that prevents dust from penetrating under the headset. Although the most used size is 100 mm.
To attach the plinth, a special clip is used on the furniture legs, which makes it easy to remove the bar if necessary.
Kitchen countertop height
The tabletop work surface should be as convenient as possible for cooking. Therefore, it is very important to calculate what height of the countertop in the kitchen from the floor will be optimal for the owners, and what to consider when choosing it or making it to order.
Ergonomic issues play an important role in the kitchen. The triangle rule helps save energy and time during constant movement, as well as the proper placement of kitchen appliances. The height of the countertop in the kitchen is also of great importance: if it does not correspond to the height of the hostess, you will have to bend low or, on the contrary, raise your arms high. Both of these disrupt comfort and cause premature fatigue.
Standard sizes of kitchen units
Standard sizes are rather a generalized set of some rules for the design of kitchen furniture, rather than strict standards. However, both foreign and domestic manufacturers adhere to them. The reason is simple: creating the ability to arrange various items, including household appliances and appliances.
Based on this rule, the standard height of a countertop in a kitchen is usually 36 inches from the floor in foreign-made models, which corresponds to the accepted domestic standard of 89–90 cm. Manufacturers of basic models assemble their cabinets to a height of 34.5 inches, taking into account the fact that the thickness of the working panels will be approximately 1.5 inches.
As a rule, design standards, including the height of the countertop in the kitchen from the floor, are adopted for a long period. They are the result of research that determines the most convenient and practical sizes for the average buyer and average-sized kitchen spaces.
Of course, small national deviations are possible, since the average height of Italians, for example, is significantly lower than that of Scandinavians. However, in most cases, people are satisfied with the average kitchen countertop height from the floor established by industry standards. If necessary, today it is not difficult to order furniture from a manufacturer according to a special project; it will ideally suit the tastes and needs of the family.
Types of base depending on material
Such parts are made from various materials. The most used are plastic strips (PVC), MDF, chipboard and aluminum profile. Depending on the material, the planks have different properties.
MDF plinth
Perfectly suitable for furniture with facades made of the same material, especially since choosing a strip of the desired color for them is not difficult. MDF is quite resistant to frequent washing, but you should still avoid excessive and constant wetting of the surface. Available in any height: 150 and 100 mm.
The MDF base has a huge range of options
Chipboard is an economical option
This material has a number of disadvantages that lead to its rapid wear and loss of external attractive qualities. Chipboard easily absorbs water and odors, quickly darkening with frequent cleaning. As a result, the geometry of the surface is disrupted, and the strip requires replacement, since even the seal does not help, although its initial height is standardly 150 or 100 mm.
Aluminum profile
One of the best options for installing a protective strip between the floor and the bottom of furniture. This is a durable, lightweight option with a height of 150 or 100 mm.
The photo shows an aluminum base
The aluminum base is environmentally friendly, absolutely resistant to moisture and excess water, even in puddles that may form during the cleaning process. This profile is very easily attached to the legs of the headset, for which standard components are used.
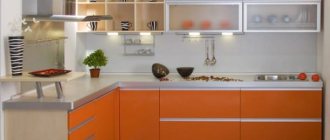
Plastic base
Another option, which in its properties is superior to wood solutions for use on the kitchen floor. PVC is affordable and easy to install: installing such a bar is not difficult without special knowledge and skills. As a rule, its standard height is 150 or 100 mm.
Manufacturing materials
Plastic
What is good about a plastic profile? Firstly, it is lightweight, secondly, it is cheap, and thirdly, it is reliable and durable. Moreover, a plinth of any shape, width and texture can be cast from PVC, which is important. Additionally, the structure is equipped with seals that prevent water from seeping under the furniture.
Plastic base
The plinth can vary in height from 100 to 150 mm, which is quite enough to hide the legs of the cabinets. Plastic perfectly resists mechanical damage such as bending and breaking, so an accidental “kick” with your foot will do absolutely nothing to it.
The plastic plinth can be easily matched to any furniture. If you have not found a suitable pattern or color of the material, order an individual model for yourself from the same factory where you purchased the kitchen.
The main advantages of the material
- Relatively low price, which fully corresponds to the quality.
- Thanks to the corners and connections, it can be installed under a kitchen of any shape and configuration.
- Insensitive to sudden temperature fluctuations.
- It is not afraid of various mechanical impacts during operation: scratches, abrasion, etc.
- He doesn’t care about the sun’s rays, nor does he care about burnout.
- It is lightweight, so even a child can remove it when cleaning.
- He is not at all afraid of not only moisture, but also water.
However, this type of kitchen plinth also has several disadvantages:
- Despite the fact that the plastic base is resistant to various types of mechanical stress, various dirt and liquid leaks will immediately be evident, so it will need to be wiped more often.
- A kitchen plastic plinth can be damaged if you use aggressive cleaning products with a high pH level to clean it, so try to use their counterparts with a more neutral pH level.
Installing a plastic base
To install the plug under the kitchen furniture correctly, there is no need to study video or photo instructions, although they will help you understand how to correctly assemble all the components for installation.
First, you should choose the most suitable base: it is desirable that it has a seal that will make the gap between the floor and the furniture more airtight. As a rule, silicone sealant is optimal, as it is the most wear-resistant.
The components for installation of any profile include:
- end caps (usually PVC, even for wood planks);
- corner connections;
- snap clips with clamps.
The photo shows elements of a plastic base.
So, the installation process is quite simple, regardless of what height the bar is needed - 150 or 100 mm:
We have prepared the fragments, assemble the structure using adapters, insert the clips and that’s it.
- the clips that snap onto the legs of the headset should be inserted into the grooves on the “wrong” side of the plug;
- if it is necessary to rotate the bar, a corner connection is assembled;
- the base simply snaps onto the furniture legs using clips;
- All that remains is to install end caps if they are needed.
In just a few minutes, the kitchen will take on a complete look, and you can easily keep the floor clean.
"Basement" feeling
If you think that the basement is actually the first floor, then you are very mistaken. People make up whole legends about apartments on the ground floor; about the basement they are even worse.
Living in a basement is almost the same as living in a basement. In any case, this is exactly what the residents feel. What else can you experience when it’s dark and cold from morning to night? In addition, the smell of dampness that regularly manifests itself (especially during the period when the weather is humid outside) evokes not the most joyful sensations. Do not forget that in addition to this unpleasant smell, others may appear that also will not bring much joy.
The worst situation is for those whose apartment windows face the roadway. In this case, all exhaust gases are drawn directly into the windows. Unpleasant, especially in the dry and hot season.
True, residents of apartments in the basement still give one argument in favor of such housing, they say, but it doesn’t get hot in the summer. How to say! You can escape the heat with an air conditioner or, at worst, a fan. What to do with everything else?
Plastic kitchen plinth versus aluminum: who will win?
A modern kitchen is a set of furniture made up of heterogeneous components, united by common façade elements. A plastic plinth for the kitchen is a strip installed at the bottom of the kitchen unit, hiding the lower supporting elements. Its goal is to complete and refine the appearance of the furniture.
The plinth for the kitchen is the lowest level of the set
What materials is the plinth made of?
There are two ways to decorate the lower part of the set: make the kitchen legs decorative or cover them with a special strip. In the first case, dust and dirt falling under the floor cabinets will complicate the daily cleaning process. The use of a plinth strip solves two problems at the same time - it gives the structure an aesthetically neat appearance and protects the furniture from debris getting under it.
The plinth for kitchen furniture is not necessarily made of the same material as the set itself. It performs not only a practical, but also a decorative function, so it can be made of any other material and provide a stylish contrasting furniture frame. The base is made from the following materials:
Yes, yes, the base on the headset is also made of metal
Advantages and disadvantages of each type
It is easy to make planks of any height and length from chipboard - this is an advantage of this material. They are edged around the perimeter and secured with self-tapping screws. The base made of chipboard has a significant drawback: the seams at the junction of the edge and the laminate are a vulnerable place for moisture. When water penetrates there, the plank swells and the element requires replacement. The chipboard structure requires additional sealing of the seams. Advantages of the plinth:
- ease of self-production;
- variety of sizes;
- a large number of colors;
- the ability to choose the laminated surface of the plinth exactly to match the tone of the furniture.
- low moisture resistance, the need to seal the seam.
The plastic base is practical in terms of water resistance and ease of cleaning. It is attached using special fasteners. Its advantages:
- practicality - easy to clean;
- water resistance - does not deform under the influence of moisture.
- a small number of colors - it is difficult to choose exactly the tone of the furniture;
- limited size range: kitchen plinth height – 10, 12, 15 cm.
The aluminum plinth for the kitchen has the following advantages:
- reliability – does not change under the influence of steam or temperature;
- strength;
- wear resistance;
- moisture resistance;
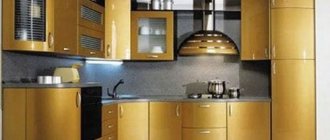
- stylishness helps designers when designing high-tech interiors.
High-tech kitchen includes aluminum elements
- uniformity of the appearance of the metal surface;
- high cost of the element.
Features of the plastic base
The plastic strip is mounted by fixing it in grooves that are made in the product on the reverse side.
The standard height of the plastic strip is 10 cm, length 4 m. If the ceilings in the house are high, then the kitchen legs can be adjusted higher, and the base can be used with a height of 12 or 15 cm.
To complete the appearance of the plastic strip, the following elements are used: connecting elements, end elements, rounded corners. Elements with radius curves of 90, 135, 180 degrees are available. If desired, you can additionally install a plastic ventilation grille.
The plinth for the kitchen is a necessary finishing touch to the overall furniture ensemble. It is not difficult to install it yourself, and the choice of material is a matter of individual taste and preference.
How to correctly calculate the base of a cabinet
When designing furniture, various nuances are taken into account. Much is calculated intuitively, because somewhere something has already been noted unconsciously and accepted “as it should be.” A lot of things are realized later, according to the principle “experience is the son of difficult mistakes.” When I did it and realized that it would be better to do it differently. The base of the cabinet, its calculation, can also be attributed to “intuitive” knowledge. Because any person has seen these cabinets hundreds and thousands of times, and how the bottoms are attached is usually no question. However, there is always a reason to think - maybe in my case it would be better to do it differently?
How to make the bottom of a wall cabinet
When designing the bottoms and bases of cabinets, they are always guided by elementary considerations of how the “breakable” fasteners will behave. Let's look at the example of an overlay and inset bottom for a wall cabinet.
If you load the bottom shelf (which is what the bottom of the wall cabinet is), then the inset base will be stronger than the overhead one - this is obvious. The “tearing” action of the fastener manifests itself in exactly this way – the overhead bottom will be “pulled out” from the sidewalls faster than if it is secured between the sidewalls. Therefore, the bottom of wall cabinets (any kind, including kitchen cabinets) is always made inset.
For the top of a wall cabinet, this rule is not critical, since all the hinges are attached to the sides. If you need an overhanging visor, then make an overhead top. If the facade is planned to be an invoice, then the top is definitely laid the same as the bottom of the wall cabinet. The more parts of the same type, the better for the assembler - this simplifies and speeds up the process.
Features of hanging tiers
Kitchen hanging cabinets that are shallower in depth, when well-arranged, create an amazing perception of a rationally organized room. They can be arranged in local groups or hung in one line to create a monolithic single facade.
The main safety requirement reflected in GOST requires compliance with the accessibility of the upper shelves (1.9 m from the floor), as well as the presence of easily opening doors. Any kitchen cabinet from the top tier can become an exclusive bright spot in terms of finishing or blend in tone with the rest of the set.
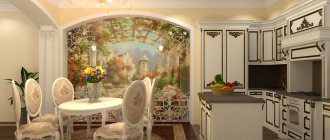
If the fronts for the cabinets are made closed from the same material with a uniform finish, then the interior is created more austere and restrained. Glass door inserts add airiness and sophistication to the atmosphere of the kitchen, decorating the upper kitchen cabinet with mosaic elements, stained glass or wonderful ornate paintings.
If you decide to use contrasting colors, then it is advisable to select a shade for the kitchen cabinet located at the top that is several tones lighter than the facades for the cabinets that form the bottom row.
Cabinet base with legs
The tensile fastening rule also applies here. Definitely an overhead cabinet base with legs is better. Since the inset bottom and its fasteners are constantly “pressed” by the weight of the cabinet itself, and it is significant.
An overhead bottom is usually not made for corner modules. Here we are guided by considerations of simplification. In the case of an overhead cabinet base, you will have to cut out an overly complex shape. And if you make the sidewalls through, the work becomes less.
The same can be said about end modules.
Although in the end modules of the kitchen I most often lay one outer side through, down to the floor.
Again, for reasons of making the work of assemblers easier - there is less fuss with installing the base and adjusting it to an angle.
Upper kitchen cabinets
A variety of furniture systems are used to furnish living space. There are ready-made kits available that contain everything you need to create a comfortable and cozy environment. You can buy one or two separate elements and complement the standard set with them, giving it originality and expanding its functionality. You can comprehensively equip a room using free-standing units, among which upper kitchen modules .
Main advantages
If we compare upper kitchen cabinets with other designs, they have a number of significant advantages. And the main advantage is the ability to integrate into space without occupying useful space. Indeed, unlike its “floor” counterparts, the upper kitchen module does not take up space and is used to place utensils, household appliances, etc.
Cabinet base on plinth
Conventional cabinet furniture, cabinets and cabinets have a base with through sides and a front, non-removable plinth.
The standard height of the plinth is 80mm, rarely 100mm, 70mm or 50mm. If new, designed furniture is being made into a room where there are already other furnishings, it is better to measure the base when taking measurements and make it the same. Then the new furniture will “fit” better into the interior and will not look foreign.
The base of a large cabinet (such as a sliding wardrobe) is further strengthened by placing vertical strips under each internal partition.
They are less than the depth of the bottom if there is a baseboard in the room.
Difference in the depth of housing elements
We have already discussed the difference in the width of the side posts and its impact on the design and assembly of the cabinet. Let's discuss the difference in the width (depth) of the roof and bottom - it is also important!
The roof is 24 mm smaller in depth than the side pillar of the internal door Swn: K = Swn - 24 mm . This is the width of the top track + 2 mm. The track is installed inside the body, between the side posts flush with their front edge. Pay attention to this when you install the guides (section 5 of the Instructions).
The bottom, in turn, is 18 mm wider (deeper) than the roof: D = K + 18 mm . This is necessary due to the difference in the size of the tracks and moving rollers, so that the fronts move perpendicular to the floor/ceiling.
Accordingly, the bottom is also installed inside the body, between the side posts. Since K = Svn - 24 mm, D = K + 18 mm, it is logical that D = (Svn - 24) + 18 = Svn - 6 mm .
Those. The bottom is not placed flush with the edge of the side pillar of the inner door, but 6 mm deeper.
In this case, the base is installed inside the case from the bottom level another 45 mm in depth. This value is determined by the width of the lower guide, installed under the bottom flush with it directly on the base. Those. We place the plinth 51 mm deeper from the level of the front edge of the side post of the internal door.
Adjustable wardrobe base
Bulky, tall furniture, such as sliding wardrobes with a cast base, is very difficult to align horizontally - any assembler will confirm this. Perfectly smooth floors are a myth. Almost always the floor is littered in one direction or another. Or it even looks like a “trough” with a drop in height from the walls to the center.
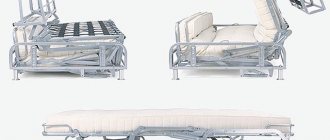
That is why experienced craftsmen make the base of sliding wardrobes removable, which is a kind of lattice on which the bottom is laid.
It is easier to level the freestanding base of a sliding wardrobe if you equip it with special adjustable supports. And then place the wardrobe body with all the partitions, shelves and drawers on it.
By the way, a separate base allows you to “bypass” the baseboard and install the wardrobe in a niche or corner of the room without cutting it off. It is enough to make the base of the cabinet smaller by the width of the baseboard.
The removable base of the cabinet also helps out if there are heating pipes running along the wall or if there are any protrusions at a height of no more than 100-150mm above the floor level. It’s enough to make the base higher and you won’t have to bother with cuts on the sides and partitions of the cabinet.
In order not to lose space inside the base that has increased in height, you can build drawers into it. Well, or simply make the front false panel removable, fixed with magnets, so that the owners can dispose of the “secret” place behind it at their discretion.